原文引用:https://www.51cto.com/article/705727.html
Dlib 是用编程语言 C ++编写的通用跨平台软件库。它的设计深受来自契约式设计和基于组件的软件工程的思想的影响。因此,首先也是最重要的是一组独立的软件组件。这是一个加速软件许可证下发布的开源软件。
Dlib包含用于处理网络,线程,图形用户界面,数据结构,线性代数,机器学习,图像处理,数据挖掘,XML 和文本解析,数值优化,贝叶斯网络以及许多其他任务的软件组件。近年来,许多开发工作都集中在创建广泛的统计机器学习工具上。2009 年,Dlib 发表在机器学习研究。从那时起,它已在广泛的领域中使用。
使用dlib可以大大简化开发,比如人脸识别,特征点检测之类的工作都可以很轻松实现。同时也有很多基于dlib开发的应用和开源库,比如face_recogintion库(应用一个基于Python的开源人脸识别库,face_recognition)等等。
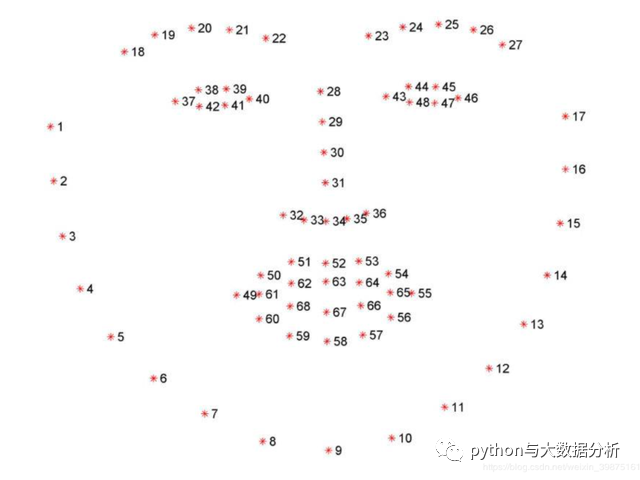
dlib库采用68点位置标志人脸重要部位,比如18-22点标志右眉毛,23-27点标志左眉毛,37-42点标志左眼,43-48点标志右眼,32-36点标志鼻子,49-68标志嘴巴,这其中还可以识别嘴唇。
可以通过对眼睛的算法变换,识别出眨眼、眯眼等动作,对眼睛、嘴巴的变换实现各种情绪的识别。
也可以通过对人的68点构造算法模型,进行人脸识别。
dlib的安装比较麻烦,尤其是python3.7版本,通过pip intall命名无法安装成功,建议自行到网上下载whl包,可节约探索时间。
# windows 通过whl文件安装dlib
# dlib在python3.7版本下兼容性有问题,即使安装了 Visual Studio 也还是无法安装dlib
# 因此从网上下载了dlib for python37的whl文件
# pip install dlib-19.17.99-cp37-cp37m-win_amd64.whl
# pip install face_recognition
# pip install imutils
import dlib
import numpy as np
import cv2
import imutils
from imutils import face_utils

# 使用 Dlib 的正面人脸检测器 frontal_face_detector
detector = dlib.get_frontal_face_detector()
# 使用训练好的模型shape_predictor_68_face_landmarks.dat,在检测出人脸的同时,检测出人脸上的68个关键点
predictor=dlib.shape_predictor(r'C:\Python\Pycharm\docxprocess\face_detector\shape_predictor_68_face_landmarks.dat')

# 图片所在路径
imgname = r'C:\Python\Pycharm\docxprocess\picture\other\renwu\juhui1.jpg' #21
# imgname = r'C:\Python\Pycharm\docxprocess\picture\other\renwu\juhui2.png' #6
# imgname = r'C:\Python\Pycharm\docxprocess\picture\other\ldh\angry.png'
# imgname = r'C:\Python\Pycharm\docxprocess\picture\other\ldh\ldh.png'
# imgname = r'C:\Python\Pycharm\docxprocess\picture\other\ldh\happy.png'
# imgname = r'C:\Python\Pycharm\docxprocess\picture\other\ldh\shigu.jpeg'
# imgname = r'C:\Python\Pycharm\docxprocess\picture\other\renwu\juhui4.png' #24
# 读取图片,转换灰度
img = cv2.imread(imgname)
img_gray = cv2.cvtColor(img, cv2.COLOR_RGB2GRAY)

# 人脸检测,获得人脸数据
faces = detector(img_gray, 1)
# rectangles[[(941, 254) (977, 290)], [(361, 210) (397, 246)], [(717, 138) (753, 174)], [(801, 214) (837, 250)],
#   [(573, 138) (609, 174)], [(45, 210) (81, 246)], [(585, 202) (621, 238)], [(189, 254) (225, 290)],
#   [(245, 214) (281, 250)], [(689, 210) (725, 246)], [(419, 247) (463, 290)], [(553, 242) (589, 278)],
#   [(901, 218) (937, 254)], [(77, 246) (113, 282)], [(141, 222) (177, 258)], [(741, 242) (777, 278)],
#   [(485, 202) (521, 238)], [(161, 110) (197, 146)], [(297, 166) (333, 202)], [(905, 138) (941, 174)],
#   [(301, 246) (337, 282)], [(865, 106) (901, 142)], [(389, 146) (425, 182)], [(241, 138) (277, 174)]]
if len(faces) < 1:
    print("未检测到人脸")
else:
    print("人脸数总数为", len(faces))
    for(i, rect) in enumerate(faces):

        # 返回人脸框的左上角坐标和矩形框的尺寸
        (x, y, w, h) = face_utils.rect_to_bb(rect)
        # 在图片上画矩形框和输出检测的人脸数量
        cv2.rectangle(img, (x, y), (x + w, y + h), (0, 255, 0), 2)
        cv2.putText(img, "Face #{}".format(i + 1), (x - 10, y - 10),
                    cv2.FONT_HERSHEY_SIMPLEX, 0.5, (0, 255, 0), 2)


    cv2.imshow("Output", img)
cv2.waitKey(0)- 1.
- 2.
- 3.
- 4.
- 5.
- 6.
- 7.
- 8.
- 9.
- 10.
- 11.
- 12.
- 13.
- 14.
- 15.
- 16.
- 17.
- 18.
- 19.
- 20.
- 21.
- 22.
- 23.
- 24.
- 25.
- 26.
- 27.
- 28.
- 29.
- 30.
- 31.
- 32.
- 33.
- 34.
- 35.
- 36.
- 37.
- 38.
- 39.
- 40.
- 41.
- 42.
- 43.
- 44.
- 45.
- 46.
- 47.
- 48.
- 49.
- 50.
- 51.
- 52.
- 53.
之前opencv自带的人脸检测结果

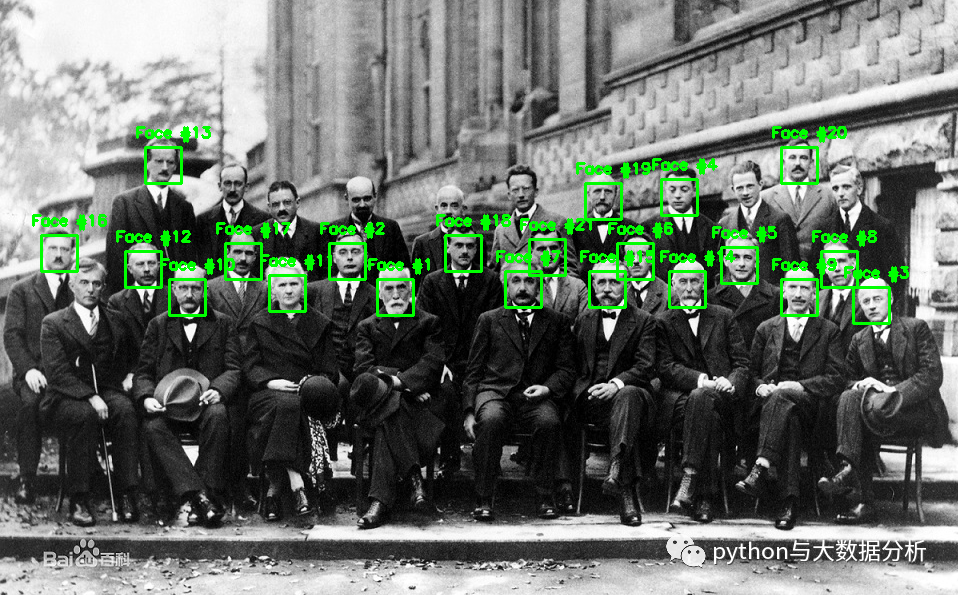
1927年在比利时布鲁塞尔召开的第五次索尔维会议,黑白照片,检测出21人。
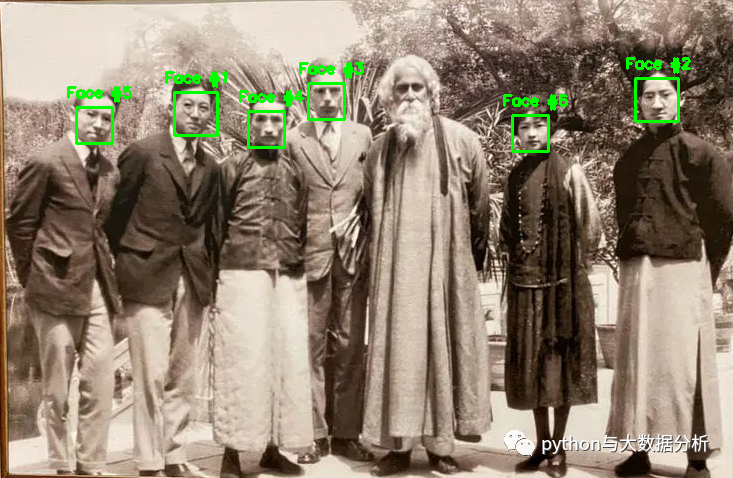
1924年林徽因等与访问中国的泰戈尔合影,共7个人,重要的泰戈尔没检测出来。
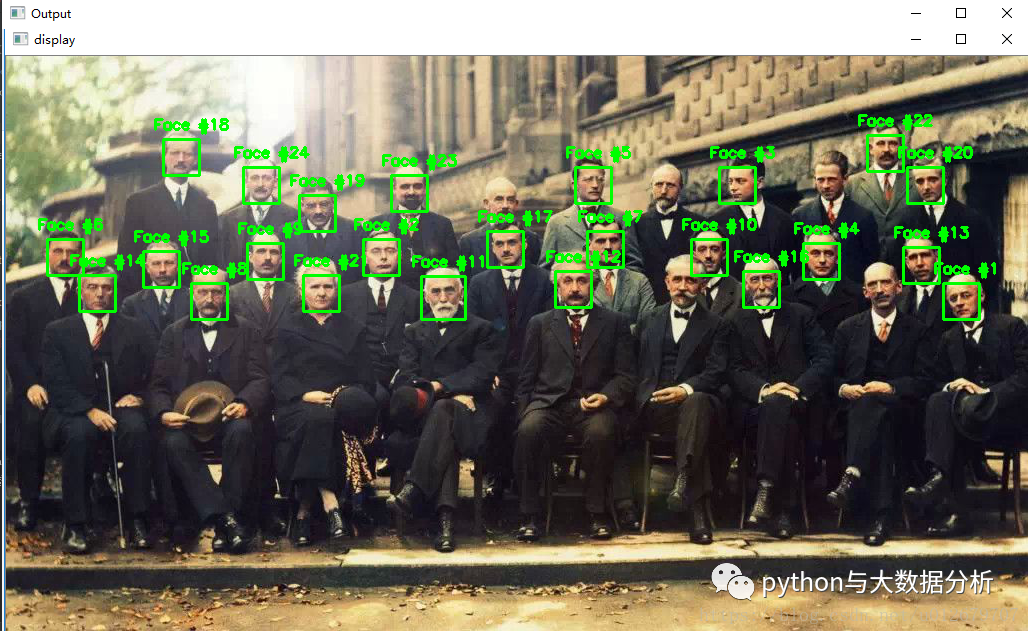
1927年在比利时布鲁塞尔召开的第五次索尔维会议,彩色照片,检测出24人。
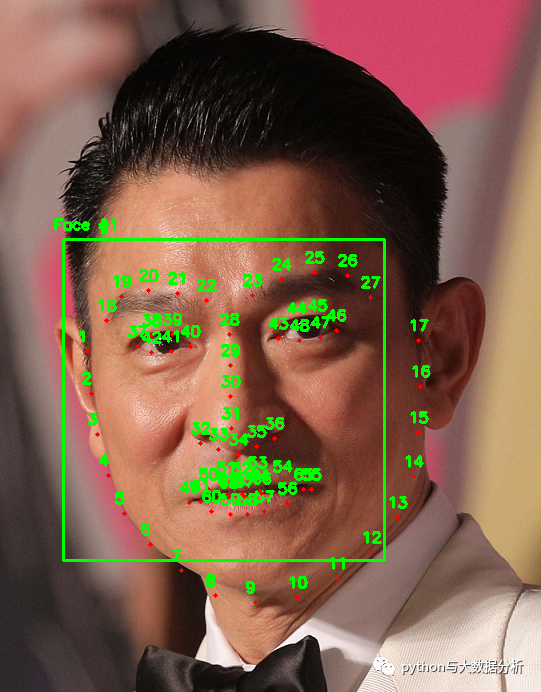
不老男神,帅气的刘德华。
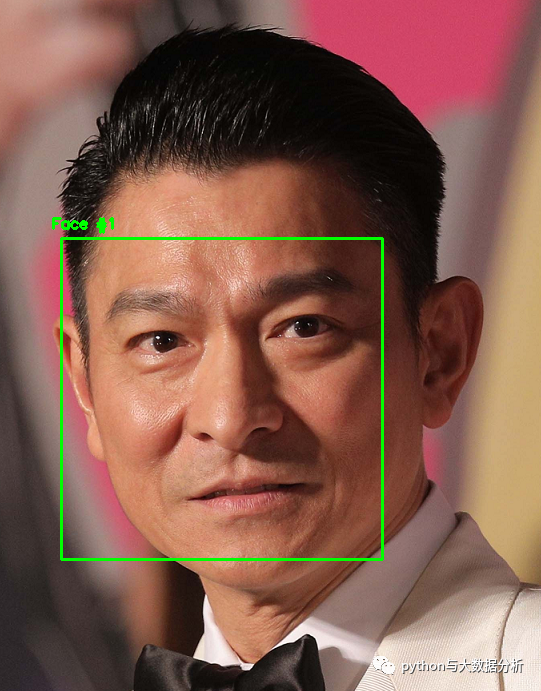
使用训练好的模型shape_predictor_68_face_landmarks.dat,在检测出人脸的同时,检测出人脸上的68个关键点,再看一下刘德华。
import dlib
import numpy as np
import cv2
import imutils
from imutils import face_utils

# 使用 Dlib 的正面人脸检测器 frontal_face_detector
detector = dlib.get_frontal_face_detector()
# 使用训练好的模型shape_predictor_68_face_landmarks.dat,在检测出人脸的同时,检测出人脸上的68个关键点
predictor=dlib.shape_predictor(r'C:\Python\Pycharm\docxprocess\face_detector\shape_predictor_68_face_landmarks.dat')

# 图片所在路径
imgname = r'C:\Python\Pycharm\docxprocess\picture\other\renwu\juhui1.jpg' #21
imgname = r'C:\Python\Pycharm\docxprocess\picture\other\renwu\juhui2.png' #6
# imgname = r'C:\Python\Pycharm\docxprocess\picture\other\ldh\angry.png'
imgname = r'C:\Python\Pycharm\docxprocess\picture\other\ldh\ldh.png'
# imgname = r'C:\Python\Pycharm\docxprocess\picture\other\ldh\happy.png'
# imgname = r'C:\Python\Pycharm\docxprocess\picture\other\ldh\shigu.jpeg'
# imgname = r'C:\Python\Pycharm\docxprocess\picture\other\renwu\juhui4.png' #24
# 读取图片,转换灰度
img = cv2.imread(imgname)
img_gray = cv2.cvtColor(img, cv2.COLOR_RGB2GRAY)

# 人脸检测,获得人脸数据
faces = detector(img_gray, 1)
# rectangles[[(941, 254) (977, 290)], [(361, 210) (397, 246)], [(717, 138) (753, 174)], [(801, 214) (837, 250)],
#   [(573, 138) (609, 174)], [(45, 210) (81, 246)], [(585, 202) (621, 238)], [(189, 254) (225, 290)],
#   [(245, 214) (281, 250)], [(689, 210) (725, 246)], [(419, 247) (463, 290)], [(553, 242) (589, 278)],
#   [(901, 218) (937, 254)], [(77, 246) (113, 282)], [(141, 222) (177, 258)], [(741, 242) (777, 278)],
#   [(485, 202) (521, 238)], [(161, 110) (197, 146)], [(297, 166) (333, 202)], [(905, 138) (941, 174)],
#   [(301, 246) (337, 282)], [(865, 106) (901, 142)], [(389, 146) (425, 182)], [(241, 138) (277, 174)]]
if len(faces) < 1:
    print("未检测到人脸")
else:
    print("人脸数总数为", len(faces))
    for(i, rect) in enumerate(faces):

        # 返回人脸框的左上角坐标和矩形框的尺寸
        (x, y, w, h) = face_utils.rect_to_bb(rect)
        # 在图片上画矩形框和输出检测的人脸数量
        cv2.rectangle(img, (x, y), (x + w, y + h), (0, 255, 0), 2)
        cv2.putText(img, "Face #{}".format(i + 1), (x - 10, y - 10),
                    cv2.FONT_HERSHEY_SIMPLEX, 0.5, (0, 255, 0), 2)

        # 标记人脸中的68个landmark点
        shape = predictor(img_gray, rect)
        # <dlib.full_object_detection object at 0x0000018AF09586F8>
        # shape转换成68个坐标点矩阵
        shape = face_utils.shape_to_np(shape)
        # [[245 149]
        #  [245 152]
        #  ...
        #  [246 159]]
        # [[364 225]
        #  [365 228]
        #  ...
        #  [366 236]]
        # 在源图上输出landmark点
        for j,(x, y) in enumerate(shape):
            cv2.circle(img, (x, y), 2, (0, 0, 255), -1)
            cv2.putText(img, "{}".format(j + 1), (x - 10, y - 10),
                        cv2.FONT_HERSHEY_SIMPLEX, 0.5, (0, 255, 0), 2)

    cv2.imshow("Output", img)
cv2.waitKey(0)- 1.
- 2.
- 3.
- 4.
- 5.
- 6.
- 7.
- 8.
- 9.
- 10.
- 11.
- 12.
- 13.
- 14.
- 15.
- 16.
- 17.
- 18.
- 19.
- 20.
- 21.
- 22.
- 23.
- 24.
- 25.
- 26.
- 27.
- 28.
- 29.
- 30.
- 31.
- 32.
- 33.
- 34.
- 35.
- 36.
- 37.
- 38.
- 39.
- 40.
- 41.
- 42.
- 43.
- 44.
- 45.
- 46.
- 47.
- 48.
- 49.
- 50.
- 51.
- 52.
- 53.
- 54.
- 55.
- 56.
- 57.
- 58.
- 59.
- 60.
- 61.
- 62.
- 63.
- 64.
- 65.