WPF使用Path来画圆, 在 WPF 中可以使用 Path (路径) 来画圆,而 Path 支持两种写法:xaml 代码格式、标记格式,这里介绍的是标记格式:
例子:
<Path Data="M 300,300 A 100,100 0 1 1 300,299 Z" Stroke="Black" StrokeThickness="5" Fill="Transparent"/>效果:

结合代码解释:
1. Stroke 表示圆边框的颜色,这里是黑色 black
2. StrokeThickness 表示边框粗细
3. Fill 表示圆内部的颜色,这里为蓝色 blue
4. Path 的 Data 属性,就是描述当前路径是如何描画的
Data=”M 300,300 A 100,100 0 1 1 300,299 Z”
M 300,300 : 300,300 表示起始坐标,字母 M 为 Move, 意思是将画笔移到 300,300 处;
A 100,100 0 1 1 300,299 这是圆弧的书写语法,详细格式如下:
A 表示 Arc 圆弧,
100,100 表示圆弧的 x, y 值,表示椭圆时表示大小半径,圆是两值相同;
0 表示图形的旋转角度;
1 当图形设置了旋转角度,并且大于 180度时,才会生效,1 表示取大圆弧,0 表示取小圆弧;
1 表示画圆时笔画是是顺时针画,需要逆时针时设置为 0;
300,299 表示终止坐标
Z 表示路径闭合。
官方描述如下:
Elliptical Arc Command
Creates an elliptical arc between the current point and the specified end point.
语法格式如下:
A size rotationAngle isLargeArcFlag sweepDirectionFlag endPoint或者
a size rotationAngle isLargeArcFlag sweepDirectionFlag endPoint| 参数 | 描述 |
| size | System.Windows.Size The x- and y-radius of the arc. 就是起始坐标,如 (0, 0) |
| rotationAngle | System.Double The rotation of the ellipse, in degrees. 图形的旋转角度 |
| isLargeArcFlag | Set to 1 if the angle of the arc should be 180 degrees or greater; otherwise, set to 0. 当画正圆和椭圆时,不生效;只有在画圆弧时, 并且旋转角度大于 180 是才生效, 判断是取小圆弧合适大圆弧 |
| sweepDirectionFlag | Set to 1 if the arc is drawn in a positive-angle direction; otherwise, set to 0. 1 为顺时针画图,0 为逆时针画图 |
| endPoint | System.Windows.Point The point to which the arc is drawn. 终止坐标 |
注意:标记命令不区分大小写
正圆是椭圆的子集,上述的语法其实是针对所有椭圆都有效的,编写 Data 的思路大致可以参考以下说明:
1.确定起始坐标、终止坐标;
这决定了路径的起始位置和结束位置,特别注意:
如果需要画正圆,大小半径必须一样,而因为起始坐标和终止坐标不能相同,所以一般终止坐标减一,例如:
起始坐标 (100, 100)
终止坐标可以为 (100, 99) 或者 (99, 100)
2.半径和坐标之间的关系:
当只画部分圆弧时,两个坐标之间的距离会影响半径的大小:
当两个坐标之间的距离大于2倍半径之和时,半径(椭圆的小半径)为两坐标距离/2;
当两坐标之间的距离小于2倍半径之和时,半径 (椭圆的小半径) 为设定值;
例子如下:
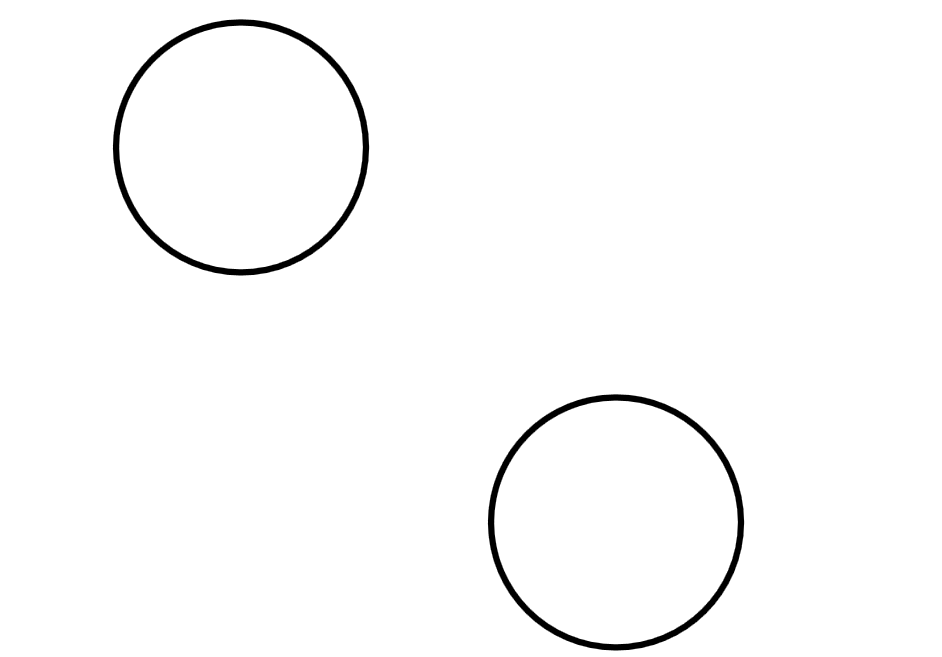
3 个图形,圆心坐标为(300,300),顺时针画圆
<Path Data="M 300,300 A 100,100 0 1 1 300,0 Z" Stroke="Black" StrokeThickness="5" Fill="Transparent"/>

<Path Data="M 300,300 A 100,100 0 1 1 300,100 Z" Stroke="Red" StrokeThickness="5" Fill="Transparent"/>

<Path Data="M 300,300 A 100,100 0 1 1 300,200 Z" Stroke="Violet" StrokeThickness="5" Fill="Transparent"/>
结果如下:
 黑色图形的两个坐标的距离大于2倍半径,所以最终的半径变大;
红色图形和紫粉色图形的两个坐标的距离小于2倍半径,所以半径不变;
总结:
1. 画圆弧(圆形)时,先确定两个坐标(起始坐标、终止坐标);
2.确定顺时针还是逆时针方向画图;
3.如果是椭圆还可以根据需求设置旋转角度;
4.如果设置了旋转角度大于 180 度,可以通过设置获取大圆弧还是小圆弧;
椭圆的例子:
<!--黑色椭圆,是原始角度-->
<Path Data="M 300,300 A 100,50 0 1 1 300,299 Z" Stroke="Black" StrokeThickness="5" Fill="Transparent"/>

<!--红色椭圆,旋转了90度-->
<Path Data="M 300,300 A 100,50 90 1 1 300,299 Z" Stroke="Red" StrokeThickness="5" Fill="Transparent"/>

<!--紫蓝色椭圆,逆时针画的-->
<Path Data="M 300,300 A 100,50 0 1 0 300,299 Z" Stroke="BlueViolet" StrokeThickness="5" Fill="Transparent"/>
结果如下:

设置了大于180度的旋转角度,并根据需要获取大小圆弧
 <!--红色的圆,旋转200度,顺时针,获取大圆弧-->
<Path Data="M 50,200 A 100,100 200 1 0 200,100" Stroke="Red" StrokeThickness="5" Fill="Transparent"/>

<!--咖啡色的圆,旋转200度,逆时针,获取大圆弧-->
<Path Data="M 50,200 A 100,100 200 1 1 200,100" Stroke="Chocolate" StrokeDashArray="4 1" StrokeThickness="5" Fill="Transparent"/>

<!--绿色的圆,旋转200度,顺时针,获取小圆弧-->
<Path Data="M 50,200 A 100,100 200 0 1 200,100" Stroke="LawnGreen" StrokeDashArray="2 2" StrokeThickness="5" Fill="Transparent"/>

<!--蓝色的圆,旋转200度,逆时针,获取小圆弧-->
<Path Data="M 50,200 A 100,100 200 0 0 200,100" Stroke="Blue" StrokeDashArray="3 3" StrokeThickness="5" Fill="Transparent"/>
效果如下图:

设置了大于180度的旋转角度,椭圆弧获取大小圆弧:
注意:strokedasharray = “4 1” 是用来设置虚线显示效果的,4 表示虚线中每段实体的长度,1表示虚线中每段空白的长度
<!--黑色椭圆弧,旋转200度,逆时针,取大圆弧-->
<Path Data="M 400,300 A 200,100 200 1 0 200,150" Stroke="Black" StrokeThickness="5" Fill="Transparent"/>

<!--粉红色椭圆弧,旋转200度,顺时针,取大圆弧-->
<Path Data="M 400,300 A 200,100 200 1 1 200,150" Stroke="PaleVioletRed" StrokeDashArray="4 1" StrokeThickness="5" Fill="Transparent"/>

<!--蓝色椭圆弧,旋转200度,逆时针,取小圆弧-->
<Path Data="M 400,300 A 200,100 200 0 0 200,150" Stroke="Blue" StrokeThickness="5" StrokeDashArray="4 2" Fill="Transparent"/>

<!--绿色椭圆弧,旋转200度,顺时针,取小圆弧-->
<Path Data="M 400,300 A 200,100 200 0 1 200,150" Stroke="Green" StrokeThickness="5" StrokeDashArray="4 2" Fill="Transparent"/>
结果如下图:

-------------------------------------------------------------------------------------------------------------------------------------
<Grid>
<Path x:Name="p1" Stroke="Black" StrokeThickness="5" Fill="Transparent"/>
<Path Data="M 300,300 A 100,100 0 1 1 300,299 Z" Stroke="Black" StrokeThickness="5" Fill="Transparent"/>
</Grid>
C# code..
string str = "M 600,600 A 100,100 0 1 1 600,599 Z";
p1.Data = Geometry.Parse(str);