使用 GitHub API 进行数据分析 (Node.js)
Node.js 的访问 GitHub 的 API 库,通过 npm 或者 yarn 安装:
1 yarn add github-api
官方示例
获取 rate limit,有修改:
 1 var GitHub = require('github-api');
 2
 3 var gh = new GitHub( {token: "Your Token Here" } );
 4
 5 /**
 6  * Search API has its own rate limit other than other apis
 7  */
 8 function rateLimit() {
 9     // check our rate-limit status
10     // since we're unauthenticated the limit is 60 requests per hour
11     gh.getRateLimit().getRateLimit()
12     .then( function(resp) {
13         console.log('Limit remaining: ' + resp.data.rate.remaining);
14         // date constructor takes epoch milliseconds and we get epoch seconds
15         console.log('Reset date: ' + new Date(resp.data.rate.reset * 1000));
16     }).catch( function(error) {
17         console.log('Error fetching rate limit', error.message);
18     });
19 }
20
21 rateLimit();
在构建 GitHub 对象时,输入用户名及密码,或者你在 GitHub 上申请的 Token。
申请 Token 步骤比较简单,进入 https://github.com/settings/developers 中,选择 Personal Access Tokens,点击 Generate New Token,该 Token 在关闭页面后便无法再次查看,需要将它记录下来。
注意这里打印的 rate limit 次数是 5000/h,但它与 Search api 是有区别的。参考: https://github.com/github-tools/github/issues/487
搜索
官方示例中只有一个获取 rate limit 的示例,如果想要使用 GitHub 提供的 Search api 对整个 GitHub 进行搜索,其实也比较简单:
 1 keyword = 'test';
 2 gh.search( {q: keyword, type: "code" } ).forCode()  // *
 3 .then( ( result ) => {
 4     console.log( 'Processing data...' );
 5     const data = result.data;
 6     if( saveFile ) {
 7         console.log( 'Saving into file...' );
 8         writeJsonIntoFile( "./repos.data", data );
 9     }
10
11     for( let i = 0; i < data.length; i++ ) {
12         console.log( `Searching Page ${i+1}` );
13         process( data[i] );
14     }
15
16 }).catch( ( error ) => {
17     console.log( `Status ${error.response.statusText }` )
18     console.log( `Wait ${error.response.headers.retry-after} seconds before try again.`)
19
20     writeJsonIntoFile( "./test.log", error );
21 });
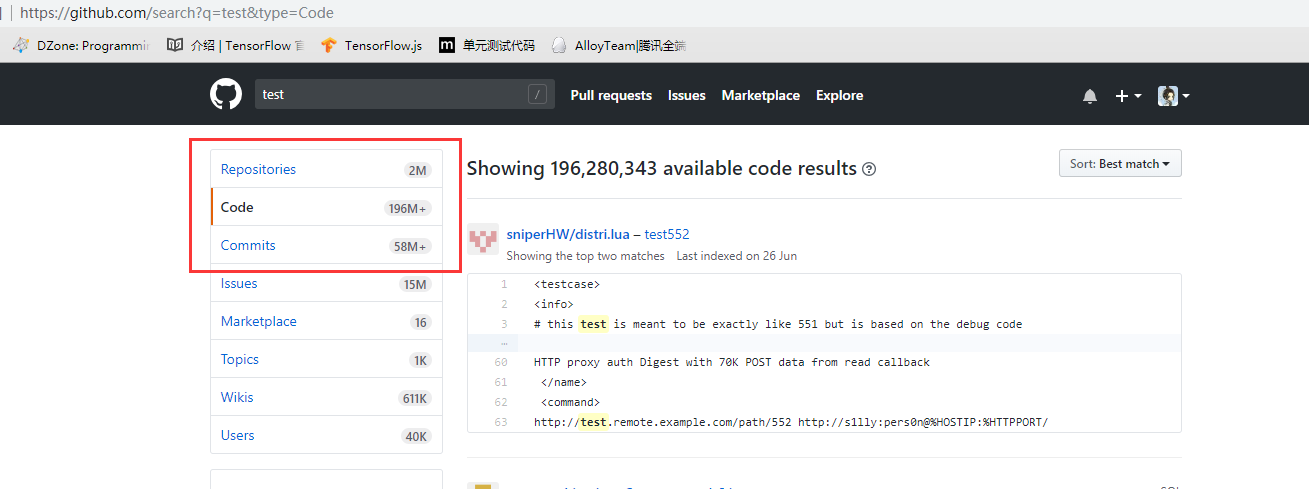
上面 * 号位置有几个不同的接口:forCode()、forRepositories() 等等,对应着下图中的红色方框的位置进行的筛选:
之前提到过,这个 Search API 是有限制的,如果你过度使用的话,forCode() 中会捕获到错误 error,将 error.data 打印出来:

如果出现了 abuse detection 的话,就需要等待一定时间后才能进行查询操作,等待的时间在响应的头部信息中:error.response.headers.retry-after。
顺便一提,使用这个搜索 api 很耗时,应该是网络的原因。
如果在对 JSON 对象做 JSON.stringify 处理时出现 converting circular structure to json 的错误,需要解决掉循环引用,可参考下方中提到的做法:
我将 JSON 对象的日志输出封装成了 writeJsonToFile 方法中。
小结
这里简单的提到了 GitHub api 的用法和使用过程中的一些注意事项,但仅仅通过 api 获取到了相应的数据还没有对其进行处理。
数据的处理需要先对 Search.forCode() 方法的返回值 data 进行分析,以后再说。