Let's Encrypt 免费通配符 SSL 证书申请教程
from:https://blog.csdn.net/English0523/article/details/79608464
2018 年 3 月 14 日,Let’s Encrypt 对外宣布 ACME v2 已正式支持通配符证书。这就意外味着用户可以在 Let’s Encrypt 上免费申请支持通配符的 SSL 证书。
什么是 Let’s Encrypt
Let’s Encrypt 是国外一个公共的免费 SSL 项目,由 Linux 基金会托管。它的来头不小,由 Mozilla、思科、Akamai、IdenTrust 和 EFF 等组织发起,目的就是向网站自动签发和管理免费证书。以便加速互联网由 HTTP 过渡到 HTTPS,目前 Facebook 等大公司开始加入赞助行列。
Let’s Encrypt 已经得了 IdenTrust 的交叉签名,这意味着其证书现在已经可以被 Mozilla、Google、Microsoft 和 Apple 等主流的浏览器所信任。用户只需要在 Web 服务器证书链中配置交叉签名,浏览器客户端会自动处理好其它的一切,Let’s Encrypt 安装简单,使用非常方便。
本文将会详细介绍如何免费申请 Let’s Encrypt 通配符证书。
什么是通配符证书
域名通配符证书类似 DNS 解析的泛域名概念,通配符证书就是证书中可以包含一个通配符。主域名签发的通配符证书可以在所有子域名中使用,比如 .example.com、bbs.example.com。
申请通配符证书
Let’s Encrypt 上的证书申请是通过 ACME 协议来完成的。ACME 协议规范化了证书申请、更新、撤销等流程,实现了 Let’s Encrypt CA 自动化操作。解决了传统的 CA 机构是人工手动处理证书申请、证书更新、证书撤销的效率和成本问题。
ACME v2 是 ACME 协议的更新版本,通配符证书只能通过 ACME v2 获得。要使用 ACME v2 协议申请通配符证书,只需一个支持该协议的客户端就可以了,官方推荐的客户端是 Certbot。
获取 Certbot 客户端
1
2
3
4
5
|
# 下载 Certbot 客户端
$ wget https://dl.eff.org/certbot-auto

# 设为可执行权限
$ chmod a+x certbot-auto
|
注:Certbot 从 0.22.0 版本开始支持 ACME v2,如果你之前已安装旧版本客户端程序需更新到新版本。
更详细的安装可参考官方文档:https://certbot.eff.org/
申请通配符证书
客户在申请 Let’s Encrypt 证书的时候,需要校验域名的所有权,证明操作者有权利为该域名申请证书,目前支持三种验证方式:
- dns-01:给域名添加一个 DNS TXT 记录。
- http-01:在域名对应的 Web 服务器下放置一个 HTTP well-known URL 资源文件。
- tls-sni-01:在域名对应的 Web 服务器下放置一个 HTTPS well-known URL 资源文件。
使用 Certbot 客户端申请证书方法非常的简单,只需如下一行命令就搞定了。
1
|
$ ./certbot-auto certonly -d "*.xxx.com" --manual --preferred-challenges dns-01 --server https://acme-v02.api.letsencrypt.org/directory
|
1.申请通配符证书,只能使用 dns-01 的方式。
2.xxx.com请根据自己的域名自行更改。
相关参数说明:
1
2
3
4
|
certonly 表示插件,Certbot 有很多插件。不同的插件都可以申请证书,用户可以根据需要自行选择。
-d 为哪些主机申请证书。如果是通配符,输入 *.xxx.com (根据实际情况替换为你自己的域名)。
--preferred-challenges dns-01,使用 DNS 方式校验域名所有权。
--server,Let's Encrypt ACME v2 版本使用的服务器不同于 v1 版本,需要显示指定。
|
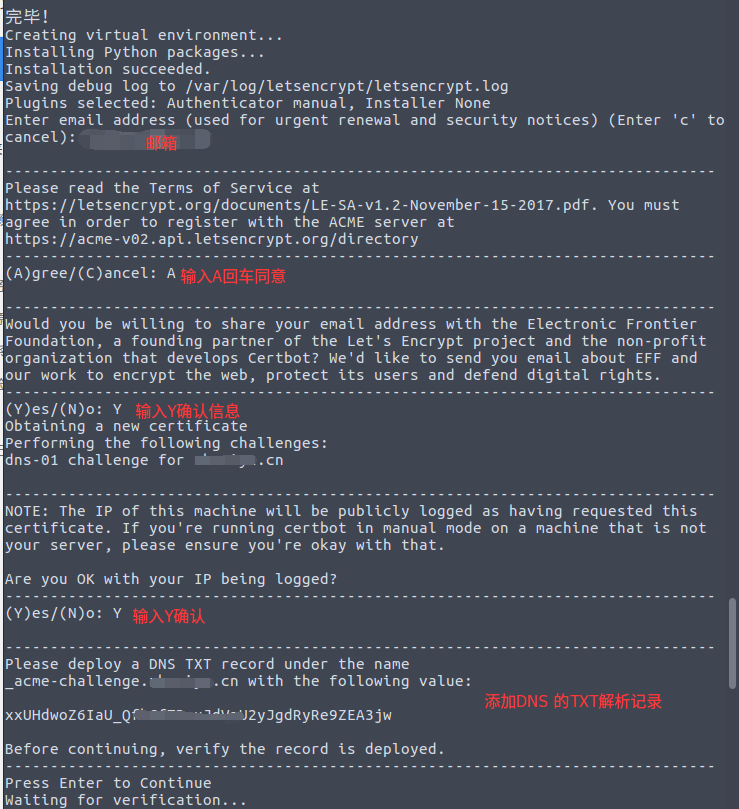
执行完这一步之后,就是命令行的输出,请根据提示输入相应内容:
执行到上图最后一步时,先暂时不要回车。申请通配符证书是要经过 DNS 认证的,接下来需要按照提示在域名后台添加对应的 DNS TXT 记录。添加完成后,先输入以下命令确认 TXT 记录是否生效:
1
2
3
4
5
6
7
8
9
10
|
$ dig  -t txt _acme-challenge.xxx.com @8.8.8.8
...
;; OPT PSEUDOSECTION:
; EDNS: version: 0, flags:; udp: 512
;; QUESTION SECTION:
;_acme-challenge.xxx.com.        IN      TXT

;; ANSWER SECTION:
_acme-challenge.xxx.com. 599 IN  TXT     "xxUHdwoZ6IaU_ab87h67rvbU2yJgdRyRe9zEA3jw"
...
|
确认生效后,回车继续执行,最后会输出如下内容:
1
2
3
4
5
6
7
8
9
10
11
12
13
|
IMPORTANT NOTES:
 - Congratulations! Your certificate and chain have been saved at:
   /etc/letsencrypt/live/xxx.com/fullchain.pem
   Your key file has been saved at:
   /etc/letsencrypt/live/xxx.com/privkey.pem
   Your cert will expire on 2018-06-12. To obtain a new or tweaked
   version of this certificate in the future, simply run certbot-auto
   again. To non-interactively renew *all* of your certificates, run
   "certbot-auto renew"
 - If you like Certbot, please consider supporting our work by:

   Donating to ISRG / Let's Encrypt:   https://letsencrypt.org/donate
   Donating to EFF:                    https://eff.org/donate-le
|
到了这一步后,恭喜您,证书申请成功。 证书和密钥保存在下列目录:
1
2
3
4
5
6
|
$ tree /etc/letsencrypt/live/xxx.com/
.
├── cert.pem
├── chain.pem
├── fullchain.pem
└── privkey.pem
|
校验证书信息,输入如下命令:
1
2
3
4
5
6
7
8
9
10
11
|
$ openssl x509 -in  /etc/letsencrypt/live/xxx.com/cert.pem -noout -text

# 可以看到证书包含了 SAN 扩展,该扩展的值就是 *.xxx.com
...
Authority Information Access:
        OCSP - URI:http://ocsp.int-x3.letsencrypt.org
        CA Issuers - URI:http://cert.int-x3.letsencrypt.org/

X509v3 Subject Alternative Name:
    DNS:*.xxx.com
...
|
到此,我们就演示了如何在 Let’s Encrypt 申请免费的通配符证书。
其它相关
- 证书续期
Let’s encrypt 的免费证书默认有效期为 90 天,到期后如果要续期可以执行:
1
|
$ certbot-auto renew
|
- 在 Nginx 中 配置 Let’s Encrypt 证书
Nginx 配置文件片断:
1
2
3
4
5
6
7
8
9
10
11
12
|
server {
    server_name xxx.com;
    listen 443 http2 ssl;
    ssl on;
    ssl_certificate /etc/cert/xxx.com/fullchain.pem;
    ssl_certificate_key /etc/cert/xxx.com/privkey.pem;
    ssl_trusted_certificate  /etc/cert/xxx.com/chain.pem;

    location / {
      proxy_pass http://127.0.0.1:6666;
    }
}
|
参考文档
https://www.google.com
https://www.jianshu.com/p/c5c9d071e395
https://my.oschina.net/kimver/blog/1634575
