对于Zookeeper的定义以及原理,网上已经有很多的优秀文章对其进行了详细的介绍,所以本文不再进行这方面的阐述。
本文主要介绍一些基本的准备工作以及zookeeper.net的使用。
本文源代码github地址:https://github.com/Mike-Zrw/ZookeeperHelper
zookeeper下载地址:https://archive.apache.org/dist/zookeeper/
ZooInspector下载地址:https://issues.apache.org/jira/secure/attachment/12436620/ZooInspector.zip
Zookeeper下载及安装
目前版本最新的为3.5.3 。 本文使用的版本为3.4.10
随意下载一个版本的压缩包,解压到某个文件夹中. zookeeper服务的启动脚本在bin目录下的文件:zkServer.cmd
在服务启动之前,需要对配置文件进行基本的设置:
将conf目录下的zoo_sample.cfg改名为 zoo.cf
修改里面的日志文件路径,我修改完之后的文件内容如下
The number of milliseconds of each tick
tickTime=2000
The number of ticks that the initial
synchronization phase can take
initLimit=10
The number of ticks that can pass between
sending a request and getting an acknowledgement
syncLimit=5
the directory where the snapshot is stored.
do not use /tmp for storage, /tmp here is just
example sakes.
dataDir=data
dataLogDir=datalogthe port at which the clients will connect
clientPort=2181
the maximum number of client connections.
increase this if you need to handle more clients
maxClientCnxns=60
Be sure to read the maintenance section of the
administrator guide before turning on autopurge.
http://zookeeper.apache.org/doc/current/zookeeperAdmin.html#sc_maintenance
The number of snapshots to retain in dataDir
autopurge.snapRetainCount=3
Purge task interval in hours
Set to "0" to disable auto purge feature
autopurge.purgeInterval=1
- tickTime:Zookeeper之间维持心跳的时间间隔
- initLimit:集群中的follower服务器(F)与leader服务器(L)之间 初始连接 时能容忍的最多心跳数(tickTime的数量),这里为2000*10 ,超过10次心跳仍然没同步完成,会重新选举leader
- syncLimit:集群中的follower服务器(F)与leader服务器(L)之间 请求和应答 之间能容忍的最多心跳数(tickTime的数量)。超时follwer将被丢弃
- dataDir:Zookeeper保存数据的目录 ,目录不可含中文字符
- dataLogDir:Zookeeper保存日志文件的目录
- clientPort:Zookeeper服务器的端口
配置完成之后就可以双击zkServer.cmd启动zookeeper服务了

ZooInspector的安装
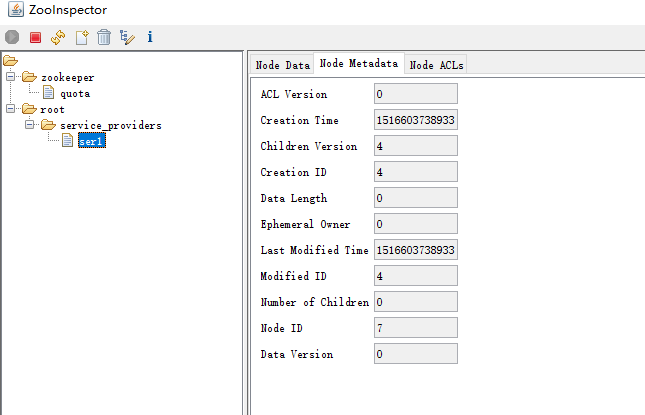
ZooInspector是zookeeper的监视工具,可以查看zookeeper的数据信息
下载完成后直接解压,运行zookeeper-dev-ZooInspector.jar。如果默认端口没有修改,直接点击连接就可以了

ZooKeeper.Net
通过Nuget来安装ZooKeeper.Net的开发包到项目中

下面的代码会建立一个zookeeper的连接,并创建一个名为parent的临时目录
   public static void TestConnect()
    {
        Console.WriteLine("建立连接");
        //服务地址为:localhost:2181  超时连接30秒
        using (ZooKeeper Instance = new ZooKeeperNet.ZooKeeper("localhost:2181", new TimeSpan(0, 0, 30), new Watcher("new")))
        {
            Console.WriteLine("检测是否有parent目录");
            var sdata = Instance.Exists("/parent", new Watcher("exists"));
            Console.WriteLine(sdata==null?"否":"是");
            if (sdata==null)
            {
                Console.WriteLine("开始创建parent目录");
                //data:目录关联的data为:this is the parentnode data
                //acl:目录的访问权限控制
                //CreateMode:Ephemeral:目录为临时目录,断开连接目录会自动清除  永久目录:Persistent  自增目录:***Sequential
                Instance.Create("/parent", "this is the parentnode data".GetBytes(), Ids.OPEN_ACL_UNSAFE, CreateMode.Ephemeral);
                Console.WriteLine("创建parent目录完成");
                Console.WriteLine("检测是否有parent目录");
                sdata = Instance.Exists("/parent", new Watcher("exists2"));
                Console.WriteLine(sdata == null ? "否" : "是");
                if (sdata != null)
                {
                    Console.WriteLine("删除parent目录");
                    Instance.Delete("/parent", 0);
                }
            }
        }
    }
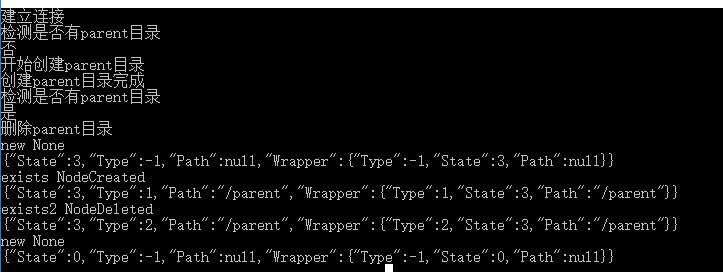
运行结果如下

需要注意的是执行这段代码可能会报错提示connection loss,出现错误的原因是建立连接的这一步是异步的操作,应当等待zookeeper连接成功之后再执行下面的代码。所以这段代码只是进行一个简单的演示,nuget上附有正确的使用方式
关于zookeeper的watch定义如下:
监视是一种简单的机制,使客户端收到关于ZooKeeper集合中的更改的通知。客户端可以在读取特定znode时设置Watches。Watches会向注册的客户端发送任何znode(客户端注册表)更改的通知。
Znode更改是与znode相关的数据的修改或znode的子项中的更改。只触发一次watches。如果客户端想要再次通知,则必须通过另一个读取操作来完成。当连接会话过期时,客户端将与服务器断开连接,相关的watches也将被删除。
Zookeeper的每个节点称之为znode,znode的类型分为四种:持久节点,临时节点,持久顺序节点,临时顺序节点
这里简单说下顺序节点:比如我需要建立一个名称为 /app的节点,那么zookeeper会建立一个名为/app0000000001的节点,如果再有人要创建一个名为/app的顺序节点,新建的节点名称会变为/app0000000002
也就是说顺序节点生成之后的名字是指定的名字加十位序列号,序列号不会重复,即使是两个操作同时创建。 我们可以利用这一个特性来实现分布式锁:
分布式锁的伪代码如下:
public void lock(){
var parentpath=/lock_
var path = CreateEphemeralSequentialNode(parentpath)
while(true){
var children = 获取父节点的所有子节点
if(path是children中的最小的){
成功获取锁
return;
}else{
监控等待前一个节点删除
wait();
}
}
}
具体的代码可以在github上查看