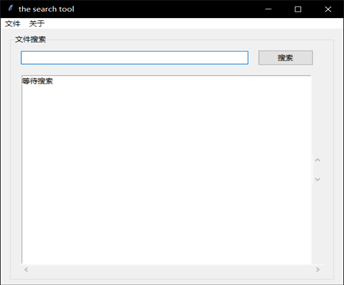
在python学习过程中有一次需要进行GUI 的绘制,
而在python中有自带的库tkinter可以用来简单的GUI编写,于是转而学习tkinter库的使用。
学以致用,现在试着编写一个简单的磁文件搜索工具,
方法就是将指定的文件夹进行扫描遍历,把其中的每个文件路径数据存入数据库,
然后使用数据库搜索文件就很快捷。实现的效果大致如下:

整个程序分为大致几个模块:
主界面的绘制,
指定文件夹功能函数,
搜索文件功能函数,
ui线程与扫描线程同步函数,
扫描线程工作函数
要实现扫描文件功能时,
导入了一个这样的模块 disk.py
这个模块实现的功能就是将指定文件夹下的所有文件遍历,并将路径和所在盘符存到一个列表中返回
import os
import os.path as pt


def scan_file(path):
    result = []
    for root, dirs, files in os.walk(path):
        for f in files:
            file_path = pt.abspath(pt.join(root, f))

            result.append((file_path, file_path[0]))  # 保存路径与盘符

    return result
然后我们需要将扫描到的文件存入到数据库中,
因此需要编写数据库模块 datebase.py
import sqlite3


class DataMgr:

    def __init__(self):
        # 创建或打开一个数据库
        # check_same_thread 属性用来规避多线程操作数据库的问题
        self.conn = sqlite3.connect("file.db", check_same_thread=False)
        # 建表
        self.conn.execute('create table if not exists disk_table('
                          'id integer primary key autoincrement,'
                          'file_path text,'
                          'drive_letter text)')
        # 创建索引 用来提高搜索速度
        self.conn.execute('create index if not exists index_path on disk_table(file_path)')

    # 批量插入数据
    def batch_insert(self, data):
        for line in data:
            self.conn.execute('insert into disk_table values (null,?,?)', line)
        self.conn.commit()

    # 模糊搜索
    def query(self, key):
        cursor = self.conn.cursor()
        cursor.execute("select file_path from disk_table where file_path like ?", ('%{0}%'.format(key),))
        r = [row[0] for row in cursor]
        cursor.close()
        return r

    def close(self):
        self.conn.close()
还需要一个额外的模块为 progressbar.py
这个模块的功能是在扫描时弹出一个进度条窗口,
使得GUI功能看起来更完善
from tkinter import *
from tkinter import ttk


class GressBar:

    def start(self):
        top = Toplevel()  # 弹出式窗口,实现多窗口时经常用到
        self.master = top
        top.overrideredirect(True)  # 去除窗体的边框
        top.title("进度条")
        Label(top, text="正在扫描选定路径的文件,请稍等……", fg="blue").pack(pady=2)
        prog = ttk.Progressbar(top, mode='indeterminate', length=200)  # 创建进度条
        prog.pack(pady=10, padx=35)
        prog.start()

        top.resizable(False, False)  # 参数为false表示不允许改变窗口尺寸
        top.update()
        # 计算窗口大小,使显示在屏幕中央
        curWidth = top.winfo_width()
        curHeight = top.winfo_height()
        scnWidth, scnHeight = top.maxsize()
        tmpcnf = '+%d+%d' % ((scnWidth - curWidth) / 2, (scnHeight - curHeight) / 2)
        top.geometry(tmpcnf)
        top.mainloop()

    def quit(self):
        if self.master:
            self.master.destroy()
主体的search.py 代码:
  1 from tkinter import *
  2 from tkinter import ttk
  3 import tkinter.filedialog as dir
  4 import queue
  5 import threading
  6 import progressbar
  7 import disk
  8 from database import DataMgr
  9
 10
 11 class SearchUI:
 12
 13     def __init__(self):
 14         # 创建一个消息队列
 15         self.notify_queue = queue.Queue()
 16         root = Tk()
 17         self.master = root
 18         self.create_menu(root)
 19         self.create_content(root)
 20         self.path = 'D:'
 21         root.title('the search tool')
 22         root.update()
 23         # 在屏幕中心显示窗体
 24         curWidth = root.winfo_width()
 25         curHeight = root.winfo_height()
 26         scnWidth, scnHeight = root.maxsize()  # 得到屏幕的宽度和高度
 27         tmpcnf = '+%d+%d' % ((scnWidth - curWidth)/2, (scnHeight-curHeight)/2)
 28         root.geometry(tmpcnf)
 29
 30         # 创建一个进度条对话框实例
 31         self.gress_bar = progressbar.GressBar()
 32
 33         # 创建一个数据库的实例
 34         self.data_mgr = DataMgr()
 35
 36         # 在UI线程启动消息队列循环
 37         self.process_msg()
 38         root.mainloop()
 39
 40     # ui线程与扫描线程同步
 41     def process_msg(self):
 42         # after方法,相当于一个定时器,
 43         # 第一个参数是时间的毫秒值,
 44         # 第二个参数指定执行一个函数
 45         self.master.after(400, self.process_msg)
 46         # 这样我们就在主线程建立了一个消息队列,
 47         # 每隔一段时间去消息队列里看看,
 48         # 有没有什么消息是需要主线程去做的,
 49         # 有一点需要特别注意,
 50         # 主线程消息队列里也不要干耗时操作,
 51         # 该队列仅仅用来更新UI。
 52         while not self.notify_queue.empty():
 53             try:
 54                 msg = self.notify_queue.get()
 55                 if msg[0] == 1:
 56                     self.gress_bar.quit()
 57
 58             except queue.Empty:
 59                 pass
 60
 61     # 扫描线程工作
 62     def execute_asyn(self):
 63         # 定义一个scan函数,放入线程中去执行耗时扫描
 64         def scan(_queue):
 65             if self.path:
 66                 paths = disk.scan_file(self.path)  # 位于disk.py
 67                 self.data_mgr.batch_insert(paths)  # 位于database.py
 68
 69             _queue.put((1,))
 70         th = threading.Thread(target=scan, args=(self.notify_queue,))
 71         th.setDaemon(True)  # 设置为守护进程
 72         th.start()
 73
 74         self.gress_bar.start()
 75
 76     # 菜单绘制
 77     def create_menu(self, root):
 78         menu = Menu(root)  # 创建菜单
 79
 80         # 二级菜单
 81         file_menu = Menu(menu, tearoff=0)
 82         file_menu.add_command(label='设置路径', command=self.open_dir)
 83         file_menu.add_separator()
 84         file_menu.add_command(label='扫描', command=self.execute_asyn)
 85
 86         about_menu = Menu(menu, tearoff=0)
 87         about_menu.add_command(label='version1.0')
 88
 89         # 在菜单栏中添加菜单
 90         menu.add_cascade(label='文件', menu=file_menu)
 91         menu.add_cascade(label='关于', menu=about_menu)
 92         root['menu'] = menu
 93
 94     # 主界面绘制
 95     def create_content(self, root):
 96         lf = ttk.LabelFrame(root, text='文件搜索')
 97         lf.pack(fill=X, padx=15, pady=8)
 98
 99         top_frame = Frame(lf)
100         top_frame.pack(fill=X, expand=YES, side=TOP, padx=15, pady=8)
101
102         self.search_key = StringVar()
103         ttk.Entry(top_frame, textvariable=self.search_key, width=50).pack(fill=X, expand=YES, side=LEFT)
104         ttk.Button(top_frame, text="搜索", command=self.search_file).pack(padx=15, fill=X, expand=YES)
105
106         bottom_frame = Frame(lf)
107         bottom_frame.pack(fill=BOTH, expand=YES, side=TOP, padx=15, pady=8)
108
109         band = Frame(bottom_frame)
110         band.pack(fill=BOTH, expand=YES, side=TOP)
111
112         self.list_val = StringVar()
113         listbox = Listbox(band, listvariable=self.list_val, height=18)
114         listbox.pack(side=LEFT, fill=X, expand=YES)
115
116         vertical_bar = ttk.Scrollbar(band, orient=VERTICAL, command=listbox.yview)
117         vertical_bar.pack(side=RIGHT, fill=Y)
118         listbox['yscrollcommand'] = vertical_bar.set
119
120         horizontal_bar = ttk.Scrollbar(bottom_frame, orient=HORIZONTAL, command=listbox.xview)
121         horizontal_bar.pack(side=BOTTOM, fill=X)
122         listbox['xscrollcommand'] = horizontal_bar.set
123
124         # 给list动态设置数据,set方法传入一个元组
125         self.list_val.set(('等待搜索',))
126
127     # 搜索文件
128     def search_file(self):
129         if self.search_key.get():
130             result_data = self.data_mgr.query(self.search_key.get())
131             if result_data:
132                  self.list_val.set(tuple(result_data))
133
134     # 指定文件夹
135     def open_dir(self):
136         d = dir.Directory()
137         self.path = d.show(initialdir=self.path)
138
139
140 if __name__ == '__main__':
141     SearchUI()
问题总结:
1.UI线程负责界面的绘制与更新,如果在UI线程中进行耗时操作,会影响界面的流畅性,所以需要异步线程。
此时的问题在于UI的主线程与异步线程的通信问题,为什么一定要两个线程通信?
因为在大多数GUI界面编程中,异步线程都是不能对当前界面进行操作更新的,否则会引起界面混乱。
可以简单的理解成 如果异步线程也操作主界面,则两个线程对相同资源进行操作,就会导致混乱。
接下来的问题是tkinter中没有提供接口进行线程通信,因此我们通过消息队列的方式来同步线程,用到的类为Queue。
项目中当在消息队列中检索到消息为元组(1, )时,说明子线程(扫描)已经结束了,告知主线程可以结束子线程了。
2.扫描文件夹时需要将所选文件夹中的所有文件遍历一遍,发现python中提供了方法os.walk(path), 可以直接达到这一效果,所以说python在写代码时确实提供了方便。
3.该磁盘搜索工具用到的原理是将文件路径存到数据库中,再进行检索。 选用的数据库为sqlite,已经可以满足该项目的要求。在主线程创建数据库,子线程操作数据库,有可能出现问题,因此设置check_same_thread = false 来拒绝多线程的访问。
4.在进行GUI编程时,打算在扫描等待时添加一个进度条显示窗口,也就需要多窗口,用到了toplevel,表现为一个弹出式窗口,在使用toplevel时,要注意首先需要一个根窗口。