html5中的canvas标签的支持ie9+ 所以考虑兼容性ie下的用vml 下面是简单封装的一个类
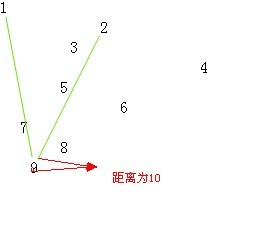
用法 qtx_ht("mydiv", "#74DF00", 10).line("shu_1", "shu_9", "shu_2");
mydiv 为容器id
#74DF0 为线的颜色
10 为先的起始位置理要链接的元素的中心点的半径
shu_1-shu_2 为要链接的元素id 这里的参数不限,是按顺序链接
这里要注意的是 ie浏览器下要加
<html xmlns:v="urn:schemas-microsoft-com:vml">
<style>
v:*
{
behavior: url(#default#VML);
}
</style>
/// 下面是页面的html代码
<html xmlns:v="urn:schemas-microsoft-com:vml">
<head>
    <title>第一个范例</title>
    <style>
        v:*
        {
            behavior: url(#default#VML);
        }
    </style>
    <script type="text/javascript" src="qtx.js">
    </script>
</head>
<body>
    <div id="shu_1" name="shu" style="position: absolute; top: 0px; left: 0px">
        1
    </div>
    <div id="shu_2" name="shu" style="position: absolute; top: 20px; left: 100px">
        2
    </div>
    <div id="shu_3" name="shu" style="position: absolute; top: 40px; left: 70px">
        3
    </div>
    <div id="shu_4" name="shu" style="position: absolute; top: 60px; left: 200px">
        4
    </div>
    <div id="shu_5" name="shu" style="position: absolute; top: 80px; left: 60px">
        5
    </div>
    <div id="shu_6" name="shu" style="position: absolute; top: 100px; left: 120px">
        6
    </div>
    <div id="shu_7" name="shu" style="position: absolute; top: 120px; left: 20px">
        7
    </div>
    <div id="shu_8" name="shu" style="position: absolute; top: 140px; left: 60px">
        8
    </div>
    <div id="shu_9" name="shu" style="position: absolute; top: 160px; left: 30px">
        9
    </div>
    <div id="shu_10" name="shu" style="position: absolute; top: 500px; left: 800px">
        10
    </div>
    <div id="mydiv" style="display: block">
    </div>

</body>
</html>
<script type="text/javascript">
    qtx_ht("mydiv", "#74DF00", 10).line("shu_1", "shu_9", "shu_2");

</script>
下面是
qtx.js的代码
///画线 吹预算法 2013-7-4
(function (w) {
    function isIE() {//是IE反回真 否则返回假
        if (! +[1, ]) return true;
        else return false;
    }
    function isExist(strObj) {
        if (typeof (eval("document.all." + strObj)) != "undefined") {
            return true;
        }
        else {
            return false;
        }
    }
    //获取绝对坐标
    function getAbsPoint(e) {
        var x = e.offsetLeft, y = e.offsetTop;
        while (e = e.offsetParent) {
            x += e.offsetLeft;
            y += e.offsetTop;
        }
        var pxy = {};
        pxy.x = x; pxy.y = y;
        return pxy;
    }
    function l(lfrom, lto, r, c, d) {
        var of = document.getElementById(lfrom);
        var ot = document.getElementById(lto);
        //获取对象长宽
        var wf = of.offsetWidth;
        var hf = of.offsetHeight; //是否绝对坐标待议

        var wt = ot.offsetWidth;
        var ht = ot.offsetHeight;

        //获取画线坐标
        var xf = getAbsPoint(of).x + wf / 2;
        var yf = getAbsPoint(of).y + hf / 2;

        var xt = getAbsPoint(ot).x + wt / 2;
        var yt = getAbsPoint(ot).y + ht / 2;
        var _w = Math.abs(xt - xf);
        var _h = Math.abs(yt - yf);
        var hd = Math.atan2(_h, _w)
        var _x = r * Math.cos(hd);
        var _y = r * Math.sin(hd);
        //                var _x = 3;
        //                var _y = 3;
        if (isIE()) {
            //alert("start -- ");
            var s = "<v:line StrokeColor="" + c + "" from="" + (xf < xt ? xf + _x : xf - _x) + "," + (yf < yt ? yf + _y : yf - _y) + "" to="" + (xt < xf ? xt + _x : xt - _x) + "," + (yt < yf ? yt + _y : yt - _y) + """ + " style="position:absolute;left:0;top:0;"></v:line>";
            var _myo = document.createElement(s);

            // 这个方法,使在特定的位置添加对象,具体使用,请参考其它的资料

            d.appendChild(_myo);
        }
        else {
            //创建画布
            var myo = document.createElement("canvas");
            myo.setAttribute("width", Math.abs(xt - xf) + "px");
            myo.setAttribute("height", Math.abs(yt - yf) + "px");
            myo.style.left = xf < xt ? xf : xt;
            myo.style.top = yf < yt ? yf : yt;
            myo.style.position = "absolute";
            //            myo.style.visibility = "visible";
            d.appendChild(myo);
            var cxt = myo.getContext("2d");
            cxt.strokeStyle = c;
            if ((xf - xt) * (yf - yt) > 0) {
                cxt.moveTo(0 + _x, 0 + _y);
                cxt.lineTo(Math.abs(xt - xf) - _x, Math.abs(yt - yf) - _y);
            } else {
                cxt.moveTo(0 + _x, Math.abs(yt - yf) - _y);
                cxt.lineTo(Math.abs(xt - xf) - _x, 0 + _y);
            }
            cxt.stroke();
        }

    }
    var h5 = function (d, c, r) {//参数为容器ID
        return new h5.divline(d, c, r);
    };

    h5.divline = function (d, c, r) {//参数为容器ID
        this.o;
        this.iso = false;
        this.lcolor = "#FF0000"; //默认颜色
        this.lr = 0
        if (d != null) {
            if (isExist(d)) {
                this.o = document.getElementById(d);
                this.iso = true;
                if (c != null) this.lcolor = c;
                if (r != null) this.lr = r; ;
            }
        }
    };
    h5.divline.prototype.line = function () {
        if (this.iso == true) {
            var numargs = arguments.length;
            if (numargs >= 2) {
                for (var i = 0; i < numargs - 1; i++) {
                    l(arguments[i], arguments[i + 1], this.lr, this.lcolor, this.o);
                }

            }
        }
    }
    w.qtx_ht = h5;
})(window);