为什么要进行单元测试?
单元测试的目的就在于,当你修改了项目中的其中一部分代码A,可能会影响到其他代码B的逻辑,所以我们在写完代码后需要在每一个代码逻辑上都加上单元测试断言,这样就可以提前判断其他代码的逻辑运行是否符合预期,如果不符合预期,就代表你的修改影响了其他代码的逻辑,不能上传,得保证其他代码的逻辑也能正常运行才行。
什么是Junit?
Junit是xUnit的一个子集,在c++,paython,java语言中测试框架的名字都不相同
xUnit是一套基于测试驱动开发的测试框架
其中的断言机制:将程序预期的结果与程序运行的最终结果进行比对,确保对结果的可预知性
java所用的测试工具是Junit
使用 JUnit 需要导入 JUnit 包。官方网站:https://junit.org/junit5/
在不同编译器下的导包过程不一样,这里以 Maven 为例
<dependency>
    <groupId>junit</groupId>
    <artifactId>junit</artifactId>
    <version>4.12</version>
</dependency>
Junit测试原理
springboot中使用junit编写单元测试默认是事物回滚的,这样测试的脏数据不影响数据库,即实际上是执行了对应的插入操作,但是完成操作后执行了事务回滚操作,从而数据库中没有对应数据。
关闭自动事务回滚
在对应的测试方法上添加@Rollback(false)关闭回滚。
测试流程
创建测试文件
- 新建一个源代码目录来存放我们的测试代码
- 测试类的包应该和被测试类保持一致
- 测试方法上必须使用
@Test进行修饰 - 测试方法必须使用 public void 进行修饰,不能带任何的参数
- 测试单元中的每个方法必须可以独立测试,测试方法间不能有任何的依赖
- 测试类使用 Test 作为类名的后缀(不是必须)
- 测试方法使用 test 作为方法名的前缀(不是必须)
目标代码:
package com.imooc.util;

public class Calculate {
    public int add(int a,int b) {
        return a + b;
    }

    public int subtract(int a, int b) {
        return a - b;
    }

    public int multiply(int a,int b) {
        return a * b;
    }

    public int divide(int a ,int b) {
        return a / b;
    }
}
创建测试代码
其实就是创建一个JUnit测试文件。
IDEA:
ctrl + shift + t生成测试文件
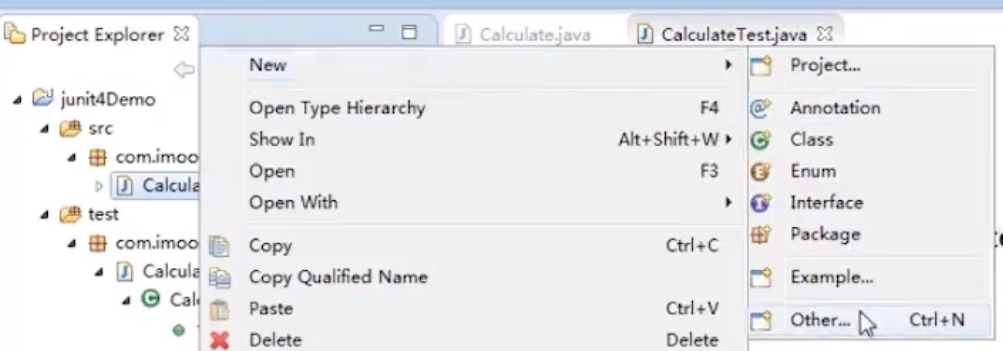
eclipse:
右键选中需要测试的目标代码,创建 JUnit Test Case 测试用例。

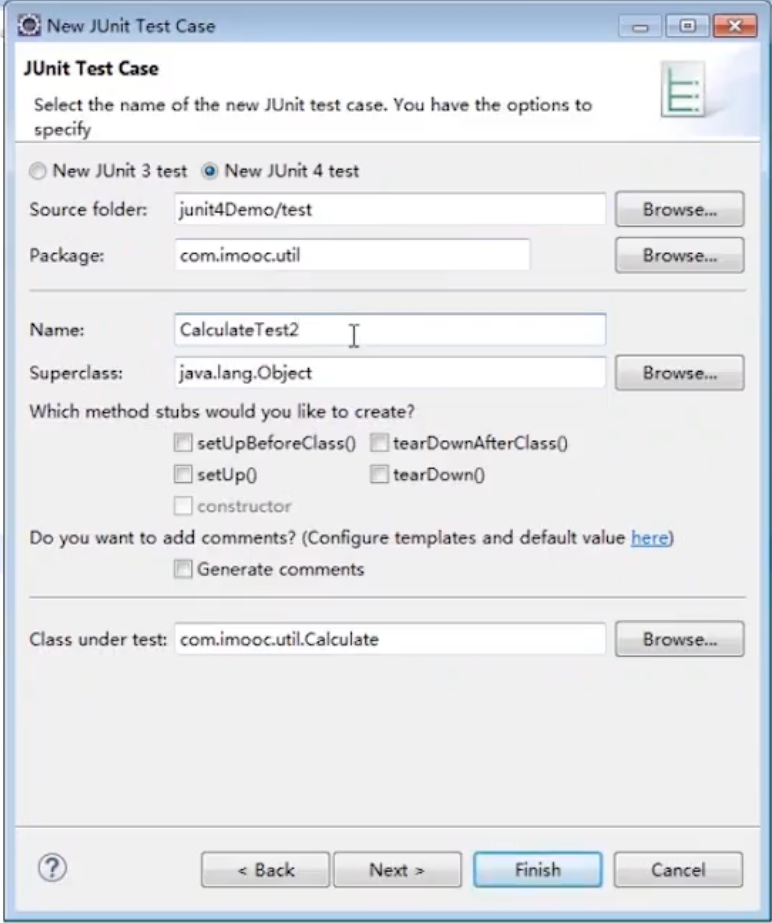

选择一下要测试的方法即可自动生成该方法对应的JUnit空白测试方法。
IDEA中类似操作:代码中右键弹出菜单-Go to-Test
idea2020.2 代码中 Ctrl + Shfit + T
编写测试代码
测试代码:
package com.imooc.util;
import static org.junit.Assert.*;
import org.junit.Test;
public class CalculateTest {
/*
* 1.测试方法上必须使用@Test进行修饰
* 2.测试方法必须使用public void 进行修饰,不能带任何的参数
* 3.新建一个源代码目录来存放我们的测试代码
* 4.测试类的包应该和被测试类保持一致
* 5.测试单元中的每个方法必须可以独立测试,测试方法间不能有任何的依赖
* 6.测试类使用Test作为类名的后缀(不是必须)
* 7.测试方法使用test作为方法名的前缀(不是必须)
*/
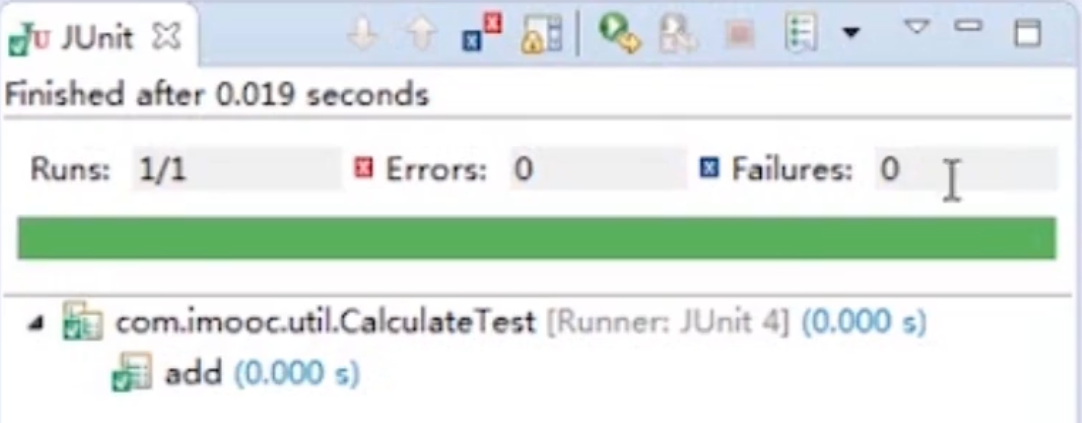
@Test
public void testAdd() {
assertEquals(6, new Calculate().add(3,3));
}
@Test
public void testSubtract() {
assertEquals(3, new Calculate().subtract(5,2));
}
@Test
public void testMultiply() {
assertEquals(4, new Calculate().multiply(2, 2));
}
@Test
public void testDivide() {
assertEquals(3, new Calculate().divide(6, 2));
}
}
注意:
- Failure 一般由单元测试使用的断言方法判断失败所引起的,这表示在测试点发现了问题,即 程序输出的结果和我们预期的不一样。
- error 是由代码异常引起的,它可以产生于测试代码本身的错误,也可以是被测试代码中的一个隐藏 bug。
- 测试用例不说用来证明你是对的,而是用来证明你没有错
注释
演示代码:
package com.imooc.util;
import static org.junit.Assert.*;
import org.junit.After;
import org.junit.AfterClass;
import org.junit.Before;
import org.junit.BeforeClass;
import org.junit.Test;
public class JunitFlowTest {
/*
* 1.@BeforeClass修饰的方法会在所有方法被调用前被执行,
* 而且该方法是静态的,所以当测试类被加载后接着就会运行它,
* 而且在内存中它只会存在一份实例,它比较适合加载配置文件。
* 2.@AfterClass所修饰的方法通常用来对资源的清理,如关闭数据库的连接
* 3.@Before和@After会在每个测试方法的前后各执行一次。
*
*/
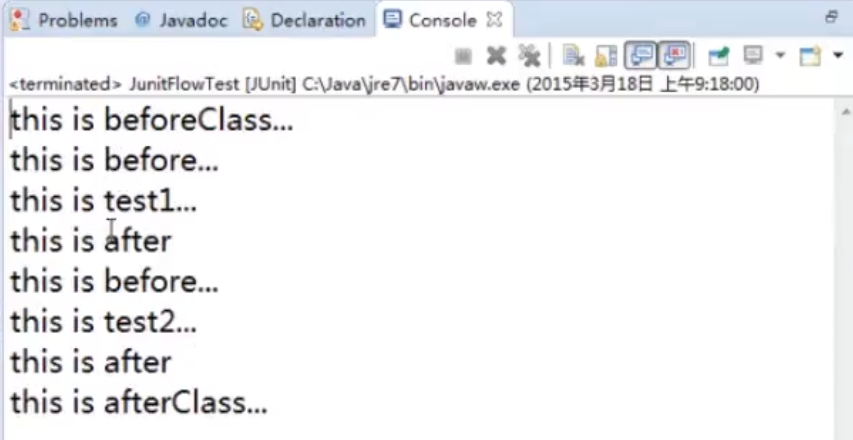
@BeforeClass
public static void setUpBeforeClass() throws Exception {
System.out.println("this is beforeClass...");
}
@AfterClass
public static void tearDownAfterClass() throws Exception {
System.out.println("this is afterClass...");
}
@Before
public void setUp() throws Exception {
System.out.println("this is before...");
}
@After
public void tearDown() throws Exception {
System.out.println("this is after");
}
@Test
public void test1() {
System.out.println("this is test1...");
}
@Test
public void test2(){
System.out.println("this is test2...");
}
}运行结果:
隐藏的固定代码:
@BeforeClass修饰的方法会在所有方法被调用前被执行,而且该方法是静态的,所以当测试类被加载后接着就会运行它,而且在内存中它只会存在一份实例,它比较适合加载配置文件以及一些只用加载一次的东西。@AfterClass所修饰的方法通常用来堆资源的清理,如关闭数据库的连接@Before和@After会在每个测试方法的前后各执行一次。这些都是固定代码,运行时一定会被执行
常用注释:
@Test:将一个普通的方法修饰成为一个测试方法@Test(expected=XX.class)@Test(timeout=毫秒)
@BeforeClass:它会在所有的方法运行前被执行,static 修饰@AfterClass:它会在所有的方法运行结束后被执行,static 修饰@Before:会在每一个测试方法被运行前执行一次@After:会在每一个测试方法运行后被执行一次@Ignore:所修饰的测试方法会被测试运行器忽略@RunWith:可以更改测试运行器(如想自定义测试运行器可继承 org.junit.runner.Runner)
可以配合测试套件使用。
测试套件
测试套件:可以组织测试类一起运行。
- 写一个作为测试套件的入口类,这个类里不包含其他的方法
- 更改测试运行器为
@RunWith(Suite.class) - 将要测试的类作为数组传入到
@Suite.SuiteClasses({A,B,...})
演示代码:
package com.imooc.util;

import static org.junit.Assert.*;

import org.junit.Test;
import org.junit.runner.RunWith;
import org.junit.runners.Suite;

@RunWith(Suite.class)
@Suite.SuiteClasses({TaskTest1.class,TaskTest2.class,TaskTest3.class})
public class SuiteTest {
    /*
     * 1.测试套件就是组织测试类一起运行的
     *
     * 写一个作为测试套件的入口类,这个类里不包含其他的方法
     * 更改测试运行器Suite.class
     * 将要测试的类作为数组传入到Suite.SuiteClasses({})
     */
}
这段代码可以将 TaskTest1、2、3 同时运行测试。从而达到测试套件的效果。
参数化设置
- 更改默认的测试运行器为
@RunWith(Parameterized.class) - 声明变量来存放预期值和结果值
- 声明一个返回值为
Collection<>的公共静态方法,并使用@Parameters进行修饰 - 为测试类声明一个带有参数的公共构造函数,并在其中为之声明变量赋值
- 编写测试方法,使用变量
演示代码:
package com.imooc.util;

import static org.junit.Assert.*;

import java.util.Arrays;
import java.util.Collection;

import org.junit.Test;
import org.junit.runner.RunWith;
import org.junit.runners.Parameterized;
import org.junit.runners.Parameterized.Parameters;

@RunWith(Parameterized.class)
public class ParameterTest {
    /*
     * 1.更改默认的测试运行器为RunWith(Parameterized.class)
     * 2.声明变量来存放预期值 和结果值
     * 3.声明一个返回值 为Collection的公共静态方法,并使用@Parameters进行修饰
     * 4.为测试类声明一个带有参数的公共构造函数,并在其中为之声明变量赋值
     */
    int expected = 0;//预期值
    int input1 = 0;//输入值1
    int input2 = 0;//输入值2

    public ParameterTest(int expected,int input1,int input2) {
        this.expected = expected;
        this.input1 = input1;
        this.input2 = input2;
    }

    @Parameters //可以将返回的参数依次放入构造方法中进行测试
    public static Collection<Object[]> t() {
        return Arrays.asList(new Object[][]{
                {3,1,2},//预期值,输入值1,输入值2
                {4,2,2}
        }) ;
    }

    @Test
    public void testAdd() {
        assertEquals(expected, new Calculate().add(input1, input2));
    }

}
在 Spring 中进行测试
Spring 配置文件
<?xml version="1.0" encoding="UTF-8"?>
<beans
    xmlns="http://www.springframework.org/schema/beans"
    xmlns:xsi="http://www.w3.org/2001/XMLSchema-instance"
    xmlns:p="http://www.springframework.org/schema/p"
    xsi:schemaLocation="http://www.springframework.org/schema/beans http://www.springframework.org/schema/beans/spring-beans-3.0.xsd">
    <bean id="sessionFactory" class="org.springframework.orm.hibernate3.LocalSessionFactoryBean">
        <property name="configLocation" value="classpath:hibernate.cfg.xml"/>
    </bean>
    <bean id="date" class="java.util.Date"/>
</beans>
Spring 测试代码
package com.imooc.conform;

import java.util.Date;

import org.junit.BeforeClass;
import org.junit.Test;
import org.springframework.context.ApplicationContext;
import org.springframework.context.support.ClassPathXmlApplicationContext;

public class SpringTest {

    private static ApplicationContext context = null;
    @BeforeClass
    public static void setUpBeforeClass() throws Exception {
        context = new ClassPathXmlApplicationContext("applicationContext.xml");
    }

    @Test
    public void test() {
        Date date =  (Date) context.getBean("date");
        System.out.println(date);
    }
}
Spring5 整合 JUnit5
第一步 引入 JUnit5 的 jar 包
第二步 创建测试类,使用注解完成
@ExtendWith(SpringExtension.class)
@ContextConfiguration("classpath:bean1.xml")
public class JTest5 {
    @Autowired
    private UserService userService;
    @Test
    public void test1() {
        userService.accountMoney();
    }
}
或者,可以使用一个复合注解替代上面两个注解完成整合
@SpringJUnitConfig(locations = "classpath:bean1.xml")
public class JTest5 {
    @Autowired
    private UserService userService;
    @Test
    public void test1() {
        userService.accountMoney();
    }
}