首先我们要了解注解和xml配置的区别:
作用一样,但是注解写在Bean的上方来代替我们之前在xml文件中所做的bean配置,也就是说我们使用了注解的方式,就不用再xml里面进行配置了,相对来说注解方式更为简便。
IOC获取对象注解方式:
在我们第二篇(IOC容器配置 xml方式)总结的基础上做修改:
首先我们的applicationContext.xml配置文件要略作修改:(把beans里面加上绿色背景的配置)
<?xml version="1.0" encoding="UTF-8"?>
<beans xmlns="http://www.springframework.org/schema/beans"
       xmlns:context="http://www.springframework.org/schema/context"
       xmlns:xsi="http://www.w3.org/2001/XMLSchema-instance"
       xsi:schemaLocation="
               http://www.springframework.org/schema/beans
               http://www.springframework.org/schema/beans/spring-beans.xsd
               http://www.springframework.org/schema/context
               http://www.springframework.org/schema/context/spring-context.xsd
">

    <!--开启扫描 扫描包com.zy下面的-->
    <context:component-scan base-package="com.zy"></context:component-scan>
</beans>
然后我们的JavaBean类加上注解(Component):
@Component("bean1")
public class Bean1 {
    public Bean1() {
        System.out.println("Bean1的无参构造方法");
    }
}
这样就代替了我们之前在applicationContext.xml中配置的: <bean id="bean1" class="com.zy.IoC.Bean1"></bean>
测试及运行结果请参照总结第二篇,得出的结果是一样的。
-
@Repository 用于注册DAO(持久层 )
-
@Service 用于注册 Service(业务层)
-
@Controller 用于注册 Action (表现层)
以@Repository为例:
/**
 * 测试UserDao接口
 */
public interface UserDao {
    public void getUser();
}
/**
 * UserDao实现类1
 */
@Repository("userDao")
public class UserDaoImpl implements UserDao {
    public UserDaoImpl() {
        System.out.println("dao1 构造方法");
    }

    @Override
    public void getUser() {
        System.out.println("UserDao实现类1  获取用户信息...");
    }
}
测试:
    @Test
    public void getUser() throws Exception {
        //根据spring配置文件 获取spring容器
        ApplicationContext ac = new ClassPathXmlApplicationContext("applicationContext.xml");
        //使用容器创建UserDao的实现类对象  userDao和配置文件中的 bean的id一致
        UserDao dao = ac.getBean("userDao", UserDao.class);
        dao.getUser();
    }
运行结果:

DI依赖注入注解方式:
注解基本类型属性:这个不多做介绍了
// 基本类型属性
@Value("#{'张学友'}")
private String name;
注解复杂类型属性:
1,Spring3.0提供@Value注解
    // 复杂类型属性
    // 第一种 @Value 结合 spEL
    @Value("#{userDao}")
    private UserDao userDao;
2,Spring2.0 提供@Autowired 注解 结合 @Qualifier 注解
    // 第二种 @Autowired 注解 结合 @Qualifier 注解
    // 如果单独使用@Autowired 默认按照类型注入,如果有多个同一类型的只能找到一个
    // 使用 @Qualifier 按照名称注入
    @Autowired
    @Qualifier("userDao")
    private UserDao userDao;
3,JSR-250规范 提供 @Resource 注解实现注入(不推荐使用)
    // 第三种 JSR-250提供@Resource 注解
    // 不写name属性,按照类型注入,写了name属性,按照名称注入
    @Resource(name = "userDao")
    private UserDao userDao;
以把UserDao注入到UserService为例:
JavaBean代码:
/**
 * 测试UserDao接口
 */
public interface UserDao {
    public void getUser();
}
/**
 * UserDao实现类1
 */
@Repository("userDao")
public class UserDaoImpl implements UserDao {
    @Override
    public void getUser() {
        System.out.println("2 UserDao实现类1  获取用户信息...");
    }
}

/**
 * UserService接口
 */
public interface UserService {
    public void getUser();
}
/**
 * UserService实现类
 */
@Service("userService")
public class UserServiceImpl implements UserService {
    //@Autowired+@Qualifier的方式
    //@Autowired
    //@Qualifier("userDao")

    @value("#{userDao}")  //@Value("#{}")的方式     使用注解注入,要与dao实现类的注解一致(使用注解 不需要setter方法,  如果没有构造方法,使用xml配置的时候需要setter方法)
    private UserDao userDao;

    @Override
    public void getUser() {
        System.out.println("1 业务层1 获取user对象...");
        userDao.getUser();
    }
}
测试:
    @Test
    public void getUser() throws Exception {
        ApplicationContext ac = new ClassPathXmlApplicationContext("applicationContext.xml");
        UserService userService = ac.getBean("userService", UserService.class);
        userService.getUser();
    }
运行结果:

其他注解的使用:
生命周期注解:
@PostConstruct 初始化方法
@PreDestroy 销毁方法
//Bean的注解
@Component("springLifeCycle")
public class SpringLifeCycle {
    //构造方法
    public SpringLifeCycle() {
        System.out.println("SpringLifeCycle 构造...");
    }

    //初始化方法的注解
    @PostConstruct
    public void init() {
        System.out.println("SpringLifeCycle 初始化...");
    }

    //销毁方法的注解
    @PreDestroy
    public void destroy() {
        System.out.println("SpringLifeCycle 销毁...");
    }

    public void helloSpring() {
        System.out.println("hello spring !");
    }
}
测试:
    @Test
    public void testLifeCycle() {
        ApplicationContext ac = new ClassPathXmlApplicationContext(
                "applicationContext.xml");
        SpringLifeCycle springLifeCycle = (SpringLifeCycle) ac.getBean("springLifeCycle");
        springLifeCycle.helloSpring();

        // 调用close(ApplicationContext没有close方法,需要转子类调用close)
        ClassPathXmlApplicationContext classAc = (ClassPathXmlApplicationContext) ac;
        classAc.close();
    }
运行结果:

Bean的作用域注解:
还是上面的JavaBean类:
//Bean的注解
@Component("springLifeCycle")
//作用域注解 prototype为多实例,默认为singleton单实例
@Scope("prototype")
public class SpringLifeCycle {
测试:
    @Test
    public void testScope() throws Exception {
        ApplicationContext applicationContext = new ClassPathXmlApplicationContext(
                "applicationContext.xml");
        SpringLifeCycle lifeCycleBean1 = (SpringLifeCycle) applicationContext
                .getBean("springLifeCycle");
        SpringLifeCycle lifeCycleBean2 = (SpringLifeCycle) applicationContext
                .getBean("springLifeCycle");
        System.out.println(lifeCycleBean1);
        System.out.println(lifeCycleBean2);

        // 通过反射 代码调用 close方法
        Method closeMethod = applicationContext.getClass().getMethod("close");
        closeMethod.invoke(applicationContext);
    }
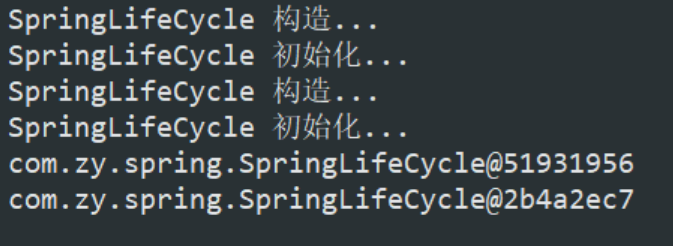
运行结果:

大家会发现销毁方法没有起作用,这里说明一下,Bean必须为singleton单实例的时候,销毁方法才能执行。
将scope设置成singleton:
//Bean的注解
@Component("springLifeCycle")
//作用域注解,singleton为默认值,可以不写这个注解
@Scope("singleton")
public class SpringLifeCycle {
执行结果:
