1.1 cobbler简介
Cobbler是一个Linux服务器安装的服务,可以通过网络启动(PXE)的方式来快速安装、重装物理服务器和虚拟机,同时还可以管理DHCP,DNS等。
Cobbler可以使用命令行方式管理,也提供了基于Web的界面管理工具(cobbler-web),还提供了API接口,可以方便二次开发使用。
Cobbler是较早前的kickstart的升级版,优点是比较容易配置,还自带web界面比较易于管理。
Cobbler内置了一个轻量级配置管理系统,但它也支持和其它配置管理系统集成,如Puppet,暂时不支持SaltStack。
Cobbler官网http://cobbler.github.io
在使用cobbler之前需要了解kickstart的使用: http://www.cnblogs.com/clsn/p/7833333.html
1.1.1 cobbler集成的服务
PXE服务支持
DHCP服务管理
DNS服务管理(可选bind,dnsmasq)
电源管理
Kickstart服务支持
YUM仓库管理
TFTP(PXE启动时需要)
Apache(提供kickstart的安装源,并提供定制化的kickstart配置)
1.2 安装cobbler
1.2.1 环境说明
[root@Cobbler ~]# cat /etc/redhat-release
CentOS Linux release 7.4.1708 (Core)

[root@Cobbler ~]# uname -r
3.10.0-693.el7.x86_64

[root@Cobbler ~]# getenforce
Disabled

[root@Cobbler ~]# systemctl status firewalld.service
● firewalld.service - firewalld - dynamic firewall daemon
   Loaded: loaded (/usr/lib/systemd/system/firewalld.service; disabled; vendor preset: enabled)
   Active: inactive (dead)
     Docs: man:firewalld(1)

[root@Cobbler ~]# hostname -I
10.0.0.202 172.16.1.202
yum源说明:
curl -o /etc/yum.repos.d/CentOS-Base.repo http://mirrors.aliyun.com/repo/Centos-7.repo
curl -o /etc/yum.repos.d/epel.repo http://mirrors.aliyun.com/repo/epel-7.repo
1.2.2 使用yum安装cobbler
yum -y install cobbler cobbler-web dhcp tftp-server pykickstart httpd xinetd
说明:cobbler是依赖与epel源下载
1.2.3 cobbler语法检查前先启动http与cobbler
systemctl start httpd.service
systemctl start cobblerd.service
cobbler check
1.2.4 进行语法检查
[root@Cobbler ~]# cobbler check
The following are potential configuration items that you may want to fix:

1 : The 'server' field in /etc/cobbler/settings must be set to something other than localhost, or kickstarting features will not work.  This should be a resolvable hostname or IP for the boot server as reachable by all machines that will use it.

2 : For PXE to be functional, the 'next_server' field in /etc/cobbler/settings must be set to something other than 127.0.0.1, and should match the IP of the boot server on the PXE network.

3 : change 'disable' to 'no' in /etc/xinetd.d/tftp

4 : Some network boot-loaders are missing from /var/lib/cobbler/loaders, you may run 'cobbler get-loaders' to download them, or, if you only want to handle x86/x86_64 netbooting, you may ensure that you have installed a *recent* version of the syslinux package installed and can ignore this message entirely.  Files in this directory, should you want to support all architectures, should include pxelinux.0, menu.c32, elilo.efi, and yaboot. The 'cobbler get-loaders' command is the easiest way to resolve these requirements.

5 : enable and start rsyncd.service with systemctl

6 : debmirror package is not installed, it will be required to manage debian deployments and repositories

7 : The default password used by the sample templates for newly installed machines (default_password_crypted in /etc/cobbler/settings) is still set to 'cobbler' and should be changed, try: "openssl passwd -1 -salt 'random-phrase-here' 'your-password-here'" to generate new one

8 : fencing tools were not found, and are required to use the (optional) power management features. install cman or fence-agents to use them

Restart cobblerd and then run 'cobbler sync' to apply changes.
1.2.5 解决当中的报错
命令集


sed -i 's/server: 127.0.0.1/server: 172.16.1.202/' /etc/cobbler/settings
sed -i 's/next_server: 127.0.0.1/next_server: 172.16.1.202/' /etc/cobbler/settings
sed -i 's/manage_dhcp: 0/manage_dhcp: 1/' /etc/cobbler/settings
sed -i 's/pxe_just_once: 0/pxe_just_once: 1/' /etc/cobbler/settings
sed -ri "/default_password_crypted/s#(.*: ).*#1"`openssl passwd -1 -salt 'oldboy' '123456'`"#" /etc/cobbler/settings
sed -i 's#yes#no#' /etc/xinetd.d/tftp

systemctl start rsyncd
systemctl enable rsyncd
systemctl enable tftp.socket
systemctl start tftp.socket
systemctl restart cobblerd.service

sed -i.ori 's#192.168.1#172.16.1#g;22d;23d' /etc/cobbler/dhcp.template

cobbler sync
详解
解决1、2
cp /etc/cobbler/settings{,.ori}
sed -i 's/server: 127.0.0.1/server: 172.16.1.202/' /etc/cobbler/settings
sed -i 's/next_server: 127.0.0.1/next_server: 172.16.1.202/' /etc/cobbler/settings
问题3
sed 's#yes#no#g' /etc/xinetd.d/tftp -i
4下载包所需的软件包
[root@Cobbler ~]# cobbler get-loaders
[root@Cobbler ~]# ls  /var/lib/cobbler/loaders
COPYING.elilo     elilo-ia64.efi   menu.c32    yaboot
COPYING.syslinux  grub-x86_64.efi  pxelinux.0
COPYING.yaboot    grub-x86.efi     README
5启动rsync服务
[root@Cobbler ~]# systemctl start rsyncd.service
[root@Cobbler ~]# systemctl enable rsyncd.service
6 debian相关无需修改
7、修改安装完成后的root密码
openssl passwd -1 -salt 'random-phrase-here' 'your-password-here'
random-phrase-here  随机字符串
your-password-here 密码
示例
[root@Cobbler ~]# openssl passwd -1 -salt 'CLSN' '123456'
$1$CLSN$LpJk4x1cplibx3q/O4O/K/
管理dhcp
sed -i 's/manage_dhcp: 0/manage_dhcp: 1/' /etc/cobbler/settings
防止重装
sed -i 's/pxe_just_once: 0/pxe_just_once: 1/' /etc/cobbler/settings
修改dhcp模板
[root@cobbler-node1~]# sed -i 's#manage_dhcp: 0#manage_dhcp: 1#g' /etc/cobbler/settings #使用cobbler管理dhcp
[root@cobbler-node1~]# vim /etc/cobbler/dhcp.template #修改cobbler的dhcp模版,因为cobbler会替换。
subnet 172.16.1.0 netmask 255.255.255.0 {
option routers 172.16.1.2;
option domain-name-servers 172.16.1.2;
option subnet-mask 255.255.255.0;
range dynamic-bootp 172.16.1.200 172.16.1.250;
default-lease-time 21600;
max-lease-time 43200;
next-server $next_server;
cobbler组配置文件位置
/etc/cobbler/settings
注意:修改完成之后要使用cobbler sync 进行同步,否则不生效。
1.2.6 修改之后
再次检查语法:
[root@Cobbler ~]# cobbler check
The following are potential configuration items that you may want to fix:

1 : debmirror package is not installed, it will be required to manage debian deployments and repositories
2 : fencing tools were not found, and are required to use the (optional) power management features. install cman or fence-agents to use them

Restart cobblerd and then run 'cobbler sync' to apply changes.
重启所有服务
systemctl restart httpd.service
systemctl restart cobblerd.service
systemctl restart dhcpd.service
systemctl restart rsyncd.service
systemctl restart tftp.socket
到此cobbler就安装完成,下面进行web界面的操作。
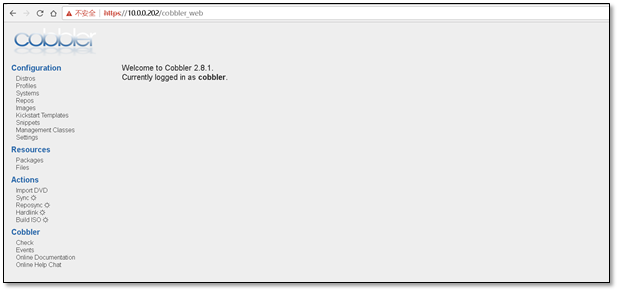
1.3 cobbler的web及界面操作
浏览器访问https://10.0.0.202/cobbler_web
注意CentOS7中cobbler只支持https访问。
1.3.1 浏览器报500错误的解决方法
[root@localhost /]# rpm -qa | grep "python2-django"
python2-django-1.11.13-4.el7.noarch
这个包只要在1.8以上,就有问题
TEMPLATE_CONTEXT_PROCESSORS was deprecated in Django 1.8 and removed in Django 1.10. It's not possible to import it anymore.

解决方法
1、rpm -e --nodeps python2-django
2、yum install python2-pip
3、pip install --upgrade pip
4、pip install Django==1.8.17
账号密码默认均为cobbler
1.3.1 操作说明--导入镜像
1)在虚拟机上添加上镜像
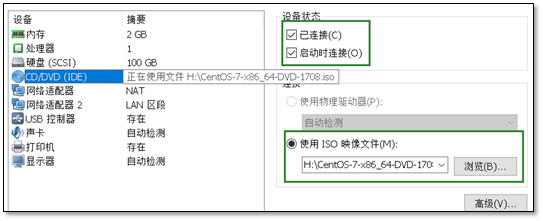
2)挂载上镜像
[root@Cobbler ~]# mount /dev/cdrom  /mnt/
mount: /dev/sr0 is write-protected, mounting read-only

[root@Cobbler ~]# df -h |grep mnt
/dev/sr0        4.3G  4.3G     0 100% /mnt
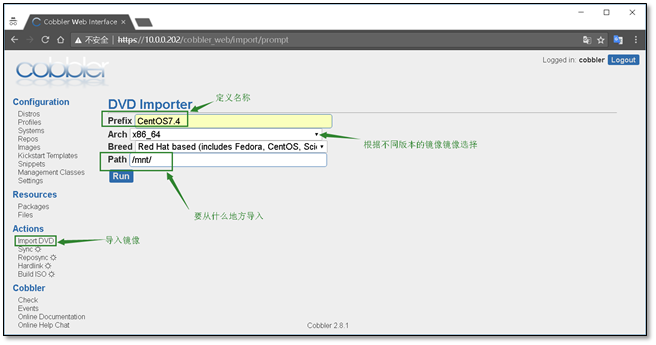
3)进行导入镜像
方式一:
选择Import DVD 输入Prefix(文件前缀),Arch(版本),Breed(品牌),Path(要从什么地方导入)
在导入镜像的时候要注意路径,防止循环导入。
信息配置好后,点击run,即可进行导入。
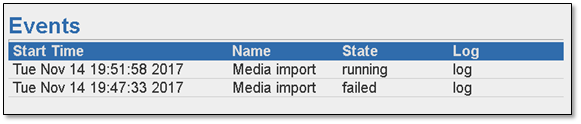
导入过程使用rsync进行导入,三个进程消失表示导入完毕
[root@Cobbler mnt]# ps -ef |grep rsync
root   12026      1  0 19:04 ?   00:00:00 /usr/bin/rsync --daemon --no-detach
root  13554  11778 12 19:51 ?    00:00:06 rsync -a /mnt/ /var/www/cobbler/ks_mirror/CentOS7.4-x86_64 --progress
root   13555  13554  0 19:51 ?     00:00:00 rsync -a /mnt/ /var/www/cobbler/ks_mirror/CentOS7.4-x86_64 --progress
root   13556  13555 33 19:51 ?        00:00:17 rsync -a /mnt/ /var/www/cobbler/ks_mirror/CentOS7.4-x86_64 --progress
root   13590  10759  0 19:52 pts/1    00:00:00 grep --color=auto rsync
查看日志可以发现右running进程
日志位于 Events
方式二:
cobbler import --path=/mnt/ --name=CentOS-7.1-x86_64 --arch=x86_64# --path 镜像路径# --name 为安装源定义一个名字# --arch 指定安装源是32位、64位、ia64, 目前支持的选项有: x86│x86_64│ia64# 安装源的唯一标示就是根据name参数来定义,本例导入成功后,安装源的唯一标示就是:CentOS-7.1-x86_64,如果重复,系统会提示导入失败。
导入完成后生成的文件夹
[root@Cobbler ks_mirror]# pwd
/var/www/cobbler/ks_mirror

[root@Cobbler ks_mirror]# ls
CentOS7.4-x86_64  config
cd /var/lib/cobbler/kickstarts/
CentOS-6.8-x86_64文件
#Kickstart Configurator for cobbler by Jason Zhao
#platform=x86, AMD64, or Intel EM64T
key --skip
#System  language
lang en_US
#System keyboard
keyboard us
#Sytem timezone
timezone Asia/Shanghai
#Root password
rootpw --iscrypted $default_password_crypted
#Use text mode install
text
#Install OS instead of upgrade
install
#Use NFS installation Media
url --url=$tree
#System bootloader configuration
bootloader --location=mbr
#Clear the Master Boot Record
zerombr yes
#Partition clearing information
clearpart --all --initlabel
#Disk partitioning information
part /boot --fstype ext4 --size 1024 --ondisk sda
part swap --size 16384 --ondisk sda
part / --fstype ext4 --size 1 --grow --ondisk sda
#System authorization infomation
auth  --useshadow  --enablemd5
#Network information
$SNIPPET('network_config')
#network --bootproto=dhcp --device=em1 --onboot=on
#Reboot after installation
reboot
#Firewall configuration
firewall --disabled
#SELinux configuration
selinux --disabled
#Do not configure XWindows
skipx
#Package install information
%packages
@ base
@ chinese-support
@ core
sysstat
iptraf
ntp
e2fsprogs-devel
keyutils-libs-devel
krb5-devel
libselinux-devel
libsepol-devel
lrzsz
ncurses-devel
openssl-devel
zlib-devel
OpenIPMI-tools
mysql
lockdev
minicom
nmap

%post
#/bin/sed -i 's/#Protocol 2,1/Protocol 2/' /etc/ssh/sshd_config
/bin/sed  -i 's/^ca::ctrlaltdel:/#ca::ctrlaltdel:/' /etc/inittab
/sbin/chkconfig --level 3 diskdump off
/sbin/chkconfig --level 3 dc_server off
/sbin/chkconfig --level 3 nscd off
/sbin/chkconfig --level 3 netfs off
/sbin/chkconfig --level 3 psacct off
/sbin/chkconfig --level 3 mdmpd off
/sbin/chkconfig --level 3 netdump off
/sbin/chkconfig --level 3 readahead off
/sbin/chkconfig --level 3 wpa_supplicant off
/sbin/chkconfig --level 3 mdmonitor off
/sbin/chkconfig --level 3 microcode_ctl off
/sbin/chkconfig --level 3 xfs off
/sbin/chkconfig --level 3 lvm2-monitor off
/sbin/chkconfig --level 3 iptables off
/sbin/chkconfig --level 3 nfs off
/sbin/chkconfig --level 3 ipmi off
/sbin/chkconfig --level 3 autofs off
/sbin/chkconfig --level 3 iiim off
/sbin/chkconfig --level 3 cups off
/sbin/chkconfig --level 3 openibd off
/sbin/chkconfig --level 3 saslauthd off
/sbin/chkconfig --level 3 ypbind off
/sbin/chkconfig --level 3 auditd off
/sbin/chkconfig --level 3 rdisc off
/sbin/chkconfig --level 3 tog-pegasus off
/sbin/chkconfig --level 3 rpcgssd off
/sbin/chkconfig --level 3 kudzu off
/sbin/chkconfig --level 3 gpm off
/sbin/chkconfig --level 3 arptables_jf off
/sbin/chkconfig --level 3 dc_client off
/sbin/chkconfig --level 3 lm_sensors off
/sbin/chkconfig --level 3 apmd off
/sbin/chkconfig --level 3 sysstat off
/sbin/chkconfig --level 3 cpuspeed off
/sbin/chkconfig --level 3 rpcidmapd off
/sbin/chkconfig --level 3 rawdevices off
/sbin/chkconfig --level 3 rhnsd off
/sbin/chkconfig --level 3 nfslock off
/sbin/chkconfig --level 3 winbind off
/sbin/chkconfig --level 3 bluetooth off
/sbin/chkconfig --level 3 isdn off
/sbin/chkconfig --level 3 portmap off
/sbin/chkconfig --level 3 anacron off
/sbin/chkconfig --level 3 irda off
/sbin/chkconfig --level 3 NetworkManager off
/sbin/chkconfig --level 3 acpid off
/sbin/chkconfig --level 3 pcmcia off
/sbin/chkconfig --level 3 atd off
/sbin/chkconfig --level 3 sendmail off
/sbin/chkconfig --level 3 haldaemon off
/sbin/chkconfig --level 3 smartd off
/sbin/chkconfig --level 3 xinetd off
/sbin/chkconfig --level 3 netplugd off
/sbin/chkconfig --level 3 readahead_early off
/sbin/chkconfig --level 3 xinetd off
/sbin/chkconfig --level 3 ntpd on
/sbin/chkconfig --level 3 avahi-daemon off
/sbin/chkconfig --level 3 ip6tables off
/sbin/chkconfig --level 3 restorecond off
/sbin/chkconfig --level 3 postfix off
CentOS-7-x86_64.cfg文件
#Kickstart Configurator for cobbler by Jason Zhao
#platform=x86, AMD64, or Intel EM64T
#System  language
lang en_US
#System keyboard
keyboard us
#Sytem timezone
timezone Asia/Shanghai
#Root password
rootpw --iscrypted $default_password_crypted
#Use text mode install
text
#Install OS instead of upgrade
install
#Use NFS installation Media
url --url=$tree
#System bootloader configuration
bootloader --location=mbr
#Clear the Master Boot Record
zerombr
#Partition clearing information
clearpart --all --initlabel
#Disk partitioning information
part /boot --fstype xfs --size 1024 --ondisk sda
part swap --size 16384 --ondisk sda
part / --fstype xfs --size 1 --grow --ondisk sda
#System authorization infomation
auth  --useshadow  --enablemd5
#Network information
$SNIPPET('network_config')
#network --bootproto=dhcp --device=em1 --onboot=on
# Reboot after installation
reboot
#Firewall configuration
firewall --disabled
#SELinux configuration
selinux --disabled
#Do not configure XWindows
skipx
#Package install information
%pre
$SNIPPET('log_ks_pre')
$SNIPPET('kickstart_start')
$SNIPPET('pre_install_network_config')
# Enable installation monitoring
$SNIPPET('pre_anamon')
%end

%packages
@ base
@ core
sysstat
iptraf
ntp
lrzsz
ncurses-devel
openssl-devel
zlib-devel
OpenIPMI-tools
mysql
nmap
screen
%end

%post
systemctl disable postfix.service
%end
cobbler profile edit --name=CentOS-7.1-x86_64 --kickstart=/var/lib/cobbler/kickstarts/CentOS-7-x86_64.cfg
cobbler profile edit --name=CentOS-6.8-x86_64 --kickstart=/var/lib/cobbler/kickstarts/CentOS-6-x86_64.cfg
# 修改安装系统的内核参数,在CentOS7系统有一个地方变了,就是网卡名变成eno16777736这种形式,但是为了运维标准化,我们需要将它变成我们常用的eth0,因此使用下面的参数。但要注意是CentOS7才需要下面的步骤,CentOS6不需要。
[root@linux-node1 ~]# cobbler profile edit --name=CentOS-7.1-x86_64 --kopts='net.ifnames=0 biosdevname=0'
# 查看安装镜像文件信息
[root@linux-node1 ~]# cobbler distro report --name=CentOS-7.1-x86_64
# 查看所有的profile设置
[root@linux-node1 ~]# cobbler profile report
# 查看指定的profile设置
[root@linux-node1 ~]# cobbler profile report --name=CentOS-7.1-x86_64
cobbler sync 每次修改profile都需要同步
1.3.2 创建一台空白虚拟机,进行测试网路安装
注意:虚拟机的内存不能小于2G,网卡的配置要保证网络互通
启动虚拟机
启动虚拟机即可发现会有cobbler的选择界面
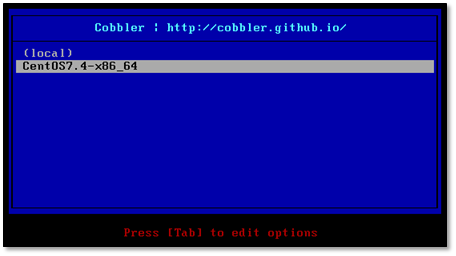
选择CentOS7.4即可进行安装,安装过程与光盘安装一致,这里就不在复述。
1.4 定制化安装操作系统
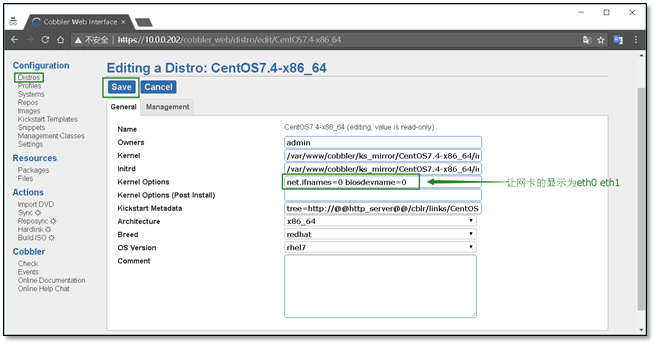
1.4.1 添加内核参数
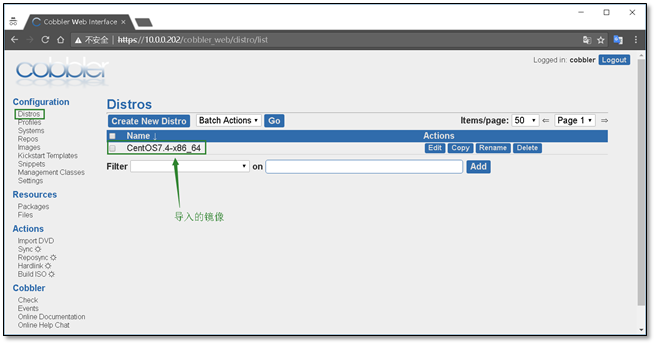
1)查看导入的镜像,点击edit
2)在内核参数中添加net.ifnames=0 biosdevname=0
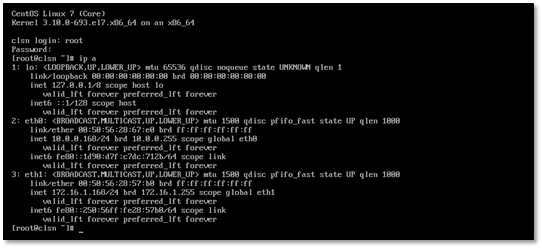
能够让显示的网卡变为eth0 ,而不是CentOS7中的ens33
修改完成后点击保存
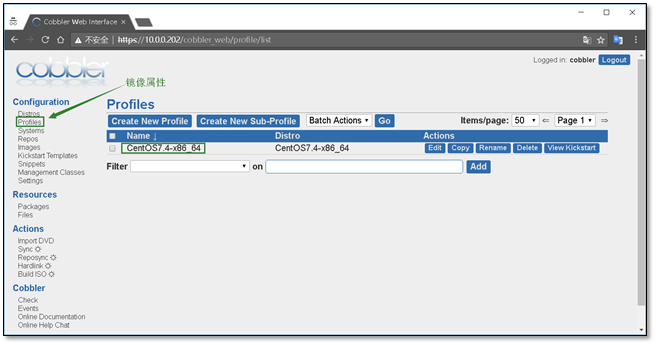
1.4.2 查看镜像属性
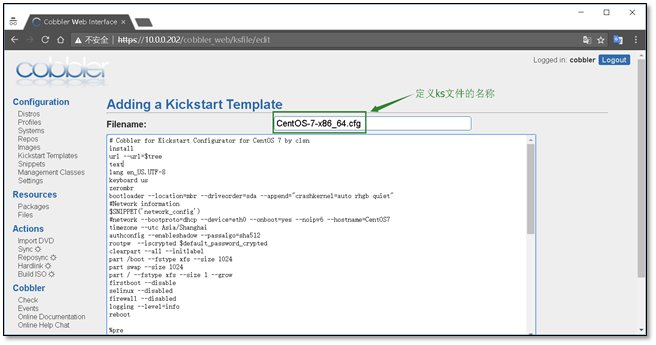
1.4.3 编写ks文件
1)创建新的ks文件

2)添加ks文件,并配置文件名
创建完成后点击Save进行保存
CentOS7 ks配置文件参考
 1 # Cobbler for Kickstart Configurator for CentOS 7 by clsn
 2 install
 3 url --url=$tree
 4 text
 5 lang en_US.UTF-8
 6 keyboard us
 7 zerombr
 8 bootloader --location=mbr --driveorder=sda --append="crashkernel=auto rhgb quiet"
 9 #Network information
10 $SNIPPET('network_config')
11 #network --bootproto=dhcp --device=eth0 --onboot=yes --noipv6 --hostname=CentOS7
12 timezone --utc Asia/Shanghai
13 authconfig --enableshadow --passalgo=sha512
14 rootpw  --iscrypted $default_password_crypted
15 clearpart --all --initlabel
16 part /boot --fstype xfs --size 1024
17 part swap --size 1024
18 part / --fstype xfs --size 1 --grow
19 firstboot --disable
20 selinux --disabled
21 firewall --disabled
22 logging --level=info
23 reboot
24
25 %pre
26 $SNIPPET('log_ks_pre')
27 $SNIPPET('kickstart_start')
28 $SNIPPET('pre_install_network_config')
29 # Enable installation monitoring
30 $SNIPPET('pre_anamon')
31 %end
32
33 %packages
34 @^minimal
35 @compat-libraries
36 @core
37 @debugging
38 @development
39 bash-completion
40 chrony
41 dos2unix
42 kexec-tools
43 lrzsz
44 nmap
45 sysstat
46 telnet
47 tree
48 vim
49 wget
50 %end
51
52 %post
53 systemctl disable postfix.service
54 %end
1.4.4 自定义安装系统
1)选择systems 创建一个新的系统
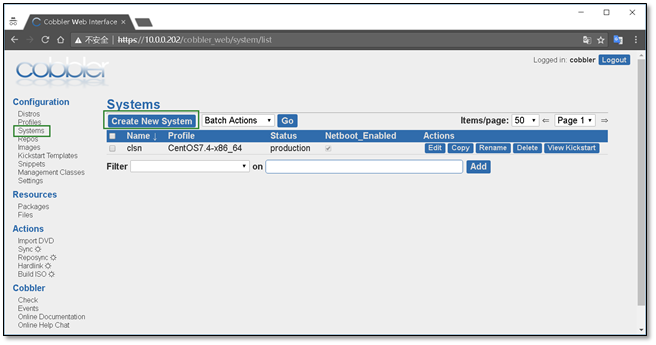
2)定义系统信息

3)配置全局网络信息
主机名、网关、DNS

4)配置网卡信息,eth0,eth1
需要注意,选择static静态,

以上的所有配置完成后,点击Save进行保存
附录:
VMware workstation中查看虚拟机mac地址的方法。在虚拟机设置中。

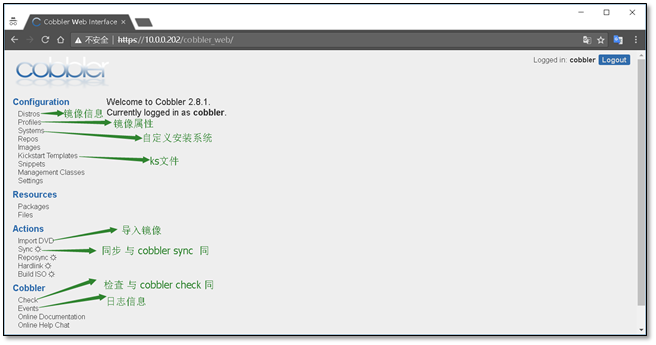
cobbler web 界面说明
1.5 安装虚拟机
1.5.1 开启虚拟机
如果之前的设置就显示安装进度

1.5.2 安装完成进行检查
1.6 cobbler使用常见错误
1.6.1 cobbler check报错
[root@Cobbler ~]# cobbler sync
Traceback (most recent call last):
  File "/usr/bin/cobbler", line 36, in <module>
    sys.exit(app.main())
  File "/usr/lib/python2.7/site-packages/cobbler/cli.py", line 662, in main
    rc = cli.run(sys.argv)
  File "/usr/lib/python2.7/site-packages/cobbler/cli.py", line 269, in run
    self.token         = self.remote.login("", self.shared_secret)
  File "/usr/lib64/python2.7/xmlrpclib.py", line 1233, in __call__
    return self.__send(self.__name, args)
  File "/usr/lib64/python2.7/xmlrpclib.py", line 1587, in __request
    verbose=self.__verbose
  File "/usr/lib64/python2.7/xmlrpclib.py", line 1273, in request
    return self.single_request(host, handler, request_body, verbose)
  File "/usr/lib64/python2.7/xmlrpclib.py", line 1306, in single_request
    return self.parse_response(response)
  File "/usr/lib64/python2.7/xmlrpclib.py", line 1482, in parse_response
    return u.close()
  File "/usr/lib64/python2.7/xmlrpclib.py", line 794, in close
    raise Fault(**self._stack[0])
xmlrpclib.Fault: <Fault 1: "<class 'cobbler.cexceptions.CX'>:'login failed'">
解决办法
systemctl restart httpd.service
systemctl restart cobblerd.service
cobbler check
1.6.2 No space left on device

出现这个错误的原因是虚拟机的内存不足2G,
将内存调为2G即可(这个错误只会出现在CentOS7.3之上)
1.7 附录cobbler_CentOS6.x_ks配置文件
# Cobbler for Kickstart Configurator for CentOS 6  by clsn
install
url --url=$tree
text
lang en_US.UTF-8
keyboard us
zerombr
bootloader --location=mbr --driveorder=sda --append="crashkernel=auto rhgb quiet"
$SNIPPET('network_config')
timezone --utc Asia/Shanghai
authconfig --enableshadow --passalgo=sha512
rootpw  --iscrypted $default_password_crypted
clearpart --all --initlabel
part /boot --fstype=ext4 --asprimary --size=200
part swap --size=1024
part / --fstype=ext4 --grow --asprimary --size=200
firstboot --disable
selinux --disabled
firewall --disabled
logging --level=info
reboot

%pre
$SNIPPET('log_ks_pre')
$SNIPPET('kickstart_start')
$SNIPPET('pre_install_network_config')
# Enable installation monitoring
$SNIPPET('pre_anamon')
%end

%packages
@base
@compat-libraries
@debugging
@development
tree
nmap
sysstat
lrzsz
dos2unix
telnet
%end

%post --nochroot
$SNIPPET('log_ks_post_nochroot')
%end

%post
$SNIPPET('log_ks_post')
# Start yum configuration
$yum_config_stanza
# End yum configuration
$SNIPPET('post_install_kernel_options')
$SNIPPET('post_install_network_config')
$SNIPPET('func_register_if_enabled')
$SNIPPET('download_config_files')
$SNIPPET('koan_environment')
$SNIPPET('redhat_register')
$SNIPPET('cobbler_register')
# Enable post-install boot notification
$SNIPPET('post_anamon')
# Start final steps
$SNIPPET('kickstart_done')
# End final steps
%end
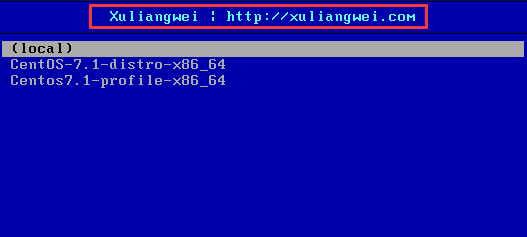
1.8自定义登陆界面
有时候需要给个人打广告,可以通过这种方式
[root@cobbler-node1 ~]# grep "xuliangwei" /etc/cobbler/pxe/pxedefault.template #自定义装机页面
MENU TITLE Xuliangwei | http://xuliangwei.com
[root@cobbler-node1 ~]# cobbler sync #同步
1.8 cobbler koan自动重装系统
介绍
koan是kickstart-over-a-network的缩写,它是cobbler的客户端帮助程序,koan允许你通过网络提供虚拟机,也允许你重装已经存在的客户端。当运行时,koan会从远端的cobbler server获取安装信息,然后根据获取的安装信息进行安装。
1、在客户端安装koan
[root@localhost ~]# yum install -y koan
2、执行安装命令
[root@localhost ~]# koan --server=192.168.56.133 --list=profiles
- looking for Cobbler at http://192.168.56.133:80/cobbler_api
centos-7-x86_64
3、
在指定要重装的系统上执行要重装的哪个系统
[root@localhost ~]# koan --replace-self --server=192.168.56.133 --profile=centos-7-x86_64
- looking for Cobbler at http://192.168.56.130:80/cobbler_api
- reading URL: http://192.168.56.130/cblr/svc/op/ks/profile/CentOS-7-x86_64
install_tree: http://192.168.56.130/cblr/links/CentOS-7-x86_64
downloading initrd initrd.img to /boot/initrd.img_koan
url=http://192.168.56.130/cobbler/images/CentOS-7-x86_64/initrd.img
- reading URL: http://192.168.56.130/cobbler/images/CentOS-7-x86_64/initrd.img
downloading kernel vmlinuz to /boot/vmlinuz_koan
url=http://192.168.56.130/cobbler/images/CentOS-7-x86_64/vmlinuz
- reading URL: http://192.168.56.130/cobbler/images/CentOS-7-x86_64/vmlinuz
- ['/sbin/grubby', '--add-kernel', '/boot/vmlinuz_koan', '--initrd', '/boot/initrd.img_koan', '--args', '"ksdevice=link lang= text net.ifnames=0 ks=http://192.168.56.130/cblr/svc/op/ks/profile/CentOS-7-x86_64 biosdevname=0 kssendmac "', '--copy-default', '--make-default', '--title=kick1489851371']
- ['/sbin/grubby', '--update-kernel', '/boot/vmlinuz_koan', '--remove-args=root']
- reboot to apply changes
4、然后重启就会自动安装新系统了
修改安装引导界面提示符(小技巧)
[root@localhost ~]# vim /etc/cobbler/pxe/pxedefault.template
1.9 自定义yum源
1.添加yum源
cobbler repo add --name=openstack-mitaka --mirror=https://mirrors.aliyun.com/centos-vault/7.2.1511/cloud/Source/openstack-mitaka/ --arch=x86_64 --breed=yum

2.同步repo

cobbler reposync

3.添加repo到对应的profile

cobbler profile edit --name=Centos-7-x86_64 --repo=https://mirrors.aliyun.com/centos-vault/7.2.1511/cloud/Source/openstack-mitaka/

4.修改kickstart文件,添加这些到%post %end之间
%post
systemctl disable postfix.service
$yum_config_stanza
%end
5.添加定时任务,定期同步repo
echo '1 3 * * * /usr/bin/cobbler reposync --tries=3 --no--fail' >> /var/spool/cron/root
1.10参考文档
http://blog.oldboyedu.com/autoinstall-cobbler/
http://www.zyops.com/autoinstall-cobbler
https://www.xuliangwei.com