概念:
LinearLayout是一种线性布局,他会将控件在水平和垂直方向做线性排列
官方文档:
继承关系:
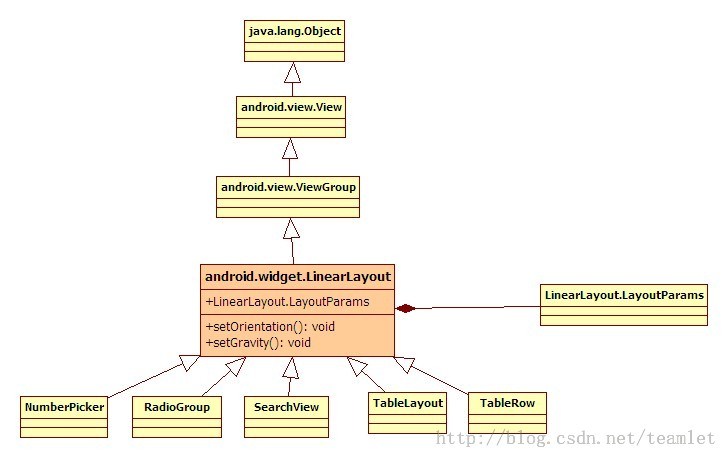
常用属性:
android:orientation:可以设置布局的方向
android:gravity:用来控制组件的对齐方式
layout_weight:控制各个组件在布局中的相对大小 同一线性上当前控件所占比例长度
样例一:
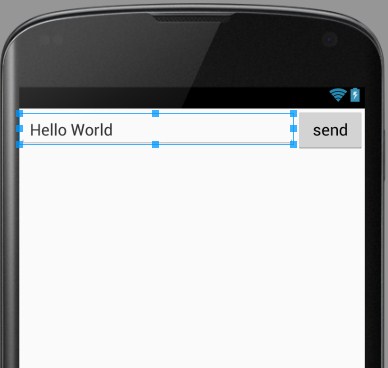
代码
<?xml version="1.0" encoding="utf-8"?>
<LinearLayout xmlns:android="http://schemas.android.com/apk/res/android"
    android:orientation="horizontal"
    android:layout_width="match_parent"
    android:layout_height="match_parent"
    android:layout_alignParentTop="true"
    android:layout_alignParentLeft="true"
    android:layout_alignParentStart="true">


    <EditText
        android:layout_width="0dp"
        android:layout_height="wrap_content"
        android:id="@+id/editText2"
        android:layout_weight="4" />

    <Button
        android:layout_width="0dp"
        android:layout_height="wrap_content"
        android:text="send"
        android:id="@+id/btn_send"
        android:layout_weight="1" />
</LinearLayout>
android:layout_width="0dp" 使得宽度不依赖于layout_width
当前同一水平线上有2个控件 所以layout_weight = 4 表示其宽度占屏幕宽度的4/5
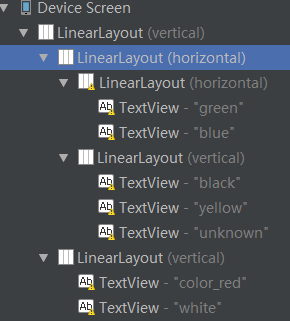
案例二:
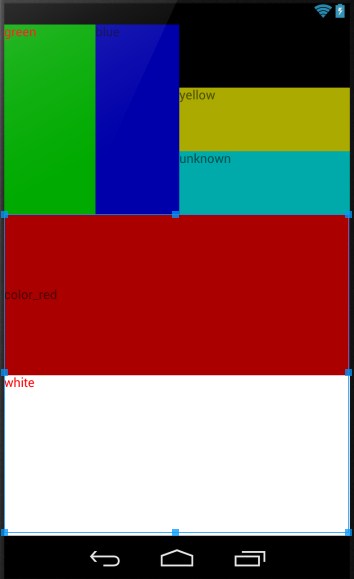
LinearLayout嵌套
Code:
<?xml version="1.0" encoding="utf-8"?>
<LinearLayout xmlns:android="http://schemas.android.com/apk/res/android"
    android:layout_width="fill_parent"
    android:layout_height="fill_parent"
    android:orientation="vertical" >
    <LinearLayout
        android:orientation="horizontal"
        android:layout_width="fill_parent"
        android:layout_height="wrap_content"
        android:baselineAligned="false"
        android:layout_weight="1"  >

        <LinearLayout
            android:orientation="horizontal"
            android:layout_width="wrap_content"
            android:layout_height="fill_parent"
            android:layout_weight="1">
            <TextView
                android:text="green"
                android:textColor="#ff0000"
                android:background="#00aa00"
                android:layout_width="wrap_content"
                android:layout_height="fill_parent"
                android:layout_weight="1"/>
            <TextView
                android:text="blue"
                android:background="#0000aa"
                android:layout_width="wrap_content"
                android:layout_height="fill_parent"
                android:layout_weight="1"/>
        </LinearLayout>
        <LinearLayout
            android:orientation="vertical"
            android:layout_width="wrap_content"
            android:layout_height="fill_parent"
            android:layout_weight="1">
            <TextView
                android:text="black"
                android:background="#000000"
                android:layout_width="fill_parent"
                android:layout_height="wrap_content"
                android:layout_weight="1"/>
            <TextView
                android:text="yellow"
                android:background="#aaaa00"
                android:layout_width="fill_parent"
                android:layout_height="wrap_content"
                android:layout_weight="1"/>
            <TextView
                android:text="unknown"
                android:background="#00aaaa"
                android:layout_width="fill_parent"
                android:layout_height="wrap_content"
                android:layout_weight="1"/>
        </LinearLayout>
    </LinearLayout>
    <LinearLayout
        android:orientation="vertical"
        android:layout_width="fill_parent"
        android:layout_height="wrap_content"
        android:layout_weight="2">
        <TextView
            android:text="color_red"
            android:gravity="fill_vertical"
            android:background="#aa0000"
            android:layout_width="fill_parent"
            android:layout_height="wrap_content"
            android:layout_weight="2"/>
        <TextView
            android:text="white"
            android:textColor="#ff0000"
            android:background="#ffffff"
            android:layout_width="fill_parent"
            android:layout_height="wrap_content"
            android:layout_weight="2"/>
    </LinearLayout>

</LinearLayout>
案例三:
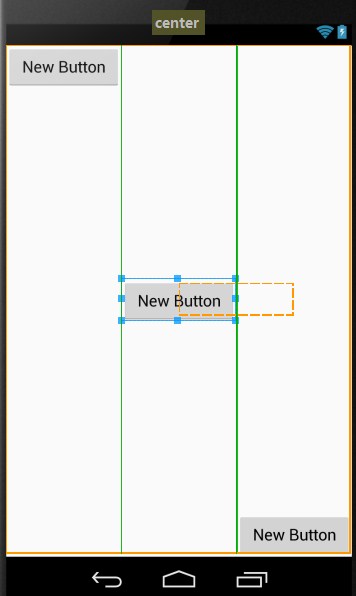
android:gravity:用来控制组件的对齐方式
每一个按钮独自占一列
Code:
<?xml version="1.0" encoding="utf-8"?>
<LinearLayout xmlns:android="http://schemas.android.com/apk/res/android"
    android:layout_width="match_parent"
    android:layout_height="match_parent">

    <Button
        android:layout_width="wrap_content"
        android:layout_height="wrap_content"
        android:text="New Button"
        android:id="@+id/button3"
        android:layout_gravity="bottom|right|top"
        android:layout_weight="1"/>

    <Button
        android:layout_width="wrap_content"
        android:layout_height="wrap_content"
        android:text="New Button"
        android:id="@+id/button2"
        android:layout_gravity="center_vertical"
        android:layout_weight="1"/>

    <Button
        android:layout_width="wrap_content"
        android:layout_height="wrap_content"
        android:text="New Button"
        android:id="@+id/button"
        android:layout_gravity="bottom"
        android:layout_weight="1" />
</LinearLayout>