作业一:nginx服务
二进制安装nginx包
[root@bogon ~]# yum install gcc-* glibc-* openssl openssl-devel pcre pcre-devel zlib zlib-devel -y 安装Nginx依赖包
[root@bogon ~]# yum -y install nginx 安装Nginx
作为web服务修改配置文件
[root@bogon ~]# systemctl stop firewalld 关闭防火墙
[root@bogon ~]# vi /etc/nginx/nginx.conf
[root@bogon ~]# cd /usr/share/nginx/html/
[root@bogon ~]# mv index.html index.html.bak
[root@bogon ~]#vi index.thml

[root@bogon html]# mkdir /usr/share/nginx/html/a/b/ -p
[root@bogon html]# echo 'welcome oldboy' > /usr/share/nginx/html/a/b/c.txt
让配置生效,验证配置
[root@bogon html]# systemctl start nginx 启动Nginx服务


作业二:nfs服务
二进制安装nfs
[root@bogon ~]# yum install rpcbind nfs-utils -y
作为共享存储挂载在三台web的网站根目录下
Python-反向代理主机IP为:192.168.16.158,另外再克隆三台虚拟机,Python-web1:192.168.16.79,Python-web1:192.168.16.175,Python-web1:192.168.16.170

在三台克隆的主机上运行命令yum install rpcbind nfs-utils -y,安装rpcbind和nfs服务,并启动
[root@bogon ~]# yum install rpcbind nfs-utils -y

在客户端和服务端关闭防火墙
[root@bogon ~]# systemctl stop firewalld
[root@bogon ~]# vi /etc/exports NFS服务端配置ip网段和共享目录

[root@bogon ~]# chmod -R o+w /share/ 给共享目录开通写权限
NFS服务端(192.168.16.158)添加dns解析

[root@bogon ~]# systemctl enable nfs-server.service

为rpcbind和nfs做开机启动

启动NFS(启动前必须先启动rpcbind)

实现,在任意一台web上修改的结果,其余两台都可以看到
[root@bogon ~]# exportfs
/share 192.168.16.158/24
[root@bogon ~]# showmount -e
Export list for bogon:
/share 192.168.16.158/24
NFS服务端新建一个文件,输入一些数字:

NFS客户端挂在服务端目录到本机,然后查看文件

作业三:nginx反向代理三台web
实现基于轮询的方式调度三台web,并验证结果
在Python-反向代理主机IP为:192.168.16.158,三台web主机,Python-web1:192.168.16.79,Python-web1:192.168.16.175,Python-web1:192.168.16.170,四台机器都安装yum安装Nginx,命令为:
[root@bogon ~]# yum install nginx -y
[root@bogon ~]# echo "wen01" >/usr/share/nginx/html/index.html 在三台web主机都输入相同的命令
[root@bogon ~]# systemctl start nginx 启动Nginx
[root@bogon ~]# vi /etc/nginx/nginx.conf 修改代理主机的配置文件


实现基于权重的方式调度三台web,并验证结果
修改配置文件,第一台服务器的权重为3,其他的不变


实现基于hash的方式调用三台web,并验证结果
[root@bogon ~]# vi /etc/nginx/nginx.conf 修改代理主机的配置文件

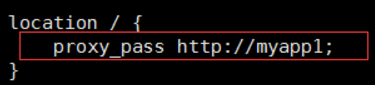
然后重启反向代理服务器和web主机的Nginx服务
验证结果为: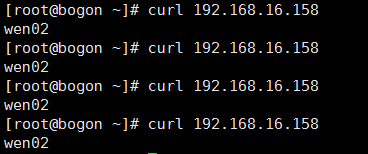
作业四:nginx反向代理+三台web+nfs共享存储实现集群配置
Python-反向代理主机IP为:192.168.16.158,另外再克隆三台虚拟机,Python-web1:192.168.16.79,Python-web1:192.168.16.175,Python-web1:192.168.16.170
[root@bogon ~]# yum install rpcbind nfs-utils -y 安装NFS等相关服务
作为共享存储挂载在三台web的网站根目录下
在反向代理主机和三台克隆的主机上运行命令yum install rpcbind nfs-utils -y,安装rpcbind和nfs服务,并启动
[root@bogon ~]# yum install rpcbind nfs-utils -y
在客户端和服务端关闭防火墙
[root@bogon ~]# systemctl stop firewalld
[root@bogon ~]# vi /etc/exports NFS服务端配置ip网段和共享目录
[root@bogon ~]# chmod -R o+w /share/ 给共享目录开通写权限
NFS服务端(192.168.16.158)添加dns解析
[root@bogon ~]# systemctl enable nfs-server.service
为rpcbind和nfs做开机启动
启动NFS(启动前必须先启动rpcbind)
实现,在任意一台web上修改的结果,其余两台都可以看到
[root@bogon ~]# exportfs
/share 192.168.16.158/24
[root@bogon ~]# showmount -e
Export list for bogon:
/share 192.168.16.158/24
NFS服务端新建一个文件,输入一些数字:
NFS客户端挂在服务端目录到本机,然后查看文件
作业五:源码安装nginx,并按照作业一描述的那样去测试使用
[root@bogon ~]# yum install gcc-* glibc-* openssl openssl-devel pcre pcre-devel zlib zlib-devel -y 安装Nginx依赖包
[root@bogon ~]# tar -zxvf nginx-1.10.3.tar.gz
[root@bogon ~]# cd nginx-1.10.3 进入解压目录
[root@bogon nginx-1.10.3]# ./configure --prefix=/usr/local/nginx 配置安装路径
[root@bogon nginx-1.10.3]# make && make install 编译并安装
[root@bogon nginx-1.10.3]# /usr/local/nginx/sbin/nginx -c /usr/local/nginx/conf/nginx.conf 启动Nginx