阅读目录
1、介绍
2、对比session登录
3、应用案例
3.1、启用无状态登录系统
3.2、使用token访问受保护的action
3.3、给用户添加角色和权限
3.4、完成注册过程
3.5、完成登录过程
3.6、自定义用户模型,添加初始化数据
4、参考
IdentityServer JWT是一套鉴权授权开源组件,授权是允许你做什么?即授予权力,鉴权是在程序执行过程中确认你是谁?被允许做什么?IdentityServer JWT遵循JWT(JSON Web Token)这个开放标准。JWT它定义了一种紧凑独立的方式,可以将各方之间的信息作为JSON对象进行安全传输。该信息可以验证和信任,因为是经过数字签名的。JWT由头部Header、有效载荷Payload和签名Signature三部分构成。各个部分见用“.”隔开,可以在网站 https://jwt.io/ 进行详细的跟踪测试。
头部Header由typ和alg两部分构成,typ表示token的类型,这里固定为JWT,alg表示使用hash算法,例如HMAC SHA256或者RSA。例如编码前Header“{"alg":"HS256","typ":"JWT"}”,编码后“eyJhbGciOiJIUzI1NiIsInR5cCI6IkpXVCJ9”。
有效载荷Payload作用①存储需要传递的信息,如用户ID、用户名等,②存储元素据,如过期时间、发布人等,③与Header不同,Payload可以加密。例如编码前“{"userId":"BigBox777"}”,base64编码后“eyJ1c2VySWQiOiJCaWdCb3g3NzcifQ==”,base64Url编码后“eyJ1c2VySWQiOiJCaWdCb3g3NzcifQ”。
签名Signature作用对Header和Payload部分进行签名,保证Token在传输的过程中没有被篡改或者损坏,Signature算法:Signature=HMACSHA256(base64UrlEncode(header)+“.”+base64UrlEncode(payload),secret)。
最后我们来看一看JWT标准所定义常用有效载荷字段:
- iss:该 jwt 的签发者
- sub:该 jwt 所面向的用户
- aud:接收该 jwt 的一方
- nbf:定义在什么时间之前该jwt是不可用的
- iat(issued at签发):jwt的签发时间,是一个 unix 时间戳
- exp(expires过期):jwt的过期时长,一个时间长度单位ms
- jti:jwt的唯一标识,主要用作一次性token,避免重放攻击
除了JWT之外还有一种鉴权授权方式session,这是一种有状态的登录方式,而JWT是无状态登录,常用来做单点登录系统(开源免费有OpenAM、OpenIDM、OpenDJ,企业付费有ForgeRock、Microsoft AM),下面看一下两种方式原理对比。

Session对比JWT优势
1:相比JWT,服务器可以主动清除session,可以管理授权有效期。
2:session保存在服务器端,相对比较安全,JWT保存在客户端不安全,可以使用HTTPS传输解决。
3:结合Cookie使用,较为灵活,兼容性好。
Session对比JWT劣势
1:Cookie+session在跨域场景表现得并不太好,Cookie跨域不好。
2:如果是分布式部署,需要做多机共享session机制,额外资源投入。
3:基于Cookie的机制很容易被CSRF(跨站请求伪造攻击)。
4:查询session信息可能有数据库查询操作,额外的资源投入。
相关概念
1:session主要存放在服务器,相对安全。
2:Cookie主要存放在客户端,不是很安全。
3:sessionStorage仅在当前会话下有效,关闭页面或浏览器后被清除。
4:localStorage除非被清除,否则被永久保存。
此案例使用一个NET5创建的ASP.NET Core MVC项目上做演示,先创建一个项目。
3.1、启用无状态登录系统
第一步:在项目文件夹 Controllers 下创建一个控制器 AuthenticateController 。
第二步:给这个控制器加上登录的Action Login ,分别加上Post请求特性 [HttpPost] 和允许匿名访问特性 [AllowAnonymous] //允许匿名访问 ,
第三步:在项目文件夹 Models 下创建登录数据DTO LoginDto.cs 。


 1 using System;
 2 using System.Collections.Generic;
 3 using System.Linq;
 4 using System.Threading.Tasks;
 5
 6 namespace Demo19_IdentityServerJWT.Models
 7 {
 8     public class LoginDto
 9     {
10         public string Username { get; set; }
11         public string Password { get; set; }
12     }
13 }
第四步:给项目安装JWT框架 Microsoft.AspNetCore.Authentication.JwtBearer v5.0.15 ,这里需要主要NET6使用的是v6.0.0以上的框架。
第五步:在 Login Action中完成创建jwt,并响应客户端200 OK,并返回jwt(注意密码有最小长度要求,太短会报IDX10653异常),完整的 AuthenticateController.cs 代码如下。
 1 using Demo19_IdentityServerJWT.Models;
 2 using Microsoft.AspNetCore.Authorization;
 3 using Microsoft.AspNetCore.Mvc;
 4 using Microsoft.IdentityModel.Tokens;
 5 using System;
 6 using System.Collections.Generic;
 7 using System.IdentityModel.Tokens.Jwt;
 8 using System.Linq;
 9 using System.Security.Claims;
10 using System.Text;
11 using System.Threading.Tasks;
12
13 namespace Demo19_IdentityServerJWT.Controllers
14 {
15     public class AuthenticateController : Controller
16     {
17         private readonly string _secretKey = "jwtTestsMiMa777888999";//jwt加密用的密码
18         [AllowAnonymous] //允许匿名访问
19         [HttpPost]
20         public IActionResult Login([FromBody]LoginDto loginDto)
21         {
22             //1、验证用户名和密码
23             //2、创建jwt(header、payload、signiture)
24             //2.1、创建header
25             var signingAlgorithm = SecurityAlgorithms.HmacSha256;//存储使用算法
26             //2.2、创建payload
27             var claims = new Claim[]
28             {
29                 new Claim(JwtRegisteredClaimNames.Sub,"BigBox777") //自定义数据部分,这里使用JWT标准定义的Sub表示该 jwt 所面向的用户
30             };
31             //2.3、创建signiture
32             var secretByte = Encoding.UTF8.GetBytes(_secretKey);
33             var signingKey = new SymmetricSecurityKey(secretByte);//对密码进行加密
34             var signingCredentials = new SigningCredentials(signingKey, signingAlgorithm); //验证加密后的私钥
35             //2.4、创建jwt
36             var token = new JwtSecurityToken(
37                 issuer: "donesoft.cn",//谁发布的
38                 audience: "donesoft.cn",//发布给谁用
39                 claims,//payload数据
40                 notBefore:DateTime.UtcNow,//发布时间
41                 expires:DateTime.UtcNow.AddMinutes(10),//有效期10分钟
42                 signingCredentials //数字签名
43                 );
44             var tokenString = new JwtSecurityTokenHandler().WriteToken(token);//转成字符串token
45             //3、返回200 OK,回传jwt
46             return Ok(tokenString);
47         }
48     }
49 }
第六步:使用测试工具Postman来发起请求,测试一下是否正常运行。

第七步:复制返货的jwt到网站 https://jwt.io/ ,并输入密码进行验证。

要使用token访问受保护的action,就需要先做系统级的jwt配置,看下面操作。
第一步:由于很多地方需要共用jwt密码,发布者这些信息,我们先把这部分放到配置文件 appsettings.json 里。
 1 {
 2   "Logging": {
 3     "LogLevel": {
 4       "Default": "Information",
 5       "Microsoft": "Warning",
 6       "Microsoft.Hosting.Lifetime": "Information"
 7     }
 8   },
 9   "AllowedHosts": "*",
10   "Authentication": {
11     "secretKey": "jwtTestsMiMa777888999", //jwt密码
12     "issuer": "donesoft.cn",  //发布者
13     "audience": "donesoft.cn"  //发布给谁用
14   }
15 }
第二步:更新项目文件夹 Controllers 下创建一个控制器 AuthenticateController.cs文件,加入对配置文件的依赖注入。
 1 using Demo19_IdentityServerJWT.Models;
 2 using Microsoft.AspNetCore.Authorization;
 3 using Microsoft.AspNetCore.Mvc;
 4 using Microsoft.Extensions.Configuration;
 5 using Microsoft.IdentityModel.Tokens;
 6 using System;
 7 using System.Collections.Generic;
 8 using System.IdentityModel.Tokens.Jwt;
 9 using System.Linq;
10 using System.Security.Claims;
11 using System.Text;
12 using System.Threading.Tasks;
13
14 namespace Demo19_IdentityServerJWT.Controllers
15 {
16     public class AuthenticateController : Controller
17     {
18         private readonly IConfiguration _configuration;//配置文件
19         public AuthenticateController(IConfiguration configuration)
20         {
21             _configuration = configuration;
22         }
23
24         [AllowAnonymous] //允许匿名访问
25         [HttpPost]
26         public IActionResult Login([FromBody]LoginDto loginDto)
27         {
28             //1、验证用户名和密码
29             //2、创建jwt(header、payload、signiture)
30             //2.1、创建header
31             var signingAlgorithm = SecurityAlgorithms.HmacSha256;//存储使用算法
32             //2.2、创建payload
33             var claims = new Claim[]
34             {
35                 new Claim(JwtRegisteredClaimNames.Sub,"BigBox777") //自定义数据部分,这里使用JWT标准定义的Sub表示该 jwt 所面向的用户
36             };
37             //2.3、创建signiture
38             var secretByte = Encoding.UTF8.GetBytes(_configuration["Authentication:secretKey"]);
39             var signingKey = new SymmetricSecurityKey(secretByte);//对密码进行加密
40             var signingCredentials = new SigningCredentials(signingKey, signingAlgorithm); //验证加密后的私钥
41             //2.4、创建jwt
42             var token = new JwtSecurityToken(
43                 issuer: _configuration["Authentication:issuer"],//谁发布的
44                 audience: _configuration["Authentication:audience"],//发布给谁用
45                 claims,//payload数据
46                 notBefore:DateTime.UtcNow,//发布时间
47                 expires:DateTime.UtcNow.AddMinutes(10),//有效期10分钟
48                 signingCredentials //数字签名
49                 );
50             var tokenString = new JwtSecurityTokenHandler().WriteToken(token);//转成字符串token
51             //3、返回200 OK,回传jwt
52             return Ok(tokenString);
53         }
54     }
55 }
第三步:在项目Startup.cs文件下的 public void ConfigureServices(IServiceCollection services) 方法内注册jwt服务。
 1 public void ConfigureServices(IServiceCollection services)
 2         {
 3             services.AddAuthentication(JwtBearerDefaults.AuthenticationScheme).//使用jwtBearer注册身份认真服务
 4                 AddJwtBearer(options =>//配置jwtBearer
 5                 {
 6                     var secretByte = Encoding.UTF8.GetBytes(Configuration["Authentication:secretKey"]);
 7                     options.TokenValidationParameters = new TokenValidationParameters()
 8                     {
 9                         //只有配置的发布者donesoft.cn才会被接受
10                         ValidateIssuer = true,
11                         ValidIssuer = Configuration["Authentication:issuer"],
12                         //只有配置的使用者donesoft.cn才会被接受
13                         ValidateAudience = true,
14                         ValidAudience = Configuration["Authentication:audience"],
15                         //验证token是否过期
16                         ValidateLifetime=true,
17                         //对密码进行加密
18                         IssuerSigningKey=new SymmetricSecurityKey(secretByte)
19                     };
20                 });
21             services.AddControllersWithViews();
22         }
第四步:在项目Startup.cs文件下的 public void Configure(IApplicationBuilder app, IWebHostEnvironment env) 方法内配置授权鉴权中间件,需要特别注意中间件顺序。
 1 public void Configure(IApplicationBuilder app, IWebHostEnvironment env)
 2         {
 3             if (env.IsDevelopment())
 4             {
 5                 app.UseDeveloperExceptionPage();
 6             }
 7             else
 8             {
 9                 app.UseExceptionHandler("/Home/Error");
10             }
11             app.UseStaticFiles();
12             //使用路由,访问去哪里?
13             app.UseRouting();
14             //验证中间件,你有什么权限?
15             app.UseAuthentication();
16             //授权中间件,你可以干什么?
17             app.UseAuthorization();
18
19             app.UseEndpoints(endpoints =>
20             {
21                 endpoints.MapControllerRoute(
22                     name: "default",
23                     pattern: "{controller=Home}/{action=Index}/{id?}");
24             });
25         }
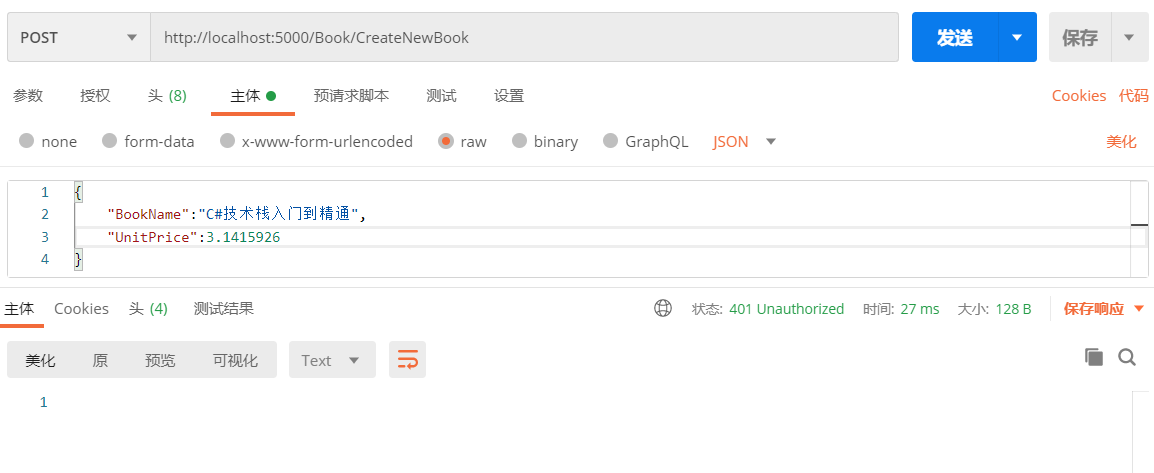
第五步:文件夹 Controllers 下创建一个控制器 BookController.cs 文件,再创建一个POST的Action CreateNewBook 用来测试业务逻辑。
 1 using Demo19_IdentityServerJWT.Models;
 2 using Microsoft.AspNetCore.Authorization;
 3 using Microsoft.AspNetCore.Mvc;
 4 using System;
 5 using System.Collections.Generic;
 6 using System.Linq;
 7 using System.Threading.Tasks;
 8
 9 namespace Demo19_IdentityServerJWT.Controllers
10 {
11     public class BookController : Controller
12     {
13         [HttpPost]
14         [Authorize]
15         public IActionResult CreateNewBook([FromBody]BookDto bookDto)
16         {
17             return Ok($"{bookDto.BookName}:创建成功!");
18         }
19     }
20 }
 1 using System;
 2 using System.Collections.Generic;
 3 using System.Linq;
 4 using System.Threading.Tasks;
 5
 6 namespace Demo19_IdentityServerJWT.Models
 7 {
 8     public class BookDto
 9     {
10         public string BookName { get; set; }
11         public decimal UnitPrice { get; set; }//单价
12     }
13 }
第六步:使用Postman测试一下在没有登录的时候,访问返回401 Unauthorized(没有授权)。
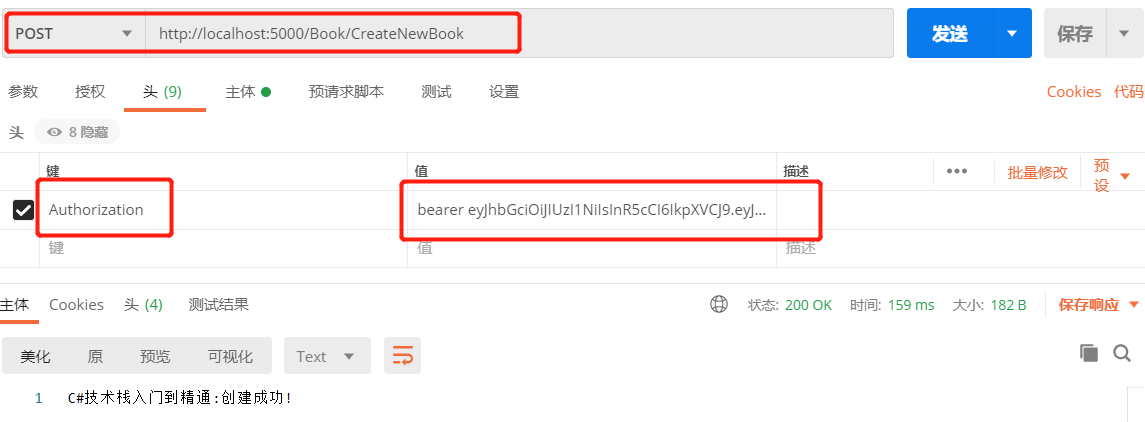
第七步:我们在Postman请求的头Header里加入登录返回的token,注意添加的字段为 Authorization ,对应值为 bearer +登录返回的token,这里要严格注意大小写格式和bearer和token之间有空格。
第八步:以上就完成了使用token访问授权的action,下一节我们来介绍一下对角色和权限的管理。
在.NET中基于Claims的身份认证体系(JWT只是Claim的其中一种认证方式),需要用一个类 Claim ①用来表示资源的所有权,例如:说明用户的角色,表示用户所具有的权限。②最小不可分割单位,可以自由组合使用的灵活度相当高。
第一步:更新项目文件夹 Controllers 下控制器 AuthenticateController.cs 文件,给jwt中加入角色信息,关键代码 new Claim(ClaimTypes.Role,"Admin") 。
 1 using Demo19_IdentityServerJWT.Models;
 2 using Microsoft.AspNetCore.Authorization;
 3 using Microsoft.AspNetCore.Mvc;
 4 using Microsoft.Extensions.Configuration;
 5 using Microsoft.IdentityModel.Tokens;
 6 using System;
 7 using System.Collections.Generic;
 8 using System.IdentityModel.Tokens.Jwt;
 9 using System.Linq;
10 using System.Security.Claims;
11 using System.Text;
12 using System.Threading.Tasks;
13
14 namespace Demo19_IdentityServerJWT.Controllers
15 {
16     public class AuthenticateController : Controller
17     {
18         private readonly IConfiguration _configuration;//配置文件
19         public AuthenticateController(IConfiguration configuration)
20         {
21             _configuration = configuration;
22         }
23
24         [AllowAnonymous] //允许匿名访问
25         [HttpPost]
26         public IActionResult Login([FromBody]LoginDto loginDto)
27         {
28             //1、验证用户名和密码
29             //2、创建jwt(header、payload、signiture)
30             //2.1、创建header
31             var signingAlgorithm = SecurityAlgorithms.HmacSha256;//存储使用算法
32             //2.2、创建payload
33             var claims = new Claim[]
34             {
35                 new Claim(JwtRegisteredClaimNames.Sub,"BigBox777"), //自定义数据部分,这里使用JWT标准定义的Sub表示该 jwt 所面向的用户
36                 new Claim(ClaimTypes.Role,"Admin") //加入角色认证信息
37             };
38             //2.3、创建signiture
39             var secretByte = Encoding.UTF8.GetBytes(_configuration["Authentication:secretKey"]);
40             var signingKey = new SymmetricSecurityKey(secretByte);//对密码进行加密
41             var signingCredentials = new SigningCredentials(signingKey, signingAlgorithm); //验证加密后的私钥
42             //2.4、创建jwt
43             var token = new JwtSecurityToken(
44                 issuer: _configuration["Authentication:issuer"],//谁发布的
45                 audience: _configuration["Authentication:audience"],//发布给谁用
46                 claims,//payload数据
47                 notBefore:DateTime.UtcNow,//发布时间
48                 expires:DateTime.UtcNow.AddMinutes(10),//有效期10分钟
49                 signingCredentials //数字签名
50                 );
51             var tokenString = new JwtSecurityTokenHandler().WriteToken(token);//转成字符串token
52             //3、返回200 OK,回传jwt
53             return Ok(tokenString);
54         }
55     }
56 }
第二步:更新文件夹 Controllers 下控制器 BookController.cs 文件,指定访问action的角色名称,关键代码 [Authorize(Roles = "Admin")] 。
 1 using Demo19_IdentityServerJWT.Models;
 2 using Microsoft.AspNetCore.Authorization;
 3 using Microsoft.AspNetCore.Mvc;
 4 using System;
 5 using System.Collections.Generic;
 6 using System.Linq;
 7 using System.Threading.Tasks;
 8
 9 namespace Demo19_IdentityServerJWT.Controllers
10 {
11     public class BookController : Controller
12     {
13         [HttpPost]
14         [Authorize(Roles = "Admin")]
15         public IActionResult CreateNewBook([FromBody]BookDto bookDto)
16         {
17             return  Created("donesoft.cn",bookDto);
18         }
19     }
20 }
第三步:完成以上就完成了角色和权限功能。
这节来完成注册过程,注册需要用到数据库,这里用到了EFCore,跟着下面一起操作吧。
第一步:nuget安装 Microsoft.AspNetCore.Identity.EntityFrameworkCore v5.0.15 。
第二步:项目下创建Database文件夹,在创建一个数据库上下文AppDbContext.cs来管理数据库数据。
 1 using Demo19_IdentityServerJWT.Models;
 2 using Microsoft.AspNetCore.Identity;
 3 using Microsoft.AspNetCore.Identity.EntityFrameworkCore;
 4 using Microsoft.EntityFrameworkCore;
 5 using System;
 6 using System.Collections.Generic;
 7 using System.Linq;
 8 using System.Threading.Tasks;
 9
10 namespace Demo19_IdentityServerJWT.Database
11 {
12     public class AppDbContext : IdentityDbContext<IdentityUser>
13     {
14         public AppDbContext(DbContextOptions<AppDbContext> options) : base(options)
15         {
16         }
17         public DbSet<BookDto> BookDtos { get; set; }
18     }
19 }
 1 using System;
 2 using System.Collections.Generic;
 3 using System.ComponentModel.DataAnnotations;
 4 using System.ComponentModel.DataAnnotations.Schema;
 5 using System.Linq;
 6 using System.Threading.Tasks;
 7
 8 namespace Demo19_IdentityServerJWT.Models
 9 {
10     public class BookDto
11     {
12         [Key]
13         public int Id { get; set; }
14         [Required]
15         [MaxLength(100)]
16         public string BookName { get; set; }
17         [Required]
18         [Column(TypeName = "decimal(18, 2)")]
19         public decimal UnitPrice { get; set; }//单价
20         [Range(0.0, 1.0)]
21         public double? DiscountPresent { get; set; }//折扣
22         public DateTime CreateTime { get; set; }
23         public DateTime? UpdateTime { get; set; }
24     }
25 }
第三步:更新项目下文件Startup.cs里 public void ConfigureServices(IServiceCollection services) 方法里代码,注册身份认证服务框架依赖,关键代码 services.AddIdentity<IdentityUser, IdentityRole>().AddEntityFrameworkStores<AppDbContext>();//注册身份认证服务框架依赖 。
 1 using Demo19_IdentityServerJWT.Database;
 2 using Microsoft.AspNetCore.Authentication.JwtBearer;
 3 using Microsoft.AspNetCore.Builder;
 4 using Microsoft.AspNetCore.Hosting;
 5 using Microsoft.AspNetCore.Identity;
 6 using Microsoft.Extensions.Configuration;
 7 using Microsoft.Extensions.DependencyInjection;
 8 using Microsoft.Extensions.Hosting;
 9 using Microsoft.IdentityModel.Tokens;
10 using System;
11 using System.Collections.Generic;
12 using System.Linq;
13 using System.Text;
14 using System.Threading.Tasks;
15
16 namespace Demo19_IdentityServerJWT
17 {
18     public class Startup
19     {
20         public Startup(IConfiguration configuration)
21         {
22             Configuration = configuration;
23         }
24
25         public IConfiguration Configuration { get; }
26
27         // This method gets called by the runtime. Use this method to add services to the container.
28         public void ConfigureServices(IServiceCollection services)
29         {
30             services.AddIdentity<IdentityUser, IdentityRole>().AddEntityFrameworkStores<AppDbContext>();//注册身份认证服务框架依赖
31             services.AddAuthentication(JwtBearerDefaults.AuthenticationScheme).//使用jwtBearer注册身份认真服务
32                 AddJwtBearer(options =>//配置jwtBearer
33                 {
34                     var secretByte = Encoding.UTF8.GetBytes(Configuration["Authentication:secretKey"]);
35                     options.TokenValidationParameters = new TokenValidationParameters()
36                     {
37                         //只有配置的发布者donesoft.cn才会被接受
38                         ValidateIssuer = true,
39                         ValidIssuer = Configuration["Authentication:issuer"],
40                         //只有配置的使用者donesoft.cn才会被接受
41                         ValidateAudience = true,
42                         ValidAudience = Configuration["Authentication:audience"],
43                         //验证token是否过期
44                         ValidateLifetime=true,
45                         //对密码进行加密
46                         IssuerSigningKey=new SymmetricSecurityKey(secretByte)
47                     };
48                 });
49             services.AddControllersWithViews();
50         }
51
52         // This method gets called by the runtime. Use this method to configure the HTTP request pipeline.
53         public void Configure(IApplicationBuilder app, IWebHostEnvironment env)
54         {
55             if (env.IsDevelopment())
56             {
57                 app.UseDeveloperExceptionPage();
58             }
59             else
60             {
61                 app.UseExceptionHandler("/Home/Error");
62             }
63             app.UseStaticFiles();
64             //使用路由,访问去哪里?
65             app.UseRouting();
66             //验证中间件,你有什么权限?
67             app.UseAuthentication();
68             //授权中间件,你可以干什么?
69             app.UseAuthorization();
70
71             app.UseEndpoints(endpoints =>
72             {
73                 endpoints.MapControllerRoute(
74                     name: "default",
75                     pattern: "{controller=Home}/{action=Index}/{id?}");
76             });
77         }
78     }
79 }
第四步:打开Visual Studio菜单栏视图=》SQL Server对象资源管理器,创建一个测试数据库TestDB,打开TestDB的属性,找到连接字符串保存到配置文件 appsettings.json 中。
 1 {
 2   "Logging": {
 3     "LogLevel": {
 4       "Default": "Information",
 5       "Microsoft": "Warning",
 6       "Microsoft.Hosting.Lifetime": "Information"
 7     }
 8   },
 9   "AllowedHosts": "*",
10   "Authentication": {
11     "secretKey": "jwtTestsMiMa777888999", //jwt密码
12     "issuer": "donesoft.cn", //发布者
13     "audience": "donesoft.cn" //发布给谁用
14   },
15   "DbContext": {
16     "ConnectionString": "Data Source=(localdb)\\MSSQLLocalDB;Initial Catalog=TestDB;Integrated Security=True;Connect Timeout=30;Encrypt=False;TrustServerCertificate=False;ApplicationIntent=ReadWrite;MultiSubnetFailover=False"
17   }
18 }
第五步:nuget安装EFCore需要的迁移工具 Microsoft.EntityFrameworkCore.Tools v5.0.15 、sqlServer包 Microsoft.EntityFrameworkCore v5.0.15 和 Microsoft.EntityFrameworkCore.SqlServer v5.0.15 。在更新Startup.cs里 public void ConfigureServices(IServiceCollection services) 方法里代码,添加EF Core的使用 services.AddDbContext<AppDbContext>(options => { options.UseSqlServer(Configuration["DbContext:ConnectionString"]); }); 。
 1 using Demo19_IdentityServerJWT.Database;
 2 using Microsoft.AspNetCore.Authentication.JwtBearer;
 3 using Microsoft.AspNetCore.Builder;
 4 using Microsoft.AspNetCore.Hosting;
 5 using Microsoft.AspNetCore.Identity;
 6 using Microsoft.EntityFrameworkCore;
 7 using Microsoft.Extensions.Configuration;
 8 using Microsoft.Extensions.DependencyInjection;
 9 using Microsoft.Extensions.Hosting;
10 using Microsoft.IdentityModel.Tokens;
11 using System;
12 using System.Collections.Generic;
13 using System.Linq;
14 using System.Text;
15 using System.Threading.Tasks;
16
17 namespace Demo19_IdentityServerJWT
18 {
19     public class Startup
20     {
21         public Startup(IConfiguration configuration)
22         {
23             Configuration = configuration;
24         }
25
26         public IConfiguration Configuration { get; }
27
28         // This method gets called by the runtime. Use this method to add services to the container.
29         public void ConfigureServices(IServiceCollection services)
30         {
31             services.AddDbContext<AppDbContext>(options => {
32                 options.UseSqlServer(Configuration["DbContext:ConnectionString"]);
33             });
34             services.AddIdentity<IdentityUser, IdentityRole>().AddEntityFrameworkStores<AppDbContext>();//注册身份认证服务框架依赖
35             services.AddAuthentication(JwtBearerDefaults.AuthenticationScheme).//使用jwtBearer注册身份认真服务
36                 AddJwtBearer(options =>//配置jwtBearer
37                 {
38                     var secretByte = Encoding.UTF8.GetBytes(Configuration["Authentication:secretKey"]);
39                     options.TokenValidationParameters = new TokenValidationParameters()
40                     {
41                         //只有配置的发布者donesoft.cn才会被接受
42                         ValidateIssuer = true,
43                         ValidIssuer = Configuration["Authentication:issuer"],
44                         //只有配置的使用者donesoft.cn才会被接受
45                         ValidateAudience = true,
46                         ValidAudience = Configuration["Authentication:audience"],
47                         //验证token是否过期
48                         ValidateLifetime=true,
49                         //对密码进行加密
50                         IssuerSigningKey=new SymmetricSecurityKey(secretByte)
51                     };
52                 });
53             services.AddControllersWithViews();
54         }
55
56         // This method gets called by the runtime. Use this method to configure the HTTP request pipeline.
57         public void Configure(IApplicationBuilder app, IWebHostEnvironment env)
58         {
59             if (env.IsDevelopment())
60             {
61                 app.UseDeveloperExceptionPage();
62             }
63             else
64             {
65                 app.UseExceptionHandler("/Home/Error");
66             }
67             app.UseStaticFiles();
68             //使用路由,访问去哪里?
69             app.UseRouting();
70             //验证中间件,你有什么权限?
71             app.UseAuthentication();
72             //授权中间件,你可以干什么?
73             app.UseAuthorization();
74
75             app.UseEndpoints(endpoints =>
76             {
77                 endpoints.MapControllerRoute(
78                     name: "default",
79                     pattern: "{controller=Home}/{action=Index}/{id?}");
80             });
81         }
82     }
83 }
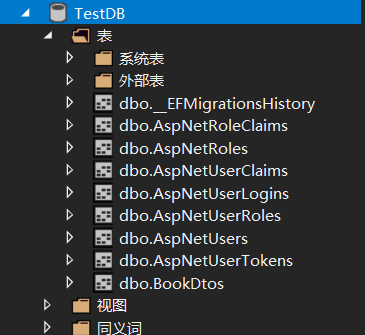
第六步:打开Visual Studio菜单工具=》Nuget包管理器=》程序包管理器控制台 中输入命令 EntityFrameworkCore\Enable-Migrations 打开迁移,再用命令 EntityFrameworkCore\Add-Migration InitDB 和 EntityFrameworkCore\update-database 更新Identity EFCore相关的角色权限数据表到数据库中(打开数据库就可以看见刚刚迁移的数据表)。不少很清楚EF的迁移可以看我的文章https://www.cnblogs.com/bigbox777/p/13907142.html。

第七步:更新项目文件夹 Controllers 下控制器 AuthenticateController.cs 文件,添加注册用户action函数,这里需要依赖注入用户工具类 private readonly UserManager<IdentityUser> _userManager; 。
 1 using Demo19_IdentityServerJWT.Models;
 2 using Microsoft.AspNetCore.Authorization;
 3 using Microsoft.AspNetCore.Identity;
 4 using Microsoft.AspNetCore.Mvc;
 5 using Microsoft.Extensions.Configuration;
 6 using Microsoft.IdentityModel.Tokens;
 7 using System;
 8 using System.Collections.Generic;
 9 using System.IdentityModel.Tokens.Jwt;
10 using System.Linq;
11 using System.Security.Claims;
12 using System.Text;
13 using System.Threading.Tasks;
14
15 namespace Demo19_IdentityServerJWT.Controllers
16 {
17     public class AuthenticateController : ControllerBase
18     {
19         private readonly IConfiguration _configuration;//配置文件
20         private readonly UserManager<IdentityUser> _userManager; //依赖注入的用户工具
21         public AuthenticateController(IConfiguration configuration, UserManager<IdentityUser> userManager)
22         {
23             _configuration = configuration;
24             _userManager = userManager;
25         }
26
27         [AllowAnonymous] //允许匿名访问
28         [HttpPost]
29         public IActionResult Login([FromBody] LoginDto loginDto)
30         {
31             //1、验证用户名和密码
32             //2、创建jwt(header、payload、signiture)
33             //2.1、创建header
34             var signingAlgorithm = SecurityAlgorithms.HmacSha256;//存储使用算法
35             //2.2、创建payload
36             var claims = new Claim[]
37             {
38                 new Claim(JwtRegisteredClaimNames.Sub,"BigBox777"), //自定义数据部分,这里使用JWT标准定义的Sub表示该 jwt 所面向的用户
39                 new Claim(ClaimTypes.Role,"Admin") //加入角色认证信息
40             };
41             //2.3、创建signiture
42             var secretByte = Encoding.UTF8.GetBytes(_configuration["Authentication:secretKey"]);
43             var signingKey = new SymmetricSecurityKey(secretByte);//对密码进行加密
44             var signingCredentials = new SigningCredentials(signingKey, signingAlgorithm); //验证加密后的私钥
45             //2.4、创建jwt
46             var token = new JwtSecurityToken(
47                 issuer: _configuration["Authentication:issuer"],//谁发布的
48                 audience: _configuration["Authentication:audience"],//发布给谁用
49                 claims,//payload数据
50                 notBefore:DateTime.UtcNow,//发布时间
51                 expires:DateTime.UtcNow.AddMinutes(10),//有效期10分钟
52                 signingCredentials //数字签名
53                 );
54             var tokenString = new JwtSecurityTokenHandler().WriteToken(token);//转成字符串token
55             //3、返回200 OK,回传jwt
56             return Ok(tokenString);
57         }
58
59         [AllowAnonymous] //允许匿名访问
60         [HttpPost]
61         public async Task<IActionResult> Register([FromBody] RegisterDto registerDto) //需要访问数据库用异步操作
62         {
63             //1、使用registerDto对象创建IdentityUser用户对象
64             var user = new IdentityUser()
65             {
66                 UserName = registerDto.Username
67             };
68
69             //2、使用UserManager来把密码hash加密,保存到数据库
70             var result = await _userManager.CreateAsync(user, registerDto.Password);
71             if (!result.Succeeded)
72             {
73                 return BadRequest();
74             }
75             else
76             {
77                 //3、返回200
78                 return Ok();
79             }
80         }
81     }
82 }
第八步:注入还需要用到 RegisterDto.cs ,这用到了特性来比较密码是否一致 [Compare(nameof(Password), ErrorMessage ="密码输入不一致")] //比较两个字段是否一致 。
 1 using System;
 2 using System.Collections.Generic;
 3 using System.ComponentModel.DataAnnotations;
 4 using System.Linq;
 5 using System.Threading.Tasks;
 6
 7 namespace Demo19_IdentityServerJWT.Models
 8 {
 9     public class RegisterDto
10     {
11
12         [Required]
13         public string Username { get; set; }
14         [Required]
15         public string Password { get; set; }
16         [Required]
17         [Compare(nameof(Password), ErrorMessage ="密码输入不一致")] //比较两个字段是否一致
18         public string ConfirmPassword { get; set; }
19     }
20 }
第九步:以上就完成了注册功能,看下面测试结果。

第一步:登录的过程还需要用到SignInManager这个签名工具类,更新项目文件夹 Controllers 下控制器 AuthenticateController.cs 文件,添加SignInManager的依赖注入和更新Action函数Login,添加登录验证的逻辑。
  1 using Demo19_IdentityServerJWT.Models;
  2 using Microsoft.AspNetCore.Authorization;
  3 using Microsoft.AspNetCore.Identity;
  4 using Microsoft.AspNetCore.Mvc;
  5 using Microsoft.Extensions.Configuration;
  6 using Microsoft.IdentityModel.Tokens;
  7 using System;
  8 using System.Collections.Generic;
  9 using System.IdentityModel.Tokens.Jwt;
 10 using System.Linq;
 11 using System.Security.Claims;
 12 using System.Text;
 13 using System.Threading.Tasks;
 14
 15 namespace Demo19_IdentityServerJWT.Controllers
 16 {
 17     public class AuthenticateController : ControllerBase
 18     {
 19         private readonly IConfiguration _configuration;//配置文件
 20         private readonly UserManager<IdentityUser> _userManager; //依赖注入的用户工具
 21         private readonly SignInManager<IdentityUser> _signInManager;//依赖注入签名用户工具
 22         public AuthenticateController(IConfiguration configuration,
 23             UserManager<IdentityUser> userManager,
 24             SignInManager<IdentityUser> signInManager)
 25         {
 26             _configuration = configuration;
 27             _userManager = userManager;
 28             _signInManager = signInManager;
 29         }
 30
 31         [AllowAnonymous] //允许匿名访问
 32         [HttpPost]
 33         public async Task<IActionResult> Login([FromBody] LoginDto loginDto)
 34         {
 35             //1、验证用户名和密码
 36             var loginResult = await _signInManager.PasswordSignInAsync(
 37                 loginDto.Username,//用户名
 38                 loginDto.Password,//密码
 39                 false,//关闭浏览器后登录 cookie 是否应保持不变
 40                 false//登录失败时是否锁定用户帐户
 41                 );
 42             if (!loginResult.Succeeded)
 43             {
 44                 return BadRequest();
 45             }
 46             //从数据库中取得用户数据
 47             var user = await _userManager.FindByNameAsync(loginDto.Username);
 48             //2、创建jwt的header
 49             var signingAlgorithm = SecurityAlgorithms.HmacSha256;//存储使用算法
 50             //3、创建jwt的payload
 51             var claims = new List<Claim>()
 52             {
 53                 new Claim(JwtRegisteredClaimNames.Sub,user.Id)
 54             };
 55             //获取用户所有角色,把角色加入payload数据中
 56             var roleNames = await _userManager.GetRolesAsync(user);
 57             foreach (var roleName in roleNames)
 58             {
 59                 var roleClaim = new Claim(ClaimTypes.Role, roleName);
 60                 claims.Add(roleClaim);
 61             }
 62             //4、创建jwt的signiture
 63             var secretByte = Encoding.UTF8.GetBytes(_configuration["Authentication:secretKey"]);
 64             var signingKey = new SymmetricSecurityKey(secretByte);//对密码进行加密
 65             var signingCredentials = new SigningCredentials(signingKey, signingAlgorithm); //验证加密后的私钥
 66             //5、创建jwt
 67             var token = new JwtSecurityToken(
 68                 issuer: _configuration["Authentication:issuer"],//谁发布的
 69                 audience: _configuration["Authentication:audience"],//发布给谁用
 70                 claims,//payload数据
 71                 notBefore: DateTime.UtcNow,//发布时间
 72                 expires: DateTime.UtcNow.AddMinutes(10),//有效期10分钟
 73                 signingCredentials //数字签名
 74                 );
 75             var tokenString = new JwtSecurityTokenHandler().WriteToken(token);//转成字符串token
 76             //6、返回200 OK,回传jwt
 77             return Ok(tokenString);
 78
 79             #region Login之前测试代码
 80             ////2、创建jwt(header、payload、signiture)
 81             ////2.1、创建header
 82             //var signingAlgorithm = SecurityAlgorithms.HmacSha256;//存储使用算法
 83             ////2.2、创建payload
 84             //var claims = new Claim[]
 85             //{
 86             //    new Claim(JwtRegisteredClaimNames.Sub,"BigBox777"), //自定义数据部分,这里使用JWT标准定义的Sub表示该 jwt 所面向的用户
 87             //    new Claim(ClaimTypes.Role,"Admin") //加入角色认证信息
 88             //};
 89             ////2.3、创建signiture
 90             //var secretByte = Encoding.UTF8.GetBytes(_configuration["Authentication:secretKey"]);
 91             //var signingKey = new SymmetricSecurityKey(secretByte);//对密码进行加密
 92             //var signingCredentials = new SigningCredentials(signingKey, signingAlgorithm); //验证加密后的私钥
 93             ////2.4、创建jwt
 94             //var token = new JwtSecurityToken(
 95             //    issuer: _configuration["Authentication:issuer"],//谁发布的
 96             //    audience: _configuration["Authentication:audience"],//发布给谁用
 97             //    claims,//payload数据
 98             //    notBefore: DateTime.UtcNow,//发布时间
 99             //    expires: DateTime.UtcNow.AddMinutes(10),//有效期10分钟
100             //    signingCredentials //数字签名
101             //    );
102             //var tokenString = new JwtSecurityTokenHandler().WriteToken(token);//转成字符串token
103             ////3、返回200 OK,回传jwt
104             //return Ok(tokenString);
105             #endregion
106         }
107
108         [AllowAnonymous] //允许匿名访问
109         [HttpPost]
110         public async Task<IActionResult> Register([FromBody] RegisterDto registerDto) //需要访问数据库用异步操作
111         {
112             //1、使用registerDto对象创建IdentityUser用户对象
113             var user = new IdentityUser()
114             {
115                 UserName = registerDto.Username
116             };
117
118             //2、使用UserManager来把密码hash加密,保存到数据库
119             var result = await _userManager.CreateAsync(user, registerDto.Password);
120             if (!result.Succeeded)
121             {
122                 return BadRequest();
123             }
124             else
125             {
126                 //3、返回200
127                 return Ok();
128             }
129         }
130     }
131 }
第二步:给需要验证的Action都加上IdentityServer的Bearer验证,关键代码 [Authorize(AuthenticationSchemes = "Bearer")] ,否则就会返回404错误。
第三步:验证一下。

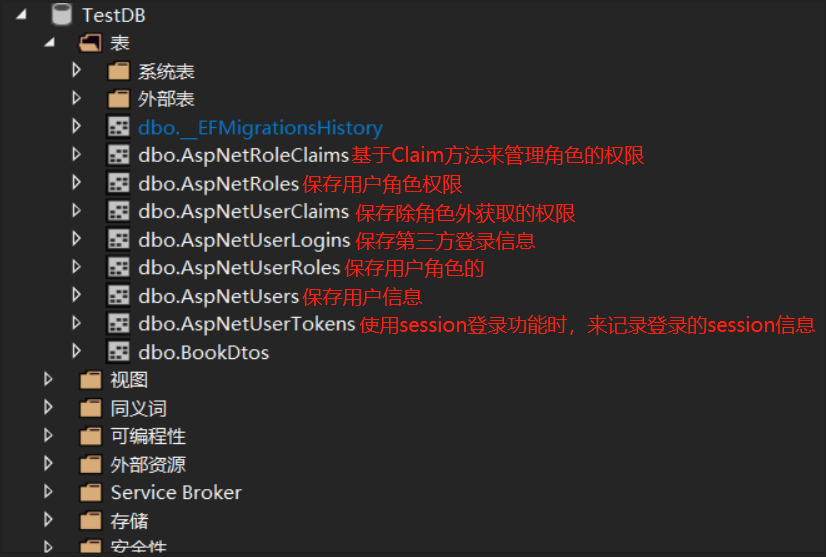
修改用户模型之前,先来介绍一下IdentityServer框架默认添加的用户数据表功能,看下图。
第一步:在项目文件夹 Models 下创建自定义用户模型ApplicationUser.cs,继承自IdentityServer框架的IdentityUser。
 1 using Microsoft.AspNetCore.Identity;
 2 using System;
 3 using System.Collections.Generic;
 4 using System.Linq;
 5 using System.Threading.Tasks;
 6
 7 namespace Demo19_IdentityServerJWT.Models
 8 {
 9     public class ApplicationUser:IdentityUser
10     {
11         public string Address { get; set; } //添加拓展的字段
12         //建立代码和模型的关系
13         public virtual ICollection<IdentityUserRole<string>> UserRoles { get; set; } //用户角色
14         public virtual ICollection<IdentityUserClaim<string>> Claims { get; set; } //用户权限声明
15         public virtual ICollection<IdentityUserLogin<string>> Logins { get; set; } //用户第三方登录信息
16         public virtual ICollection<IdentityUserToken<string>> Tokens { get; set; } //用户登录的session
17     }
18 }
第二步:把项目里使用的全部 IdentityUser类 替换成我们自定义的 ApplicationUser 类, Startup.cs 、 AppDbContext.cs 和 AuthenticateController.cs 。
第三步:更改项目文件夹 Database 下AppDbContext.cs,重写 protected override void OnModelCreating(ModelBuilder modelBuilder) 方法,加入初始化数据库代码。
 1 using Demo19_IdentityServerJWT.Models;
 2 using Microsoft.AspNetCore.Identity;
 3 using Microsoft.AspNetCore.Identity.EntityFrameworkCore;
 4 using Microsoft.EntityFrameworkCore;
 5 using System;
 6 using System.Collections.Generic;
 7 using System.Linq;
 8 using System.Threading.Tasks;
 9
10 namespace Demo19_IdentityServerJWT.Database
11 {
12     public class AppDbContext : IdentityDbContext<ApplicationUser>
13     {
14         public AppDbContext(DbContextOptions<AppDbContext> options) : base(options)
15         {
16         }
17         public DbSet<BookDto> BookDtos { get; set; }
18         protected override void OnModelCreating(ModelBuilder builder)
19         {
20             // 初始化用户与角色的种子数据
21             // 1. 更新用户ApplicationUser与角色IdentityUserRole的外键关系
22             builder.Entity<ApplicationUser>(b => {
23                 b.HasMany(x => x.UserRoles)
24                 .WithOne() //HasMany表示和一对多的关系
25                 .HasForeignKey(ur => ur.UserId) //使用IdentityUserRole的UserId作为外键
26                 .IsRequired(); //不能为空必填
27             });
28
29             // 2. 添加管理员角色
30             var adminRoleId = "308660dc-ae51-480f-824d-7dca6714c3e2"; // guid
31             builder.Entity<IdentityRole>().HasData(
32                 new IdentityRole
33                 {
34                     Id = adminRoleId,
35                     Name = "Admin",
36                     NormalizedName = "Admin".ToUpper()
37                 }
38             );
39
40             // 3. 添加用户
41             var adminUserId = "90184155-dee0-40c9-bb1e-b5ed07afc04e";
42             ApplicationUser adminUser = new ApplicationUser
43             {
44                 Id = adminUserId,
45                 UserName = "BigBox777",
46                 NormalizedUserName = "BigBox777".ToUpper(),
47                 Email = "BigBox777@donesoft.cn",
48                 NormalizedEmail = "BigBox777@donesoft.cn".ToUpper(),
49                 TwoFactorEnabled = false,
50                 EmailConfirmed = true,
51                 PhoneNumber = "13888888888",
52                 PhoneNumberConfirmed = false
53             };
54             PasswordHasher<ApplicationUser> ph = new PasswordHasher<ApplicationUser>();
55             adminUser.PasswordHash = ph.HashPassword(adminUser, "Abcdef123$");
56             builder.Entity<ApplicationUser>().HasData(adminUser);
57
58             // 4. 给用户加入管理员权限
59             // 通过使用 linking table:IdentityUserRole
60             builder.Entity<IdentityUserRole<string>>().HasData(
61                 new IdentityUserRole<string>()
62                 {
63                     RoleId = adminRoleId,
64                     UserId = adminUserId
65                 });
66             base.OnModelCreating(builder);
67         }
68     }
69 }
第四步:打开Visual Studio菜单工具=》Nuget包管理器=》程序包管理器控制台 中输入命令 EntityFrameworkCore\Enable-Migrations 打开迁移。

第五步:以上就完成了用户模型的扩展功能,可以登录测试一下。
EF数据迁移完整步骤 https://www.cnblogs.com/bigbox777/p/13907142.html