Hadoop的Compressor解压缩模块是Hadoop Common IO模块中又一大的模块。虽然说在现实生活中,我们使用压缩工具等的使用场景并不是那么多。或许在我们潜在的意识里,压缩的概念就停留在一些压缩种类上,zip,gzip,bizp等等不同类型的压缩,分别具有不同的压缩比,效率比等等。也许当你看完本篇本人对于Hadoop的压缩框架的学习之后,你一定会有所收获。
压缩对于数据的传输室至关重要的,同样对于存储来说也大大的提高了效率,在Hadoop系统中目前支持的压缩算法包括1,gzip 2.bzip 3.snappy4.default系统默认算法。这些压缩工具的体现都是通过一个叫CompressionCodec的对象来体现的。先来看看这个类:
/**
 * This class encapsulates a streaming compression/decompression pair.
 */
public interface CompressionCodec {
  CompressionOutputStream createOutputStream(OutputStream out) throws IOException;

  CompressionOutputStream createOutputStream(OutputStream out,
                                             Compressor compressor) throws IOException;

  Class<? extends Compressor> getCompressorType();

  Compressor createCompressor();

  CompressionInputStream createInputStream(InputStream in) throws IOException;

  CompressionInputStream createInputStream(InputStream in,
                                           Decompressor decompressor) throws IOException;

  Class<? extends Decompressor> getDecompressorType();

  Decompressor createDecompressor();

  String getDefaultExtension();
}1个是Compressor和Decompressor解压缩的构造,
1个是CompressionInputStream,CompressionOutputStream压缩输入输出流。
其实2者很像,因为压缩输入输出流的很多操作也是基于上面的压缩器,解压器的操作实现的。具体压缩算法的表现都是继承与这个基类。看一下比较庞大的结构图:
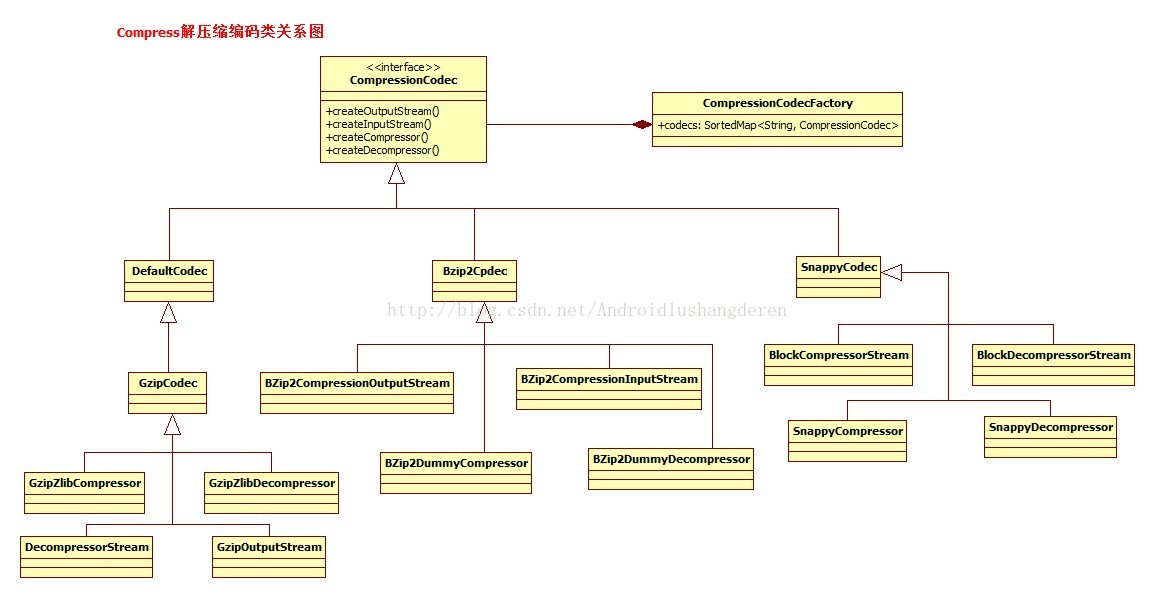
可以看到在每种Codec子类中,都会有解压缩器的实现和压缩输入输出流的构造。然后把这种压缩算法类保存在了一个Codec的工厂中,通过统一的接口调用。
public class CompressionCodecFactory {

  public static final Log LOG =
    LogFactory.getLog(CompressionCodecFactory.class.getName());

  /**
   * A map from the reversed filename suffixes to the codecs.
   * This is probably overkill, because the maps should be small, but it
   * automatically supports finding the longest matching suffix.
   * 所有的解压缩编码类放入 codecs Map图中,CompressionCodec是一个基类,
   * 允许添加上其所继承的子类
   */
  private SortedMap<String, CompressionCodec> codecs = null;
/**
   * Find the codecs specified in the config value io.compression.codecs
   * and register them. Defaults to gzip and zip.
   * 根据配置初始化压缩编码工厂,默认添加的是gzip和zip编码类
   */
  public CompressionCodecFactory(Configuration conf) {
    codecs = new TreeMap<String, CompressionCodec>();
    List<Class<? extends CompressionCodec>> codecClasses = getCodecClasses(conf);
    if (codecClasses == null) {
      //如果没有编码类的设置,则加入gzip,defaultCode
      addCodec(new GzipCodec());
      addCodec(new DefaultCodec());
    } else {
      Iterator<Class<? extends CompressionCodec>> itr = codecClasses.iterator();
      while (itr.hasNext()) {
        CompressionCodec codec = ReflectionUtils.newInstance(itr.next(), conf);
        addCodec(codec);
      }
    }
  }
 /**
   * Find the relevant compression codec for the given file based on its
   * filename suffix.
   * @param file the filename to check
   * @return the codec object
   */
  public CompressionCodec getCodec(Path file) {
    CompressionCodec result = null;
    if (codecs != null) {
      String filename = file.getName();
      String reversedFilename = new StringBuffer(filename).reverse().toString();
      SortedMap<String, CompressionCodec> subMap =
        codecs.headMap(reversedFilename);
      if (!subMap.isEmpty()) {
        String potentialSuffix = subMap.lastKey();
        //根据比对名字,从codecs Map中取出对应的CompressionCodec
        if (reversedFilename.startsWith(potentialSuffix)) {
          result = codecs.get(potentialSuffix);
        }
      }
    }
    return result;
  }
/**
 * Specification of a stream-based 'compressor' which can be
 * plugged into a {@link CompressionOutputStream} to compress data.
 * This is modelled after {@link java.util.zip.Deflater}
 *
 */
public interface Compressor {
  /**
   * Sets input data for compression.
   * This should be called whenever #needsInput() returns
   * <code>true</code> indicating that more input data is required.
   * 输入待压缩的数据
   *
   * @param b Input data
   * @param off Start offset
   * @param len Length
   */
  public void setInput(byte[] b, int off, int len);

  /**
   * Returns true if the input data buffer is empty and
   * #setInput() should be called to provide more input.
   * 判断缓冲区中能否再输入数据
   *
   * @return <code>true</code> if the input data buffer is empty and
   * #setInput() should be called in order to provide more input.
   */
  public boolean needsInput();

  /**
   * Sets preset dictionary for compression. A preset dictionary
   * is used when the history buffer can be predetermined.
   *
   * @param b Dictionary data bytes
   * @param off Start offset
   * @param len Length
   */
  public void setDictionary(byte[] b, int off, int len);

  /**
   * Return number of uncompressed bytes input so far.
   * 返回未压缩的数据的字节长度
   */
  public long getBytesRead();

  /**
   * Return number of compressed bytes output so far.
   * 返回已压缩字节的大小
   */
  public long getBytesWritten();

  /**
   * When called, indicates that compression should end
   * with the current contents of the input buffer.
   * 代表输入的结束
   */
  public void finish();

  /**
   * Returns true if the end of the compressed
   * data output stream has been reached.
   * @return <code>true</code> if the end of the compressed
   * data output stream has been reached.
   * 判断压缩器中还有没有未取出的压缩后的数据
   */
  public boolean finished();

  /**
   * Fills specified buffer with compressed data. Returns actual number
   * of bytes of compressed data. A return value of 0 indicates that
   * needsInput() should be called in order to determine if more input
   * data is required.
   * 压缩处理方法,将输入的压缩数据压缩处理后输出到传入的输出缓冲中
   *
   * @param b Buffer for the compressed data
   * @param off Start offset of the data
   * @param len Size of the buffer
   * @return The actual number of bytes of compressed data.
   */
  public int compress(byte[] b, int off, int len) throws IOException;

  /**
   * Resets compressor so that a new set of input data can be processed.
   * 压缩器重置方法
   */
  public void reset();

  /**
   * Closes the compressor and discards any unprocessed input.
   * 关闭压缩器,一般在结束的时候调用
   */
  public void end();

  /**
   * Prepare the compressor to be used in a new stream with settings defined in
   * the given Configuration
   * 根据配置重新初始化压缩器的实现
   *
   * @param conf Configuration from which new setting are fetched
   */
  public void reinit(Configuration conf);
}
public class ZlibCompressor implements Compressor {
  //默认的缓冲区64k
  private static final int DEFAULT_DIRECT_BUFFER_SIZE = 64*1024;

  // HACK - Use this as a global lock in the JNI layer
  private static Class clazz = ZlibCompressor.class;

  private long stream;

  /**
   * 定义了压缩水平,可以是无损压缩,可以是追求效率的快速的压缩等等类型
   */
  private CompressionLevel level;

  /**
   * 定义了压缩策略,有比如常见的哈弗曼编码方式,filterd方式,或者其他
   */
  private CompressionStrategy strategy;

  /**
   * 定于了压缩的头部格式信息,比如一般前面都会有个checksum校验和的信息,当然可以选择NO_HEAEDER
   */
  private final CompressionHeader windowBits;
  private int directBufferSize;
  private byte[] userBuf = null;
  private int userBufOff = 0, userBufLen = 0;
  //未压缩的缓冲
  private Buffer uncompressedDirectBuf = null;
  private int uncompressedDirectBufOff = 0, uncompressedDirectBufLen = 0;
  //已压缩缓冲数据
  private Buffer compressedDirectBuf = null;
  //输入结束标识,压缩结束标识
  private boolean finish, finished;
/**
   * Creates a new compressor with the default compression level.
   * Compressed data will be generated in ZLIB format.
   * 默认构造出压缩器,压缩水平,策略等都是默认值
   */
  public ZlibCompressor() {
    this(CompressionLevel.DEFAULT_COMPRESSION,
         CompressionStrategy.DEFAULT_STRATEGY,
         CompressionHeader.DEFAULT_HEADER,
         DEFAULT_DIRECT_BUFFER_SIZE);
  }
public ZlibCompressor(CompressionLevel level, CompressionStrategy strategy,
                        CompressionHeader header, int directBufferSize) {
    this.level = level;
    this.strategy = strategy;
    this.windowBits = header;
    stream = init(this.level.compressionLevel(),
                  this.strategy.compressionStrategy(),
                  this.windowBits.windowBits());

    //设置直接缓冲区的大小为64*1024个字节
    this.directBufferSize = directBufferSize;
    //申请2个一样大小的64k的缓冲区
    uncompressedDirectBuf = ByteBuffer.allocateDirect(directBufferSize);
    compressedDirectBuf = ByteBuffer.allocateDirect(directBufferSize);
    //把压缩缓冲的位置挪到最后面
    compressedDirectBuf.position(directBufferSize);
}下面是一个压缩器中的压缩步骤
1.调用setInput()向里面输入待压缩数据
2.调用needsInput()判断是否能够输入,如果不能输入,则调用Compress取出已压缩的数据,才能再次输入数据
3.执行上述2步骤直到全部输入数据,调用finish(),代表输入结束
4.最后调用Compress连续取出压缩好的数据直到调用finished()方法判断已压缩缓冲中无数据了。
下面是一个流程图
流程搞清楚了之后,我们才能知道里面到底是怎么做的。首先setInput()方法,

public synchronized void setInput(byte[] b, int off, int len) {
    if (b== null) {
      throw new NullPointerException();
    }
    if (off < 0 || len < 0 || off > b.length - len) {
      throw new ArrayIndexOutOfBoundsException();
    }

    //设置用户缓冲数据变量
    this.userBuf = b;
    this.userBufOff = off;
    this.userBufLen = len;
    setInputFromSavedData();

    // Reinitialize zlib's output direct buffer
    //重新初始化已压缩缓冲的位置
    compressedDirectBuf.limit(directBufferSize);
    compressedDirectBuf.position(directBufferSize);
  }
synchronized void setInputFromSavedData() {
    uncompressedDirectBufOff = 0;
    //更新未压缩缓冲数据的长度为用户buf的长度
    uncompressedDirectBufLen = userBufLen;
    if (uncompressedDirectBufLen > directBufferSize) {
      //如果超过最大值,则变为最大值
      uncompressedDirectBufLen = directBufferSize;
    }

    // Reinitialize zlib's input direct buffer
    uncompressedDirectBuf.rewind();
    //将用户数据存入uncompressedDirectBuf
    ((ByteBuffer)uncompressedDirectBuf).put(userBuf, userBufOff,
                                            uncompressedDirectBufLen);

    // Note how much data is being fed to zlib
    //加上用户缓冲区的偏移量
    userBufOff += uncompressedDirectBufLen;
    //减少用户缓冲区的数据长度
    userBufLen -= uncompressedDirectBufLen;
  }
public boolean needsInput() {
    // Consume remaining compressed data?
    if (compressedDirectBuf.remaining() > 0) {
      //如果已压缩缓冲区中有数据,必须先取出其中的数据,才能输入
      return false;
    }

    // Check if zlib has consumed all input
    if (uncompressedDirectBufLen <= 0) {
      //判断未压缩缓冲的大小是否小于等于0
      // Check if we have consumed all user-input
      if (userBufLen <= 0) {
    	//判断之前用户的缓冲数据都已经出来完毕了
        return true;
      } else {
        setInputFromSavedData();
      }
    }

    return false;
}下面是finish()代表输入的结束标记,操作很简单:
public synchronized void finish() {
	//输入结束标识改为true
    finish = true;
  }
public synchronized int compress(byte[] b, int off, int len)
    throws IOException {
    if (b == null) {
      throw new NullPointerException();
    }
    if (off < 0 || len < 0 || off > b.length - len) {
      throw new ArrayIndexOutOfBoundsException();
    }

    int n = 0;

    // Check if there is compressed data
    //判断已压缩缓冲区中是否还有数据
    n = compressedDirectBuf.remaining();
    if (n > 0) {
      n = Math.min(n, len);
      //取出放入传入的输出缓冲中
      ((ByteBuffer)compressedDirectBuf).get(b, off, n);
      return n;
    }

    // Re-initialize the zlib's output direct buffer
    //如果已压缩缓冲中没有数据了,重新设置compressedDirectBuf
    compressedDirectBuf.rewind();
    compressedDirectBuf.limit(directBufferSize);

    // Compress data
    //调用压缩数据的native方法,最后未压缩的数据就会被压缩后转入已压缩的缓冲中
    n = deflateBytesDirect();
    compressedDirectBuf.limit(n);

    // Get atmost 'len' bytes
    n = Math.min(n, len);
    //将此时压缩好后的数据再从已压缩缓冲中取出
    ((ByteBuffer)compressedDirectBuf).get(b, off, n);

    return n;
}1.如果已压缩缓冲区中还有数据,先取出compressedDirectBuf到输出缓冲中,就是传入的b中,操作结束
2.如果已压缩缓冲区中没有数据,则会deflateBytesDirect()调用方法压缩数据,然后再执行1操作,取出缓冲数据,操作结束
我们找到关键的deflateBytesDirect方法,发现如下:
private native static void initIDs();
  private native static long init(int level, int strategy, int windowBits);
  private native static void setDictionary(long strm, byte[] b, int off,
                                           int len);
  private native int deflateBytesDirect();
  private native static long getBytesRead(long strm);
  private native static long getBytesWritten(long strm);
  private native static void reset(long strm);
  private native static void end(long strm);
发现了一堆的native的方法,也就是说,这些更加底层的实现是通过JNI的方式被调用的,但是我们基本能猜到,在这个方法里就是2个缓冲区方法的压缩转移处理。最后一个方法是判断是否结束方法
public synchronized boolean finished() {
    // Check if 'zlib' says its 'finished' and
    // all compressed data has been consumed
	//判断压缩过程是佛结束,判断已压缩缓冲中是否还有未取出的数据
    return (finished && compressedDirectBuf.remaining() == 0);
  }
以上就是压缩操作的主要步骤,解压操作思路类似,不展开分析了。