教材学习内容总结
学习目标
- 理解流与IO
- 理解InputStream/OutPutStream的继承架构
- 理解Reader/Writer继承架构
- 会使用装饰类
- 会使用多线程进行并发程序设计
第十章 输入、输出
首先掌握父类中方法,核心类如下:

InputStream与OutputStream
串流设计的概念
-
java将输入输出抽象化为串流,数据有来源及目的地,衔接两者的是串流对象
-
从应用程序角度来看,如果要将数据从来源取出,可以使用输入串流(java.io.InputStream 实例),如果要将数据写入目的地,可以使用输出串流(java.io.OutputStream 实例)
* 通用的 dump() 方法:
package week06;

import java.io.*;

public class IO {
    public static void dump(InputStream src, OutputStream dest)
                               throws IOException {
        try (InputStream input = src; OutputStream output = dest) {
            byte[] data = new byte[1024];
            int length;
            while ((length = input.read(data)) != -1) {
                output.write(data, 0, length);
            }
        }
    }
}
•read():InputStream 的 read() 方法,每次会尝试读入 byte 数组的数据,并返回实际读入的字节,只要不是 -1,就表示读取到数据
•write():OutputStream 的 write() 方法,指定要写出的 byte 数组、初始索引与数据长度
•将某个文档读入并另存为另一个文档:
package week06;

import java.io.*;

public class Copy {
    public static void main(String[] args) throws IOException {
        IO.dump(
              new FileInputStream(args[0]),
              new FileOutputStream(args[1])
        );
    }
}
•dump 方法另存文档:
package week06;

import java.io.*;
import java.net.URL;

public class Download {
    public static void main(String[] args) throws IOException {
        URL url = new URL(args[0]);
        InputStream src = url.openStream();
        OutputStream dest = new FileOutputStream(args[1]);
        IO.dump(src, dest);
    }
}
串流继承架构
-
System.in:文本模式下取得整行用户输入
-
System.err:标准错误输出串流,用来立即显示错误信息
-
System.setErr:重新指定标准错误输出串流
-
setIn():使用 setIn() 方法指定 InputStream 实例,重新指定标准输入来源
-
setOut():使用 setOut() 方法指定 PrintStream 实例,将结果输出至指定的目的地
-
FileInputStream:可以指定文件名创建实例,一旦创建文档就开启,接着就可用来读取数据,主要操作 InputStream 的 read() 抽象方法,使之可以从文档中读取数据
-
FileOutputStream:可以指定文件名创建实例,一旦创建文档就开启,接着就可用来写出数据,主要操作 InputStream 的 write() 抽象方法,使之可以写出数据至文档
-
ByteArrayInputStream:可以指定 byte 数组创建实例,一旦创建就可将 byte 数组当作数据源进行读取,主要操作了 InputStream 的 read() 抽象方法,使之可从 byte 数组中读取数据
-
ByteArrayOutputStream:可以指定 byte 数组创建实例,一旦创建就可将 byte 数组当作目的地写出数据,主要操作了 OutputStream 的 write() 抽象方法,使之可写出数据至 byte 数组
串流处理装饰器
BufferedInputStream与BufferedOutputStream:主要在内部提供缓冲区功能,例:
package week06;

import java.io.*;

public class BufferedIO {
    public static void dump(InputStream src, OutputStream dest)
                              throws IOException {
        try(InputStream input = new BufferedInputStream(src);
             OutputStream output = new BufferedOutputStream(dest)) {
            byte[] data = new byte[1024];
            int length;
            while ((length = input.read(data)) != -1) {
                output.write(data, 0, length);
            }
        }
    }
}
•DataInputStream与DataOutputStream:装饰InputStream、OutputStream、DataInputStream、DataOutputStream 提供读取、写入 java 基本数据类型的方法,例:
package week06;

import java.io.*;

public class Member {
    private String number;
    private String name;
    private int age;

    public Member(String number, String name, int age) {
        this.number = number;
        this.name = name;
        this.age = age;
    }

    public String getNumber() {
        return number;
    }

    public void setNumber(String number) {
        this.number = number;
    }

    public String getName() {
        return name;
    }

    public void setName(String name) {
        this.name = name;
    }

    public int getAge() {
        return age;
    }

    public void setAge(int age) {
        this.age = age;
    }

    @Override
    public String toString() {
        return String.format("(%s, %s, %d)", number, name, age);
    }

    public void save() throws IOException {
        try(DataOutputStream output =
                new DataOutputStream(new FileOutputStream(number))) {
            output.writeUTF(number);
            output.writeUTF(name);
            output.writeInt(age);
        }
    }

    public static Member load(String number) throws IOException {
        Member member;
        try(DataInputStream input =
                new DataInputStream(new FileInputStream(number))) {
            member = new Member(
                    input.readUTF(), input.readUTF(), input.readInt());
        }
        return member;
    }
}
•ObjectInputStream与ObjectOutputStream:ObjectInputStream 提供 readObject() 方法将数据读入为对象,ObjectOutputStream提供writeObject() 方法将对象写至目的地,例:
package week06;

import java.io.*;

public class Member2 implements Serializable {
    private String number;
    private String name;
    private int age;

    public Member2(String number, String name, int age) {
        this.number = number;
        this.name = name;
        this.age = age;
    }

    public String getNumber() {
        return number;
    }

    public void setNumber(String number) {
        this.number = number;
    }

    public String getName() {
        return name;
    }

    public void setName(String name) {
        this.name = name;
    }

    public int getAge() {
        return age;
    }

    public void setAge(int age) {
        this.age = age;
    }

    @Override
    public String toString() {
        return String.format("(%s, %s, %d)", number, name, age);
    }

    public void save() throws IOException {
        try(ObjectOutputStream output =
                new ObjectOutputStream(new FileOutputStream(number))) {
            output.writeObject(this);
        }
    }

    public static Member2 load(String number)
                    throws IOException, ClassNotFoundException {
        Member2 member;
        try(ObjectInputStream input =
                new ObjectInputStream(new FileInputStream(number))) {
            member = (Member2) input.readObject();
        }
        return member;
    }
}
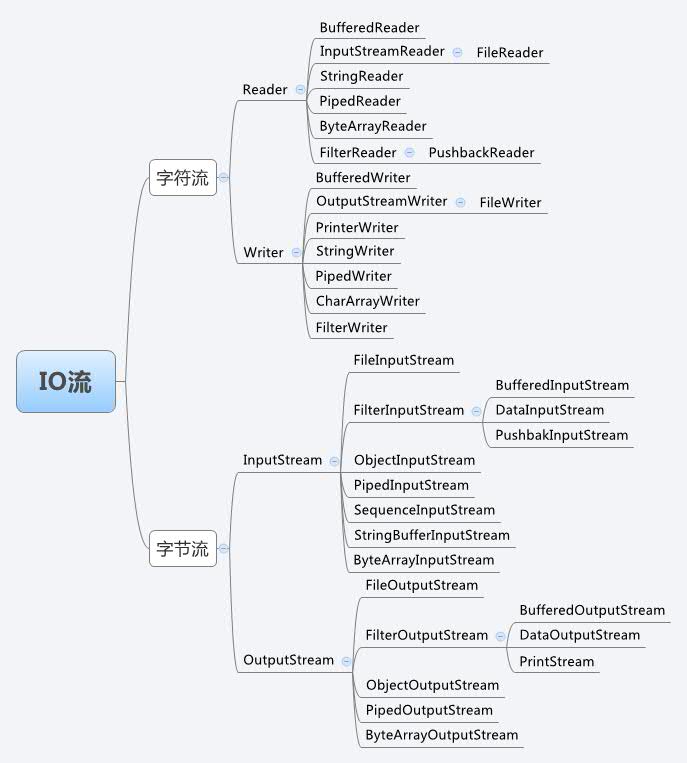
字符处理类
-
Reader与Writer 继承架构
-
针对字符数据的读取,Java SE 提供了
java.io.Reader类,其抽象化了字符数据读入的来源 -
针对字符数据的写入,Java SE 提供了
java.io.Writer类,其抽象化了数据写出的目的地 -
使用
CharUtil.dump()方法从来源读入字符数据、将字符数据写至目的地:
package week06;

import java.io.*;

public class CharUtil {
    public static void dump(Reader src, Writer dest) throws IOException {
        try(Reader input = src; Writer output = dest) {
            char[] data = new char[1024];
            int length;
            while((length = input.read(data)) != -1) {
                output.write(data, 0, length);
            }
        }
    }
}
•read():每次从Reader 读入的数据,都会先置入 char 数组中,Reader 的 read() 方法,每次会尝试读入 char 数组长度的数据,并返回实际读入的字符数,只要不是-1,就表示读取到字符
•write():使用 write() 方法,指定要写出的 byte 数组、初始索引与数据长度
•使用CharUtil.dump() 读入文档、转为字符串并显示在文本模式中:
package week06;

import java.io.*;

public class CharUtilDemo {
    public static void main(String[] args) throws IOException {
        FileReader reader = new FileReader(args[0]);
        StringWriter writer = new StringWriter();
        CharUtil.dump(reader, writer);
        System.out.println(writer.toString());
    }
}
•字符处理装饰器
•InputStreamReader 与 OutputStreamWriter:可对串流数据打包
•BufferedReader 与BufferedWriter:可对Reader、Writer 提供缓冲区作用,在处理字符输入输出时,对效率也会有所帮助
•PrintWriter:可对 OutputStream、Writer 进行打包,提供 print()、println()、format() 方法
第十一章 线程与并行API
线程
线程
•单线程程序:启动的程序从 main() 程序进入点开始至结束只有一个流程
•多线程程序:程序有多个流程
•在 java 中,从 main() 开始的流程会由主线程执行:
package week06;

public class TortoiseHareRace2 {
    public static void main(String[] args) {
        Tortoise tortoise = new Tortoise(10);
        Hare hare = new Hare(10);
        Thread tortoiseThread = new Thread(tortoise);
        Thread hareThread = new Thread(hare);
        tortoiseThread.start();
        hareThread.start();
    }
}
结果如下:

•在以上程序中,主线程执行 main() 定义的流程,main() 定义的流程中建立了 tortoiseThread 与 hareThread 两个线程,这两个线程会分别执行 Tortoise 与 Hare() 的 run() 定义的流程,要启动线程执行指定流程,必须调用 Thread 实例的 start() 方法
•Thread 与 Runnable
•Thread:如果想要加装主线程,就要创建 Thread 实例,要启动额外的主线程就是调用 Thread 实例的 start() 方法
•额外线程执行流程的进入点,有两种方式:
   •可以定义在 Runnable 的 run() 方法中

   •继承 Thread 类,重新定义 run() 方法
•在 java 中,任何线程可执行的流程都要定义在 Runnable 的 run() 方法,Thread 类本身也操作了 Runnable 接口,run() 方法的操作如下:
@Override
public void run(){
    if(target != null){
       target.run();
    }
}
•线程生命周期
•Daemon 线程
  •主线程会从 main() 方法开始执行,直到 main() 方法结束后停止 JVM

  •如果主线程中启动了额外线程,默认会等待被启动的所有线程都执行完 run() 方法才中止 JVM

  •如果一个 Thread 被标示为 Daemon 线程,在所有的非 Daemon 线程都结束时,JVM 自动就会终止

  •从 main() 方法开始的就是一个非 Daemin 线程,可以使用 setDaemon() 方法来设定一个线程是否为 Daemon 线程,例:
package week06;

public class DaemonDemo {

    public static void main(String[] args) {
        Thread thread = new Thread(() -> {
            while (true) {
                System.out.println("Orz");
            }
        });
        // thread.setDaemon(true);
        thread.start();
    }
}
•使用 isDaemon() 方法可以判断线程是否为 Daemon 线程
•Thread 基本状态图
  •在调用 Thread 实例 start() 方法后,基本状态为可执行(Runnable)、被阻断(Blocked)、执行中(Running)

  •状态间的转移如下图:
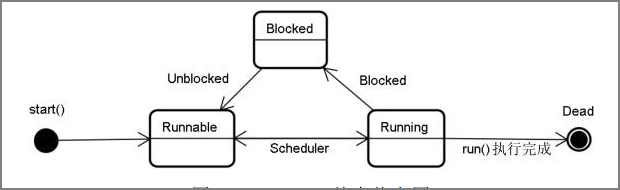
  •线程看起来像是同时执行,但事实上同一时间点上,一个 CPU 只能执行一个线程,只是 CPU 会不断切换线程,且切换动作很快,所以看起来像是同时执行

  •setPriority():线程有其优先权,可使用 Thread 的 setPriority() 方法设定优先权,可设定值为1到10,默认是5,超出1到10外的设定值会抛出 IllegalArgumentException

  •数字越大优先权越高,排版器越优先排入 CPU,如果优先权相同,则输流执行

  •改进效能的方式:运用多线程,当某线程进入 Blocked 时,让另一线程排入 CPU 执行,避免 CPU 空闲下来

  •interrupt():一个进入 Blocked 状态的线程,可以由另一个线程调用,该线程的 interrupt() 方法,让它离开 Blocked 状态,例:
package week06;

public class InterruptedDemo {

    public static void main(String[] args) {
        Thread thread = new Thread(() -> {
            try {
                Thread.sleep(99999);
            } catch (InterruptedException ex) {
                System.out.println("我醒了XD");
            }
        });
        thread.start();
        thread.interrupt(); // 主线程调用thread的interrupt()
    }
}
•安插线程
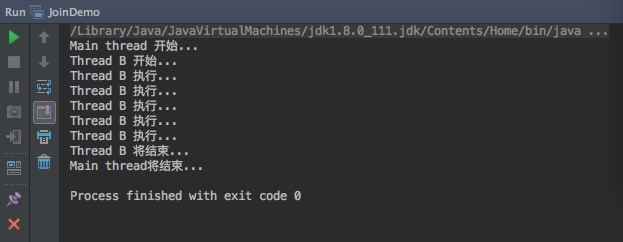
•join():如果A线程正在运行,流程中允许B线程加入,等到B线程执行完毕后再继续A线程流程,则可以使用 join() 方法完成这个需求,例:
package cc.openhome;

import static java.lang.System.out;

public class JoinDemo {

    public static void main(String[] args) throws InterruptedException {
        out.println("Main thread 开始...");

        Thread threadB = new Thread(() -> {
            out.println("Thread B 开始...");
            for (int i = 0; i < 5; i++) {
                out.println("Thread B 执行...");
            }
            out.println("Thread B 将结束...");
        });

        threadB.start();
        threadB.join(); // Thread B 加入 Main thread 流程

        out.println("Main thread将结束...");
    }
}
运行结果如下:
•停止线程
  •线程完成 run() 方法后,就会进入 Dead ,进入 Dead 的线程不可以再次调用 start() 方法,否则会抛出 IllegalThreadStateException

  •如果要停止线程,最好自行操作,让线程跑完应有的流程,而非调用 Thread 的 stop() 方法

  •stop():直接调用 Thread 的 stop() 方法,将不理会所设定的释放、取得锁定流程,线程会直接释放所有已锁定对象,这有可能使对象陷入无法预期状态
•ThreadGroup
•每个线程都属于某个线程群组
•每个线程产生时,都会归入某个线程群组,这视线程在那个群组中产生,如果没有指定,则归入产生该子线程的线程群组,也可以自行指定线程群组,线程一旦归入某个群组,就无法再更换
•java.lang.ThreadGroup:管理群组中的线程,可以使用以下方式产生群组,并在产生线程时指定所属群组:
ThreadGroup group1 = new ThreadGroup("group1");
ThreadGroup group2 = new ThreadGroup("group2");
Thread thread1 = new Thread(group1,"group1's member");
Thread thread2 = new Thread(group2,"group2's member");
•interrupt():中断群组中所有线程
•setMaxpriority():设定群组中所有线程最大优先权(本来就有更高优先权的线程不受影响)
•enumerate():一次取得群组中所有线程:
Thread[] threads = new Thread[threadGroup1.activeCount()];
threadGroup1.enumerate(threads);
•activeCount():取得群组的线程数量,enumerate() 方法要传入 Thread 数组,这会将线程对象设定至每个数组索引
•uncaughtException():群组中某个线程发生异常而未捕捉时,JVM 会调用此方法进行处理。如果 ThreadGroup 有父 ThreadGroup,就会调用父 ThreadGroup 的 uncaughtException() 方法,否则看看异常是否为 ThreadDeath 实例,若是则什么都不做,若不是则调用异常的 printStrackTrace(),如果必须定义 ThreadGroup 中的线程异常处理行为,可重新定义此方法,例:
package week06;

public class ThreadGroupDemo {

    public static void main(String[] args) {
        ThreadGroup group = new ThreadGroup("group") {
            @Override
            public void uncaughtException(Thread thread, Throwable throwable) {
                System.out.printf("%s: %s%n",
                        thread.getName(), throwable.getMessage());
            }
        };

        Thread thread = new Thread(group, () -> {
            throw new RuntimeException("测试异常");
        });

        thread.start();
    }
}
•uncaughtException() 方法第一个参数可取得发生异常的线程实例,第二个参数可取得异常对象
•在JDK5 之后,如果 ThreadGroup 中的线程发生异常,uncaughtException() 方法处理顺序为:
  •如果 ThreadGroup 有父 ThreadGroup,就会调用父 ThreadGroup 的 uncaughtException() 方法

  •否则,看看 Thread 是否使用 setUncaughtExceptionHandler() 方法设定 Thread.Uncaught-ExceptionHandler 实例,有的话就会调用其 uncaughtException() 方法

  •否则,看看异常是否为 ThreadDeath 实例,若“是”则什么都不做,若“否”则调用异常的 printfStractTrace()
•对于线程本身未捕捉的异常,可以自行指定处理方式,例:
package week06;

public class ThreadGroupDemo2 {

    public static void main(String[] args) {
        ThreadGroup group = new ThreadGroup("group");

        Thread thread1 = new Thread(group, () -> {
            throw new RuntimeException("thread1 测试例外");
        });
        thread1.setUncaughtExceptionHandler((thread, throwable) -> {
            System.out.printf("%s: %s%n",
                    thread.getName(), throwable.getMessage());
        });

        Thread thread2 = new Thread(group, () -> {
            throw new RuntimeException("thread2 测试异常");
        });

        thread1.start();
        thread2.start();
    }
}
•synchronized 与 volatile
•synchronized
   •每个对象都会有个内部锁定,或称为监控锁定。被标示为 synchronized 的区块将会被监控,任何线程要执行 synchronized 区块都必须先取得指定的对象锁定

   •如果在方法上标示 synchronized,则执行方法必须取得该实例的锁定

   •线程若因尝试执行 synchronized 区块而进入 Blocked,在取得锁定之后,会先回到 Runnable 状态,等待 CPU 排版器排入 Running 状态

   •java的 synchronized 提供的是可重入同步,也就是线程取得某对象锁定后,若执行过程中又要执行 synchronized,尝试取得锁定的对象来源又是同一个,则可以直接执行

   •有些资源在多线程下彼此交叉取用,有可能造成死结,例:
package week06;

class Resource {
    private String name;
    private int resource;

    Resource(String name, int resource) {
        this.name = name;
        this.resource = resource;
    }

    String getName() {
        return name;
    }

    synchronized int doSome() {
        return ++resource;
    }

    synchronized void cooperate(Resource resource) {
        resource.doSome();
        System.out.printf("%s 整合 %s 的资源%n",
                this.name, resource.getName());
    }
}

public class DeadLockDemo {
    public static void main(String[] args) {
        Resource resource1 = new Resource("resource1", 10);
        Resource resource2 = new Resource("resource2", 20);

        Thread thread1 = new Thread(() -> {
            for (int i = 0; i < 10; i++) {
                resource1.cooperate(resource2);
            }
        });
        Thread thread2 = new Thread(() -> {
            for (int i = 0; i < 10; i++) {
                resource2.cooperate(resource1);
            }
        });

        thread1.start();
        thread2.start();
    }
}
•volatile
  •synchronized 要求达到的所标示区块的互斥性与可见性,互斥性是指 synchronized 区块同时间只能有一个线程,可见性是指线程离开 synchronized 区块后,另一线程接触到的就是上一线程改变后的对象状态

  •在java中对于可见性的要求,可以使用 volatile 达到变量范围,例:
package cc.openhome;

class Variable1 {
    static int i = 0, j = 0;

    static void one() {
        i++;
        j++;
    }

    static void two() {
        System.out.printf("i = %d, j = %d%n", i, j);
    }
}

public class Variable1Test {
    public static void main(String[] args) {
        Thread thread1 = new Thread(() -> {
            while (true) {
                Variable1.one();
            }
        });
        Thread thread2 = new Thread(() -> {
            while (true) {
                Variable1.two();
            }
        });

        thread1.start();
        thread2.start();
    }
}
•可以在变量上声明 volatile,表示变量是不稳定的、易变的,也就是可能在多线程下存取,这保证变量的可见性,也就是若有线程变动了变量值,另一线程一定可以看到变更。被标示为 volatile 的变量,不允许线程快取,变量值的存取一定是在共享内存中进行,如:
package week06;

class Variable3 {
    volatile static int i = 0, j = 0;

    static void one() {
        i++;
        j++;
    }

    static void two() {
        System.out.printf("i = %d, j = %d%n", i, j);
    }
}

public class Variable3Test {
    public static void main(String[] args) {
        Thread thread1 = new Thread(() -> {
            while (true) {
                Variable3.one();
            }
        });
        Thread thread2 = new Thread(() -> {
            while (true) {
                Variable3.two();
            }
        });
        thread1.start();
        thread2.start();
    }
}
•volatile 保证的是单一变数的可见性,线程对变量的存取一定是在共享内存中,不会在自己的内存空间中快取变量,线程对共享内存中变量的存取,另一线程一定看得到
•等待与通知
•wait()、notify()、notifyAll() 是 Object 定义的方法,可以通过这三个方法控制线程释放对象的锁定,或者通知线程参与锁定竞争
•wait():执行 synchronized 范围的程序代码期间,若要调用锁定对象的 wait() 方法,线程会释放对象锁定,并进入对象等待集合而处于阻断状态,其他线程可以竞争对象锁定,取得锁定的线程可以执行 synchronized 范围的程序代码。wait() 可以指定等待时间,时间到之后线程会再次加入排班,如果指定时间0或不指定,则线程会持续等待,只到被中断或是告知可以参与排班
•noyify():被竞争锁定的对象调用 noyify() 时,会从对象等待集合中随机通知一个线程加入排班,再次执行 synchronized 前,被通知的线程会与其他线程共同竞争对象锁定
•notifyAll():如果调用 notifyAll(),所有等待集合中的线程都会被通知参与排班,这些线程会与其他线程共同竞争对象锁定
并行API
•Lock、ReadWriteLock 与 Condition
•Lock
•Lock 接口主要操作类之一为 ReentrantLock,可以达到synchronized 的作用,也提供额外的功能,例:
package week06;

import java.util.Arrays;
import java.util.concurrent.locks.*;

public class ArrayList<E> {
    private Lock lock = new ReentrantLock();
    private Object[] elems;
    private int next;

    public ArrayList(int capacity) {
        elems = new Object[capacity];
    }

    public ArrayList() {
        this(16);
    }

    public void add(E elem) {
        lock.lock();
        try {
            if (next == elems.length) {
                elems = Arrays.copyOf(elems, elems.length * 2);
            }
            elems[next++] = elem;
        } finally {
            lock.unlock();
        }
    }

    public E get(int index) {
        lock.lock();
        try {
            return (E) elems[index];
        } finally {
            lock.unlock();
        }
    }

    public int size() {
        lock.lock();
        try {
            return next;
        } finally {
            lock.unlock();
        }
    }
}
  •想要锁定 Lock 对象,可以调用其 lock 方法,只有取得 Lock 对象锁定的线程,才可以继续往后执行程序代码,要接触锁定,可以调用 Lock 对象的 unlock()

  •Lock 接口还定义了tryLock() 方法,如果线程调用 tryLock() 可以取得锁定会返回 true,若无法取得锁定并不会发生阻断,而是返回 false,例:
package week06;

import java.util.concurrent.locks.*;

class Resource {
    private ReentrantLock lock = new ReentrantLock();
    private String name;

    Resource(String name) {
        this.name = name;
    }

    void cooperate(Resource res) {
        while (true) {
            try {
                if (lockMeAnd(res)) {
                    System.out.printf("%s 整合 %s 的资源%n", this.name, res.name);
                    break;
                }
            } finally {
                unLockMeAnd(res);
            }
        }
    }

    private boolean lockMeAnd(Resource res) {
        return this.lock.tryLock() && res.lock.tryLock();
    }

    private void unLockMeAnd(Resource res) {
        if (this.lock.isHeldByCurrentThread()) {
            this.lock.unlock();
        }
        if (res.lock.isHeldByCurrentThread()) {
            res.lock.unlock();
        }
    }
}

public class NoDeadLockDemo {

    public static void main(String[] args) {
        Resource res1 = new Resource("resource1");
        Resource res2 = new Resource("resource2");

        Thread thread1 = new Thread(() -> {
            for (int i = 0; i < 10; i++) {
                res1.cooperate(res2);
            }
        });
        Thread thread2 = new Thread(() -> {
            for (int i = 0; i < 10; i++) {
                res2.cooperate(res1);
            }
        });

        thread1.start();
        thread2.start();
    }
}
•ReadWriteLock
  •ReadWriteLock 接口定义了读取锁定与写入锁定行为,可以使用 readLock()、writeLock() 方法返回 Lock 操作对象

  •ReentrantReadWriteLock.ReadLock 操作了Lock 接口,调用其 lock() 方法时,若没有任何 ReentrantReadWriteLock.WriteLock 调用过 lock() 方法,也就是没有任何写入锁定时,就可以取得读取锁定

  •ReentrantReadWriteLock.WriteLock 操作了 Lock 接口,调用其 lock() 方法时,若没有任何 ReentrantReadWriteLock.ReadLock 或 ReentrantReadWriteLock.WriteLock 调用过 lock() 方法,也就是没有任何读取或写入锁定时,才可以取得写入锁定
•StampedLock
•StampedLock:支持乐观读取操作,例:
package week06;

import java.util.Arrays;
import java.util.concurrent.locks.*;

public class ArrayList3<E> {
    private StampedLock lock = new StampedLock();
    private Object[] elems;
    private int next;

    public ArrayList3(int capacity) {
        elems = new Object[capacity];
    }

    public ArrayList3() {
        this(16);
    }

    public void add(E elem) {
        long stamp = lock.writeLock();
        try {
            if (next == elems.length) {
                elems = Arrays.copyOf(elems, elems.length * 2);
            }
            elems[next++] = elem;
        } finally {
            lock.unlockWrite(stamp);
        }
    }

    public E get(int index) {
        long stamp = lock.tryOptimisticRead();
        Object elem = elems[index];
        if (!lock.validate(stamp)) {
            stamp = lock.readLock();
            try {
                elem = elems[index];
            } finally {
                lock.unlockRead(stamp);
            }
        }
        return (E) elem;
    }

    public int size() {
        long stamp = lock.tryOptimisticRead();
        int size = next;
        if (!lock.validate(stamp)) {
            stamp = lock.readLock();
            try {
                size = next;
            } finally {
                lock.unlockRead(stamp);
            }
        }
        return size;
    }
}
•validate():验证戳记是不是被其他排他性锁定取得了,如果是的话返回 false,如果戳记是 0 也会返回 false
•Condition
  •Condition 接口用来搭配 Lock,最基本的用法就是达到 Object 的 wait()、notify()、notifyAll() 方法的作用

  •Condition 使用样例:
package week06;

import java.util.concurrent.locks.Condition;
import java.util.concurrent.locks.Lock;
import java.util.concurrent.locks.ReentrantLock;

public class Clerk {
    private int product = -1;
    private Lock lock = new ReentrantLock();
    private Condition condition = lock.newCondition();

    public void setProduct(int product) throws InterruptedException {
        lock.lock();
        try {
            waitIfFull();
            this.product = product;
            System.out.printf("生产者设定 (%d)%n", this.product);
            condition.signal();
        } finally {
            lock.unlock();
        }
    }

    private void waitIfFull() throws InterruptedException {
        while (this.product != -1) {
            condition.await();
        }
    }

    public int getProduct() throws InterruptedException {
        lock.lock();
        try {
            waitIfEmpty();
            int p = this.product;
            this.product = -1;
            System.out.printf("消费者取走 (%d)%n", p);
            condition.signal();
            return p;
        } finally {
            lock.unlock();
        }
    }

    private void waitIfEmpty() throws InterruptedException {
        while (this.product == -1) {
            condition.await();
        }
    }
}
  •signal():要通知等待集合中的一个线程,则可以调用 signal() 方法

  •signalAll():如果要通知所有等待集合中的线程,可以调用 signalAll()

  •一个Condition 对象可代表有一个等待集合,可以重复调用 Lock 的newCondition(),取得多个Condition 实例,这代表了可以有多个等待集合
•Executor
•从JDK5 开始,定义了 java.util.concurrent.Executor 接口,目的是将 Runnable 的指定与实际如何执行分离
•Executor 接口只定义了一个 execute() 方法:
package java.util.concurrent;
public interface Executor{
    void execute(Runnable command);
}
•ThreadPoolExecutor
•根据不同的线程池需求,ThreadPoolExecutor 拥有数种不同构造函数可供使用,不过通常会使用 java.util.concurrent.Executors 的 newCachedThreadPool()、newFixedThreadPool() 静态方法来创建 ThreadPoolExecutor 实例,例:
package week06;

import java.net.URL;
import java.util.concurrent.ExecutorService;
import java.util.concurrent.Executors;

public class Download3 {
    public static void main(String[] args) throws Exception {
        URL[] urls = {
            new URL("http://openhome.cc/Gossip/Encoding/"),
            new URL("http://openhome.cc/Gossip/Scala/"),
            new URL("http://openhome.cc/Gossip/JavaScript/"),
            new URL("http://openhome.cc/Gossip/Python/")
        };

        String[] fileNames = {
            "Encoding.html",
            "Scala.html",
            "JavaScript.html",
            "Python.html"
        };

        ExecutorService executorService = Executors.newCachedThreadPool();
        new Pages(urls, fileNames, executorService).download();
        executorService.shutdown();
    }
}
•ScheduledThreadPoolExecutor
•ScheduledExecutorService 的操作类 ScheduledThreadPoolExecutor 为 ThreadPoolExecutor 的子类,具有线程池与排程功能,例:
package cc.openhome;

import java.util.concurrent.*;

public class ScheduledExecutorServiceDemo {

    public static void main(String[] args) {
        ScheduledExecutorService service
                = Executors.newSingleThreadScheduledExecutor();

        service.scheduleWithFixedDelay(
                () -> {
                    System.out.println(new java.util.Date());
                    try {
                        Thread.sleep(2000); // 假设这个工作会进行两秒
                    } catch (InterruptedException ex) {
                        throw new RuntimeException(ex);
                    }
                }, 2000, 1000, TimeUnit.MILLISECONDS);
    }
}
•ForkJoinPool
•java.util.ForkJoinPool:解决分而治之的问题
•在分而治之需要结合并行的情况下,可以使用 ForkJoinTask,其操作了 Future 接口,可以让你在未来取得耗时工作的执行结果
•ForkJoinPool 与其他的 ExecutorService 操作不同的地方在于,它实现了工作窃取演算,其建立的线程如果完成手边任务,会尝试寻找并执行其他任务建立的子任务,让线程保持忙碌状态,有效利用处理器的能力
•并行Collection
•CopyOnWriteArraySet 操作了 List 接口,这个类的实例在写入操作时,内部会建立新数组,并复制原有数组索引的参考,然后在新数组上进行写入操作,写入完成后,再将内部原参考旧数组的变量参考至新数组
•BllockingQueu 是 Queue 的子接口,新定义了 put() 与 take() 等方法,线程若调用 put() 方法,在队列已满的情况下会被阻断,线程若调用 take() 方法,在队列为空的情况下会被阻断,例:
package week06;

import java.util.concurrent.BlockingQueue;

public class Producer3 implements Runnable {
    private BlockingQueue<Integer> productQueue;

    public Producer3(BlockingQueue<Integer> productQueue) {
        this.productQueue = productQueue;
    }

    public void run() {
        System.out.println("生产者开始生产整数......");
        for(int product = 1; product <= 10; product++) {
            try {
                productQueue.put(product);
                System.out.printf("生产者提供整数 (%d)%n", product);
            } catch (InterruptedException ex) {
                throw new RuntimeException(ex);
            }
        }
    }
}
教材学习中的问题和解决过程
问题
P325的代码每次运行的结果为什么是不一样的?
解决
教材上该段代码如下:
package week06;

import static java.lang.System.out;

public class TortoiseHareRace {
    public static void main(String[] args) {
        boolean[] flags = {true, false};
        int totalStep = 10;
        int tortoiseStep = 0;
        int hareStep = 0;
        out.println("龟兔赛跑开始...");
        while(tortoiseStep < totalStep && hareStep < totalStep) {
            tortoiseStep++;

        //乌龟走一步

            out.printf("乌龟跑了 %d 步...%n", tortoiseStep);
            boolean isHareSleep = flags[((int) (Math.random() * 10)) % 2];

        //兔子随机睡觉

            if(isHareSleep) {
                out.println("兔子睡着了zzzz");
            } else {
                hareStep += 2;

        //如果兔子不睡觉,就走两步

                out.printf("兔子跑了 %d 步...%n", hareStep);
            }
        }
    }
}
因为程序中设置了兔子随机睡觉,如果兔子不睡觉就将 hareStep 递增2,表示兔子走两步,只要兔子或乌龟其中一个走完10步就离开循环,根据兔子睡觉的随机性,结果不同。
代码调试中的问题和解决过程
书上的代码没有什么问题~
关于输入输出流的应用自己写了一些小程序^ _ ^
NO.1
import java.io.*;

/**
 * Created by XiaYihua on 2017/1/30.
 */
public class Test0130 {
    public static void main(String[] args) {

        File file = new File("text.txt");
        if (file.exists()) {
            System.err.println("exist");
            try {
                FileInputStream fis = new FileInputStream(file);
                InputStreamReader isr = new InputStreamReader(fis, "UTF-8");
                BufferedReader br = new BufferedReader(isr);

                String line;
                while ((line = br.readLine()) != null) {
                    System.out.println(line);
                }

                br.close();
                isr.close();
                fis.close();
            } catch (FileNotFoundException e) {
                e.printStackTrace();
            } catch (UnsupportedEncodingException e) {
                e.printStackTrace();
            } catch (IOException e) {
                e.printStackTrace();
            }
        }

        try {
            File newfile = new File("newtext.txt");
            FileOutputStream fos = new FileOutputStream(newfile);
            OutputStreamWriter osw = new OutputStreamWriter(fos, "UTF-8");
            BufferedWriter bw = new BufferedWriter(osw);

            bw.write("ride
");
            bw.write("like
");
            bw.write("funk
");
            bw.write("queue
");
            bw.write("stack
");

            bw.close();
            osw.close();
            fos.close();

            System.out.println("Write Complete!");
        } catch (FileNotFoundException e) {
            e.printStackTrace();
        } catch (UnsupportedEncodingException e) {
            e.printStackTrace();
        } catch (IOException e) {
            e.printStackTrace();
        }
    }
}
运行结果:

newtext.txt文件中变为:
这里感受了一波System.err.println("exist");的作用~
两者都是输出流,没有本质区别,err是运行期异常和错误反馈的输出流的方向。
但是,需要注意的是: (1)System.out.println 能重定向到别的输出流,这样的话你在屏幕上将看不到打印的东西了,如输出到 一个txt的log日志中. (2)而System.err.println只能在屏幕上实现打印,即使你重定向了也一样。
如果要说最直接的区别就是:如果使用err打印字符串,在IDEA的console中会显示成红色的~如上图所示。
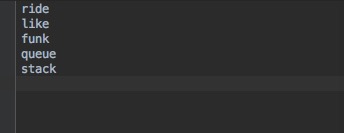
NO.2按字节读取数据流
/**
 * Created by XiaYihua on 2017/1/31.
 */
import java.io.*;

public class Test0131_2 {
    public static void main(String[] args) {
        try {
            FileInputStream fis = new FileInputStream("text.txt");
            byte[] input = new byte[40];
            fis.read(input);

            String inputString = new String(input, "UTF-8");
            System.out.println(inputString);

            fis.close();
        } catch (FileNotFoundException e) {
            e.printStackTrace();
        } catch (UnsupportedEncodingException e) {
            e.printStackTrace();
        } catch (IOException e) {
            e.printStackTrace();
        }
    }
}
运行结果截图:

- 前一个程序是为了按行读取数据(文本文件),而这个程序是按字节读取~
本周代码托管截图
学习进度条
| 代码行数(新增/累积) | 博客量(新增/累积) | 学习时间(新增/累积) | 重要成长 | |
|---|---|---|---|---|
| 目标 | 5000行 | 30篇 | 400小时 | |
| 第二周 | 200/400 | 1/3 | 12/52 | |
| 预备作业 | 0/400 | 1/4 | 15/67 | |
| 第三周 | 500/900 | 1/5 | 10/77 | |
| 第四周 | 500/1500 | 1/6 | 15/92 | |
| 第五周 | 500/2000 | 1/7 | 20/112 | |
| 第六周 | 500/2500 | 2/9 | 20/132 |