安装Pika Python客户端:
pip3 install pika
一、单发送单接收
https://www.rabbitmq.com/tutorials/tutorial-one-python.html
在下图中,"P"是我们的生产者,"C"是我们的消费者;中间的框是一个队列。

生产者send.py:

P发送消息给"秒杀"队列,C消费者从队列中获取消息,默认轮询方式。
import pika
# 创建凭证,使用RabbitMQ用户密码登录(去邮局取邮件,必须得验证身份)
credentials = pika.PlainCredentials("pd", "123456")
# 新建连接(找到这个邮局,等于连接上服务器)
connection = pika.BlockingConnection(pika.ConnectionParameters(host="localhost", port=5672, credentials=credentials))
# 创建频道(建造一个大邮箱,隶属于这家邮局的邮箱,就是个连接)
channel = connection.channel()
# 声明一个队列,用于接收消息,队列名字叫"秒杀"
channel.queue_declare(queue="秒杀")
# 注意在RabbitMQ中,消息想要发送给队列,必须经过交换(exchange),初学可以使用空字符串交换(exchange=""),它允许我们精确的指定发送给哪个队列(routing_key=""),参数body的值为发送的数据。
channel.basic_publish(exchange="", routing_key="秒杀", body="恭喜您抢到iPhone666")
print("已经发送了消息")
# 程序退出前,确保刷新网络缓冲以及消息发送给RabbitMQ,需要关闭本次连接
connection.close()
消费者receive.py:

可以同时存在多个接收者,等待接收队列的消息,默认是轮询方式分配消息。接收者receive.py,可以运行多次,即运行多个消费者。
import pika
credentials = pika.PlainCredentials("pd", "123456")
connection = pika.BlockingConnection(pika.ConnectionParameters(host="localhost", port=5672, credentials=credentials))
channel = connection.channel()
channel.queue_declare(queue="秒杀")

def callback(ch, method, properties, body):
    # 有消息来临,立即执行callback,没有消息则夯住,等待消息
    print("消费者接收到了任务:%s" % body.decode("utf8"))

# 果粉们开始去抢购iPhone,队列名字是"秒杀"
channel.basic_consume(callback, queue="秒杀", no_ack=True)
# 开始消费,接收消息
channel.start_consuming()
结果:


设置超时时间:

import pika

credentials = pika.PlainCredentials("pd", "123456")
connection = pika.BlockingConnection(pika.ConnectionParameters(host="localhost", port=5672, credentials=credentials))

# 超时时间(如果5秒内没有收到消息,将不会夯住等待消息,取消接收消息)
connection.add_timeout(5, lambda: channel.stop_consuming())

channel = connection.channel()
channel.queue_declare(queue="秒杀")

def callback(ch, method, properties, body):
    # 有消息来临,立即执行callback,没有消息则夯住,等待消息
    print("消费者接收到了任务:%s" % body.decode("utf8"))

channel.basic_consume(callback, queue="秒杀", no_ack=True)
channel.start_consuming()
二、单发送多接收
使用场景:一个发送端,多个接收端,如分布式的任务派发。为了保证消息发送的可靠性,不丢失消息,使消息持久化了。同时为了防止接收端在处理消息时down掉,只有在消息处理完成后才发送ack消息。
三、RabbitMQ消息确认之ack
默认情况下,生产者发送数据给队列,消费者取出消息后,数据将被清除。
特殊情况,如果消费者处理过程中,出现错误,数据处理没有完成,那么这段数据将从队列丢失。
no-ack机制
不确认机制也就是说每次消费者接收到数据后,不管是否处理完毕,rabbitmq-server都会把这个消息标记完成,从队列中删除。
ack机制
确认机制用于保证消费者如果拿了队列的消息,客户端处理时出错了,那么队列中仍然还存在这个消息,提供下一位消费者继续取。
代码示例
生产者无须变动,发送消息。
消费者如果no_ack=True,数据消费后如果出错就会丢失;反之no_ack=False,数据消费如果出错,数据也不会丢失。
生产者send.py:只负责发送数据即可,无须变动。
消费者reveive.py给与ack回复:
拿到消息必须给RabbitMQ服务端回复ack信息,否则消息不会被删除,防止客户端出错,数据丢失。

import pika
credentials = pika.PlainCredentials("pd", "123456")
connection = pika.BlockingConnection(pika.ConnectionParameters(host="localhost", port=5672, credentials=credentials))
channel = connection.channel()
channel.queue_declare(queue="秒杀")

def callback(ch, method, properties, body):
    print("消费者接收到了任务:%s" % body.decode("utf8"))
    # 模拟异常,没能给服务端回复ack信息,消息不丢失
    print(xx)
    # 告诉服务端,我已经取走了消息,否则消息一直存在
    ch.basic_ack(delivery_tag=method.delivery_tag)

# 关闭no_ack,代表给与服务端ack回复(确认)
channel.basic_consume(callback, queue="秒杀", no_ack=False)
channel.start_consuming()
四、公平分发
默认消息队列里的数据是按照轮询被消费者拿走,例如:消费者1去队列中获取奇数序列的任务,消费者2去队列中获取偶数序列的任务。假如消费者1获取到任务,需要处理很久;下个任务就被消费者2获取到,一下子就处理完了;那么按照RabbitMQ默认设置,下个任务就应该分发给消费者1了,但是此时消费者1还是没处理完任务。RabbitMQ是不知道消费时1还没处理完任务的,既然轮到了消费者1,那RabbitMQ依然向消费者1发送消息。

为了避免这种情况,设置:
channel.basic_qos(prefetch_count=1)
生产者:

import pika

credentials = pika.PlainCredentials("pd", "123456")
connection = pika.BlockingConnection(pika.ConnectionParameters(host="localhost", port=5672, credentials=credentials))
channel = connection.channel()
channel.queue_declare(queue="uu", durable=True)
channel.basic_publish(exchange="", routing_key="uu", body="你在干什么?")
connection.close()
消费者1:time.sleep(30)

import pika
import time

credentials = pika.PlainCredentials("pd", "123456")
connection = pika.BlockingConnection(pika.ConnectionParameters(host="localhost", port=5672, credentials=credentials))
channel = connection.channel()
channel.queue_declare(queue="uu", durable=True)

def callback(ch, method, properties, body):
    print("消费者1接收到了任务:%s" % body.decode("utf8"))
    time.sleep(30)
    ch.basic_ack(delivery_tag=method.delivery_tag)

channel.basic_qos(prefetch_count=1)
channel.basic_consume(callback, queue="uu", no_ack=False)
channel.start_consuming()
消费者2:

import pika

credentials = pika.PlainCredentials("pd", "123456")
connection = pika.BlockingConnection(pika.ConnectionParameters(host="localhost", port=5672, credentials=credentials))
channel = connection.channel()
channel.queue_declare(queue="uu", durable=True)

def callback(ch, method, properties, body):
    print("消费者2接收到了任务:%s" % body.decode("utf8"))
    ch.basic_ack(delivery_tag=method.delivery_tag)

channel.basic_qos(prefetch_count=1)
channel.basic_consume(callback, queue="uu", no_ack=False)
channel.start_consuming()
五、消息持久化
1.执行生产者,向队列写入数据,产生一个新队列queue
2.重启服务端,队列丢失

3.开启生产者数据持久化后,重启服务端,队列不丢失
4.客户端依旧可以读取数据
消息的可靠性是RabbitMQ的一大特色,那么RabbitMQ是如何保证消息可靠性的呢——消息持久化。 为了保证RabbitMQ在退出或者crash等异常情况下数据没有丢失,需要将queue、exchange和Message都持久化。
生产者send.py

import pika
credentials = pika.PlainCredentials("pd", "123456")
connection = pika.BlockingConnection(pika.ConnectionParameters(host="localhost", port=5672, credentials=credentials))
channel = connection.channel()
"""
声明一个队列(创建一个队列),
默认此队列不支持持久化,如果服务挂掉,数据丢失,
参数 durable=True 开启queue持久化,必须新开启一个队列,原本的队列已经不支持持久化了。
"""
channel.queue_declare(queue="zz", durable=True)
"""
实现RabbitMQ持久化条件
 delivery_mode=2
"""
channel.basic_publish(exchange="",
                      routing_key="zz",
                      body="吃饭了没?",
                      # 支持数据持久化
                      properties=pika.BasicProperties(
                          delivery_mode=2,  # 代表消息是持久的 2
                      )
)
print("已经发送了消息")
connection.close()
消费者receive.py

import pika
credentials = pika.PlainCredentials("pd", "123456")
connection = pika.BlockingConnection(pika.ConnectionParameters(host="localhost", port=5672, credentials=credentials))
channel = connection.channel()
"""
声明一个队列(创建一个队列),
默认此队列不支持持久化,如果服务挂掉,数据丢失,
参数 durable=True 开启queue持久化,必须新开启一个队列,原本的队列已经不支持持久化了。
"""
channel.queue_declare(queue="zz", durable=True)
"""
实现RabbitMQ持久化条件
 delivery_mode=2
"""
channel.basic_publish(exchange="",
                      routing_key="zz",
                      body="吃饭了没?",
                      # 支持数据持久化
                      properties=pika.BasicProperties(
                          delivery_mode=2,  # 代表消息是持久的 2
                      )
)
print("已经发送了消息")
connection.close()
六、exchange模型
RabbitMQ发送消息首先是发给exchange,然后再通过exchange发送消息给队列(queue)。
exchange有四种模式:
fanout:
exchange将消息发送给和该exchange连接的所有queue;也就是所谓的广播模式;此模式下忽略routing_key。
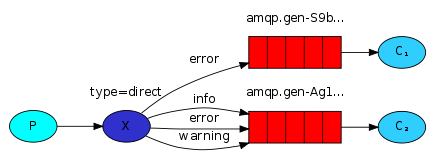
direct:
路由模式,通过routing_key将消息发送给对应的queue;如下面这句即可设置exchange为direct模式,只有routing_key为"black"时才将其发送到队列queue_name;
channel.queue_bind(exchange=exchange_name, queue=queue_name, routing_key="black")
在上图中,Q1和Q2可以绑定同一个key,如绑定routing_key="KeySame",那么收到routing_key为KeySame的消息时将会同时发送给Q1和Q2,相当于广播模式。
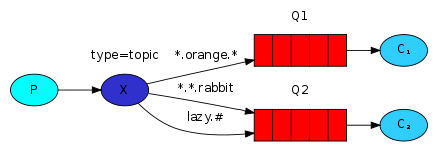
topic:
topic模式类似于direct模式,只是其中的routing_key变成了一个有"."分隔的字符串,"."将字符串分割成几个单词,每个单词代表一个条件。
headers:
headers类型的exchange不依赖于routing key与binding key的匹配规则来路由消息,而是根据发送的消息内容中的headers属性进行匹配。
发布订阅
https://www.rabbitmq.com/tutorials/tutorial-three-python.html

exchange type = "fanout"
发布订阅和简单的消息队列区别在于,发布订阅会将消息发送给所有的订阅者,而消息队列中的数据被消费一次便消失。所以,RabbitMQ实现发布和订阅时,会为每一个订阅者创建一个队列,而发布者发布消息时,会将消息放置在所有相关队列中。
生产者(发布者):
import pika
credentials = pika.PlainCredentials("pd", "123456")
connection = pika.BlockingConnection(pika.ConnectionParameters(host="localhost", port=5672, credentials=credentials))
channel = connection.channel()
# 指定exchange
channel.exchange_declare(exchange="mm", exchange_type="fanout")
channel.basic_publish(exchange="mm",
                      routing_key="",  # 这里不再指定队列,由exchange分配,如果是fanout模式,每一个队列放一份
                      body="你妈妈叫你回家吃饭了!",
)
connection.close()
消费者(订阅者):
import pika
credentials = pika.PlainCredentials("pd", "123456")
connection = pika.BlockingConnection(pika.ConnectionParameters(host="localhost", port=5672, credentials=credentials))
channel = connection.channel()
# exchange="mm",exchange(秘书)的名称
# exchange_type="fanout" , 秘书工作方式将消息发送给所有的队列
channel.exchange_declare(exchange="mm",exchange_type="fanout")
# 随机生成一个队列,并且在关闭消费者连接后,删除这个队列
result = channel.queue_declare(exclusive=True)
queue_name = result.method.queue
# 让exchange和queue进行绑定
channel.queue_bind(exchange="mm", queue=queue_name)

def callback(ch, method, properties, body):
    print("消费者接收到了任务:%s" % body.decode("utf8"))

channel.basic_consume(callback, queue=queue_name, no_ack=True)
channel.start_consuming()
操作示例:
1.运行订阅者(可以多个),相当于有多个滴滴司机,订阅同一个电台(队列),等待着消息到来
2.运行发布者,发送消息给Exchange
3.查看是否给所有的队列发送了消息
关键字发送
https://www.rabbitmq.com/tutorials/tutorial-four-python.html

exchange type = "direct"
之前事例,发送消息时明确指定某个队列并向其中发送消息,RabbitMQ还支持根据关键字发送,即:队列绑定关键字,发送者将数据根据关键字发送到消息exchange,exchange根据关键字判定应该将数据发送至指定队列。
生产者:
发送消息给匹配的路由,"小白"或者"小黑";如果routing_key为"小白",两个订阅者都可以收到消息,如果为"小黑",订阅者2无法收到消息。

import pika
credentials = pika.PlainCredentials("pd", "123456")
connection = pika.BlockingConnection(pika.ConnectionParameters(host="localhost", port=5672, credentials=credentials))
channel = connection.channel()
# 路由模式的交换机会发送给绑定的key和routing_key匹配的队列
channel.exchange_declare(exchange="kk", exchange_type="direct")
# 发送消息,给有关"小白"的路由关键字
channel.basic_publish(exchange="kk",
                      routing_key="小黑",
                      body="喜洋洋与灰太狼",
)
connection.close()
消费者1:
路由关键字"小白"、"小黑"

import pika
credentials = pika.PlainCredentials("pd", "123456")
connection = pika.BlockingConnection(pika.ConnectionParameters(host="localhost", port=5672, credentials=credentials))
channel = connection.channel()
channel.exchange_declare(exchange="kk", exchange_type="direct")
# 随机生成一个队列,并且在关闭消费者连接后,删除这个队列
result = channel.queue_declare(exclusive=True)
queue_name = result.method.queue
# 让exchange和queue进行绑定
channel.queue_bind(exchange="kk", queue=queue_name, routing_key="小白")
channel.queue_bind(exchange="kk", queue=queue_name, routing_key="小黑")

def callback(ch, method, properties, body):
    print("消费者接收到了任务:%s" % body.decode("utf8"))

channel.basic_consume(callback, queue=queue_name, no_ack=True)
channel.start_consuming()
消费者2:
路由关键字"小白"

import pika
credentials = pika.PlainCredentials("pd", "123456")
connection = pika.BlockingConnection(pika.ConnectionParameters(host="localhost", port=5672, credentials=credentials))
channel = connection.channel()
channel.exchange_declare(exchange="kk", exchange_type="direct")
# 随机生成一个队列,并且在关闭消费者连接后,删除这个队列
result = channel.queue_declare(exclusive=True)
queue_name = result.method.queue
# 让exchange和queue进行绑定
channel.queue_bind(exchange="kk", queue=queue_name, routing_key="小白")

def callback(ch, method, properties, body):
    print("消费者接收到了任务:%s" % body.decode("utf8"))

channel.basic_consume(callback, queue=queue_name, no_ack=True)
channel.start_consuming()
模糊匹配
https://www.rabbitmq.com/tutorials/tutorial-five-python.html

exchange type = "topic"
在topic类型下,可以让队列绑定几个模糊的关键字,之后发送者将数据发送到exchange,exchange将传入"路由值"和 "关键字"进行匹配,匹配成功,则将数据发送到指定队列。
*  表示只能匹配 1个 单词
#  表示可以匹配 0个 或 多个 单词
发送者路由值      队列中
i.love          i.*        匹配
i.love          i.#        匹配
i.love.you      i.*        不匹配
i.love.you      i.#        匹配
i.love.you      *.love.*   匹配
生产者:
路由秘钥:i.love.you

import pika

credentials = pika.PlainCredentials("pd", "123456")
connection = pika.BlockingConnection(pika.ConnectionParameters(host="localhost", port=5672, credentials=credentials))
channel = connection.channel()
channel.exchange_declare(exchange="topic_xx", exchange_type="topic")

# 让exchange和queue进行绑定,并且指定这条消息的路由密钥
channel.basic_publish(exchange="topic_xx", routing_key="i.love.you", body="该写做作业了!")
connection.close()
消费者1:
队列绑定秘钥:i.# 和 *.love.*
只要有一个能匹配到路由秘钥,就能接收到消息。

import pika

credentials = pika.PlainCredentials("pd", "123456")
connection = pika.BlockingConnection(pika.ConnectionParameters(host="localhost", port=5672, credentials=credentials))
channel = connection.channel()
channel.exchange_declare(exchange="topic_xx", exchange_type="topic")
result = channel.queue_declare(exclusive=True)
queue_name = result.method.queue

binding_keys = ["i.#", "*.love.*"]

for binding_key in binding_keys:
    # 让exchange和queue进行绑定,并且指定queue绑定密钥
    channel.queue_bind(exchange="topic_xx",
                       queue=queue_name,
                       routing_key=binding_key)

def callback(ch, method, properties, body):
    print("消费者接收到了任务:%s" % body.decode("utf8"))
    print(method.routing_key)

channel.basic_consume(callback, queue=queue_name, no_ack=True)
channel.start_consuming()
消费者2:
队列绑定秘钥:i.*
无法匹配到路由秘钥,丢失消息。

import pika

credentials = pika.PlainCredentials("pd", "123456")
connection = pika.BlockingConnection(pika.ConnectionParameters(host="localhost", port=5672, credentials=credentials))
channel = connection.channel()
channel.exchange_declare(exchange="topic_xx", exchange_type="topic")
result = channel.queue_declare(exclusive=True)
queue_name = result.method.queue

# 让exchange和queue进行绑定,并且指定queue绑定密钥
channel.queue_bind(exchange="topic_xx",
                   queue=queue_name,
                   routing_key="i.*")

def callback(ch, method, properties, body):
    print("消费者接收到了任务:%s" % body.decode("utf8"))
    print(method.routing_key)

channel.basic_consume(callback, queue=queue_name, no_ack=True)
channel.start_consuming()
七、RPC(远程过程调用)
将一个函数运行在远程计算机上并且等待获取那里的结果,这个称作远程过程调用(Remote Procedure Call)或者 RPC。RPC是一个计算机通信协议。
通俗理解RPC:
将计算机服务运行理解为厨师做饭,厨师想做苦瓜炒鸡蛋,则厨师需要:洗和切苦瓜、拌鸡蛋、炒等。他一个人完成所有的事,如同一台计算机做所有的事,效率低下。
RPC应用:
老板有钱了,请了专职员工,各司其职,不再是厨师一个人单打独斗,而是备菜师傅准备苦瓜、鸡蛋、调料,切菜师傅切苦瓜、拌鸡蛋,厨师只负责炒好即可。
制作苦瓜炒鸡蛋:
- 备菜师傅 -> 备好菜、调料
- 切菜师傅 -> 切好菜
- 厨师 -> 炒好菜
此时一件事好多人在做,厨师就得和其他人沟通,通知备菜、切菜师傅的这个动作就是远程过程调用(RPC)。
这个过程在计算机系统中,比如一个电商的下单过程,涉及物流、支付、库存、红包等多个系统,多个系统又在多个服务器上,由不同的技术团队负责,整个下单过程,需要所有团队进行远程调用。
下单:
- 库存 -> 减少库存
- 支付 -> 扣款
- 红包 -> 减免红包
- 物流 -> 生成订单
RPC到底是什么?
RPC指的是在计算机A上的进程,调用另外一台计算机B的进程,A上的进程被挂起,B上的被调用进程开始执行后,产生返回值给A,A继续执行。调用方可以通过参数将信息传递给被调用方,而后通过返回结果得到信息,这个过程对于开发人员来说是透明的。
如同厨师一样,服务员把菜单给后厨,厨师告诉洗菜人,备菜人,开始工作,完成工作后,整个过程对于服务员是透明的,他完全不用管后厨是怎么把菜做好的。
由于服务在不同的机器上,远程调用必经网络通信,调用服务必须写一坨网络通信代码,很容易出错且很复杂,因此就出现了RPC框架。
阿里巴巴   dubbo    java
新浪      motan    java
谷歌      grpc     多语言
Apache   thrift   多语言
RPC封装了数据的序列化,反序列化,以及传输协议。
Python实现RPC
利用RabbitMQ构建一个RPC系统,包含了客户端和RPC服务器,依旧使用pika模块。
Callback queue 回调队列
一个客户端向服务器发送请求,服务器端处理请求后,将其处理结果保存在一个存储体中。而客户端为了获得处理结果,那么客户在向服务器发送请求时,同时发送一个回调队列地址reply_to。
Correlation id 关联标识
一个客户端可能会发送多个请求给服务器,当服务器处理完后,客户端无法辨别在回调队列中的响应具体和哪个请求是对应的。为了处理这种情况,客户端在发送每个请求时,同时会附带一个独有correlation_id属性,这样客户端在回调队列中根据correlation_id字段的值就可以分辨此响应属于哪个请求。
客户端发送请求:某个应用将请求信息交给客户端,然后客户端发送RPC请求,在发送RPC请求到RPC请求队列时,客户端至少发送带有reply_to以及correlation_id两个属性的信息。
服务器端工作流程:等待接受客户端发来RPC请求,当请求出现的时候,服务器从RPC请求队列中取出请求,然后处理后,将响应发送到reply_to指定的回调队列中。
客户端接受处理结果:客户端等待回调队列中出现响应,当响应出现时,它会根据响应中correlation_id字段的值,将其返回给对应的应用。
过程:
- 启动RPC服务端,等待接收数据到来,来了之后就进行处理,再将结果丢进队列
- 启动RPC客户端,发起请求
rpc_server.py
import pika

credentials = pika.PlainCredentials("pd", "123456")
connection = pika.BlockingConnection(pika.ConnectionParameters(host="localhost", port=5672, credentials=credentials))
channel = connection.channel()
# 声明RPC请求队列
channel.queue_declare(queue="rpc_xx")

# 模拟一个进程,例如切菜师傅,等着洗菜师傅传递数据
def add(n):
    # 对RPC请求队列中的请求进行处理
    n += 100
    return n

def on_request(ch, method, props, body):
    print(body, type(body))
    n = int(body)
    print("正在处理add(%s)" % n)
    # 调用数据处理方法
    response = add(n)
    # 将处理结果(响应)发送到回调队列
    ch.basic_publish(exchange="",
                     # reply_to代表回复目标
                     routing_key=props.reply_to,
                     # correlation_id(关联标识),用来将RPC的响应和请求关联起来。
                     properties=pika.BasicProperties(correlation_id=props.correlation_id),
                     body=str(response))
    ch.basic_ack(delivery_tag=method.delivery_tag)

# 负载均衡,同一时刻发送给该服务器的请求不超过一个
channel.basic_qos(prefetch_count=1)
channel.basic_consume(on_request, queue="rpc_xx")
print("等待接收RPC请求")
# 开始消费
channel.start_consuming()
rpc_client.py
import pika
import uuid

class RpcClient(object):
    def __init__(self):
        # 客户端启动时,创建回调队列,会开启会话用于发送RPC请求以及接受响应
        # 建立连接,指定服务器的ip地址
        credentials = pika.PlainCredentials("pd", "123456")
        self.connection = pika.BlockingConnection(pika.ConnectionParameters(host="localhost", port=5672, credentials=credentials))
        # 建立一个会话,每个channel代表一个会话任务
        self.channel = self.connection.channel()
        # 声明回调队列,再次声明的原因是,服务器和客户端可能先后开启,该声明是幂等的,多次声明,但只生效一次
        # exclusive=True 是指只对首次声明它的连接可见
        # exclusive=True 会在连接断开的时候,自动删除该队列
        result = self.channel.queue_declare(exclusive=True)
        # 将次队列指定为当前客户端的回调队列
        self.callback_queue = result.method.queue
        # 客户端订阅回调队列,当回调队列中有响应时,调用"on_response"方法对响应进行处理
        self.channel.basic_consume(self.on_response, queue=self.callback_queue, no_ack=True)

    # 对回调队列中的响应进行处理的函数
    def on_response(self, ch, method, props, body):
        if self.corr_id == props.correlation_id:
            self.response = body

    # 发出RPC请求
    # 例如这里服务端就是一个切菜师傅,菜切好了,需要传递给洗菜师傅,这个过程是发送rpc请求
    def call(self, n):
        # 初始化 response
        self.response = None
        # 生成correlation_id关联标识,通过python的uuid库,生成全局唯一标识ID,保证时间空间唯一性
        self.corr_id = str(uuid.uuid4())
        # 发送RPC请求内容到RPC请求队列"rpc_xx",同时发送的还有"reply_to"和"correlation_id"
        self.channel.basic_publish(exchange="",
                                   routing_key="rpc_xx",
                                   properties=pika.BasicProperties(
                                       reply_to=self.callback_queue,
                                       correlation_id=self.corr_id,
                                   ),
                                   body=str(n))
        while self.response is None:
            self.connection.process_data_events()
        return self.response

# 建立客户端
rpc = RpcClient()
# 发送RPC请求,丢进rpc队列,等待客户端处理完毕,给与响应
print("发送了请求sum(100)")
response = rpc.call(100)
print("得到远程结果响应:%s" % response)

