docker 18.09

官方:https://docs.docker.com/
一 简介

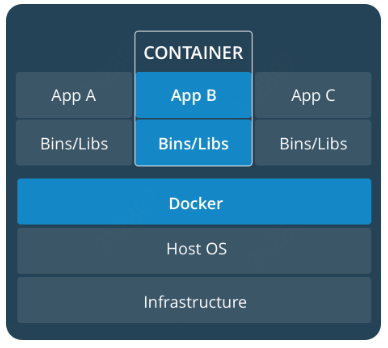
Docker is a platform for developers and sysadmins to develop, deploy, and run applications with containers. The use of Linux containers to deploy applications is called containerization. Containers are not new, but their use for easily deploying applications is.
docker是一个开发人员和系统管理人员通过容器来开发、部署和运行应用的平台;通过容器来部署应用也被成为容器化;
Containerization is increasingly popular because containers are:
- Flexible: Even the most complex applications can be containerized.
- Lightweight: Containers leverage and share the host kernel.
- Interchangeable: You can deploy updates and upgrades on-the-fly.
- Portable: You can build locally, deploy to the cloud, and run anywhere.
- Scalable: You can increase and automatically distribute container replicas.
- Stackable: You can stack services vertically and on-the-fly.
容器化:灵活、轻量级、可替换、可移植、可扩展、可叠加;

一个image是一个包含所有依赖的可执行包,一个image运行起来的一个instance称为一个container,一个(或多个)机器上运行同一个image的一个或多个container称为service;在多个机器上进行容器化部署称为swarm;
1 Container、Image
A container is launched by running an image. An image is an executable package that includes everything needed to run an application--the code, a runtime, libraries, environment variables, and configuration files.
运行一个image时会启动一个container,一个image是包含运行所需所有信息(包括代码、库、环境变量、配置文件等)的可执行包;
A container is a runtime instance of an image--what the image becomes in memory when executed (that is, an image with state, or a user process). You can see a list of your running containers with the command, docker ps, just as you would in Linux.
一个container是一个image的运行时实例,可以通过docker ps命令查看所有正在运行的container;
A container runs natively on Linux and shares the kernel of the host machine with other containers. It runs a discrete process, taking no more memory than any other executable, making it lightweight.
一个container在linux上以原生进程的方式运行,不会占用其他内存,所以非常轻量级;
2 Dockerfile
Dockerfile defines what goes on in the environment inside your container. Access to resources like networking interfaces and disk drives is virtualized inside this environment, which is isolated from the rest of your system, so you need to map ports to the outside world, and be specific about what files you want to “copy in” to that environment. However, after doing that, you can expect that the build of your app defined in this Dockerfile behaves exactly the same wherever it runs.
dockerfile定义一个容器内部的运行环境,在这个环境中,对外部资源的访问(比如网络、接口和磁盘)都被虚拟化,从而实现与外部系统的隔离,所以你需要做端口映射、指定哪些文件需要在环境中可以访问等;
3 Registry
A registry is a collection of repositories, and a repository is a collection of images—sort of like a GitHub repository, except the code is already built. An account on a registry can create many repositories. The docker CLI uses Docker’s public registry by default.
一个registry是多个仓库的集合,一个仓库是多个image的集合;docker命令行默认使用的是docker公共registry;
4 Service
Services are really just “containers in production.” A service only runs one image, but it codifies the way that image runs—what ports it should use, how many replicas of the container should run so the service has the capacity it needs, and so on. Scaling a service changes the number of container instances running that piece of software, assigning more computing resources to the service in the process.
Luckily it’s very easy to define, run, and scale services with the Docker platform -- just write a docker-compose.yml file.
service只运行一个image,service是运行同一个image的多个container的集合,service可以配置端口、资源、container数量等,通过docker-compose.yml来定义service;
A single container running in a service is called a task. Tasks are given unique IDs that numerically increment, up to the number of replicas you defined in docker-compose.yml.
service中的一个continer也被称为一个task,每个task都有一个唯一自增id;
5 Swarm

A swarm is a group of machines that are running Docker and joined into a cluster. After that has happened, you continue to run the Docker commands you’re used to, but now they are executed on a cluster by a swarm manager. The machines in a swarm can be physical or virtual. After joining a swarm, they are referred to as nodes.
Swarm managers are the only machines in a swarm that can execute your commands, or authorize other machines to join the swarm as workers. Workers are just there to provide capacity and do not have the authority to tell any other machine what it can and cannot do.
一个swarm是一组运行docker的机器;swarm集群中分为swarm manager和worker;
二 安装
支持平台

windows安装
https://hub.docker.com/editions/community/docker-ce-desktop-windows
win10之前的版本直接下载:
https://download.docker.com/win/stable/DockerToolbox.exe
linux安装
1 安装docker
yum安装
添加repo
# yum install -y yum-utils device-mapper-persistent-data lvm2
# yum-config-manager --add-repo https://download.docker.com/linux/centos/docker-ce.repo
安装
# yum install docker-ce docker-ce-cli containerd.io
手动安装
下载
http://mirror.centos.org/centos/7/os/x86_64/Packages/
libtool-ltdl-2.4.2-22.el7_3.x86_64.rpmhttp://mirror.centos.org/centos/7/extras/x86_64/Packages/
container-selinux-2.74-1.el7.noarch.rpmhttps://download.docker.com/linux/centos/7/x86_64/stable/Packages/
containerd.io-1.2.2-3.el7.x86_64.rpm
docker-ce-cli-18.09.1-3.el7.x86_64.rpm
docker-ce-18.09.1-3.el7.x86_64.rpm
根据需要安装
# yum install libcgroup selinux-policy policycoreutils-python
2 安装docker machine
$ base=https://github.com/docker/machine/releases/download/v0.16.0 &&
curl -L $base/docker-machine-$(uname -s)-$(uname -m) >/tmp/docker-machine &&
sudo install /tmp/docker-machine /usr/local/bin/docker-machine
Get Docker Machine, which is pre-installed with Docker Desktop for Mac and Docker Desktop for Windows, but on Linux systems you need to install it directly. On pre Windows 10 systems without Hyper-V, as well as Windows 10 Home, use Docker Toolbox.
3 启动
# service docker start
or
# systemctl start docker
4 开机启动
# systemctl enable docker
三 使用
1 命令
查看版本和系统信息
# docker --version
Docker version 18.09.1, build 4c52b90# docker info
常用命令
## List Docker CLI commands
docker
docker container --help## Display Docker version and info
docker --version
docker version
docker info## Execute Docker image
docker run hello-world## List Docker images
docker image ls## List Docker containers (running, all, all in quiet mode)
docker container ls
docker container ls --all
docker container ls -aq
注意:docker ps = docker container ls
2 运行image示例
1)根据名字搜索image(以nginx为例)
$ docker search nginx
2)查看一个image的所有版本(以nginx为例)
$ curl https://hub.docker.com/_/nginx
3)查看一个image或container的详细信息,包括配置(以nginx为例)
$ docker inspect nginx
4)启动ubuntu,启动前会自动pull image
$ docker run --interactive --tty ubuntu bash
5)启动nginx,启动前会自动pull image
# docker run --detach --publish 80:80 --name webserver nginx
# curl http://localhost:80
<!DOCTYPE html>
<html>
<head>
<title>Welcome to nginx!</title>
<style>
body {
35em;
margin: 0 auto;
font-family: Tahoma, Verdana, Arial, sans-serif;
}
</style>
</head>
<body>
<h1>Welcome to nginx!</h1>
<p>If you see this page, the nginx web server is successfully installed and
working. Further configuration is required.</p><p>For online documentation and support please refer to
<a href="http://nginx.org/">nginx.org</a>.<br/>
Commercial support is available at
<a href="http://nginx.com/">nginx.com</a>.</p><p><em>Thank you for using nginx.</em></p>
</body>
</html># docker container ls
CONTAINER ID IMAGE COMMAND CREATED STATUS PORTS NAMES
e8ce03aa7ebc nginx "nginx -g 'daemon of鈥 12 minutes ago Up 12 minutes 0.0.0.0:80->80/tcp webserver
其中:-p = --publish (端口映射),-d = --detach (后台运行)
Run the app, mapping your machine’s port 80 to the container’s published port 80 using -p (--publish)
注意:端口映射之后,在linux上可以直接通过 localhost:port 来访问对应的端口,但是windows不行,因为docker在不同平台上的实现方式不同,在windows上需要先通过
$ docker-machine ip default
找到virtualbox的虚拟机ip,通常为192.168.99.100,然后再访问 192.168.99.100:port
The reason you’re having this, is because on Linux, the docker daemon (and your containers) run on the Linux machine itself, so “localhost” is also the host that the container is running on, and the ports are mapped to.
On Windows (and OS X), the docker daemon, and your containers cannot run natively, so only the docker client is running on your Windows machine, but the daemon (and your containers) run in a VirtualBox Virtual Machine, that runs Linux.
6)在容器内执行命令,比如reload nginx
# docker exec d727449d221f service nginx reload
7)登陆到正在运行的容器中(其中$container_id可以从docker container ls中看到),登陆之后可以执行reload等操作
$ docker exec -it $container_id bash
8)停止正在运行的容器
$ docker container stop <Container NAME or ID>
$ docker stop <Container NAME or ID>
9)启动容器
$ docker start <Container NAME or ID>
10)查看容器日志
$ docker logs <Container NAME or ID>
前提是容器还在running,如果容器启动失败,有两种方式看日志:1)挂载日志目录;2)使用export如下:
11)导出容器文件系统
$ docker export $container_id -o save.zip
12)删除容器
$ docker rm <Container NAME or ID>
13)查看当前所有的image
$ docker images
14)删除image
$ docker rmi $image_id
15)容器和宿主机之间拷贝文件
$ docker cp $container_id:/container/path/to/file.txt /host/path/dir/
16)限制容器使用内存
$ docker run --memory 300M --memory-swap=1G nginx
--memory=-m 限制容器使用的最大物理内存,--memory-swap 限制容器使用的最大物理内存+swap
17)查看container ip
$ docker inspect -f '{{range .NetworkSettings.Networks}}{{.IPAddress}}{{end}}' $container_id_or_name
3 导出导入image
1)从官方仓库(https://hub.docker.com/)拉取镜像,可以指定版本
$ docker pull nginx
2)将image保存为文件
$ docker save -o nginx.zip nginx
3)从文件加载image
$ docker load < nginx.zip
$ docker load --input nginx.zip
还有一种方式是搭建docker私有仓库
4 制作并运行image
1)登录registry
docker login
2)制作local image
docker build --tag=
3)tag image
docker tag image username/repository:tag
The notation for associating a local image with a repository on a registry is username/repository:tag
4)上传image
docker push username/repository:tag
5)运行image
docker run -p 4000:80 username/repository:tag
5 Service命令
$ docker stack deploy -c docker-compose.yml getstartedlab
$ docker service ls
$ docker service ps getstartedlab_web
$ docker container ls -q
6 Swarm命令
swarm集群
1)swarm manager 启动和停止
$ docker swarm init
$ docker swarm leave --force
2)worker 启动和停止
$ docker swarm join
$ docker swarm leave
run docker swarm init to enable swarm mode and make your current machine a swarm manager, then run docker swarm join on other machines to have them join the swarm as workers.
在vm上安装swarm集群
1)创建vm
$ docker-machine create --driver virtualbox myvm1
$ docker-machine create --driver virtualbox myvm2
$ docker-machine ls
$ docker-machine start <machine-name>
$ docker-machine ssh myvm1
$ docker-machine env myvm1
要先安装VirtualBox
# yum install opus
# yum install libvpx
# wget http://download.virtualbox.org/virtualbox/rpm/rhel/7/x86_64/VirtualBox-5.2-5.2.8_121009_el7-1.x86_64.rpm
# rpm -ivh VirtualBox-5.2-5.2.8_121009_el7-1.x86_64.rpm
# usermod -G vboxusers $user
注意一定要安装版本5(最新的是6),否则会报错:
Error with pre-create check: "We support Virtualbox starting with version 5. Your VirtualBox install is "WARNING: The vboxdrv kernel module is not loaded. Either there is no module\n available for the current kernel (3.10.0-693.el7.x86_64) or it failed to\n load. Please recompile the kernel module and install it by\n\n sudo /sbin/vboxconfig\n\n You will not be able to start VMs until this problem is fixed.\n6.0.4r128413". Please upgrade at https://www.virtualbox.org"
2)在vm上启动swarm集群
$ docker-machine ssh myvm1 "docker swarm init --advertise-addr <myvm1 ip>"
$ docker-machine ssh myvm2 "docker swarm join --token <token> <ip>:2377"
3)在vm上的swarm集群部署应用
$ docker stack deploy -c docker-compose.yml getstartedlab
$ docker stack ps getstartedlab
$ docker stack rm getstartedlab
4)在vm上停止swarm集群
$ docker-machine ssh myvm2 "docker swarm leave"
$ docker-machine ssh myvm1 "docker swarm leave --force"
参考:https://docs.docker.com/get-started/