Spring优点
Spring是一个轻量级Java开发框架,最早有Rod Johnson创建,目的是为了解决企业级应用开发的业务逻辑层和其他各层的耦合问题。它是一个分层的JavaSE/JavaEE full-stack(一站式)轻量级开源框架,为开发Java应用程序提供全面的基础架构支持。Spring负责基础架构,因此Java开发者可以专注于应用程序的开发。
(1)方便解耦,简化开发
Spring就是一个大工厂,可以将所有对象创建和依赖的关系维护,交给Spring管理。
(2)AOP编程的支持
Spring提供面向切面编程,可以方便的实现对程序进行权限拦截、运行监控等功能。
(3)声明式事务的支持
只需要通过配置就可以完成对事务的管理,而无需手动编程。
(4)方便程序的测试
Spring对Junit4支持,可以通过注解方便的测试Spring程序。
(5)方便集成各种优秀框架
Spring不排斥各种优秀的开源框架,其内部提供了对各种优秀框架的直接支持(如:Struts、Hibernate、MyBatis等)。
(6)降低JavaEE API的使用难度
Spring对JavaEE开发中非常难用的一些API(JDBC、JavaMail、远程调用等),都提供了封装,使这些API应用难度大大降低。
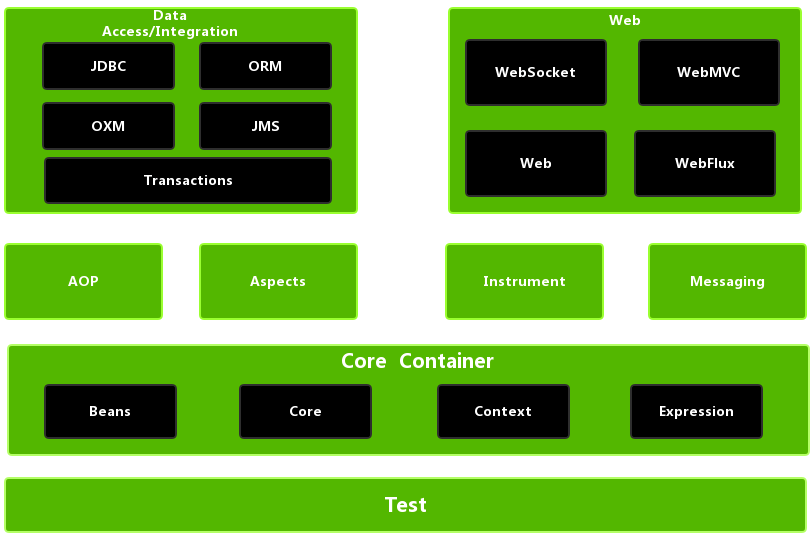
Spring体系结构
Spring框架至今已集成了20多个模块,这些模块分布在以下模块中:
- 核心容器(Core Container)
- 数据访问/集成(Data Access/Integration)层
- Web层
- AOP(Aspect Oriented Programming)模块
- 植入(Instrumentation)模块
- 消息传输(Messaging)
- 测试(Test)模块
Spring体系结构如下图:
核心容器
Spring的核心容器是其他模块建立的基础,有Spring-core、Spring-beans、Spring-context、Spring-context-support和Spring-expression(String表达式语言)等模块组成。
- Spring-core模块:提供了框架的基本组成部分,包括控制反转(Inversion of Control,IOC)和依赖注入(Dependency Injection,DI)功能。
- Spring-beans模块:提供了BeanFactory,是工厂模式的一个经典实现,Spring将管理对象称为Bean。
- Spring-context模块:建立在Core和Beans模块的基础之上,提供一个框架式的对象访问方式,是访问定义和配置的任何对象的媒介。ApplicationContext接口是Context模块的焦点。
- Spring-context-support模块:支持整合第三方库到Spring应用程序上下文,特别是用于高速缓存(EhCache、JCache)和任务调度(CommonJ、Quartz)的支持。
- Spring-expression模块:提供了强大的表达式语言去支持运行时查询和操作对象图。这是对JSP2.1规范中规定的统一表达式语言(Unified EL)的扩展。该语言支持设置和获取属性值、属性分配、方法调用、访问数组、集合和索引器的内容、逻辑和算术运算、变量命名以及从Spring的IOC容器中以名称检索对象。它还支持列表投影、选择以及常用的列表聚合。
AOP和Instrumentation
- Spring-aop模块:提供了一个符合AOP要求的面向切面的编程实现,允许定义方法拦截器和切入点,将代码按照功能进行分离,以便干净地解耦。
- Spring-aspects模块:提供了与AspectJ的集成功能,AspectJ是一个功能强大且成熟的AOP框架。
- Spring-instrument模块:提供了类植入(Instrumentation)支持和类加载器的实现,可以在特定的应用服务器中使用。
消息
Spring4.0以后新增了消息(Spring-messaging)模块,该模块提供了对消息传递体系结构和协议的支持。
数据访问/集成
数据访问/集成层由JDBC、ORM、OXM、JMS和事务模块组成。
- Spring-jdbc模块:提供了一个JDBC的抽象层,消除了烦琐的JDBC编码和数据库厂商特有的错误代码解析。
- Spring-orm模块:为流行的对象关系映射(Object-Relational Mapping)API提供集成层,包括JPA和Hibernate。使用Spring-orm模块可以将这些O/R映射框架与Spring提供的所有其他功能结合使用,例如声明式事务管理功能。
- Spring-oxm模块:提供了一个支持对象/XML映射的抽象层实现,例如JAXB、Castor、JiBX和XStream。
- Spring-jms模块(Java Messaging Service):指Java消息传递服务,包含用于生产和使用消息的功能。自Spring4.1以后,提供了与Spring-messaging模块的集成。
- Spring-tx模块(事务模块):支持用于实现特殊接口和所有POJO(普通Java对象)类的编程和声明式事务管理。
Web
Web层由Spring-web、Spring-webmvc、Spring-websocket和Portlet模块组成。
- Spring-web模块:提供了基本的Web开发集成功能,例如多文件上传功能、使用Servlet监听器初始化一个IOC容器以及Web应用上下文。
- Spring-webmvc模块:也称为Web-Servlet模块,包含用于web应用程序的Spring MVC和REST Web Services实现。Spring MVC框架提供了领域模型代码和Web表单之间的清晰分离,并与Spring Framework的所有其他功能集成。
- Spring-websocket模块:Spring4.0以后新增的模块,它提供了WebSocket和SocketJS的实现。
- Portlet模块:类似于Servlet模块的功能,提供了Portlet环境下的MVC实现。
测试
Spring-test模块支持使用JUnit或TestNG对Spring组件进行单元测试和集成测试
SPRING/SPRINGMVC配置加载
1. 启动一个WEB项目的时候,容器(如:Tomcat)会去读它的配置文件web.xml.读两个节点: <listener></listener> 和 <context-param></context-param>
2.紧接着,容器创建一个ServletContext(上下文),这个WEB项目所有部分都将共享这个上下文.
3.容器将<context-param></context-param>转化为键值对,并交给ServletContext.
4.容器创建<listener></listener>中的类实例,即创建监听.
5.在监听中会有contextInitialized(ServletContextEvent args)初始化方法,在这个方法中获得ServletContext = ServletContextEvent.getServletContext();
context-param的值 = ServletContext.getInitParameter('context-param的键');
6.得到这个context-param的值之后,你就可以做一些操作了.注意,这个时候你的WEB项目还没有完全启动完成.这个动作会比所有的Servlet都要早.
换句话说,这个时候,你对<context-param>中的键值做的操作,将在你的WEB项目完全启动之前被执行.
7.举例.你可能想在项目启动之前就打开数据库.
那么这里就可以在<context-param>中设置数据库的连接方式,在监听类中初始化数据库的连接.
8.这个监听是自己写的一个类,除了初始化方法,它还有销毁方法.用于关闭应用前释放资源.比如说数据库连接的关闭.
如:
<!-- 加载spring的配置文件 -->
又如: --->自定义context-param,且自定义listener来获取这些信息

context-param和init-param区别
web.xml里面可以定义两种参数:
(1)application范围内的参数,存放在servletcontext中,在web.xml中配置如下:
<context-param>
<param-name>context/param</param-name>
<param-value>avalible during application</param-value>
</context-param>
(2)servlet范围内的参数,只能在servlet的init()方法中取得,在web.xml中配置如下:
<servlet>
<servlet-name>MainServlet</servlet-name>
<servlet-class>com.wes.controller.MainServlet</servlet-class>
<init-param>
<param-name>param1</param-name>
<param-value>avalible in servlet init()</param-value>
</init-param>
<load-on-startup>0</load-on-startup>
</servlet>
context-param 在servlet里面可以通过getServletContext().getInitParameter('context/param')得到
init-param 在servlet的init()方法中通过this.getInitParameter('param1')取得.
  <!--web应用启动时就加载spring-->
  <context-param>
    <param-name>contextConfigLocation</param-name>
    <param-value>classpath:applicationContext.xml</param-value>
  </context-param>
  <listener>
    <listener-class>org.springframework.web.context.ContextLoaderListener</listener-class>
  </listener>

  <!--配置前端控制器,springmvc核心部件
    拦截路径为默认值,这样精确路径、*。jsp、资源路径都不会进入前端控制器了-->
  <servlet>
    <servlet-name>DispatcherServlet</servlet-name>
    <servlet-class>org.springframework.web.servlet.DispatcherServlet</servlet-class>
    <init-param>
      <param-name>contextConfigLocation</param-name>
      <param-value>classpath:springmvc.xml</param-value>
    </init-param>
    <load-on-startup>1</load-on-startup>
  </servlet>
  <servlet-mapping>
    <servlet-name>DispatcherServlet</servlet-name>
    <url-pattern>/</url-pattern>
  </servlet-mapping>
mybatis设置优先级
如果一个属性在不只一个地方进行了配置,那么,MyBatis 将按照下面的顺序来加载:
- 首先读取在 properties 元素体内指定的属性。
- 然后根据 properties 元素中的 resource 属性读取类路径下属性文件,或根据 url 属性指定的路径读取属性文件,并覆盖之前读取过的同名属性。
- 最后读取作为方法参数传递的属性,并覆盖之前读取过的同名属性。
因此,通过方法参数传递的属性具有最高优先级,resource/url 属性中指定的配置文件次之,最低优先级的则是 properties 元素中指定的属性。
Mybatis整合Spring
https://blog.csdn.net/xiao190128/article/details/87929186
springMVC注解作用:
https://blog.csdn.net/hlz5857475/article/details/81333192
日志体系
知识讲解:https://www.jianshu.com/p/546e9aace657
实战:https://www.jianshu.com/p/c00574bad529
spring5建议使用log4j2或logback打印日志。
logback配置使用详解:
https://www.cnblogs.com/xrq730/p/8628945.html
spring aop过程
4、切入点表达式
(1)切入点表达式作用:知道对哪个类里面的哪个方法进行增强
(2)语法结构: execution([权限修饰符] [返回类型] [类全路径] [方法名称]([参数列表]) )
举例 1:对 com.atguigu.dao.BookDao 类里面的 add 进行增强
execution(* com.atguigu.dao.BookDao.add(…))
举例 2:对 com.atguigu.dao.BookDao 类里面的所有的方法进行增强
execution(* com.atguigu.dao.BookDao.* (…))
举例 3:对 com.atguigu.dao 包里面所有类,类里面所有方法进行增强
execution(* com.atguigu.dao.. (…))
6、AOP 操作(基于AspectJ 注解)
1、创建类,在类里面定义方法
public class User {
	 public void add() {
		 System.out.println("add.......");
	 }
}
- 1
- 2
- 3
- 4
- 5
2、创建增强类(编写增强逻辑)
(1)在增强类里面,创建方法,让不同方法代表不同通知类型
//增强的类
public class UserProxy {
	 public void before() {//前置通知
	 	System.out.println("before......");
	 }
}
- 1
- 2
- 3
- 4
- 5
- 6
3、进行通知的配置
(1)在 spring 配置文件中,开启注解扫描
<?xml version="1.0" encoding="UTF-8"?>
<beans xmlns="http://www.springframework.org/schema/beans"
       xmlns:xsi="http://www.w3.org/2001/XMLSchema-instance"
       xmlns:context="http://www.springframework.org/schema/context"
       xmlns:aop="http://www.springframework.org/schema/aop"
       xsi:schemaLocation="http://www.springframework.org/schema/beans http://www.springframework.org/schema/beans/spring-beans.xsd
                        http://www.springframework.org/schema/context http://www.springframework.org/schema/context/spring-context.xsd
                        http://www.springframework.org/schema/aop http://www.springframework.org/schema/aop/spring-aop.xsd">
    <!-- 开启注解扫描 -->
    <context:component-scan base-package="com.atguigu.spring5.aopanno"></context:component-scan>
- 1
- 2
- 3
- 4
- 5
- 6
- 7
- 8
- 9
- 10
- 11
(2)使用注解创建 User 和 UserProxy 对象
(3)在增强类上面添加注解 @Aspect
//增强的类
@Component
@Aspect //生成代理对象
public class UserProxy {
- 1
- 2
- 3
- 4
(4)在 spring 配置文件中开启生成代理对象
	<!-- 开启Aspect生成代理对象-->
    <aop:aspectj-autoproxy></aop:aspectj-autoproxy>
- 1
- 2
//增强的类
@Component
@Aspect  //生成代理对象
@Order(3)
public class UserProxy {

    //相同切入点抽取
    @Pointcut(value = "execution(* com.atguigu.spring5.aopanno.User.add(..))")
    public void pointdemo() {

    }

    //前置通知
    //@Before注解表示作为前置通知
    @Before(value = "pointdemo()")
    public void before() {
        System.out.println("before.........");
    }

    //后置通知(返回通知)
    @AfterReturning(value = "execution(* com.atguigu.spring5.aopanno.User.add(..))")
    public void afterReturning() {
        System.out.println("afterReturning.........");
    }

    //最终通知
    @After(value = "execution(* com.atguigu.spring5.aopanno.User.add(..))")
    public void after() {
        System.out.println("after.........");
    }

    //异常通知
    @AfterThrowing(value = "execution(* com.atguigu.spring5.aopanno.User.add(..))")
    public void afterThrowing() {
        System.out.println("afterThrowing.........");
    }

    //环绕通知
    @Around(value = "execution(* com.atguigu.spring5.aopanno.User.add(..))")
    public void around(ProceedingJoinPoint proceedingJoinPoint) throws Throwable {
        System.out.println("环绕之前.........");

        //被增强的方法执行
        proceedingJoinPoint.proceed();

        System.out.println("环绕之后.........");
    }
}
- 1
- 2
- 3
- 4
- 5
- 6
- 7
- 8
- 9
- 10
- 11
- 12
- 13
- 14
- 15
- 16
- 17
- 18
- 19
- 20
- 21
- 22
- 23
- 24
- 25
- 26
- 27
- 28
- 29
- 30
- 31
- 32
- 33
- 34
- 35
- 36
- 37
- 38
- 39
- 40
- 41
- 42
- 43
- 44
- 45
- 46
- 47
- 48
5、相同的切入点抽取
//相同切入点抽取
@Pointcut(value = "execution(* com.atguigu.spring5.aopanno.User.add(..))")
public void pointdemo() {
}

//前置通知
//@Before 注解表示作为前置通知
@Before(value = "pointdemo()")
public void before() {
	 System.out.println("before.........");
}
- 1
- 2
- 3
- 4
- 5
- 6
- 7
- 8
- 9
- 10
- 11
6、有多个增强类多同一个方法进行增强,设置增强类优先级
(1)在增强类上面添加注解 @Order(数字类型值),数字类型值越小优先级越高
@Component
@Aspect
@Order(1)
public class PersonProxy
- 1
- 2
- 3
- 4
7、完全使用注解开发
(1)创建配置类,不需要创建 xml 配置文件
@Configuration
@ComponentScan(basePackages = {"com.atguigu"})
@EnableAspectJAutoProxy(proxyTargetClass = true)
public class ConfigAop {
}
- 1
- 2
- 3
- 4
- 5
7、AOP 操作(基于AspectJ 配置文件)
1、创建两个类,增强类和被增强类,创建方法
2、在 spring 配置文件中创建两个类对象
<!--创建对象-->
<bean id="book" class="com.atguigu.spring5.aopxml.Book"></bean>
<bean id="bookProxy" class="com.atguigu.spring5.aopxml.BookProxy"></bean>
- 1
- 2
- 3
3、在 spring 配置文件中配置切入点
	<!--配置aop增强-->
    <aop:config>
        <!--切入点-->
        <aop:pointcut id="p" expression="execution(* com.atguigu.spring5.aopxml.Book.buy(..))"/>
        <!--配置切面-->
        <aop:aspect ref="bookProxy">
            <!--增强作用在具体的方法上-->
            <aop:before method="before" pointcut-ref="p"/>
        </aop:aspect>
    </aop:config>

https://www.cnblogs.com/wj0816/p/8474743.htmlspring
Spring五个事务隔离级别和七个事务传播行为
(一)SpringMVC框架结构

(二)组件说明
以下组件通常使用框架提供实现:
1、DispatcherServlet:前端控制器
用户请求到达前端控制器,它就相当于mvc模式中的c,dispatcherServlet是整个流程控制的中心,由它调用其它组件处理用户的请求,dispatcherServlet的存在降低了组件之间的耦合性。
2、HandlerMapping:处理器映射器
HandlerMapping负责根据用户请求url找到Handler即处理器,springmvc提供了不同的映射器实现不同的映射方式,例如:配置文件方式,实现接口方式,注解方式等。
3、Handler:处理器
Handler 是继DispatcherServlet前端控制器的后端控制器,在DispatcherServlet的控制下Handler对具体的用户请求进行处理。
由于Handler涉及到具体的用户业务请求,所以一般情况需要程序员根据业务需求开发Handler。
4、HandlAdapter:处理器适配器
通过HandlerAdapter对处理器进行执行,这是适配器模式的应用,通过扩展适配器可以对更多类型的处理器进行执行。
5、 ViewResolver:视图解析器
View Resolver负责将处理结果生成View视图,View Resolver首先根据逻辑视图名解析成物理视图名即具体的页面地址,再生成View视图对象,最后对View进行渲染将处理结果通过页面展示给用户。
6、View:视图
springmvc框架提供了很多的View视图类型的支持,包括:jstlView、freemarkerView、pdfView等。我们最常用的视图就是jsp。
一般情况下需要通过页面标签或页面模版技术将模型数据通过页面展示给用户,需要由程序员根据业务需求开发具体的页面。
说明:在springmvc的各个组件中,处理器映射器、处理器适配器、视图解析器称为springmvc的三大组件。
(三)注解驱动
1、配置处理器映射器
注解式处理器映射器,对类中标记了@ResquestMapping的方法进行映射。根据@ResquestMapping定义的url匹配@ResquestMapping标记的方法,匹配成功返回HandlerMethod对象给前端控制器。
HandlerMethod对象中封装url对应的方法Method。
从spring3.1版本开始,废除了DefaultAnnotationHandlerMapping的使用,推荐使用RequestMappingHandlerMapping完成注解式处理器映射。
在springmvc.xml配置文件中配置如下:
<!-- 配置处理器映射器 -->
<bean class="org.springframework.web.servlet.mvc.method.annotation.RequestMappingHandlerMapping" />
- 1
- 2
- 3
2、配置处理器适配器
注解式处理器适配器,对标记@ResquestMapping的方法进行适配。
从spring3.1版本开始,废除了AnnotationMethodHandlerAdapter的使用,推荐使用RequestMappingHandlerAdapter完成注解式处理器适配。
在springmvc.xml配置文件中配置如下:
<!-- 配置处理器适配器 -->
<bean class="org.springframework.web.servlet.mvc.method.annotation.RequestMappingHandlerAdapter" />
- 1
- 2
- 3
3、注解驱动
直接配置处理器映射器和处理器适配器比较麻烦,可以使用注解驱动来加载。
SpringMVC使用<mvc:annotation-driven>自动加载RequestMappingHandlerMapping和RequestMappingHandlerAdapter
可以在springmvc.xml配置文件中使用<mvc:annotation-driven>替代注解处理器和适配器的配置。
<!-- 注解驱动 -->
<mvc:annotation-driven />
Spring进行@Value注入时,使用构造方法注入形参的方式注入,使用类变量注入无效。
spring进行事务管理时,数据源要使用同一个,不然事务失败。