写在前面
源码:https://github.com/bajdcc/GameFramework/blob/master/CCGameFramework/base/pe2d/Render2DScene5.cpp
本文主要内容:
- 三角形的渲染
- 聚光效果的实现
- 色散的简易版实现
三角形的渲染
在上一文中,主要介绍了矩形的渲染,其实三角形也跟它差不多,无非就是判断线与线的关系罢了。
三角形的数据结构:
// 三角形
class Geo2DTriangle : public Geo2DShape
{
public:
    Geo2DTriangle(vector2 p1, vector2 p2, vector2 p3, color L, color R, float eta, color S);
    ~Geo2DTriangle() = default;

    Geo2DResult sample(vector2 ori, vector2 dir) const override;

    vector2 get_center() const override;

    vector2 center, p1, p2, p3;
    vector2 n[3];
};
要注意的地方:
- 三角形的中心点(重心)要计算出来
- 缓存三角形三条边的法线
- 确保三个点p1~p3的按顺时针方向排列的
顶点排序与法线设置
// 假定三顶点是顺时针方向
const auto p12 = p2 - p1;
const auto p13 = p3 - p1;
if (p12.x * p13.y - p12.y * p13.x < 0) // 确保点1、2、3是顺时针
{
    const auto tmp = p2;
    p2 = p3;
    p3 = tmp;
}
n[0] = p2 - p1;
n[0] = Normalize(vector2(n[0].y, -n[0].x));
n[1] = p3 - p2;
n[1] = Normalize(vector2(n[1].y, -n[1].x));
n[2] = p1 - p3;
n[2] = Normalize(vector2(n[2].y, -n[2].x));
怎样知道三个点是顺时针排列的呢?本质上是求一个点在另外两个点形成的线段的哪一侧。
求点P在直线L的左侧还是右侧?可以用叉乘法,我们只要知道叉乘结果的符号就可以了。
三角形的采样方法类似于矩形的:
Geo2DResult Geo2DTriangle::sample(vector2 ori, vector2 dir) const
{
    const vector2 pts[3] = { p1,p2,p3 };

    static int m[3][2] = { { 0,1 },{ 1,2 },{ 2,0 } };
    float t[2];
    vector2 p[2];
    int ids[2];
    int cnt = 0;
    for (int i = 0; i < 3 && cnt < 2; i++)
    {
        if (IntersectWithLineAB(ori, dir, pts[m[i][0]], pts[m[i][1]], t[cnt], p[cnt]))
        {
            ids[cnt++] = i;
        }
    }
    if (cnt == 2)
    {
        const auto td = ((t[0] >= 0 ? 1 : 0) << 1) | (t[1] >= 0 ? 1 : 0);
        switch (td)
        {
        case 0: // 双反,无交点,在外
            break;
        case 1: // t[1],有交点,在内
            return Geo2DResult(this, true,
                Geo2DPoint(t[0], p[0], n[ids[0]]),
                Geo2DPoint(t[1], p[1], n[ids[1]]));
        case 2: // t[0],有交点,在内
            return Geo2DResult(this, true,
                Geo2DPoint(t[1], p[1], n[ids[1]]),
                Geo2DPoint(t[0], p[0], n[ids[0]]));
        case 3: // 双正,有交点,在外
            if (t[0] > t[1])
            {
                return Geo2DResult(this, false,
                    Geo2DPoint(t[1], p[1], n[ids[1]]),
                    Geo2DPoint(t[0], p[0], n[ids[0]]));
            }
            else
            {
                return Geo2DResult(this, false,
                    Geo2DPoint(t[0], p[0], n[ids[0]]),
                    Geo2DPoint(t[1], p[1], n[ids[1]]));
            }
        default:
            break;
        }
    }
    return Geo2DResult();
}
聚光效果
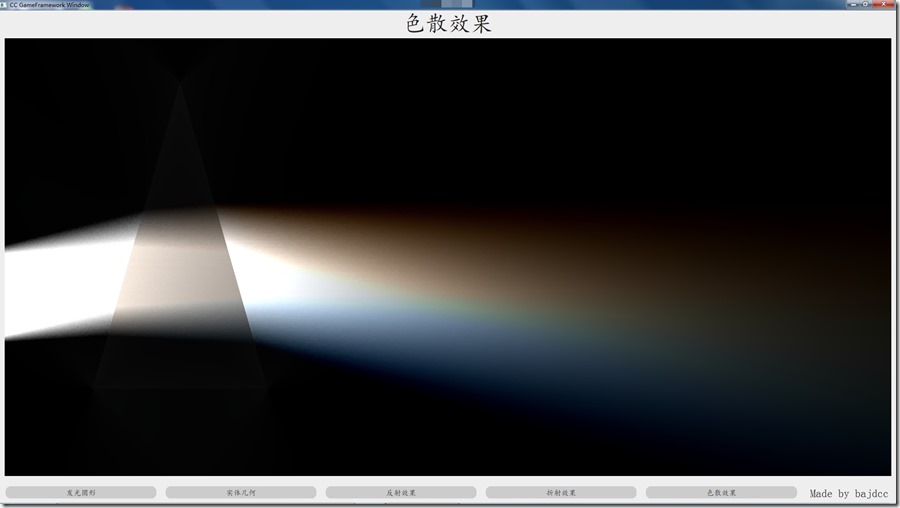
要做一个色散就要一束平行的光,实现很简单,限制角度!
我们在圆的采样方法中,做一个判断:当光线来的角度不在聚光灯有效范围内时,就返回黑色。
Geo2DResult Geo2DCircle::sample(vector2 ori, vector2 dir) const
{
    auto v = ori - center;
    auto a0 = SquareMagnitude(v) - rsq;
    auto DdotV = DotProduct(dir, v);

    //if (DdotV <= 0)
    {
        auto discr = (DdotV * DdotV) - a0; // 平方根中的算式

        if (discr >= 0)
        {
            // 非负则方程有解,相交成立
            // r(t) = o + t.d
            auto distance = -DdotV - sqrtf(discr); // 得出t,即摄影机发出的光线到其与圆的交点距离
            auto distance2 = -DdotV + sqrtf(discr);
            auto position = ori + dir * distance; // 代入直线方程,得出交点位置
            auto position2 = ori + dir * distance2;
            auto normal = Normalize(position - center); // 法向量 = 光线终点(球面交点) - 球心坐标
            auto normal2 = Normalize(position2 - center);
            if (a0 > 0 && angle && !(A1.x * dir.y < A1.y * dir.x && A2.x * dir.y > A2.y * dir.x))
            { // 判断三条线之间的时针顺序
                return Geo2DResult();
            }
            return Geo2DResult((a0 <= 0 || distance >= 0) ? this : nullptr, a0 <= 0,
                Geo2DPoint(distance, position, normal),
                Geo2DPoint(distance2, position2, normal2));
        }
    }

    return Geo2DResult(); // 失败,不相交
}
色散效果
色散其实就是不同频率的光在介质内的折射率不同,我们就简化一下,按照RGB修改折射率,如:红光=原折射率,绿光=原折射率+0.1,等。
对于没有明确修改折射率(默认为1.0)的图形,不对它做色散检查。
if (r.body->eta == 1.0f) // 不折射
{
    // 按照先前的折射方法,不变!
}
else // 色散测试
{
    const auto eta = r.inside ? r.body->eta : (1.0f / r.body->eta);
    const auto k = 1.0f - eta * eta * (1.0f - idotn * idotn);
    if (k >= 0.0f) // 可以折射,不是全反射
    {
        const auto a = eta * idotn + sqrtf(k);
        const auto refraction = eta * d - a * normal;
        const auto cosi = -(DotProduct(d, normal));
        const auto cost = -(DotProduct(refraction, normal));
        refl = refl * (r.inside ? fresnel(cosi, cost, eta, 1.0f) : fresnel(cosi, cost, 1.0f, eta));
        refl.Normalize();
        //下面不一样了
        color par;//求三个维度的分量和
        sum.Set(0.0f);//光源的光就不纳入计算
        par.Add(trace5(pos - BIAS * normal, refraction, depth + 1));//加上红光的分量
        auto n = par.Valid() ? 1 : 0;
        par.g *= ETAS;//ETAS=0.1 对红光分量而言,绿和蓝分量就削减它
        par.b *= ETAS;
        for (int i = 1; i < 3; ++i)//求蓝光和绿光分量
        {
            //ETAD=0.1   折射率:绿=红+0.1 蓝=红+0.2
            const auto eta0 = r.inside ? (r.body->eta + ETAD * i) : (1.0f / (r.body->eta + ETAD * i));
            const auto k0 = 1.0f - eta0 * eta0 * (1.0f - idotn * idotn);
            if (k >= 0.0f) // 可以折射,不是全反射
            {
                const auto a0 = eta0 * idotn + sqrtf(k0);
                const auto refraction0 = eta0 * d - a0 * normal;
                auto c = trace5(pos - BIAS * normal, refraction0, depth + 1);//做折射计算
                if (c.Valid())
                {
                    if (i == 1)
                    {
                        c.r *= ETAS;//削减其他两个颜色分量
                        c.b *= ETAS;
                    }
                    else
                    {
                        c.r *= ETAS;
                        c.g *= ETAS;
                    }
                    n++;//如果这一分量不为黑色,就有效,加一,原本要加最终值做下平均的,现在暂不用它
                }
                par.Add(c);// 加上蓝和绿分量
            }
        }
        sum.Add((refl.Negative(1.0f)) * par);//再加上三个折射分量的和
    }
    else // 不折射则为全内反射
        refl.Set(1.0f);
局部扫描
当光源很亮(RGB>10f)时,仅256的采样还不能有很好的效果,用下面的方法:
static color sample5(float x, float y) {
    color sum;
    for (auto i = 0; i < N; i++) {
        const auto a = PI2 * (i + float(rand()) / RAND_MAX) / N;
        const auto c = trace5(vector2(x, y), vector2(cosf(a), sinf(a)));
        if (c.Valid())
        {
            color par;
            for (auto j = 0; j < NP; j++) {//进一步计算
                const auto a0 = PI2 * (i + (j + float(rand()) / RAND_MAX) / NP) / N;
                const auto c0 = trace5(vector2(x, y), vector2(cosf(a0), sinf(a0)));
                par.Add(c0);
            }
            sum.Add(par * (1.0f / NP));
        }
    }
    return sum * (1.0f / N);
}
当第一层抖动采样结果有效时,做第二层抖动采样,精度更高。
最终结果1080P,一层采样数=512,二层采样数=8,双核四线程渲染用时差不多半小时。
进一步更真实的话,我只想到再增加一些折射测试,将原本的RGB分量扩展为七彩色,转换用RGB跟HSL的,其中的问题就是七彩色各分量并不正交,如何将它们整合起来还待研究。
题图的设定为RGB分量的折射率递增为0.1,也就是说1.4~1.6,颜色削减为0.1。另外,光源的光也不是严格的平行光,更优的效果还需要不断调整参数。
