前言:
Django的rest_framework一共有三大组件,分别为认证组件:perform_authentication,权限组件:check_permissions,频率组件:check_throttles;
我在前面的博客中已经梳理了认证组件,不知道大家有没有看懂;在这里我把认证的组件的博客地址在贴出来,不清楚的人可以看下
局部设置认证组件的博客:https://www.cnblogs.com/bainianminguo/p/10480887.html
全局设置认证组件的博客:https://www.cnblogs.com/bainianminguo/p/10487059.html
如果大家能看懂我上面的博客,今天学习权限组件和频率组件就很简单了
今天的博客主要分为四部分,分别是局部设置权限组件,全局设置权限组件,局部设置频率组件,全局设置频率组件
一、局部设置权限组件
1、一个请求过来,首先进入urls文件
url(r'^book_cbv/', views.Book_cbv.as_view(),name="test3"),
2、进入Book_cbv这个类,寻找as_view方法,这个类是我们自己的定义的,我们根本就没有写as_view方法
class Book_cbv(APIView):

    def get(self,request):
        query_list = models.Book.objects.all()
        # bs = book_serializers(query_list,many=True)
        bs = bookmodelserializer(query_list,many=True,context={'request': request})


        return Response(bs.data)
    def post(self,request):
        bs = bookmodelserializer(data=request.data)
        print(request.data)
        if bs.is_valid():
            print(bs.validated_data)
            bs.save()
            return Response(bs.data)
        else:
            return Response(bs.errors)
3、进入父类寻找as_view方法,父类为APIView,父类的as_view方法实际是执行APIView类的父类的view方法
    @classmethod
    def as_view(cls, **initkwargs):
        """
        Store the original class on the view function.

        This allows us to discover information about the view when we do URL
        reverse lookups.  Used for breadcrumb generation.
        """
        if isinstance(getattr(cls, 'queryset', None), models.query.QuerySet):
            def force_evaluation():
                raise RuntimeError(
                    'Do not evaluate the `.queryset` attribute directly, '
                    'as the result will be cached and reused between requests. '
                    'Use `.all()` or call `.get_queryset()` instead.'
                )
            cls.queryset._fetch_all = force_evaluation

        view = super(APIView, cls).as_view(**initkwargs)
        view.cls = cls
        view.initkwargs = initkwargs
4、进入APIView类的父类View类,看下as_view方法干了什么,实际执行View类的as_view方法,就是执行APIView类的dispatch方法,这里如果不清楚,可以看我前言中备注的博客
   @classonlymethod
    def as_view(cls, **initkwargs):
        """
        Main entry point for a request-response process.
        """
        for key in initkwargs:
            if key in cls.http_method_names:
                raise TypeError("You tried to pass in the %s method name as a "
                                "keyword argument to %s(). Don't do that."
                                % (key, cls.__name__))
            if not hasattr(cls, key):
                raise TypeError("%s() received an invalid keyword %r. as_view "
                                "only accepts arguments that are already "
                                "attributes of the class." % (cls.__name__, key))

        def view(request, *args, **kwargs):
            self = cls(**initkwargs)
            if hasattr(self, 'get') and not hasattr(self, 'head'):
                self.head = self.get
            self.request = request
            self.args = args
            self.kwargs = kwargs
            return self.dispatch(request, *args, **kwargs)
        view.view_class = cls
        view.view_initkwargs = initkwargs

        # take name and docstring from class
        update_wrapper(view, cls, updated=())

        # and possible attributes set by decorators
        # like csrf_exempt from dispatch
        update_wrapper(view, cls.dispatch, assigned=())
        return view
5、进入APIView类的dispatch方法,其实,我们这里需要关注的是initial方法
    def dispatch(self, request, *args, **kwargs):
        """
        `.dispatch()` is pretty much the same as Django's regular dispatch,
        but with extra hooks for startup, finalize, and exception handling.
        """
        self.args = args
        self.kwargs = kwargs
        request = self.initialize_request(request, *args, **kwargs)
        self.request = request
        self.headers = self.default_response_headers  # deprecate?

        try:
            self.initial(request, *args, **kwargs)

            # Get the appropriate handler method
            if request.method.lower() in self.http_method_names:
                handler = getattr(self, request.method.lower(),
                                  self.http_method_not_allowed)
            else:
                handler = self.http_method_not_allowed

            response = handler(request, *args, **kwargs)

        except Exception as exc:
            response = self.handle_exception(exc)

        self.response = self.finalize_response(request, response, *args, **kwargs)
        return self.response
6、进入initial方法,这里就到了我们的权限组件,check_permissions
    def initial(self, request, *args, **kwargs):
        """
        Runs anything that needs to occur prior to calling the method handler.
        """
        self.format_kwarg = self.get_format_suffix(**kwargs)

        # Perform content negotiation and store the accepted info on the request
        neg = self.perform_content_negotiation(request)
        request.accepted_renderer, request.accepted_media_type = neg

        # Determine the API version, if versioning is in use.
        version, scheme = self.determine_version(request, *args, **kwargs)
        request.version, request.versioning_scheme = version, scheme

        # Ensure that the incoming request is permitted
        self.perform_authentication(request)
        self.check_permissions(request)
        self.check_throttles(request)
7、进入check_permissions方法,这里需要重点看下self.get_permissions这个方法干了什么,知道这个方法了什么,我们在回到这个这个方法往下看
    def check_permissions(self, request):
        """
        Check if the request should be permitted.
        Raises an appropriate exception if the request is not permitted.
        """
        for permission in self.get_permissions():
            if not permission.has_permission(request, self):
                self.permission_denied(
                    request, message=getattr(permission, 'message', None)
                )
8、进入self.get_permissions方法,这里是不是很熟悉,和我们前面讲的认证组件是不是很类似,我们需要在我们自己的配置的视图类中定义个permission_classes的列表,而这个列表的内容是就是每个控制权限的类的实例对象
    def get_permissions(self):
        """
        Instantiates and returns the list of permissions that this view requires.
        """
        return [permission() for permission in self.permission_classes]
9、下面在回到步骤7,往下看,就知道我们该如何配置这个权限类

10、下面我们就按照上面的分析定义我们自己的权限类
具体什么逻辑为权限允许,就是我们自己设置了
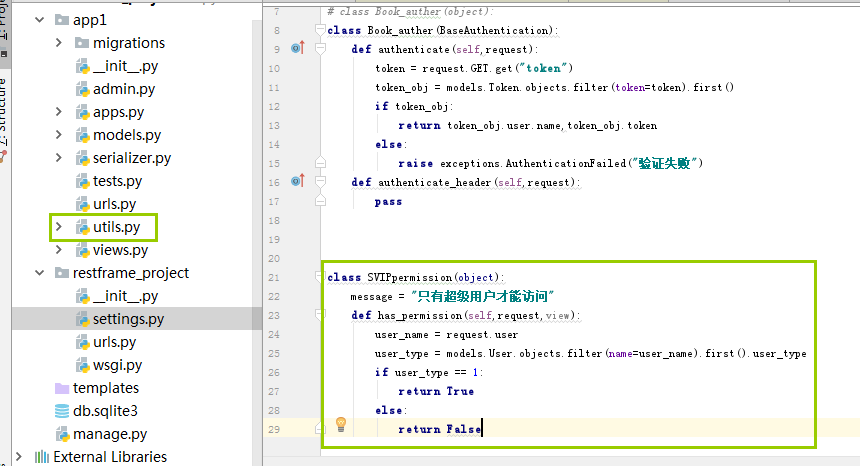
class SVIPpermission(object):
    message = "只有超级用户才能访问"
    def has_permission(self,request,view):
        user_name = request.user
        user_type = models.User.objects.filter(name=user_name).first().user_type
        if user_type == 1:
            return True
        else:
            return False
在视图类中使用权限类

二、全局设置权限组件
这个全局设置,我就简单的说一下吧,如果不清楚,可以继续到我前面的博客看一下
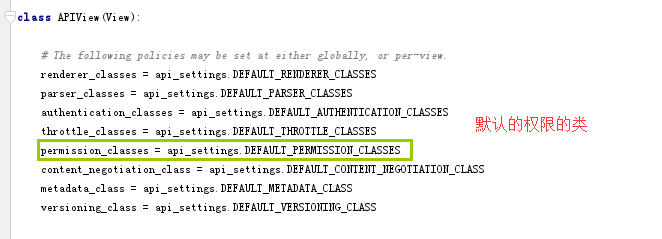
1、确定默认的权限控制的类的名称

2、把我们的权限控制的类放在一个单独文件中

3、进入settings中配置
REST_FRAMEWORK = {
    "DEFAULT_AUTHENTICATION_CLASSES":(
        "app1.utils.Book_auther",
    ),
    "DEFAULT_PERMISSION_CLASSES_CLASSES": (
        "app1.utils.SVIPpermission",
    )
}

三、局部设置频率组件
1、从局部设置权限组件的第六步开始继续讲解

2、进入check_throttles方法
    def check_throttles(self, request):
        """
        Check if request should be throttled.
        Raises an appropriate exception if the request is throttled.
        """
        for throttle in self.get_throttles():
            if not throttle.allow_request(request, self):
                self.throttled(request, throttle.wait())
3、下面看下get_throttles方法,看到这里我们是不是很清楚了,我们需要在视图类中定义了一个throttle_classe的列表,列表的内容是每个频率组件类的实例对象
    def get_throttles(self):
        """
        Instantiates and returns the list of throttles that this view uses.
        """
        return [throttle() for throttle in self.throttle_classes]
4、频率组件必须要有allow_request的方法,如果这个方法返回true,则通过频率认证,如果返回false,则没有通过频率组件,这里的频率说的意思是某个用户在单位时间内访问网页的次数,我们这里就先简单的实现就可以了,判断频率的逻辑不是这里的重点
class throttlerate(object):
    def allow_request(self,request,view):
        return True
5、在视图类中使用频率组件
class Book_cbv(APIView):
    authentication_classes = []
    permission_classes = [SVIPpermission(),]
    throttle_classes = [throttlerate(),]
    def get(self,request):
        query_list = models.Book.objects.all()
        # bs = book_serializers(query_list,many=True)
        bs = bookmodelserializer(query_list,many=True,context={'request': request})
四、全局设置频率组件
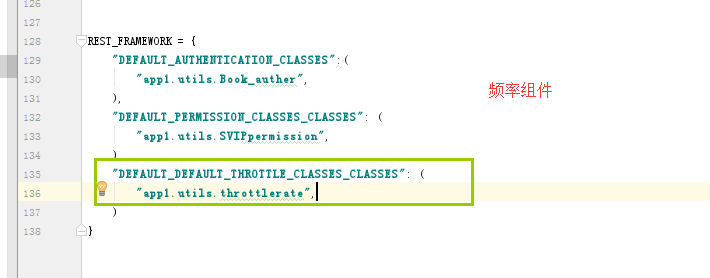
1、全局设置频率组件和全局设置权限组件也几乎是一样的,把频率组件放在一个单独的文件中

2、确定k值

3、在settings中引入配置的频率组件
REST_FRAMEWORK = {
    "DEFAULT_AUTHENTICATION_CLASSES":(
        "app1.utils.Book_auther",
    ),
    "DEFAULT_PERMISSION_CLASSES_CLASSES": (
        "app1.utils.SVIPpermission",
    ),
    "DEFAULT_DEFAULT_THROTTLE_CLASSES_CLASSES": (
        "app1.utils.throttlerate",
    )
}

总结:至此,rest_framework的三大组件都已经完成,如果有不清楚可以留言,感谢大家查阅!