Setting up multi nodes live migration in Openstack Juno with devstack
Summary
-
Live migration overview
- Setup Openstack with devstack: one controller node, two compute nodes
- Configure migrations
- Live migration test
- Issue summary
Live migration Overview
Migration enables an administrator to move a virtual-machine instance from one compute host to another. This feature is useful when a compute host requires maintenance. Migration can also be useful to redistribute the load when many VM instances are running on a specific physical machine.
The migration types are:
-
Non-live migration (sometimes referred to simply as 'migration'). The instance is shut down for a period of time to be moved to another hypervisor. In this case, the instance recognizes that it was rebooted.
-
Live migration (or 'true live migration'). Almost no instance downtime. Useful when the instances must be kept running during the migration. The different types of live migration are:
-
Shared storage-based live migration. Both hypervisors have access to shared storage.
-
Block live migration. No shared storage is required. Incompatible with read-only devices such as CD-ROMs and Configuration Drive (config_drive).
-
Volume-backed live migration. Instances are backed by volumes rather than ephemeral disk, no shared storage is required, and migration is supported (currently only available for libvirt-based hypervisors
-
This page's live migration uses block live migration which does not need shared storage.
Setup Openstack with devstack: one controller node, two compute nodes
Prepare three servers with ubuntu installed. One server is worked as control node, the other two are compute nodes(Note: please named three servers with different hostnames.) and get updates and install git
sudo apt-get update
sudo apt-get install git
Configure controller node
- Git devstack Juno release: git clone https://github.com/openstack-dev/devstack.git -b stable/juno
-
Add localrc under devstack and add content to it as following
HOST_IP=your configured IP address
MULTI_HOST=1
FIXED_RANGE=10.0.0.0/24
FIXED_NETWORK_SIZE=256
ADMIN_PASSWORD=123456
MYSQL_PASSWORD=123456
RABBIT_PASSWORD=123456
SERVICE_PASSWORD=123456
SERVICE_TOKEN=123456
SCREEN_LOGDIR=/home/stack/log/screen
LOGFILE=/home/stack/log/stack.log
LOGDAYS=1
PUBLIC_INTERFACE=eth0 #actual name of your network interface
FLAT_INTERFACE=eth0
- Run devstack to install openstack: ./stack.sh
Configure compute node
- Git devstack Juno release: git clone https://github.com/openstack-dev/devstack.git -b stable/juno
-
Add localrc under devstack and add content as done in controller node. and also add following to it.
SERVICE_HOST=your controller ip

HOST_IP=host ip

MULTI_HOST=1

 FIXED_RANGE=10.0.0.0/24

FIXED_NETWORK_SIZE=256

 ADMIN_PASSWORD=123456

MYSQL_PASSWORD=123456

RABBIT_PASSWORD=123456

SERVICE_PASSWORD=123456

SERVICE_TOKEN=123456

SCREEN_LOGDIR=/home/stack/log/screen

LOGFILE=/home/stack/log/stack.log

LOGDAYS=1

#PUBLIC_INTERFACE=eth0

FLAT_INTERFACE=eth0

DATABASE_TYPE=mysql

Q_HOST=$SERVICE_HOST

MYSQL_HOST=$SERVICE_HOST

RABBIT_HOST=$SERVICE_HOST

GLANCE_HOSTPORT=$SERVICE_HOST:9292

KEYSTONE_AUTH_HOST=$SERVICE_HOST

KEYSTONE_SERVICE_HOST=$SERVICE_HOST

ENABLED_SERVICES=n-cpu,n-net,n-api,c-sch,c-api,c-vol
-
Add some variables which would use during install openstack
Copy following info to a shell file:#!/bin/bash export OS_AUTH_URL=http://controller'ip:5000/v2.0 export OS_TENANT_ID=69eaaebc44174418956d4dd104f2be76 export OS_TENANT_NAME="admin" export OS_USERNAME="admin" export OS_PASSWORD=123456 export OS_VOLUME_API_VERSION=2
Update the OS_AUTH_URL with your controller node ip. And use command:mysql -uroot -p123456 -e "select * from keystone.project;" to get OS_TENANT_ID and update it, then run this shell
- Run devstack to install openstack: ./stack.sh
Configure migrations
-
Host name configuration
Add three server's host names to /etc/hosts to be sure that every node can ping successful to othersserver's IP server's host name
-
Configure /etc/sysconfig/iptables file to allow libvirt listen on TCP port 16509 and add a record accepting KVM communication on TCP port within the range from 49152 to 49261
Note: ubuntu does not have sysconfig folder under etc, need create it manually.-A INPUT -p tcp -m multiport --ports 16509 -m comment --comment "libvirt" -j ACCEPT -A INPUT -p tcp -m multiport --ports 49152:49216 -m comment --comment "migration" -j ACCEPT
-
Configuration libvirt
Enable libvirt listen flag at /etc/sysconfig/libvirtd file: addLIBVIRTD_ARGS="-listen"
Configure /etc/libvirt/libvirtd.conf:
listen_tls = 0
listen_tcp = 1
auth_tcp = "none"
Configure /etc/init/libvirt-bin.conf, modify exec /usr/sbin/libvirtd to exec /usr/sbin/libvirtd -l
Configure /etc/libvirt/qemu.conf, modify security_driver="none"Restart libvirt, after executing the command, ensure that libvirt is successfully restarted: sudo stop libvirt-bin && sudo start libvirt-bin
ps -ef |grep libvirt

-
Nova configuration
Modify:force_config_drive = None(value from always to None)Add:live_migration_flag=VIR_MIGRATE_UNDEFINE_SOURCE,VIR_MIGRATE_PEER2PEER,VIR_MIGRATE_LIVE (under default)
- Restart service on each node
screen -s stack -X quit
./rejoin-stack.sh
Live migration test
Before start live migration test, to be sure that the nova compute service are ready


- create instance and attach volume
nova boot --flavor=flavor_id --image=image_id instance_name
nova volume-attach vm_id volume_id auto
+----------+--------------------------------------+
| Property | Value                                |
+----------+--------------------------------------+
| device   | /dev/vdb                             |
| id       | 3deb171f-8d61-4df9-8e6e-29d86575e78e |
| serverId | bb12f3b0-c17e-49f7-b482-255258931eb4 |
| volumeId | 3deb171f-8d61-4df9-8e6e-29d86575e78e |
+----------+--------------------------------------+
- How to mount the volume which attached to the instance
1> execute command to ssh to the instance, for example: ssh cirros@10.0.0.2
2> execute command to list the partition tables for the installed devices: sudo fdisk -l
see:Disk /dev/vdb......
3> create a filesystem on the device: sudo mkfs.ext4 /dev/vdb
4> create a dictionary and mount the volume:
sudo mkdir /data
sudo mount /dev/vdb /data/
5> then we can create folder or file on it - nova show instance_id
- nova live-migration --block_migrate vm_id target_server_hostname
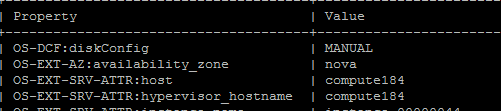
- check the host before and after migration

Issue summary
1. n-api could not start when install openstack with devstack
Solution: Restart controller node and rejoin the service, then run unstack and stack on compute node
2. Get error:libvirtError: operation failed: Failed to connect to remote libvirt URI qemu+tcp://computer247/system: Unable to resolve address 'computer247' service '16509': Name or service not known
Solution: check the iptables in configure migration step 2.
3. Live Migration failure: Invalid value '4-7,12-15' for 'cpuset.cpus': Invalid argument
Solution: Check the CPU info in your compute nodes, if there have different architecture of cpus, it would be fail to migrate
4. Compute node's nova-cpu service could not enable:

Solution: Check the libvirt settings in configure migration section, and restart libvirt-bin service, then run command in both compute node and controller node:
screen -s stack -X quit
./rejoin-stack.sh
5. Get error:

Solution: It's about nova configuration, check /etc/nova/nova.conf:
Modify:force_config_drive = None(value from always to None) Add:live_migration_flag=VIR_MIGRATE_UNDEFINE_SOURCE,VIR_MIGRATE_PEER2PEER,VIR_MIGRATE_LIVE (under default)
then rejoin stack in compute node
6. Getting error:screen-n-cpu.2015-06-02-184950.log:2015-06-04
00:16:45.797 ERROR nova.virt.libvirt.driver [-] [instance:
d1b56987-4691-4259-897f-ba4ce3e71260] Live Migration failure: Failed to
open file '/dev/disk/by-path/ip-9.115.246.45:3260-iscsi-iqn.1986-03.com.ibm:2145.v7k41.node1-lun-4': No such file or directory
Solution: No solution currently by me, it is a bug and would be fixed
7. Gettting
error when rejoin stack:2015-06-09 14:02:33.154 TRACE
cinder.openstack.common.threadgroup ArgumentError: Could not parse
rfc1738 URL from string ''"

Solution:
modify the node sql_connection in /etc/cinder/cinder.conf and
/etc/nova/nova.conf with( It has no value as default): take following as
example
/etc/cinder/cinder.conf: sql_connection = mysql://root:123456@9.115.246.185/cinder?charset=utf8
/etc/nova/nova.conf: sql_connection = mysql://root:123456@9.115.246.185/nova?charset=utf8