场景
CentOS7中Docker的安装与配置:
https://blog.csdn.net/BADAO_LIUMANG_QIZHI/article/details/119028701
首先按照上面在CentOS7中安装Docker
注:
博客:
https://blog.csdn.net/badao_liumang_qizhi
关注公众号
霸道的程序猿
获取编程相关电子书、教程推送与免费下载。
实现
1、首先打包Vue项目成dist文件
这里采用亲后端分离的快速开发框架
若依前后端分离版手把手教你本地搭建环境并运行项目:
https://blog.csdn.net/BADAO_LIUMANG_QIZHI/article/details/108465662
然后再服务器上某目录下,这里是在/usr/local下新建dockerfilenginx目录
然后进入该目录,将dist整个目录上传至该目录下。
2、上传nginx的配置文件,nginx.conf
去nginx的网站上下载一个
http://nginx.org/en/download.html
下载一个nginx找到里面的nginx.conf,并修改其内容
添加资源映射
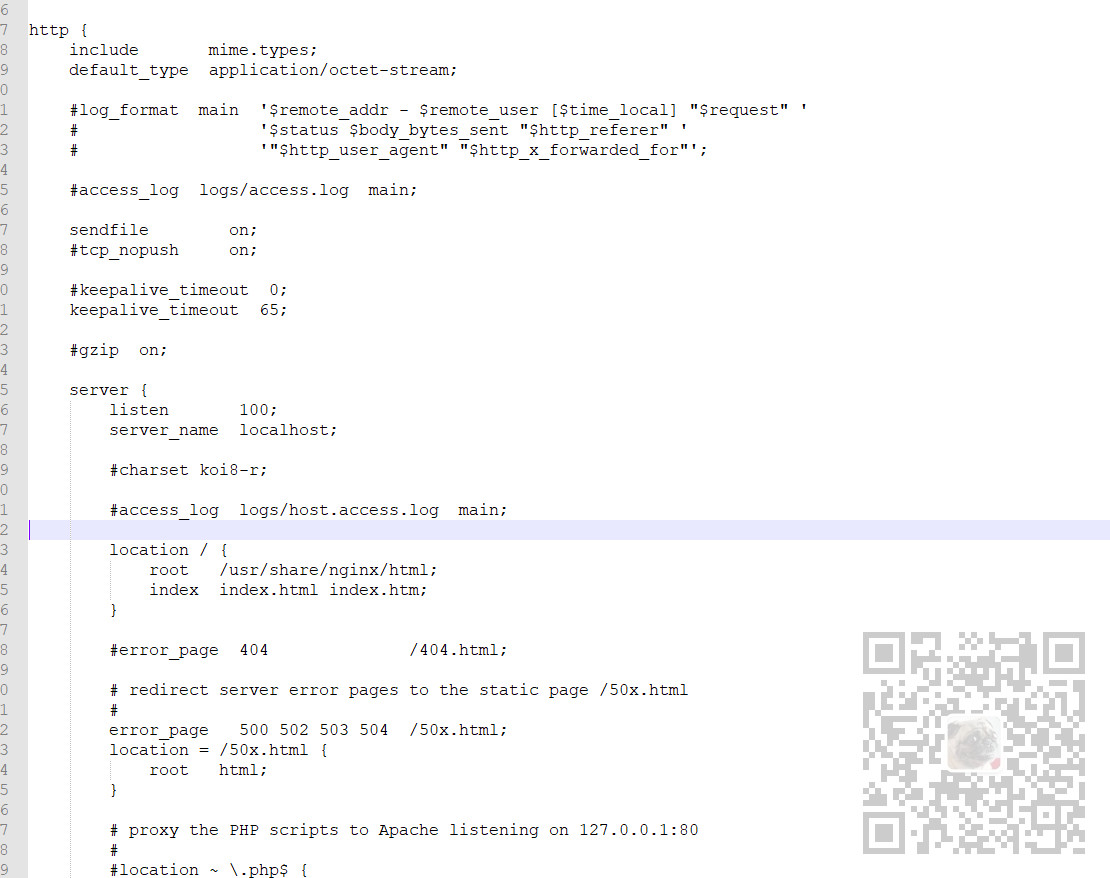
完整nginx.conf文件内容为
#user  nobody;
worker_processes  1;

#error_log  logs/error.log;
#error_log  logs/error.log  notice;
#error_log  logs/error.log  info;

#pid        logs/nginx.pid;


events {
    worker_connections  1024;
}


http {
    include       mime.types;
    default_type  application/octet-stream;

    #log_format  main  '$remote_addr - $remote_user [$time_local] "$request" '
    #                  '$status $body_bytes_sent "$http_referer" '
    #                  '"$http_user_agent" "$http_x_forwarded_for"';

    #access_log  logs/access.log  main;

    sendfile        on;
    #tcp_nopush     on;

    #keepalive_timeout  0;
    keepalive_timeout  65;

    #gzip  on;

    server {
        listen       100;
        server_name  localhost;

        #charset koi8-r;

        #access_log  logs/host.access.log  main;

        location / {
            root   /usr/share/nginx/html;
            index  index.html index.htm;
        }

        #error_page  404              /404.html;

        # redirect server error pages to the static page /50x.html
        #
        error_page   500 502 503 504  /50x.html;
        location = /50x.html {
            root   html;
        }

        # proxy the PHP scripts to Apache listening on 127.0.0.1:80
        #
        #location ~ .php$ {
        #    proxy_pass   http://127.0.0.1;
        #}

        # pass the PHP scripts to FastCGI server listening on 127.0.0.1:9000
        #
        #location ~ .php$ {
        #    root           html;
        #    fastcgi_pass   127.0.0.1:9000;
        #    fastcgi_index  index.php;
        #    fastcgi_param  SCRIPT_FILENAME  /scripts$fastcgi_script_name;
        #    include        fastcgi_params;
        #}

        # deny access to .htaccess files, if Apache's document root
        # concurs with nginx's one
        #
        #location ~ /.ht {
        #    deny  all;
        #}
    }


    # another virtual host using mix of IP-, name-, and port-based configuration
    #
    #server {
    #    listen       8000;
    #    listen       somename:8080;
    #    server_name  somename  alias  another.alias;

    #    location / {
    #        root   html;
    #        index  index.html index.htm;
    #    }
    #}


    # HTTPS server
    #
    #server {
    #    listen       443 ssl;
    #    server_name  localhost;

    #    ssl_certificate      cert.pem;
    #    ssl_certificate_key  cert.key;

    #    ssl_session_cache    shared:SSL:1m;
    #    ssl_session_timeout  5m;

    #    ssl_ciphers  HIGH:!aNULL:!MD5;
    #    ssl_prefer_server_ciphers  on;

    #    location / {
    #        root   html;
    #        index  index.html index.htm;
    #    }
    #}

}
3、在/usr/local/dockerfilenginx下新建Dockerfile文件
vi Dockerfile
修改其内容为
#基础镜像
FROM nginx
MAINTAINER “霸道的程序猿”
# 将dist文件中的内容复制到 /usr/share/nginx/html/ 这个目录下面
COPY dist/  /usr/share/nginx/html/
COPY nginx.conf /etc/nginx/nginx.conf
RUN echo 'echo nginx with dist init ok!!'
完成以上步骤之后该目录下的文件为
4、构建镜像
在该目录下执行
docker build -t nginxwithdist .
注意后面有个点,代表Dockerfile文件在当前目录
输入
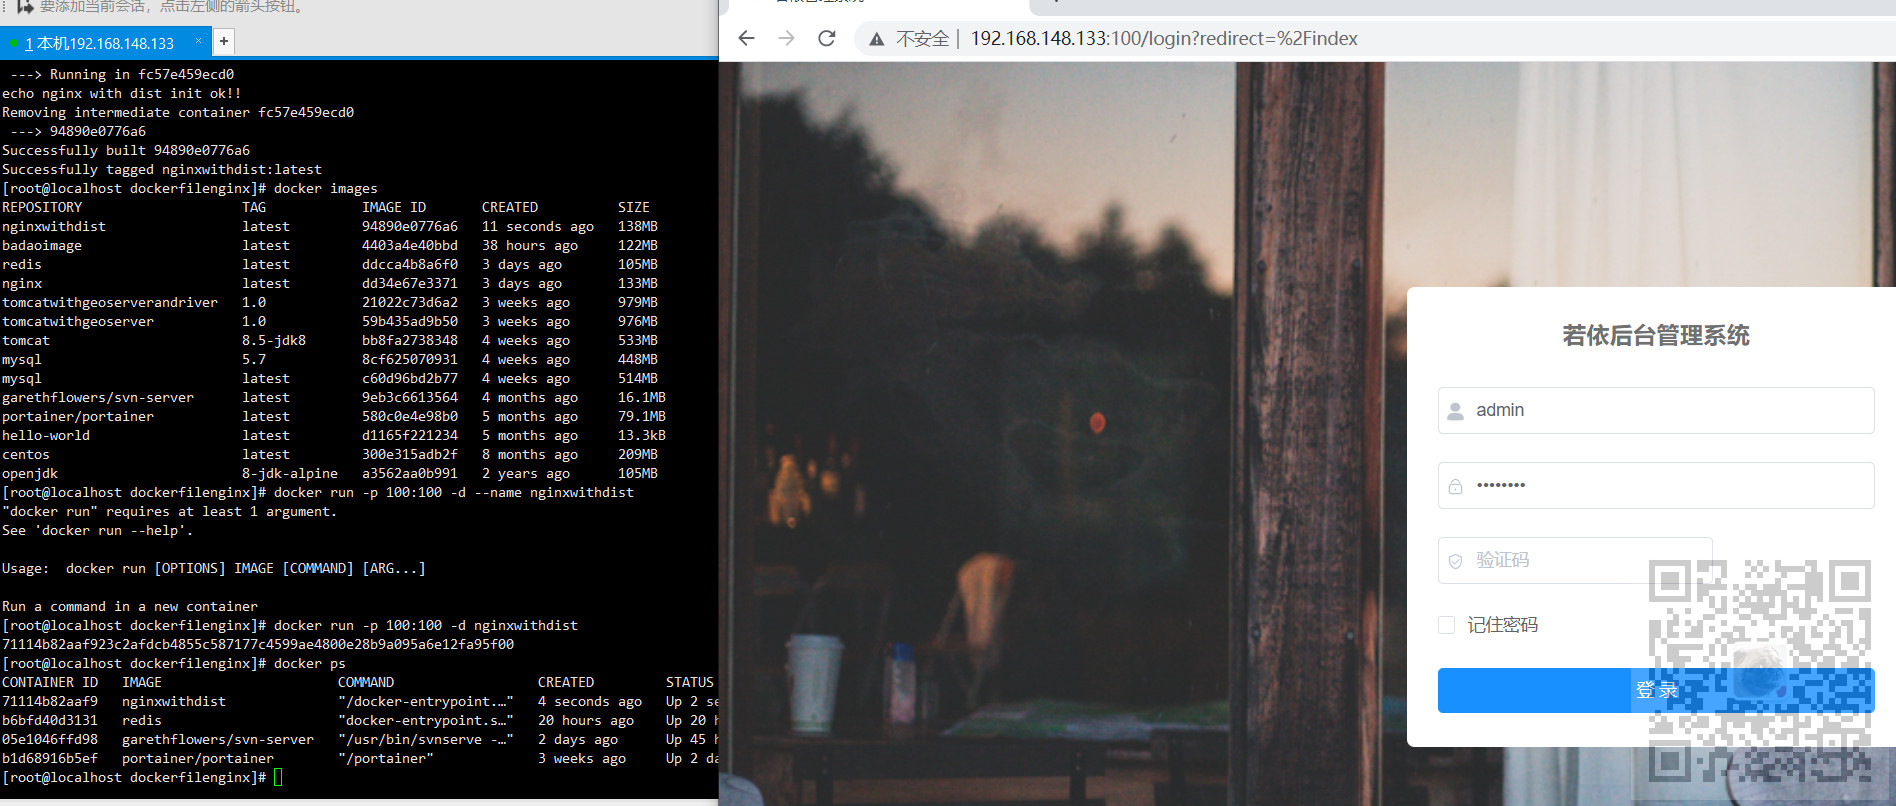
docker images
已经能看到构建好的镜像了


5、运行镜像
docker run -p 100:100 -d nginxwithdist
运行成功之后直接访问CentOS上的100端口查看效果