场景
Android布局管理器-使用FrameLayout帧布局管理器显示层叠的正方形以及前景照片:
https://blog.csdn.net/BADAO_LIUMANG_QIZHI/article/details/103839149
实现效果如下

注:
博客:
https://blog.csdn.net/badao_liumang_qizhi
关注公众号
霸道的程序猿
获取编程相关电子书、教程推送与免费下载。
实现
将activity_main.xml修改为TableLayout
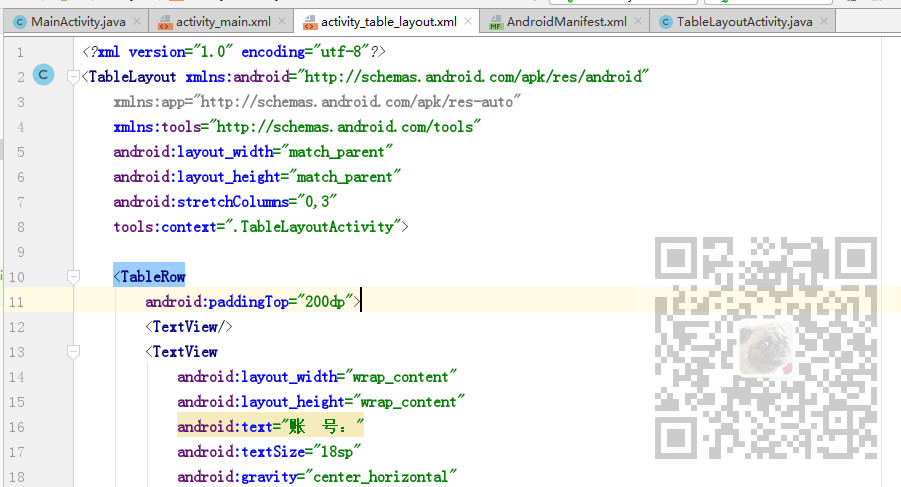
然后使用<TabelRow>标签代表添加一行,首行使用
android:paddingTop="200dp">
设置顶部内边距
第一行,添加空的TextView,再添加一个水平居中的TextView和一个EditText
 <TableRow
        android:paddingTop="200dp">
        <TextView/>
        <TextView
            android:layout_width="wrap_content"
            android:layout_height="wrap_content"
            android:text="账  号:"
            android:textSize="18sp"
            android:gravity="center_horizontal"
            />
        <EditText
            android:layout_width="match_parent"
            android:layout_height="wrap_content"
            android:hint="输入邮箱或手机号"
            />
    </TableRow>
第二行,同理,改为密码输入行,不用再设置内顶边距
<TableRow>
        <TextView/>
        <TextView
            android:layout_width="wrap_content"
            android:layout_height="wrap_content"
            android:text="密  码:"
            android:textSize="18sp"
            android:gravity="center_horizontal"
            />
        <EditText
            android:layout_width="match_parent"
            android:layout_height="wrap_content"
            android:hint="输入6-16位数字或字母"
            />
    </TableRow>
第三行添加注册和登录按钮
    <TableRow>
        <TextView/>
        <Button
            android:layout_width="wrap_content"
            android:layout_height="wrap_content"
            android:text="注  册"
            />
        <Button
            android:layout_width="match_parent"
            android:layout_height="wrap_content"
            android:text="登  录"
            android:background="#FF8247"
            />
    </TableRow>
第四行,添加忘记密码提示
<TableRow
        android:paddingTop="20dp"
        >
        <TextView/>
        <TextView/>
        <TextView
            android:layout_width="wrap_content"
            android:layout_height="wrap_content"
            android:textColor="#FF4500"
            android:text="忘记密码?"
            android:gravity="right"
            />
        <TextView/>
    </TableRow>
完整示例代码
<?xml version="1.0" encoding="utf-8"?>
<TableLayout xmlns:android="http://schemas.android.com/apk/res/android"
    xmlns:app="http://schemas.android.com/apk/res-auto"
    xmlns:tools="http://schemas.android.com/tools"
    android:layout_width="match_parent"
    android:layout_height="match_parent"
    tools:context=".TableLayoutActivity">

    <TableRow
        android:paddingTop="200dp">
        <TextView/>
        <TextView
            android:layout_width="wrap_content"
            android:layout_height="wrap_content"
            android:text="账  号:"
            android:textSize="18sp"
            android:gravity="center_horizontal"
            />
        <EditText
            android:layout_width="match_parent"
            android:layout_height="wrap_content"
            android:hint="输入邮箱或手机号"
            />
    </TableRow>

    <TableRow>
        <TextView/>
        <TextView
            android:layout_width="wrap_content"
            android:layout_height="wrap_content"
            android:text="密  码:"
            android:textSize="18sp"
            android:gravity="center_horizontal"
            />
        <EditText
            android:layout_width="match_parent"
            android:layout_height="wrap_content"
            android:hint="输入6-16位数字或字母"
            />
    </TableRow>

    <TableRow>
        <TextView/>
        <Button
            android:layout_width="wrap_content"
            android:layout_height="wrap_content"
            android:text="注  册"
            />
        <Button
            android:layout_width="match_parent"
            android:layout_height="wrap_content"
            android:text="登  录"
            android:background="#FF8247"
            />
    </TableRow>

    <TableRow
        android:paddingTop="20dp"
        >
        <TextView/>
        <TextView/>
        <TextView
            android:layout_width="wrap_content"
            android:layout_height="wrap_content"
            android:textColor="#FF4500"
            android:text="忘记密码?"
            android:gravity="right"
            />
        <TextView/>
    </TableRow>

</TableLayout>