mail/mailx
简述
mail 命令是 Linux 下一个非常轻巧的交互式的命令行邮件客户端,基于 Berkeley Mail 8.1,提供 MIME、MAP、POP3、SMTP 和 S/MIME 等扩展
mail 默认是调用本机 MTA 发送邮件的,这意味着需要在本机上安装 sendmail 或 postfix 或 exim 或…,配置比较麻烦,而且会带来不必要的资源占用。
通过修改配置文件,可以达到不使用 sendmail 而用外部 smtp 服务器发送邮件的目的。
安装
CentO S7 系统默认安装
mail 默认指向 mailx:
[root@localhost ~]# which mail
/bin/mail
[root@localhost ~]# ls -l /bin/mail
lrwxrwxrwx. 1 root root 5 8月  30 12:11 /bin/mail -> mailx
如果没有安装,使用 yum install -y mailx 进行安装。
yum -y install mailx
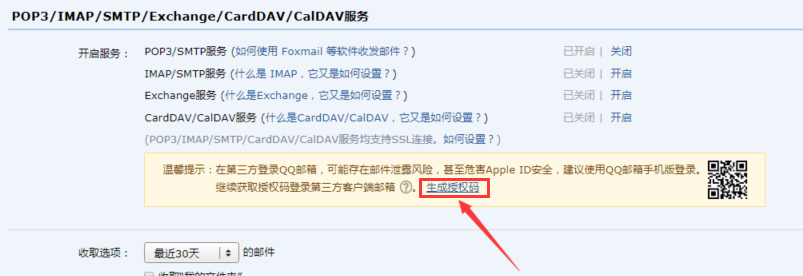
QQ邮箱配置
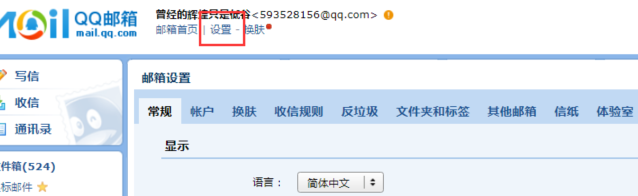
- 登录QQ邮箱, 选择设置
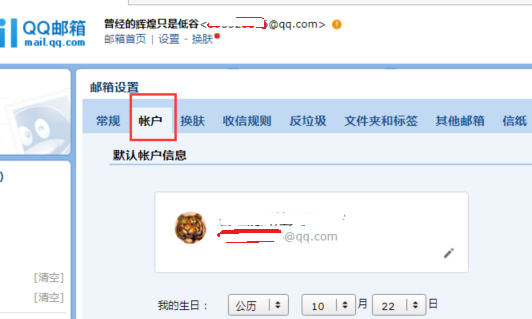
- 选择邮箱设置下的账户
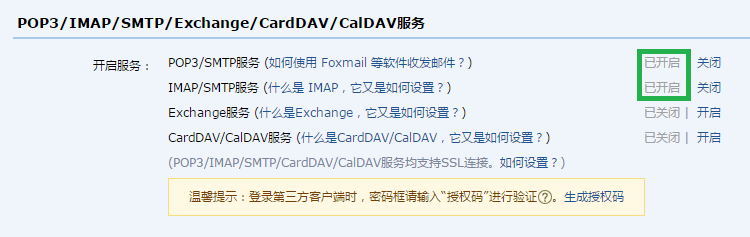
- 往下滚动, 找到并打开相应的
POP3/SMTP服务与IMAP/SMTP服务
- 需要验证密保
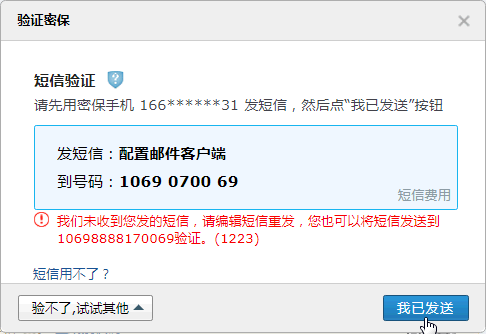
- 生成授权码
配置/etc/mail.rc
如果没有ssl加密,所有的一切邮件数据几乎都是明文发送的,包括发送给smtp服务器的授权码,有点危险,就是为了自己的邮箱帐号的安全,也最好启用ssl加密
在配置文件/etc/mail.rc的最后添加:
set from=253097001@qq.com                # 邮件来源(发件人)
set smtp=smtps://smtp.qq.com:465         # smtp服务器地址,根据相应的邮箱自行百度
set smtp-auth-user=253097001             # 发件人邮箱用户名,邮箱地址去掉@后缀
set smtp-auth-password=xcvzpqgrjtmuecaa  # smtp客户端授权密码,登录邮箱设置,并非邮箱密码!
set smtp-auth=login                      # 邮件认证方式=登录认证
set ssl-verify=ignore                    # 忽略ssl验证
set nss-config-dir=/etc/pki/nssdb/       # 证书所在目录

set smtp-use-starttls                    # 安全连接传输,启用ssl加密
set nss-config-dir=/etc/ssl/certs        # ssl加密证书,请求来的证书目录改为/root/.certs/
发送邮件:
注意:如果需要发送给多个收件人,收件人之间用逗号分隔,例如:
00000000@qq.com,888888@qq.com。
用户交互式(不常用)
这种方式很简单,也不常用,我们更希望的是通过代码或则一行命令就完成,而不是交互。
mailx test@test.com
回车,进入交互模式
- 第一行输入抄送(可空),然后回车
- 第二行输入正文内容(可空),然后回车
- ... ... 同上
ctrl+d发送邮件
重定向
- 利用cat输出的内容作为邮件内容,可以直接发送。
cat > mail test@test.com << EOF
<test
<EOF
- 利用文件作为邮件内容,可以直接发送。
mailx < test.txt test@test.com
或者
mailx test@test.com < test.txt
管道方式
利用echo输出的内容作为邮件内容,可以直接发送。
echo "test" | mailx test@test.com
命令选项
| 选项 | 说明 |
|---|---|
-a file |
指定文件附加到邮件中 |
-b address |
指定密件副本的收信人(密送人)地址 |
-c address |
指定副本的收信人(抄送人)地址 |
-f [file] |
读取指定邮件文件中的邮件 |
-i |
忽略终端发出的信息 |
-I |
使用互动模式 |
-n |
启动时禁止读取 /etc/mail.rc |
-N |
阅读邮件时,不显示邮件的标题 |
-s subject |
指定邮件的主题 |
-t |
要发送的消息应包含带有 To:、Cc:、或 Bcc: 字段的消息头,在命令行上指定的收件人将被忽略。 |
-u user |
读取指定用户的邮件 |
-v |
执行时,显示详细的信息 |
-V |
显示版本信息并退出 |
报错
Error initializing NSS: Unknown error -8015.
- 加sudo运行
- 给普通用户加上读权限(chmod +r ...)
- 改变证书拥有者(chown 普通用户名:普通用户名 ....)
一个监控用户登录的脚本,将登陆者的ip、登录方式,登录用户名发送到test@test.com
#!bin/bash
loginCO=0
loginCL=who | wc -l      # 获取已登录用户列表
while true
do
  if [[ "$loginCL" -gt 0 ]];then
    if [[ "$loginCL" -gt "$loginCO" ]];then           # 当新获取的用户数比旧用户数要多时
      user=$(who | sed -n -e '$p' | awk '{print $1}') # 取已登录用户列表的最后一个用户信息
      clientNumber=$(who | sed -n -e '$p' | awk '{print $2}')
      time=$(who | sed -n -e '$p' | awk '{print $3"-"$4" "$5}')
      ip=$(who | sed -n -e '$p' | awk '{print $6}' | cut -d "(" -f2 | cut -d ")" -f1)
      echo -e "someone is logging!
here are some imformation for it :

User:$user
ClientNumber: $clientNumber
Time: $time
IP:$ip" > /tmp/mail/loginmail
      mailx -s "logging status" test@test.com < /tmp/mail/loginmail  # test@test.com为接受邮件的邮箱
    fi
  fi
  sleep 3  # 等待3秒再次获取已登录用户数,这个时间越短检测成功率越高
  loginCO=$loginCL
  loginCL=who | wc -l
done
请求数字证书
126
[root@PLAY ~]# mkdir -p /root/.certs/                           # 创建存放证书目录
[root@PLAY ~]# echo -n | openssl s_client -connect smtp.126.com:465 | sed -ne '/-BEGIN CERTIFICATE-/,/-END CERTIFICATE-/p' > ~/.certs/126.crt          # 向126请求证书
depth=2 C = US, O = DigiCert Inc, OU = www.digicert.com, CN = DigiCert Global Root CA
verify return:1
depth=1 C = US, O = DigiCert Inc, OU = www.digicert.com, CN = GeoTrust RSA CA 2018
verify return:1
depth=0 C = CN, L = Hangzhou, O = "NetEase (Hangzhou) Network Co., Ltd", OU = Mail Dept., CN = *.126.com
verify return:1
DONE

[root@PLAY ~]# certutil -A -n "GeoTrust SSL CA" -t "C,," -d ~/.certs -i ~/.certs/126.crt                  # 添加一个证书到证书数据库中
[root@PLAY ~]# certutil -A -n "GeoTrust Global CA" -t "C,," -d ~/.certs -i ~/.certs/126.crt                # 添加一个证书到证书数据库中
[root@PLAY ~]# certutil -L -d /root/.certs   # 列出目录下证书
Certificate Nickname Trust Attributes
SSL,S/MIME,JAR/XPI
GeoTrust SSL CA C,,
[root@PLAY ~]# cd /root/.certs/
[root@PLAY .certs]# certutil -A -n "GeoTrust SSL CA - G3" -t "Pu,Pu,Pu" -d ./ -i 126.crt
Notice: Trust flag u is set automatically if the private key is present.
163
[root@PLAY ~]# mkdir -p /root/.certs/
[root@PLAY ~]# echo -n | openssl s_client -connect smtp.163.com:465 | sed -ne '/-BEGIN CERTIFICATE-/,/-END CERTIFICATE-/p' > ~/.certs/163.crt
certutil -A -n "GeoTrust SSL CA" -t "C,," -d ~/.certs -i ~/.certs/163.crt
certutil -A -n "GeoTrust Global CA" -t "C,," -d ~/.certs -i ~/.certs/163.crt
certutil -L -d /root/.certs

[root@PLAY ~]# cd /root/.certs/
[root@PLAY ~]# certutil -A -n "GeoTrust SSL CA - G3" -t "Pu,Pu,Pu" -d ./ -i 163.crt