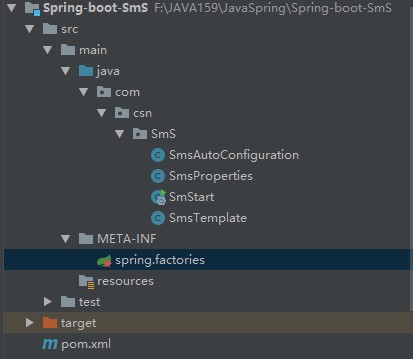
效果:在工程中只需要导入起步依赖,通过@Autowired注入工具类发送短信
详细步骤:
<?xml version="1.0" encoding="UTF-8"?>
<project xmlns="http://maven.apache.org/POM/4.0.0"
         xmlns:xsi="http://www.w3.org/2001/XMLSchema-instance"
         xsi:schemaLocation="http://maven.apache.org/POM/4.0.0 http://maven.apache.org/xsd/maven-4.0.0.xsd">
    <modelVersion>4.0.0</modelVersion>

    <groupId>spring-boot</groupId>
    <artifactId>Spring-boot-SmS</artifactId>
    <version>1.0-SNAPSHOT</version>

    <parent>
        <groupId>org.springframework.boot</groupId>
        <artifactId>spring-boot-starter-parent</artifactId>
        <version>2.2.2.RELEASE</version>
    </parent>

    <dependencies>
        <dependency>
            <groupId>org.springframework.boot</groupId>
            <artifactId>spring-boot-starter</artifactId>
        </dependency>
        <dependency>
            <groupId>org.projectlombok</groupId>
            <artifactId>lombok</artifactId>
        </dependency>
        <!--阿里云短信服务-->
        <dependency>
            <groupId>com.aliyun</groupId>
            <artifactId>aliyun-java-sdk-core</artifactId>
            <version>4.0.6</version>
        </dependency>
        <dependency>
            <groupId>com.aliyun</groupId>
            <artifactId>aliyun-java-sdk-dysmsapi</artifactId>
            <version>1.1.0</version>
        </dependency>
    </dependencies>


    <!--最后导出jar或war的名称-->
    <build>
        <finalName>springboot-demo</finalName>
        <plugins>
            <plugin>
                <groupId>org.springframework.boot</groupId>
                <artifactId>spring-boot-maven-plugin</artifactId>
            </plugin>
        </plugins>
    </build>


</project>
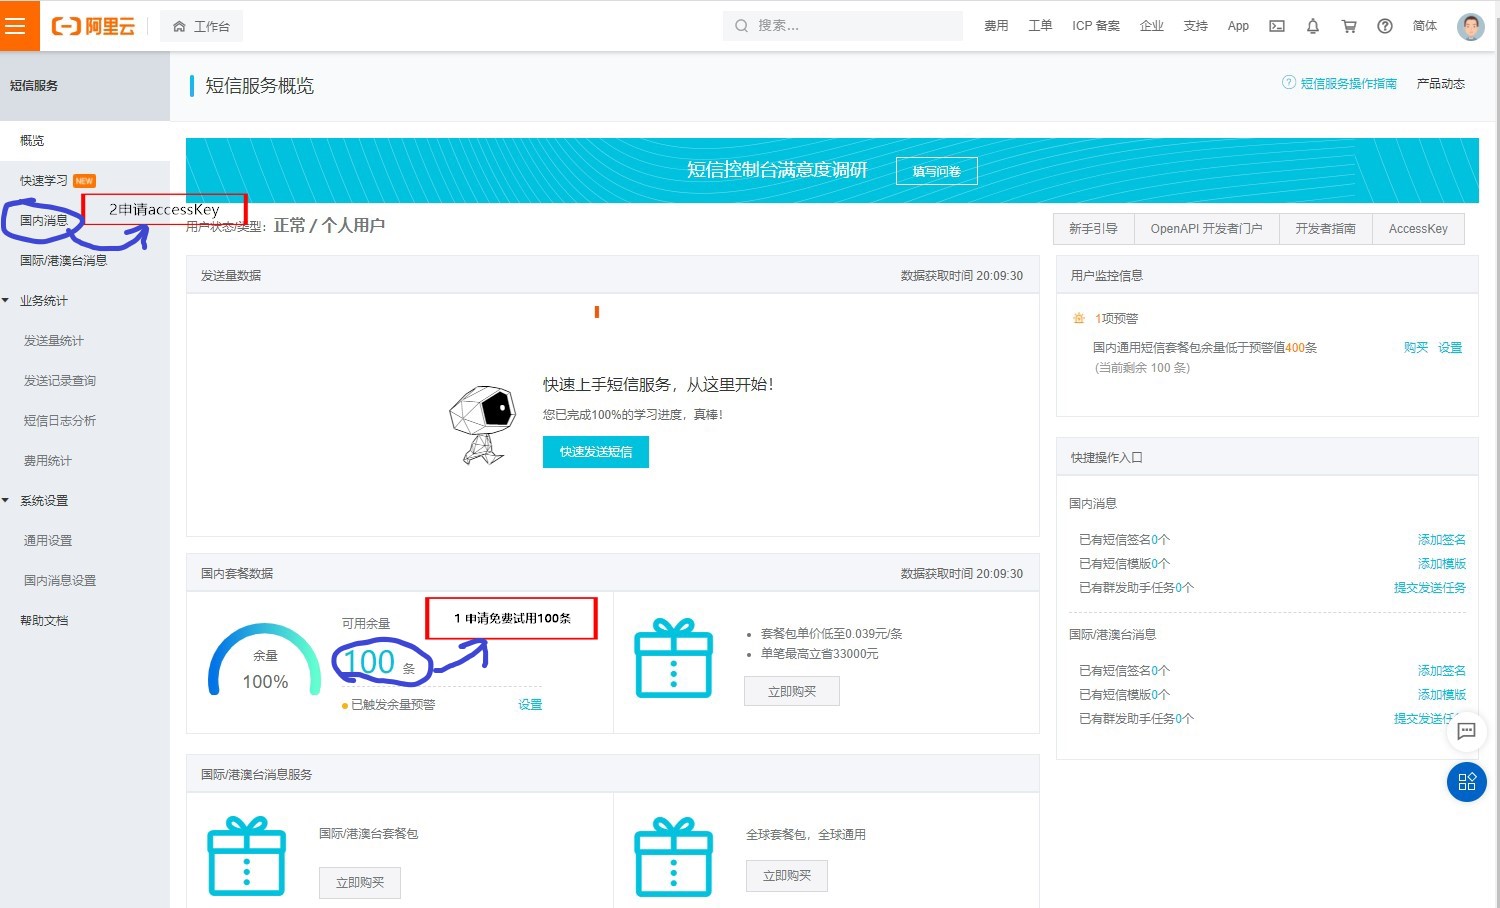
package com.csn.SmS;

import lombok.Data;
import org.springframework.boot.context.properties.ConfigurationProperties;

@Data
@ConfigurationProperties("sms")
public class SmsProperties {

    //短信模板约定
    private String accessKeyId="";//从阿里云申请 申请链接https://www.aliyun.com/product/sms?spm=5176.19720258.J_8058803260.55.c9a82c4awzdXrQ
    private String accessKeySecret="";//从阿里云申请
    private String signName="";//签名名称
    private String templateCode="";//模版CODE

}
package com.csn.SmS;

import com.aliyuncs.DefaultAcsClient;
import com.aliyuncs.IAcsClient;
import com.aliyuncs.dysmsapi.model.v20170525.SendSmsRequest;
import com.aliyuncs.dysmsapi.model.v20170525.SendSmsResponse;
import com.aliyuncs.exceptions.ClientException;
import com.aliyuncs.profile.DefaultProfile;
import com.aliyuncs.profile.IClientProfile;

public class SmsTemplate {
    private String accessKeyId;
    private String accessKeySecret;
    private String signName;
    private String templateCode;

    public SmsTemplate(SmsProperties smsProperties) {
        this.accessKeyId = smsProperties.getAccessKeyId();
        this.accessKeySecret = smsProperties.getAccessKeySecret();
        this.signName = smsProperties.getSignName();
        this.templateCode = smsProperties.getTemplateCode();
    }

    // 调用阿里云平台发送短信
    public SendSmsResponse sendSms(String phoneNumbers, String code) throws ClientException {
        //可自助调整超时时间
        System.setProperty("sun.net.client.defaultConnectTimeout", "10000");
        System.setProperty("sun.net.client.defaultReadTimeout", "10000");

        //初始化acsClient,暂不支持region化
        IClientProfile profile = DefaultProfile.getProfile("cn-hangzhou", accessKeyId, accessKeySecret);
        DefaultProfile.addEndpoint("cn-hangzhou", "cn-hangzhou", "Dysmsapi", "dysmsapi.aliyuncs.com");
        IAcsClient acsClient = new DefaultAcsClient(profile);

        //组装请求对象-具体描述见控制台-文档部分内容
        SendSmsRequest request = new SendSmsRequest();
        //必填:待发送手机号
        request.setPhoneNumbers(phoneNumbers);
        //必填:短信签名-可在短信控制台中找到
        request.setSignName(signName);
        //必填:短信模板-可在短信控制台中找到
        request.setTemplateCode(templateCode);
        //可选:模板中的变量替换JSON串,如模板内容为"亲爱的${name},您的验证码为${code}"时,此处的值为
        request.setTemplateParam("{"code":"" + code + ""}");

        //选填-上行短信扩展码(无特殊需求用户请忽略此字段)
        //request.setSmsUpExtendCode("90997");

        //可选:outId为提供给业务方扩展字段,最终在短信回执消息中将此值带回给调用者
        request.setOutId("yourOutId");

        //hint 此处可能会抛出异常,注意catch
        SendSmsResponse sendSmsResponse = acsClient.getAcsResponse(request);

        return sendSmsResponse;
    }
}
SmsAutoConfiguration
package com.csn.SmS;

import com.aliyuncs.dysmsapi.model.v20170525.SendSmsRequest;
import org.springframework.boot.autoconfigure.condition.ConditionalOnClass;
import org.springframework.boot.autoconfigure.condition.ConditionalOnMissingBean;
import org.springframework.boot.context.properties.EnableConfigurationProperties;
import org.springframework.context.annotation.Bean;
import org.springframework.context.annotation.Configuration;

@Configuration // 声明当前是一个配置类
@ConditionalOnClass(SendSmsRequest.class) // 只有项目引入了阿里的坐标,才会触发自动装配
@EnableConfigurationProperties(SmsProperties.class) // 将此属性对象创建并交给ioc容器
public class SmsAutoConfiguration {

    @Bean(name = "smsTemplate")  // 将短信工具类交给了ioc容器
    @ConditionalOnMissingBean(name = "smsTemplate") // 如果ioc容器已经有了此模板对象,我们就不会创建
    public SmsTemplate smsTemplate(SmsProperties smsProperties) {
        return new SmsTemplate(smsProperties);
    }
}
org.springframework.boot.autoconfigure.EnableAutoConfiguration=
  com.csn.SmS.SmsAutoConfiguration
package com.csn.SmS;

import org.springframework.boot.SpringApplication;
import org.springframework.boot.autoconfigure.SpringBootApplication;

@SpringBootApplication
public class SmStart {
    public static void main(String[] args) {
        SpringApplication.run(SmStart.class);
    }
}
        <!--SmS起步依赖-->
        <dependency>
            <groupId>spring-boot</groupId>
            <artifactId>Spring-boot-SmS</artifactId>
            <version>1.0-SNAPSHOT</version>
        </dependency>
    </dependencies>
#覆盖约定配置
sms:
  access-key-id:  #自己申请到的
  access-key-secret:  #自己申请到的
  sign-name:  #自己的
  template-code:  #自己的
#sl4j日志级别 用于测试
logging:
  level:
    com.csn: debug
SmsTest
package com.csn;
import com.csn.SmS.SmsTemplate;
import lombok.extern.slf4j.Slf4j;
import org.junit.Test;
import org.junit.runner.RunWith;
import org.springframework.beans.factory.annotation.Autowired;
import org.springframework.boot.test.context.SpringBootTest;
import org.springframework.test.context.junit4.SpringRunner;

@RunWith(SpringRunner.class)
@SpringBootTest
@Slf4j
public class SmsTest {
    @Autowired
    private SmsTemplate smsTemplate;

    @Test
    public void test01()throws Exception{

        smsTemplate.sendSms("176461xxxx", "6666"); //自己的手机号 ,希望收到的验证码
     log.debug("短信验证码已发送");
 } }
未经允许 禁止转载