git的使用
一.git 的介绍与安装
1.git 与svn的区别
① git 是一个分布式的, svn不是; 这是git和其他非分布式的版本控制系统,例如svn,cvs等,最大的区别。
② git把内容按元数据方式存储, 而svn是按文件; 所有的资源控制系统都是把文件的元信息隐藏在一个类似.svn 等的文件夹里。
③ git 分支和svn的分支不同; 分支在svn中一点不特别,就是版本库中的另外的一个目录。
④ git没有一个全局的版本号, 而svn有;目前为止这是跟svn相比git缺少的最大的一个特征。
⑤ git的内容完整性要优于svn; git的内容存储使用的是SHA-1哈希算法。 这能确保代码内容的完整性;确保在遇到磁盘故障和网络问题时 降低对版本库的破坏。
2. git的安装
①yum 安装
[root@git ~]# yum install git -y
[root@git ~]# git --version
git version 1.8.3.1
② 编译安装
yum -y install curl-devel expat-devel gettext-devel openssl-devel zlib-devel gcc perl-ExtUtils-MakeMaker


#编译安装git
tar -xf git-2.9.5.tar.gz
cd git-2.9.5
make prefix=/usr/local/git all
make prefix=/usr/local/git install
rm -rf /usr/bin/git
ln -s /usr/local/git/bin/git /usr/bin/git
git version
3. git的使用
① 配置git
git config --global user.name augustyang1
git config --global user.email "augustyang1@163.com"
git config --global color.ui true  #语法高亮
② 获取git仓库(初始化仓库)
# 创建目录
mkdir git_data
# 进入目录
cd git_data/
# 初始化
git init
# 查看工作区状态
git status
4. git4个区域
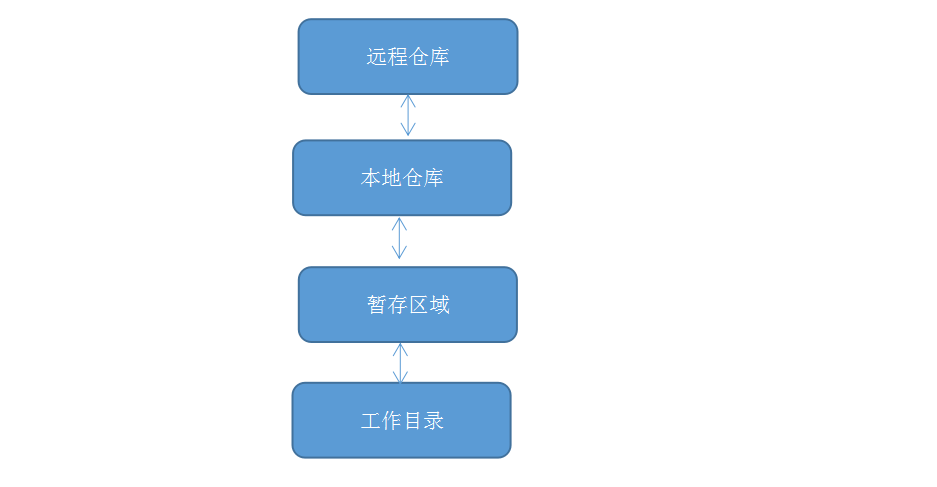
① Workspace: 工作区
② Index / Stage /Cached: 暂存区, 一般存放在”.git目录下”的index文件(.git/index)中,我们有时候把暂存区叫做索引(index)
③ Repository:本地仓库工作区有一个隐藏目录.git 这不算工作区, 而是git的版本库
④ Remote: 远程仓库
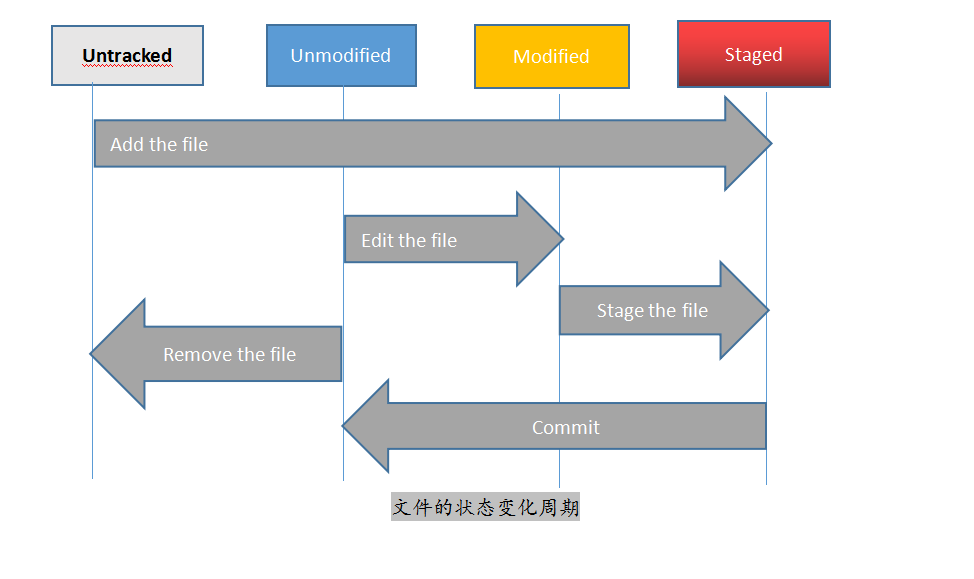
5.git的四种状态
前面讲的git有四个区域,而单就文件改动状态层面而言,git区域内的文件也有4种状态(这文件的状态不与git区域一一对应)
Untracked:新增的文件的状态,未受 Git 管理,记录在工作区
Modified: 受 Git 管理过的文件的改动状态(包括改动内容、删除文件),记录在工作区
Staged: 将记录在工作区的文件变动状态通知了 Git,记录在暂存区
Unmodified:受 Git 管理中的文件状态(没有变动),记录在本地仓库/远程仓库
6. 创建文件 ,并查看git状态
[root@git git_data]# touch a b c
[root@git git_data]# git status
On branch master

Initial commit

Untracked files:
  (use "git add <file>..." to include in what will be committed)

    a
    b
    c

nothing added to commit but untracked files present (use "git add" to track)
7. 文件提交到缓冲区(状态发生改变 untrached 变成staged )
git add a
[root@git git_data]# git add a
[root@git git_data]# git status
On branch master

Initial commit

Changes to be committed:
  (use "git rm --cached <file>..." to unstage)

    new file:   a

Untracked files:
  (use "git add <file>..." to include in what will be committed)

    b
    c
. * 代表全部
[root@git git_data]# git add .
[root@git git_data]# git status
On branch master

Initial commit

Changes to be committed:
  (use "git rm --cached <file>..." to unstage)

    new file:   a
    new file:   b
    new file:   c
8. 从缓冲区移动到工作目录
git rm --cached filename
[root@git git_data]# git rm --cached c
rm 'c'

[root@git git_data]# git status
On branch master

Initial commit

Changes to be committed:
  (use "git rm --cached <file>..." to unstage)

    new file:   a
    new file:   b

Untracked files:
  (use "git add <file>..." to include in what will be committed)

    c
9. 同时删除本地目录和缓冲区的数据
git rm -f filename
[root@git git_data]# git rm -f b
rm 'b'
[root@git git_data]# git status
On branch master

Initial commit

Changes to be committed:
  (use "git rm --cached <file>..." to unstage)

    new file:   a

Untracked files:
  (use "git add <file>..." to include in what will be committed)

    c
方法二: 先移回工作目录 再删除
git rm --cached c
rm -f c
[root@git git_data]# git status
On branch master

Initial commit

Changes to be committed:
  (use "git rm --cached <file>..." to unstage)

    new file:   a
    new file:   c

[root@git git_data]# git rm --cached c
rm 'c'
[root@git git_data]# git status
On branch master

Initial commit

Changes to be committed:
  (use "git rm --cached <file>..." to unstage)

    new file:   a

Untracked files:
  (use "git add <file>..." to include in what will be committed)

    c

[root@git git_data]# rm -f c
[root@git git_data]# git status
On branch master

Initial commit

Changes to be committed:
  (use "git rm --cached <file>..." to unstage)

    new file:   a
10. 缓存区数据, 提交到本地仓库
git commit -m "commit a"
[root@git git_data]# git commit -m "commit a"
[master (root-commit) cdc2f45] commit a
 1 file changed, 0 insertions(+), 0 deletions(-)
 create mode 100644 a

[root@git git_data]# git status
On branch master
nothing to commit, working tree clean
11. 重命名暂存区数据
git mv old_name new_name
[root@git git_data]# touch yy
[root@git git_data]# git add yy

[root@git git_data]# git mv yy yy.txt

[root@git git_data]# git status
On branch master
Changes to be committed:
  (use "git reset HEAD <file>..." to unstage)

    new file:   yy.txt
12. 对比数据
# 对比本地工作目录 与缓存区数据
git diff filename
[root@git git_data]# echo "aa" >a
[root@git git_data]# git diff a
diff --git a/a b/a
index e69de29..e61ef7b 100644
--- a/a
+++ b/a
@@ -0,0 +1 @@
+aa
# 对比缓存数据与本地仓库数据
git diff --cached filename
[root@git git_data]# git diff --cached a
13 查看历史
git log        #查看提交历史记录
git log -2     #查看最近几条记录
git log --oneline  #查看简单的历史记录
git log --oneline --decorate  #在那个分支上
git log -p   #查看完整log
git reflog   #查看以前的历史更新点
14 回滚
# 缓存区数据  覆盖本地数据
git checkout -- a

# 撤销提交 返还给缓存区
git reset HEAD a

#撤销提交(commit)
git  reset --hard a1b6e46
git  reset --hard  HEAD^  #上一个版本
二.分支
git的分支,从本质上讲 仅是指向提交对象的可变指针。这一点与svn是有着本质的区别。svn的分支实际上就是一个目录。
git默认分支名字是master。在多次提交操作之后,其实已经有一个指向最后那个提交对象的master分支。它会在每次的提交操作中自动向前移动。
1. 查看分支log
[root@git git_data]# git log --oneline --decorate
cdc2f45 (HEAD -> master) commit a
git branch             #查看分支
git checkout  -b  dev  #创建分支并切换分支
git branch dev         #创建分支
git checkout dev       #切换分支
git merge dev          #把dev分支合并到master上
git branch -d dev      #删除dev分支
2. 创建分支
git branch dev
[root@git git_data]# git branch testing
[root@git git_data]# git branch
* master
  testing
3.切换分支(testing)
git checkout dev #切换分支
[root@git git_data]# git checkout testing
M    a
A    yy.txt
Switched to branch 'testing'
4. 查看分支 输入 add commit
[root@git git_test]# git branch
  master
* testing
echo “”
[root@git git_test]# echo "testing" >> a

[root@git git_test]# git add .
[root@git git_test]# git commit -m "echo test to a branch testing"
[testing b2692fb] echo test to a branch testing
 1 file changed, 1 insertion(+)
5.切换分支(master)
git checkout master
[root@git git_data]# git checkout master
Switched to branch 'master'

[root@git git_data]# echo "master"  >> a

[root@git git_data]# git add .
[root@git git_data]# git commit -m "echo master  to a branch master"
[master 1fdd48c] echo master  to a branch master
 1 file changed, 1 insertion(+)
6. 合并分支: 查看分支 然后合并分支
git merge dev
[root@git git_test]# git branch   #查看分支
* master
  testing

[root@git git_test]# git merge testing  #合并分支
Auto-merging a
CONFLICT (content): Merge conflict in a
Automatic merge failed; fix conflicts and then commit the result.


# 解决冲突 手动修改
[root@git git_test]# cat a
aaaa
<<<<<<< HEAD
master
=======
testing
>>>>>>> testing


# 修改   add   commit
[root@git git_test]# vim a
[root@git git_test]# git add .

[root@git git_test]# git commit -m "merge testing to msater"
[master 1da66fe] merge testing to msater

[root@git git_test]# git status
# On branch master
nothing to commit, working directory clean
7. 删除分支
git branch -d dev
[root@git git_data]# git branch -d testing
Deleted branch testing (was 5fd3273).
[root@git git_data]# git branch
* master
三.标签
标签也是版本库的一个快照。 git的标签虽然是版本库的快照, 但其实它就是指向某个commit的指针
如果你达到一个重要的阶段, 并希望永远记住那个特别的提交快照, 你可以使用git tag 给他打上标签
比如说,我们想为我们项目发布一个“2.0”版本。我们可以用git tag -a v2.0 命令给最新一次提交打上(HEAD)“v2.0”的标签。 -a选项意为 “创建一个带注释的标签”。不用-a 选项也可以执行的, 但它不会记录 这个标签是啥时候打的, 谁打的,也不会让你添加个标签的注释。
1.创建标签
# 创建标签
[root@git git_data]# git tag -a v2.0

 # 查看标签
[root@git git_data]# git tag
v2.0
2.查看标签内容
[root@git git_data]# git show v2.0
tag v2.0
Tagger: augustyang1 <augustyang1@163.com>
Date:   Tue Nov 19 16:09:51 2019 +0800

test 2.0

commit 5609c87b2434e6340b71717424342ef4da7306e3
Merge: 1fdd48c 5fd3273
Author: augustyang1 <augustyang1@163.com>
Date:   Tue Nov 19 15:33:59 2019 +0800

    merge testing to msater

diff --cc a
index 1f7391f,ec4cad6..fe01fb2
--- a/a
+++ b/a
@@@ -1,1 -1,2 +1,3 @@@
 +master
+ aa
+ testing
3.删除标签
[root@git git_data]# git tag -d v2.0
Deleted tag 'v2.0' (was 8001e0e)
四. 安装gitlab
https://www.cnblogs.com/augustyang/p/11890387.html