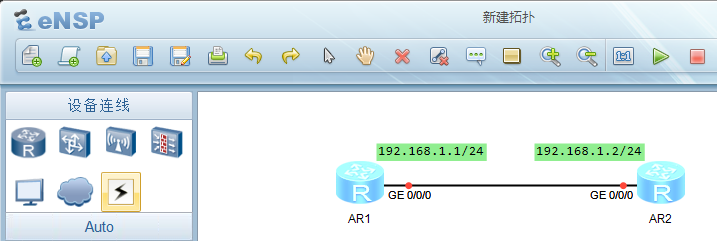
一、拓扑图
1)在路由器中拖出两台AR2220,然后选择设备连线,点击Auto进行设备接线,完成后开启设备。之后,将AR1的IP地址配置为192.168.1.1/24,将AR2的IP地址配置为192.168.1.2/24。

2)两台路由器的配置命令如下所示:
AR1:
<Huawei>system-view
[Huawei]sysname AR1
[AR1]interface g0/0/0
[AR1-GigabitEthernet0/0/0]ip add 192.168.1.1 255.255.255.0
[AR1-GigabitEthernet0/0/0]quit
AR2:
<Huawei>system-view
[Huawei]sysname AR2
[AR2]interface g0/0/0
[AR2-GigabitEthernet0/0/0]ip add 192.168.1.2 255.255.255.0
[AR2-GigabitEthernet0/0/0]quit
[AR2]ping 192.168.1.1
二、SSH
2.1、AR1配置
1)创建SSH用户及密码
<AR1>system-view
[AR1]aaa
[AR1-aaa]local-user tom password cipher huawei privilege level 3
[AR1-aaa]local-user tom service-type ssh
[AR1-aaa]q
2)配置SSH用户的认证方式和服务方式
[AR1]ssh user tom authentication-type password
3)使能SSH服务
[AR1]stelnet server enable
4)生成本地密钥对
[AR1]rsa local-key-pair create
The key name will be: Host
% RSA keys defined for Host already exist.
Confirm to replace them? (y/n)[n]:y
The range of public key size is (512 ~ 2048).
NOTES: If the key modulus is greater than 512,
       It will take a few minutes.
Input the bits in the modulus[default = 512]:
Generating keys...
.....................++++++++++++
...........++++++++++++
....................................++++++++
..++++++++
5)配置VTY用户界面
[AR1]user-interface vty 0 4
[AR1-ui-vty0-4]authentication-mode aaa
[AR1-ui-vty0-4]protocol inbound ssh
6)查看SSH服务状态
[AR1]display ssh server status
2.2、AR2命令
1)客户端第一次登录时生成公钥
<AR2>system-view
[AR2]ssh client first-time enable
2)在AR2上通过SSH远程登录AR1
[AR2]stelnet 192.168.1.1
Please input the username:tom
Trying 192.168.1.1 ...
Press CTRL+K to abort
Connected to 192.168.1.1 ...
The server is not authenticated. Continue to access it? (y/n)[n]:y
Jul 26 2022 22:16:36-08:00 AR2 %%01SSH/4/CONTINUE_KEYEXCHANGE(l)[0]:The server h
ad not been authenticated in the process of exchanging keys. When deciding wheth
er to continue, the user chose Y.
[AR2]
Save the server's public key? (y/n)[n]:y
The server's public key will be saved with the name 192.168.1.1. Please wait...
Jul 26 2022 22:16:46-08:00 AR2 %%01SSH/4/SAVE_PUBLICKEY(l)[1]:When deciding whet
her to save the server's public key 192.168.1.1, the user chose Y.
[AR2]

Enter password:
• 远程登录成功后,就可以查看/配置AR1了。
<AR1>system-view
[AR1]display current-configuration