一、繁琐的private field + public property Definition
相信大家大家已经习惯通过一个private field + public property的发式来定义和实现一个public Property。就像下面一个Artech.AutoImpProperty. Point。
 namespace Artech.AutoImpProperty
 {
{

 public class Point
 {
{ private double x; private double y; public double X { get { return this.x;
 } set { this.x = value; } } public double Y { get { return y; } set { y = value; } } public Point(double x, double y) { this.x = x; this.y = y; } }
 }
}虽然在Property中的set/get block中,我们可以不受限制地定义我们的业务逻辑,但是在大多是场合下,我们都是像上面的code一样直接对一个定义的field进行操作:在get block中返回field的值,在set block中对field赋值。也就是说,我们大多数还是将Property作为它所对应的field的直接封装。在说道Property的定义,我顺便提一下我们定义Property的一个原则:Property中的操作应该是立即能够执行完成的,我们不应该将一些Time consuming的操作放在一个Property中。因为我曾经看到过有人把调用Web Service的操作放在Property中,这是不知的推荐的,像这样的操作应该封装在一个Method中。
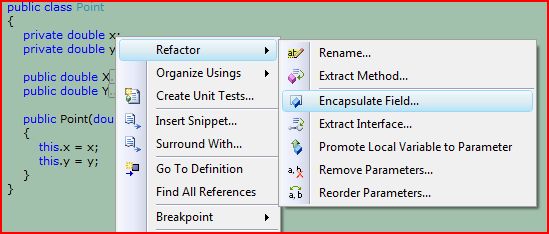
把话题转到我们简单的private field + public property Definition上来。如果我们定义一个Class中,只需要定义一个这样的Property,我们通过上面的code去定义可能觉得没什么。但是如果我们的Class,尤其是作为Business Entity的Class,需要封装非常多的数据,我们需要为不同类型的数据分别定义一个Property,这样不断重复的工作大家一定觉得很厌烦。虽然我们的IDE-VS 2005和VS 2008 beta 2通过Encapsulate Field的方式为我们的Coding工作减轻了负担(不清楚该小技巧的朋友可以参见下图),但是能在Programming Language级别就能够去除掉这些重复的定义得花,不但从根本上使Developer得到解脱,还能使我们的程序变得更加简洁和优雅。现在我们这一点我们可以做到了。
二、没有Field的Automatically Implemented Property Definition
在C# 3.x中,借助它提供的Automatically Implemented Property新特性,我们可以从繁琐的、重复的Coding工作中解脱出来了。我们来看我们先在的Property有多简单: Artech.AutoImpProperty. Vector
using System;using System.Collections.Generic;using System.Linq;using System.Text;namespace Artech.AutoImpProperty{ class Program { static void Main(string[] args) { Vector v = new Vector(1, 2); Console.WriteLine("X = {0} and Y = {1}", v.X, v.Y); } } public class Vector { public double X { get; set; } public double Y { get; set; } public Vector(double x, double y) { this.X = x; this.Y = y; } } }}通过上面的Code,我们大家能够体会到Automatically Implemented Property为我们定于Property带来的价值了吧。首先Property对应的Field从跟上上省去了;在set/get我们只需要一个申明式的语句,而不在需要去实现它(Automatically Implemented)。而我们定义的Artech.AutoImpProperty. Vector和上面定义的Artech.AutoImpProperty. Point是完全等效的。
三、Backing Field成就了Automatically Implemented Property
从上面我们提供的Code的对比,我们可以很直观的体会到Automatically Implemented Property的实用价值。我现在来讨论一下这样的功能在技术上是如何实现的。
如果读过本系列前面3篇文章的朋友,一定记得我经常在重复这样的观点:C#3.x仅仅是基于.NET Programming Language,而不是基于.NET Framework的。换句话说,就是.NET Programming Language对于得编译器在编译的时候给我们玩了一个“障眼法”:加了一些必要的code,使原本我们看起来显得残缺的code(比如缺少对Property 的实现)变得完整。在运行的时候,这些code和原来的code是完全一样的。
为了使大家对Automatically Implemented Property的实现有一个直观的了解,我们把基于两种不同的Property definition的Class放到一起:传统的Field-based Explicit Implemented Property V.S. Automatically Implemented Property。
using System;using System.Collections.Generic;using System.Linq;using System.Text;namespace Artech.AutoImpProperty{ class Program { static void Main(string[] args) { Vector v = new Vector(1, 2); Console.WriteLine("X = {0} and Y = {1}", v.X, v.Y); } } public class Vector { public double X { get; set; } public double Y { get; set; } public Vector(double x, double y) { this.X = x; this.Y = y; } } public class Point { private double x; private double y; public double X { get { return this.x; } set { this.x = value; } } public double Y { get { return y; } set { y = value; } } public Point(double x, double y) { this.x = x; this.y = y; } }}现在我们先通过Reflector来看看在最终编译生成的Assembly中,Artech.AutoImpProperty. Point和Artech.AutoImpProperty. Vector到底有何不同:
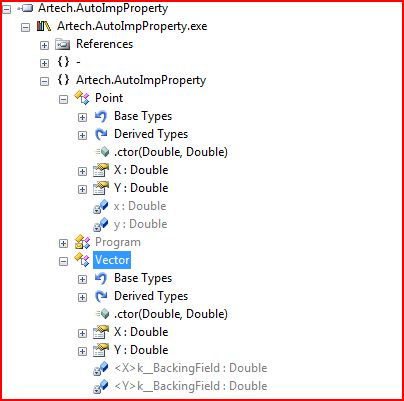
通过上图我们可以看到:Artech.AutoImpProperty. Point和我们在Source code定义的一致, 具有两个Propety(X,Y)和对应的Field(x,y)。但是对于我们通过Automatically Implemented Property方式定义的Artech.AutoImpProperty. Vetor就有点特别了:虽然在Source Code中我们只定义了两个Property(X,Y),不曾对应任何的Field。但是现在却凭空多处两个Field:<X>k__BackingField 和<Y>k__BackingField。看到这两个多出来的banking field,我们不难想象他们的作用了:他们分别对应着我们定义的两个Property(X,Y),其作用和Artech.AutoImpProperty. Point中定义的两个Field(x,y)完全一样。我们可以通过在Reflector中Disassemble Artech.AutoImpProperty. Vetor查看其最终的C# Code:
public class Vector{ // Fields [CompilerGenerated] private double <X>k__BackingField; [CompilerGenerated] private double <Y>k__BackingField; // Methods public Vector(double x, double y) { this.X = x; this.Y = y; } // Properties public double X { [CompilerGenerated] get { return this.<X>k__BackingField; } [CompilerGenerated] set { this.<X>k__BackingField = value; } } public double Y { [CompilerGenerated] get { return this.<Y>k__BackingField; } [CompilerGenerated] set { this.<Y>k__BackingField = value; } }}C# 3.x相关内容:
[原创]深入理解C# 3.x的新特性(1):Anonymous Type
[原创]深入理解C# 3.x的新特性(2):Extension Method - Part I
[原创]深入理解C# 3.x的新特性(2):Extension Method - Part II
[原创]深入理解C# 3.x的新特性(3):从Delegate、Anonymous Method到Lambda Expression
[原创]深入理解C# 3.x的新特性(4):Automatically Implemented Property
[原创]深入理解C# 3.x的新特性(5):Object Initializer 和 Collection Initializer