参考:tcp/ip协议
1.Linux框架概念
1.1.工作流程图
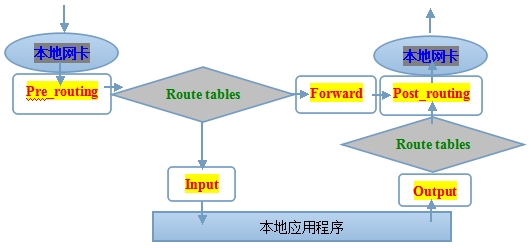
1.2.功能:
①过滤(filter)
②修改源ip、目标ip(nat)
③拆解报文、修改报文标记、重新封装(mangle)
④关闭net表启用的连接追踪标记(raw)
1.3.表
iptables/netfilter表:filter,mangle,nat
| 排序 | 功能表 | 链 |
|---|---|---|
| ① | raw | PREROUTING、OUTPUT |
| ② | mangle | 5个链全包含 |
| ③ | nat | PREROUTING、OUTPUT、POSTROUTING |
| ④ | filter | INPUT、FORWARD、OUTPUT |
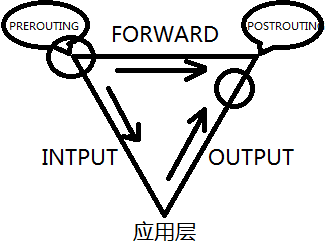
数据流向图(圆圈表示路由):
1.4.连接状态
4个状态:NEW,ESTABLISHED,INVALID,RELATED
针对3个协议:TCP,UDP,ICMP
5个配置策略:
①通用的
②TCP
③UDP
④ICMP
⑤状态,所有者,访问的频率限制
规则匹配,从上往下。高频匹配项、精确匹配项放在最上边、能合并的合并后放在中间、最后跟上默认匹配项。
1.5.监听协议
Linux防火墙工作在规则下,规则由两部分组成:匹配标准、处理办法。
匹配规则:
ip :sip、dip
tcp :sport、dport、报文(设定标志位:syn=1、ack=0、find=0、rst=0;……)
udp :sport、dport
icmp :icmp-type(0到15;0响应报文、3错误响应报文、8请求报文)
2.相关操作
保存配置
# iptables-save > /etc/sysconfig/iptables
保存配置filter表
# iptables-save -t filter > /etc/sysconfig/iptables
检查配置文件合法性
# iptables-restore -t /etc/sysconfig/iptables
iptables-restore: COMMIT expected at line 60
读取全部配置、filter表的配置
# iptables-restore < /etc/sysconfig/iptables
# iptables-restore -T filter < /etc/sysconfig/iptables
3.命令语法
3.1.语法
简单语法:
iptables [table] [Command] [chain] [num] [Rule] [Action]
指定:操作的表、操作命令、关键字chain、规则编号、匹配规则、处理办法。
语法详解:
语法:
  iptables [-t table] {-A|-C|-D} chain rule-specification
  iptables [-t table] -I chain [rulenum] rule-specification
  iptables [-t table] -R chain rulenum rule-specification
  iptables [-t table] -D chain rulenum
  iptables [-t table] -S [chain [rulenum]]
  iptables [-t table] {-F|-L|-Z} [chain [rulenum]] [options...]
  iptables [-t table] -N chain
  iptables [-t table] -X [chain]
  iptables [-t table] -P chain target
  iptables [-t table] -E old-chain-name new-chain-name

说明:
  rule-specification = [matches...] [target]
  match = -m matchname [per-match-options]
  target = -j targetname [per-target-options]
3.2.语法说明
命令:
A:添加规则
I:插入规则
D:删除规则
R:替换规则
F:清空所有规则
P:默认规则
N:自定义链
X:删除自定义链
E:重命名自定义链
Z:清空规则计数器
L:查看规则
n:数字格式显示,不反解
v:详细信息
vv:带上计数器信息
x:计数器的精确值
line-numbers:显示规则序号
匹配:
-s, --src:源地址
-d, --dst:目标地址
-p {tcp|udp|icmp}:协议
--sport:源端口
--dport:目标端口
-i {interface}:流入网卡接口
-o {interface}:流出网卡接口
-m multiport
--source-ports [p1,p2,...]
--destination-ports [p1,p2,...]
处理方法:-j
ACCEPT:接受
DROP:丢弃
REJECT:拒绝
DNAT:目标地址转换
SNAT:源地址转换
LOG:日志记录
MASQUERADE:地址伪装
常用命令:
iptables -t filter -L
iptables -t filter -L -n
iptables -t filter -L -n --line-numbers
iptables -t filter -D INPUT 3
iptables -t filter -A INPUT -p tcp --dport 22 -j ACCEPT
iptables -t filter -A OUTPUT -p tcp --sport 22 -j ACCEPT
iptables -t filter -F
iptables -t filter -X
iptables -t filter -h
iptables -t filter -P INPUT DROP
iptables -t filter -P OUTPUT ACCEPT
4.配置案例
配置前清空,设置默认丢弃。本节所有子内容均在此前提下。
[root@right tmp]# iptables -t filter -F
[root@right tmp]# iptables -t filter -P INPUT DROP
4.1.httpd服务器
开启ssh登陆,开启web访问,关闭其他任何接入。
# iptables -t filter -A INPUT -p tcp -d 213.16.200.34/224 --dport 22 -j ACCEPT
# iptables -t filter -A OUTPUT -p tcp -s 213.16.200.34/224 --sport 22 -j ACCEPT
# iptables -t filter -A INPUT -p tcp -d 213.16.200.34/224 --dport 80 -j ACCEPT
# iptables -t filter -A OUTPUT -p tcp -s 213.16.200.34/224 --sport 80 -j ACCEPT
# iptables -t filter -P INPUT DROP
4.2.tomcat服务器
开启ssh登陆,开启web访问,关闭其他任何接入。
iptables -t filter -A INPUT -p tcp -d 213.16.200.34/224 --dport 22 -j ACCEPT
iptables -t filter -A OUTPUT -p tcp -s 213.16.200.34/224 --sport 22 -j ACCEPT
iptables -t filter -A INPUT -p tcp -d 213.16.200.34/224 --dport 8080 -j ACCEPT
iptables -t filter -A OUTPUT -p tcp -s 213.16.200.34/224 --sport 8080 -j ACCEPT
iptables -t filter -A INPUT -p tcp -d 213.16.200.34/224 --dport 8009 -j ACCEPT
iptables -t filter -A OUTPUT -p tcp -s 213.16.200.34/224 --sport 8009 -j ACCEPT
iptables -t filter -P INPUT DROP
合并端口在一条规则里:
# iptables -t filter -A INPUT -d 192.168.137.20 -p tcp -m multiport --destination-ports 22,8080,8009 -m state --state NEW -j ACCEPT
# iptables -t filter -A OUTPUT -s 192.168.137.20 -p tcp -m multiport --source-ports 22,8080,8009 -m state --state ESTABLISHED -j ACCEPT
4.3.允许ping命令
允许192.168.137.1的ping操作。
[root@right tmp]# iptables -t filter -A INPUT -p icmp -s 192.168.137.1 -j ACCEPT
[root@right tmp]# iptables -t filter -A OUTPUT -p icmp -d 192.168.137.1 -j ACCEPT
要是明确禁止ping,防火墙操作,把“ACCEPT”改成“DROP”即可。
4.4.DNS主机
接收53端口,还得转发到根的53端口。而且,DNS同时工作在TCP、UDP的53口。
iptables -t filter -A INPUT -p TCP --dport 53 -j ACCEPT
iptables -t filter -A INPUT -p UDP --dport 53 -j ACCEPT
iptables -t filter -A INPUT -p TCP --sport 53 -j ACCEPT
iptables -t filter -A INPUT -p UDP --sport 53 -j ACCEPT
iptables -t filter -A OUTPUT -p TCP --dport 53 -j ACCEPT
iptables -t filter -A OUTPUT -p UDP --dport 53 -j ACCEPT
iptables -t filter -A OUTPUT -p TCP --sport 53 -j ACCEPT
iptables -t filter -A OUTPUT -p UDP --sport 53 -j ACCEPT
4.5.链路状态的控制
允许新请求、以及已经建立好的连接(本地192.168.137.20)。
# iptables -t filter -A INPUT -d 192.168.137.20 -p tcp --dport 80 -m state --state NEW,ESTABLISHED -j ACCEPT
# iptables -t filter -A OUTPUT -s 192.168.137.20 -p tcp --sport 80 -m state --state ESTABLISHED -j ACCEPT
# iptables -t filter -A OUTPUT -s 192.168.137.20 -p tcp --sport 80 -m state --state NEW -j DROP
ICMP的状态限定,允许ping出去(本地192.168.137.20)。
# iptables -A INPUT -d 192.168.137.20 -p icmp --icmp-type 0 -m state --state ESTABLISHED -j ACCEPT
# iptables -A INPUT -d 192.168.137.20 -p icmp --icmp-type 3 -m state --state ESTABLISHED -j ACCEPT
# iptables -A OUTPUT -s 192.168.137.20 -p icmp --icmp-type 8 -m state --state NEW,ESTABLISHED -j ACCEPT
4.6.放行127.0.0.1
允许本地回环通讯
# iptables -t filter -A INPUT -i lo -j ACCEPT
# iptables -t filter -A OUTPUT -o lo -j ACCEPT
4.6.启动生效
cat /etc/profile.d/iptables.sh
iptables -F
iptables -X
iptables -A INPUT -p tcp --dport 3306 -j ACCEPT
iptables -A OUTPUT -p tcp --sport 3306 -j ACCEPT
iptables -A INPUT -p tcp --dport 22 -j ACCEPT
iptables -A OUTPUT -p tcp --sport 22 -j ACCEPT
iptables -P INPUT DROP
iptables -P OUTPUT DROP
5.firewalld
- 状态查看
firewall-cmd --state systemctl status firewalld - 打开端口/服务
#启动配置(上),永久配置(下)
firewall-cmd --zone=public --add-port=80/tcp
firewall-cmd --permanent --zone=public --add-port=80/tcp

firewall-cmd --zone=public --add-service=http
firewall-cmd --permanent --zone=public --add-service=http
- 添加服务
#添加空服务
firewall-cmd --permanent --new-service=myservice

#配置服务
firewall-cmd --permanent --service=myservice --set-description=description
firewall-cmd --permanent --service=myservice --set-short=description
firewall-cmd --permanent --service=myservice --add-port=portid[-portid]/protocol
firewall-cmd --permanent --service=myservice --add-protocol=protocol
firewall-cmd --permanent --service=myservice --add-source-port=portid[-portid]/protocol
firewall-cmd --permanent --service=myservice --add-module=module
firewall-cmd --permanent --service=myservice --set-destination=ipv:address[/mask]
- 重新加载防火墙配置
firewall-cmd --reload
killall -HUP firewalld
- zone
像权限中的角色
- 预定义zone
 View Code
drop block public external dmz work home internal trusted - Son of zone
- 预定义zone
- .

Linux 防火墙