一,为什么要给图片生成缩略图?
1, 用户上传的原始图片如果太大,不能直接展示在网站页面上,
因为不但流费server的流量,而且用户打开时非常费时间,
所以要生成缩略图。
2,服务端管理图片要注意的几点:
第一点:缩略图要与原图分开存储,
然后通过符号链接方式允许前端访问,
否则原图被直接访问仍然存在浪费流量的问题,
有图片版权的公司也不允许外部直接访问原图
第二点:图片名字要加上一些随机的数字,
避免被穷举访问
第三点:图片要分目录存放,通常每1000张保存到一个目录,
因为大量的图片如果存放到同一个目录下,
打开时会非常慢或者不能打开,
不利于我们对文件进行管理
说明:刘宏缔的架构森林是一个专注架构的博客,地址:https://www.cnblogs.com/architectforest
对应的源码可以访问这里获取: https://github.com/liuhongdi/
说明:作者:刘宏缔 邮箱: 371125307@qq.com
二,演示项目的相关信息
1,项目的地址:
https://github.com/liuhongdi/imagemodify
2,项目原理:
实现了图片的文件上传,
并用ImageMagick给非gif图片生成缩略图,
用ffmpeg生成gif图片的缩略图
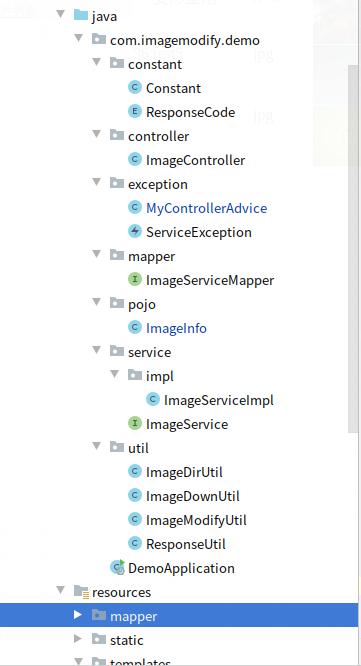
3,项目结构:如图:
三,ImageMagick/ffmpeg工具软件的安装
1,dnf安装ImageMagick
[root@blog head]# dnf install ImageMagick
说明:注意软件包名字中I和M均为大写
检查软件是否安装成功?
[root@blog head]# whereis convert
convert: /usr/bin/convert /usr/share/man/man1/convert.1.gz
2,安装ffmpeg
安装rpmfusion库
[root@blog ~]# dnf install https://download1.rpmfusion.org/free/el/rpmfusion-free-release-8.noarch.rpm
下载sdl库
[root@blog ~]# wget http://mirror.centos.org/centos/8/PowerTools/x86_64/os/Packages/SDL2-2.0.8-7.el8.x86_64.rpm
安装sdl库:
[root@blog ~]# rpm -ivh SDL2-2.0.8-7.el8.x86_64.rpm
Verifying...                          ################################# [100%]
Preparing...                          ################################# [100%]
Updating / installing...
   1:SDL2-2.0.8-7.el8                 ################################# [100%]
安装ffmpeg
[root@blog ~]# dnf install ffmpeg
四,配置文件说明:
1,application.properties
#upload
spring.servlet.multipart.maxFileSize=30MB
spring.servlet.multipart.maxRequestSize=30MB
说明:指定上传文件的最大限制,
默认大小是1M
2,nginx访问文件的host配置:file.conf
server {
    listen       81;
    server_name  file.lhdtest.com;
    root         /data/file/html;
     location ~ .(gif|jpg|jpeg|png|bmp|ico)$ {
           root /data/file/html;
           expires 24h;
       }
    index         index.html;
    access_log      /data/logs/nginxlogs/file.access_log;
    error_log       /data/logs/nginxlogs/file.error_log;
}
3,Constant.java
    //图片从nginx访问时的host
    public static final String IMAGES_URL_HOST = "http://127.0.0.1:81";
    //默认原始图片的路径
    public static final String IMAGES_ORIG_DIR = "/data/file/html/images";
    //缩略图的文件路径
    public static final String IMAGES_TMB_DIR = "/data/file/html/tmb";
    //缩略图的长边长度
    public static final String IMAGES_TMB_LONG = "300";
    //分页显示时每页的显示数量
    public static final int IMAGES_PAGE_SIZE = 5;
    //ImageMagick命令的安装路径
    public static final String IMAGEMAGICK_DIR = "/usr/bin";
    //ffmpeg的完整路径
    public static final String FFMPEG_CMD = "/usr/bin/ffmpeg";
4,创建保存图片信息的数据表:
CREATE TABLE `image_service` (
 `image_id` bigint(11) NOT NULL AUTO_INCREMENT COMMENT '图片id',
 `image_sn` varchar(100) CHARACTER SET utf8mb4 COLLATE utf8mb4_general_ci NOT NULL COMMENT '图片编号',
 `image_type` varchar(10) NOT NULL DEFAULT '' COMMENT '图片类型',
 `title` varchar(200) NOT NULL DEFAULT '' COMMENT '标题',
 `size` int(11) NOT NULL DEFAULT '0' COMMENT '文件大小',
 `width` int(11) NOT NULL DEFAULT '0' COMMENT '宽度',
 `height` int(11) NOT NULL DEFAULT '0' COMMENT '高度',
 `add_time` datetime NOT NULL DEFAULT '2019-11-01 01:01:01' COMMENT '添加时间 ',
 `staff_id` int(11) NOT NULL DEFAULT '0' COMMENT '添加的用户',
 PRIMARY KEY (`image_id`)
) ENGINE=InnoDB AUTO_INCREMENT=0 DEFAULT CHARSET=utf8mb4 COLLATE=utf8mb4_0900_ai_ci COMMENT='图片信息表'
五,java代码说明:
1,ImageModifyUtil.java
public class ImageModifyUtil {
    //按指定的边长生成缩略图
    public static boolean image_resize_by_long_side(String orig_path, String dest_path, String long_size,String imageType) {
        try {
        List<String> command = new ArrayList<>();
         String command_one = "";
        if (imageType.equals("gif")) {
            //计算得到目标宽高
            File gifFile = new File(orig_path);
            int gifWidth = 0;
            int gifHeight = 0;
            try {
                BufferedImage imageBuffer = ImageIO.read(gifFile);
                if (imageBuffer != null) {//如果image=null 表示上传的不是图片格式
                    gifWidth = imageBuffer.getWidth();
                    gifHeight = imageBuffer.getHeight();
                }
            } catch (IOException e) {
                e.printStackTrace();
            }
            int destWidth = 0;
            int destHeight = 0;
            if (gifWidth > gifHeight) {
                destWidth = Integer.parseInt( long_size );
                destHeight = (destWidth*gifHeight) / gifWidth;
            } else if  (gifWidth == gifHeight) {
                destWidth = Integer.parseInt( long_size );
                destHeight = destWidth;
            } else {
                destHeight = Integer.parseInt( long_size );
                destWidth = (destHeight*gifWidth) / gifHeight;
            }
            command_one = Constant.FFMPEG_CMD+" -i "+orig_path+" -s "+destWidth+"x"+destHeight+" "+dest_path+" 2>&1";
        } else {
            command_one = Constant.IMAGEMAGICK_DIR+"/convert -size "+long_size+"x"+long_size+" -resize "+long_size+"x"+long_size+" +profile '*' -quality 85 "+orig_path+" "+dest_path+" 2>&1";
        }
        //System.out.println(command_one);
        command.add("sh");
        command.add("-c");
        command.add(command_one);
        // 执行cmd命令
        ProcessBuilder builder = new ProcessBuilder();
        builder.command(command);
        Process process = builder.start();
        return true;
        } catch (Exception e) {
            System.out.println("save ioexception");
            e.printStackTrace();
            return false;
        }
    }
}
这个类用来生成缩略图
说明:gif图生成缩略图时,我们要帮助ffmpeg计算出准确的长和宽
2,ImageDownUtil.java
public class ImageDownUtil {
    //按指定的路径下载一张图片
    public static void downImageByLocalPath(HttpServletResponse response,String fullImagePath,String imageName) {
        File file = new File(fullImagePath);
        if (file.exists()) {
            response.setContentType("application/force-download");// 设置强制下载不打开
            response.addHeader("Content-Disposition", "attachment;fileName=" + imageName);// 设置文件名
            byte[] buffer = new byte[1024];
            FileInputStream fis = null;
            BufferedInputStream bis = null;
            try {
                fis = new FileInputStream(file);
                bis = new BufferedInputStream(fis);
                OutputStream os = response.getOutputStream();
                int i = bis.read(buffer);
                while (i != -1) {
                    os.write(buffer, 0, i);
                    i = bis.read(buffer);
                }
                System.out.println("success");
            } catch (Exception e) {
                e.printStackTrace();
            } finally {
                if (bis != null) {
                    try {
                        bis.close();
                    } catch (IOException e) {
                        e.printStackTrace();
                    }
                }
                if (fis != null) {
                    try {
                        fis.close();
                    } catch (IOException e) {
                        e.printStackTrace();
                    }
                }
            }
        }
    }

    //按指定的文件路径显示图片
    public static ResponseEntity<InputStreamResource> dispImageByLocalPath(String fullImagePath) {
        HttpHeaders header = new HttpHeaders();
        header.setContentType(MediaType.IMAGE_JPEG);
        Path path = Paths.get(fullImagePath);
        InputStream content;
        try {
            content = Files.newInputStream(path);
            return new ResponseEntity<>(new InputStreamResource(content), header, HttpStatus.OK);
        } catch (IOException e) {
            e.printStackTrace();
            return ResponseEntity.notFound().build();
        }
    }
}
这个类用来下载图片和用java显示一张图片
六,效果测试
测试前的注意事项:
测试前要先启动服务:
mysql
nginx
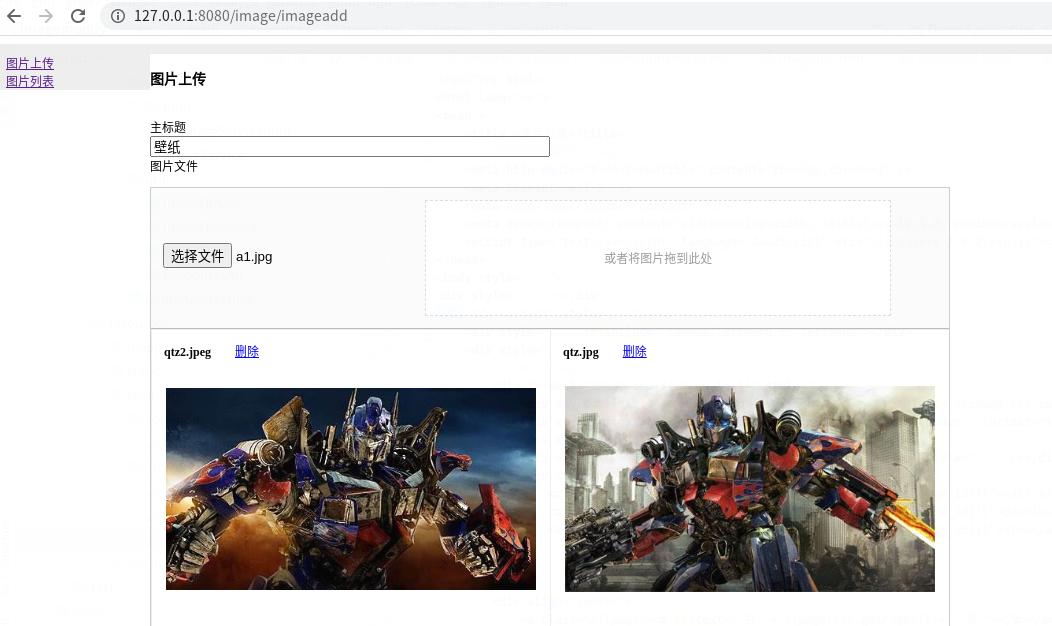
1,图片上传:
访问:
http://127.0.0.1:8080/image/imageadd
如图:
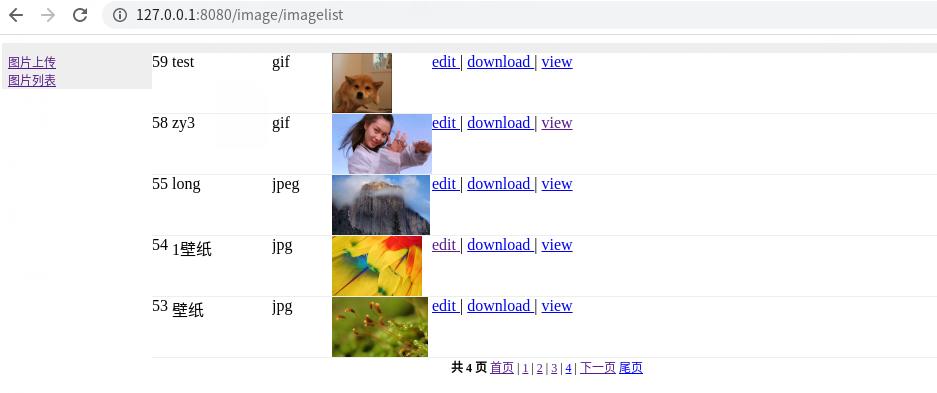
2,查看已上传的图片列表
访问:
http://127.0.0.1:8080/image/imagelist
如图:
七,查看spring boot的版本
  .   ____          _            __ _ _
 /\ / ___'_ __ _ _(_)_ __  __ _
( ( )\___ | '_ | '_| | '_ / _` |
 \/  ___)| |_)| | | | | || (_| |  ) ) ) )
  '  |____| .__|_| |_|_| |_\__, | / / / /
 =========|_|==============|___/=/_/_/_/
 :: Spring Boot ::        (v2.3.1.RELEASE)