Cacti
cacti重图形,有数据历史,需要用到数据库支持,支持web配置,默认不支持告警,可以加插件。
Server端配置
安装epel
yum install -y epel-release
安装lamp
yum install -y httpd php php-mysql mysql mysql-server mysql-devel php-gd libjpeg libjpeg-devel libpng-devel
安装cacti
yum install -y cacti net-snmp net-snmp-utils rrdtool
启动Mysql服务
/etc/init.d/mysqld start
启动http服务
/etc/init.d/httpd start
启动snmp服务
/etc/init.d/snmpd start
编辑httpd.conf文件
vim /etc/httpd/conf.d/cacti.conf
用以下代码替换配置
1,$ s/Deny from all/Allow from all/g
重启http服务
/etc/init.d/httpd restart
创建cacti数据库
mysql -uroot -e "create database cacti"
创建cacti用户
mysql -uroot -e "grant all on cacti.* to 'cacti'@'127.0.0.1' identified by 'cacti';"
导入sql文件
mysql -uroot cacti </usr/share/doc/cacti-0.8.8h/cacti.sql
编辑cacti配置文件
vim /usr/share/cacti/include/config.php
配置参数如下所示:
$database_type = "mysql";
$database_default = "cacti";
$database_hostname = "127.0.0.1";
$database_username = "cacti";
$database_password = "cacti";
$database_port = "3306";
$database_ssl = false;
web访问cacti安装
http://ip/cacti/
点两下next和一次finish即可
输入admin admin即可,重新设置新的密码
执行图形生成前,需要注意时区正确:
tzselect 选择Asia,选择China,选择BeiJing,ShangHai
vi /etc/bashrc
加入如下参数
TZ='Asia/Shanghai'; export TZ
执行poller.php.生成图形,需要注意时区/时间
/usr/bin/php /usr/share/cacti/poller.php
添加cron计划任务
crontab -e
添加如下参数
*/5 * * * * /usr/bin/php /usr/share/cacti/poller.php
待client配置完毕后,图形化参照配置:


Client配置
yum install -y net-snmp
修改snmpd.conf配置
参数示例:
syslocation 192.168.211.139
view all included .1 80
access notConfigGroup "" any noauth exact all none none
Nagios
Nagios注重状态和结果,没有数据历史,不成图像,不支持web配置,可以自己开发脚本定制个性化监控,支持多种插件。
Server端配置
安装epel源
yum install -y epel-release
安装nagios相关包
yum install -y httpd nagios nagios-plugins nagios-plugins-all nrpe nagios-plugins-nrpe
设置登录nagios后台用户和密码
htpasswd -c /etc/nagios/passwd nagiosadmin
检查配置文件是否有问题
nagios -v /etc/nagios/nagios.cfg
启动http和nagios服务
service httpd start;service nagios start
浏览器访问测试
http:/ip/nagios
用户名为nagiosadmin,密码为刚才设置的密码。
编辑配置文件,增加nrpe代码,监控系统负载、磁盘使用率需要用到nrpe服务
vim /etc/nagios/objects/commands.cfg
define command{
command_name check_nrpe
command_line $USER1$/check_nrpe -H $HOSTADDRESS$ -c $ARG1$
}
定义收发邮件接受者
vim /etc/nagios/objects/contacts.cfg
define contact{
contact_name gyt
use gereric-contact
alias guyingtao
email yingtao_gu@phegda.com
}
define contactgroup{
contact_name common
alias common
members gyt
}
Nagios Server配置client
vim /etc/nagios/conf.d/192.168.211.128.cfg
#定义client端
define host {
use linux-server
host_name 192.168.211.128
alias 211.128
address 192.168.211.128
}
#get ping
define service{
use generic-service
host_name 192.168.211.128
service_description check_ping
check_command check_ping!100.0,20%!200.0,50%
max_check_attempts 5
normal_check_interval 1
}
#get ssh
define service{
use generic-service
host_name 192.168.211.128
service_description check_ssh
check_command check_ssh
max_check_attempts 5
normal_check_interval 1
notification_interval 60
}
#get http
define service{
use generic-service
host_name 192.168.211.128
service_description check_http
check_command check_http
max_check_attempts 5
26,2-9 Top
check_command check_http
max_check_attempts 5
normal_check_interval 1
}
#get system load
define service{
use generic-service
host_name 192.168.211.128
service_description check_load
check_command check_nrpe!check_load
max_check_attempts 5
normal_check_interval 1
contact_groups common
#开启提醒功能,1为开启,0为禁用
notifications_enabled 1
notification_period 24x7
#服务状态: w为waning,u为unknown,c为critical,r为recover
#主机状态: d为down,u为recover,r为ok
notification_options w,u,c,r
}
#get disk usage
define service{
use generic-service
host_name 192.168.211.128
service_description check_disk_hda1
check_command check_nrpe!check_hda1
max_check_attempts 5
normal_check_interval 1
}
重启nagios服务
service nagios restart

Client端配置
客户端需要安装nagios相关软件包,并且需要在服务端配置。
在客户端机器上安装epel扩展源
yum install -y epel-release
安装nagios以及nagios-plugins
yum install -y nagios-plugins nagios-plugins-all nrpe nagios-plugins-nrpe
编辑配置文件
vim /etc/nagios/nrpe.cfg
修正参数示例:
allowed_hosts=127.0.0.1,192.168.211.139
dont_blame_nrpe=1
#get disk status
command[check_hda1]=/usr/lib64/nagios/plugins/check_disk -w 20% -c 10% -p /dev/sda1
command[check_hda2]=/usr/lib64/nagios/plugins/check_disk -w 20% -c 10% -p /dev/sda2
启动客户端
/etc/init.d/nrpe start
Zabbix
用的较多的监控工具,需要LAMP环境。
Server配置
#安装epel扩展源
yum install -y epel-release
#有些是否yum报错,注释掉mirrorlist,启用baseurl
vi /etc/yum.repos.d/epel.repo
#安装rpm包的lamp环境
yum install -y httpd mysql mysql-libs php php-mysql mysql-server php-bcmath php-gd php-mbstring
#安装zabbix服务端
yum install zabbix20 zabbix20-agent zabbix20-server zabbix20-server-mysql zabbix20-web zabbix20-web-mysql net-snmp-devel
#修改mysql配置文件
vim /etc/my.cnf
[mysqld]下面增加
character_set_server = utf8
#启动Mysql
/etc/init.d/mysqld start
#建库,导入数据
mysql -uroot -e "create database zabbix"
mysql -uroot --default-character-set=utf8 zabbix</usr/share/zabbix-mysql/schema.sql
mysql -uroot --default-character-set=utf8 zabbix</usr/share/zabbix-mysql/images.sql
mysql -uroot --default-character-set=utf8 zabbix</usr/share/zabbix-mysql/data.sql
#创建远程user
insert into mysql.user(Host,User,Password) values('localhost','zabbix',password('zabbix'));
grant all on zabbix.* to 'zabbix'@'127.0.0.1' identified by 'zabbix' with grant option;
grant all on zabbix.* to 'zabbix'@'%' identified by 'zabbix';
flush privileges;
#修改zabbix配置文件,添加数据库账户/密码
vim /etc/zabbix/zabbix_server.conf
DBUser=zabbix
DBPassword=zabbix
#启动server &agent服务
/etc/init.d/zabbix-server start
/etc/init.d/zabbix-agent start
#启动http服务
/etc/init.d/httpd start
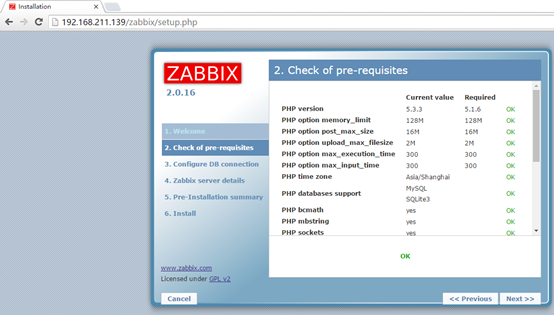
浏览器访问http://ip/zabbix配置,出现报错,修改建议值。
本次案例修改如下参数
vim /etc/php.ini
date.timezone = Asia/Shanghai
post_max_size = 16M
max_execution_time = 300
max_input_time = 300
默认管理员账号密码admin/zabbix
web配置参考截图


Client配置
#安装扩展源
yum install -y epel-release
#安装agent
yum install -y zabbix20-agent
#修改如下参数
vim /etc/zabbix_agentd.conf
Server=192.168.211.139
Hostname=test1
ServerActive=0.0.0.0:10050
Hostname=test1
#启动agent服务
/etc/init.d/zabbix-agent start
在Server上测试客户端
zabbix_get -s 192.168.211.128 -p 10050 -k "2"
添加客户端监控


自定义监控模板


配置邮件告警
#Server配置sendmail
yum install -y sendmail
/etc/init.d/sendmail start
#测试
echo "test mail" | mail –s "testtest" 375090147@qq.com
mkdir –p /home/zabbix/bin/
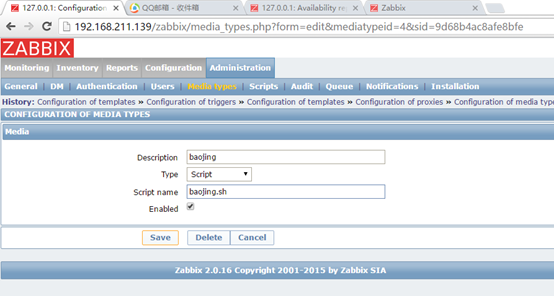
vim /home/zabbix/bin/baojing.sh
#!/bin/bash
echo "$3" |/bin/mail -s "$2" $1
chmod +x /home/zabbix/bin/baojing.sh
#修改zabbix Server配置
vim /etc/zabbix_server.conf
AlertScriptsPath=/home/zabbix/bin/
ExternalScripts=/home/zabbix/bin/
#新建一个Media type

#新建一个User绑定Media type


#新建一个action绑定media type


参考:http://www.jb51.net/article/56973.htm