前言
RemoteViews表面意思就是远程的view,这个就很难理解了,远程的view。但是英语是抽象,remote本身就是偏僻的,偏远的意思。
所以remoteViews 就是地方view,天高皇帝远,要管理地方的view就需要下达圣旨了。
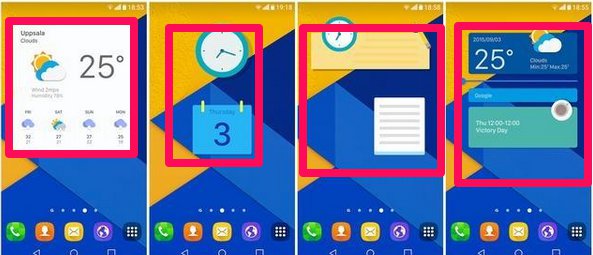
用途:一般就是通知栏与桌面小部件。
通知栏好理解,微信通知经常见到。
桌面小部件,这个无论是苹果还是按照,都有这个东西。

这些就是系统自带的,然后我们也可以自己开发,但是这东西用的并不多,也有特定的app专门做这个,可以把桌面定制的吊炸天。
正文
如果说起这个remoteView,就必须提到一个巡按,这个巡按的名字就叫做pendingIntent。古时候,有些君主会留一个巡按在某一个地方,如果发生了一些大事,就要禀报一下。
remoteView 天高皇帝远,皇帝就要派一个自己人去体察民情,反馈和禀报。因为无法通过findViewById去直接控制地方,所以呢,当remoteView去上任的时候呢,一般都会带上pendingIntent。
pendingIntent 走的时候呢,一般要带上一个intent。比如皇帝派下去一个pendingIntent 和 remoteView 去上任,remoteView 年轻力壮,怕自己不在了,所以走得时候下了一封密旨给pendingIntent。
当用户点击的时候,pendingIntent就带上intent发给中央,留下老皇帝触发用户点击通知栏事件后续要做的事情,大概就是这么一个理。
notification
remoteView 其中一个应用就是通知栏。在通知栏的api(android 不同版本有不同的api,比如说android4.4的api就是19)中,因为api的变换,导致了需要根据不同版本去书写不同的code,美其名曰:兼容。
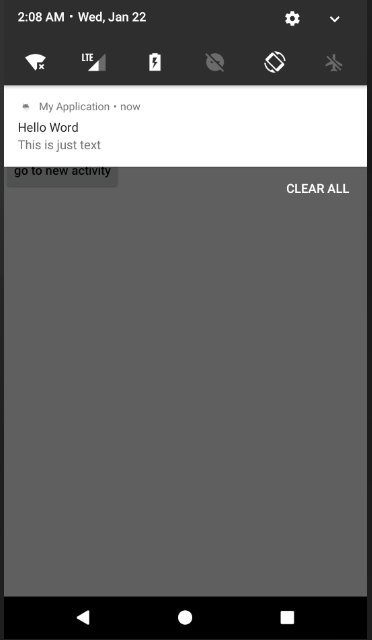
简单的通知就是这样:
public void createNotify(View view) {
	Intent resultIntent = new Intent(this, MainActivity.class);
	TaskStackBuilder stackBuilder = TaskStackBuilder.create(this);
	stackBuilder.addParentStack(MainActivity.class);
	stackBuilder.addNextIntent(resultIntent);
	PendingIntent resultPendingIntent = stackBuilder.getPendingIntent(0, PendingIntent.FLAG_UPDATE_CURRENT);
	NotificationManager notificationManager = (NotificationManager)getSystemService(Context.NOTIFICATION_SERVICE);
        /*
	 使用Builder构造器来创建Notification对象
	*/
	Notification notification = new NotificationCompat.Builder(this, "defult")
			//指定通知的标题内容
			.setContentTitle("Hello Word")
			//设置通知的内容
			.setContentText("This is just text")
			//指定通知被创建的时间
			.setWhen(System.currentTimeMillis())
			//设置通知的小图标
			.setSmallIcon(R.drawable.ic_launcher_foreground)
			//设置通知的大图标
			.setLargeIcon(BitmapFactory.decodeResource(getResources(), R.drawable.ic_launcher_background))
			//添加点击跳转通知跳转
			.setContentIntent(resultPendingIntent)
			//实现点击跳转后关闭通知
			.setAutoCancel(true)
			.build();
			//id 固定只能是通知到这个通知块,可更新
			notificationManager.notify(1, notification);
}
效果:

然后定制是这样的:
我们需要制定界面:
<?xml version="1.0" encoding="utf-8"?>
<LinearLayout
    xmlns:android="http://schemas.android.com/apk/res/android"
    android:layout_width="match_parent"
    android:layout_height="80dp"
    >
    <ImageView
        android:layout_width="80dp"
        android:layout_height="match_parent"
        android:id="@+id/icon"
        android:src="@color/colorPrimary"
        />
    <LinearLayout
        android:layout_width="match_parent"
        android:layout_height="match_parent"
        android:orientation="vertical"
        >
        <TextView
            android:layout_width="match_parent"
            android:layout_height="wrap_content"
            android:text="title"
            android:textSize="20dp"
            android:id="@+id/title"
            android:layout_marginLeft="20dp"
            android:gravity="center|left"
            />
        <TextView
            android:layout_width="match_parent"
            android:layout_height="match_parent"
            android:text="content"
            android:textSize="18dp"
            android:id="@+id/content"
            android:layout_marginLeft="40dp"
            android:gravity="center|left"
            />
    </LinearLayout>
</LinearLayout>
然后通过remoteViews 来建立他们之间的沟通。
其实简单来说,我们的通知消息就是一个app,通过remoteViews 实现了我们app和通知栏app之间的沟通。
下面是实现code:
public void createCustomNotify(View view) {
	Intent resultIntent = new Intent(this, MainActivity.class);
	TaskStackBuilder stackBuilder = TaskStackBuilder.create(this);
	stackBuilder.addParentStack(MainActivity.class);
	stackBuilder.addNextIntent(resultIntent);
	PendingIntent resultPendingIntent = stackBuilder.getPendingIntent(0, PendingIntent.FLAG_UPDATE_CURRENT);

	NotificationManager notificationManager = (NotificationManager)getSystemService(Context.NOTIFICATION_SERVICE);
   /*
	 使用Builder构造器来创建Notification对象
	*/
	RemoteViews remoteView =new RemoteViews(getPackageName(),R.layout.notification_layout);
	remoteView.setImageViewResource(R.id.icon,R.drawable.ic_launcher_foreground);
	remoteView.setTextViewText(R.id.title,"标题");
	remoteView.setTextViewText(R.id.content,"内容");
	Notification notification = new NotificationCompat.Builder(this, "defult")
			.setContent(remoteView)
			//指定通知被创建的时间
			.setWhen(System.currentTimeMillis())
			//设置通知的小图标
			.setSmallIcon(R.drawable.ic_launcher_foreground)
			//设置通知的大图标
			.setLargeIcon(BitmapFactory.decodeResource(getResources(), R.drawable.ic_launcher_background))
			//添加点击跳转通知跳转
			.setContentIntent(resultPendingIntent)
			.setShowWhen(true)
			//实现点击跳转后关闭通知
			.setAutoCancel(true)
			.build();

	//id 固定只能是通知到这个通知块,可更新
	notificationManager.notify(2, notification);
}
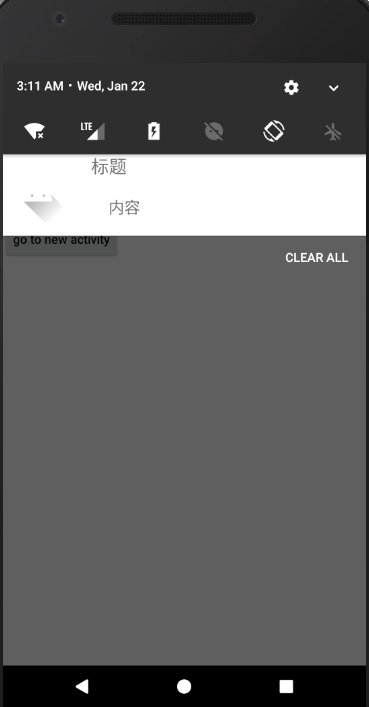
效果:

非常不好看哈。
如果是这样的自定义,只是界面上的花哨,我们可以点击图片后然后执行一些东西这样才能体现定义。
remoteViews 比如说通知通过intent,然后会用startActivity 去执行intent,所以打开了。
然后同样自定义的同样可以通过intent,在这里,假如自定义layout上有多个的事件,单纯去startActivity效果就无法实现了。
但是如果我们能监听到这个intent那么很多问题就简单了。
创建广播监听:
public class myBroadcastReceiver extends BroadcastReceiver {
    public  static  final  String actionImage="imageCallback";
    @Override
    public void onReceive(Context context, Intent intent) {
        String action = intent.getAction();
        if (actionImage.equals(actionImage))
        {
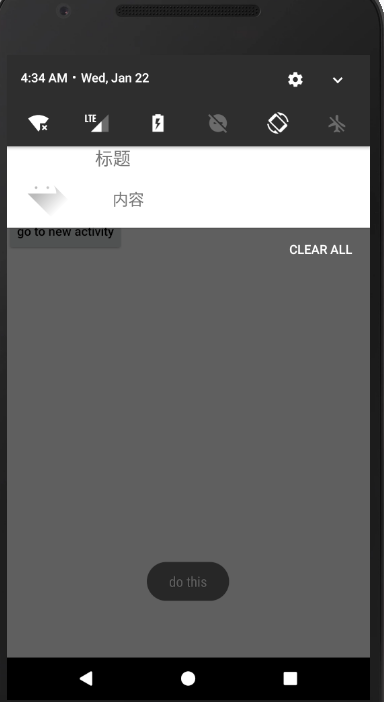
            Toast.makeText(context,"do this",Toast.LENGTH_SHORT).show();
        }
    }
}
然后再去创建监听:
private void init()
{
	myBroadcastReceiver = new myBroadcastReceiver();
	IntentFilter intentFilter = new IntentFilter(myBroadcastReceiver.actionImage);
	registerReceiver(myBroadcastReceiver, intentFilter);
}
最后只有设置绑定,也就是说用户点击某些事件后。
    public void createCustomNotify(View view) {
        Intent resultIntent = new Intent(this, MainActivity.class);
        TaskStackBuilder stackBuilder = TaskStackBuilder.create(this);
        stackBuilder.addParentStack(MainActivity.class);
        stackBuilder.addNextIntent(resultIntent);
        PendingIntent resultPendingIntent = stackBuilder.getPendingIntent(0, PendingIntent.FLAG_UPDATE_CURRENT);
        NotificationManager notificationManager = (NotificationManager)getSystemService(Context.NOTIFICATION_SERVICE);
       /*
         使用Builder构造器来创建Notification对象
        */
        RemoteViews remoteView =new RemoteViews(getPackageName(),R.layout.notification_layout);
        remoteView.setImageViewResource(R.id.icon,R.drawable.ic_launcher_foreground);
        remoteView.setTextViewText(R.id.title,"标题");
        remoteView.setTextViewText(R.id.content,"内容");
        Intent imageIntent=new Intent(myBroadcastReceiver.actionImage);
        PendingIntent imagePintent=PendingIntent.getBroadcast(this,0,imageIntent,0);
        remoteView.setOnClickPendingIntent(R.id.icon,imagePintent);
        Notification notification = new NotificationCompat.Builder(this, "defult")
                .setContent(remoteView)
                //指定通知被创建的时间
                .setWhen(System.currentTimeMillis())
                //设置通知的小图标
                .setSmallIcon(R.drawable.ic_launcher_foreground)
                //设置通知的大图标
                .setLargeIcon(BitmapFactory.decodeResource(getResources(), R.drawable.ic_launcher_background))
                //添加点击跳转通知跳转
                .setContentIntent(resultPendingIntent)
                .setShowWhen(true)
                //实现点击跳转后关闭通知
                .setAutoCancel(true)
                .build();

        //id 固定只能是通知到这个通知块,可更新
        notificationManager.notify(2, notification);
    }
关键部分就是:
// 实例化一个intent
Intent imageIntent=new Intent(myBroadcastReceiver.actionImage);
// 绑定intent,并且以广播的形式执行
PendingIntent imagePintent=PendingIntent.getBroadcast(this,0,imageIntent,0);
// 在icon 点击的时候触发
remoteView.setOnClickPendingIntent(R.id.icon,imagePintent);
效果:

总之就是这个套路了,但是到了android 8 套路就换了,多了一个notificationChannel。
notificationChannel 这个东西用来做啥的呢?
我理解是频道的意思,比如说通知,用户可以更好的管理,接收还是不接受通知。
这东西就是来管理通知的,以前通知过于分散,设置一个id就是一个通知,然后用户不想要要一个一个去取消,同样开发者也麻烦。
    @RequiresApi(api = Build.VERSION_CODES.O)
    public void createNotificationChannel(String id, String name, int importance, String desc, String groupId) {
        if (mNotificationManager.getNotificationChannel(id) != null) return;
        NotificationChannel notificationChannel = new NotificationChannel(id, name, importance);
        notificationChannel.enableLights(true);
        notificationChannel.enableVibration(true);
        notificationChannel.setLightColor(Color.RED);
        notificationChannel.setLockscreenVisibility(Notification.VISIBILITY_PRIVATE);
        notificationChannel.setShowBadge(true);
        notificationChannel.setBypassDnd(true);
        notificationChannel.setVibrationPattern(new long[]{100, 200, 300, 400});
        notificationChannel.setDescription(desc);
        notificationChannel.setGroup(groupId);
//      notificationChannel.setSound();
        mNotificationManager.createNotificationChannel(notificationChannel);
    }
上述中关键部分就两个一个是创建:
NotificationChannel notificationChannel = new NotificationChannel(id, name, importance);
mNotificationManager.createNotificationChannel(notificationChannel);
然后加入进去。中间的基本都是设置了,比如设置分为一个组setGroup,给一些描述setDescription等,必须这个id 注册后才能用于通知中。
Notification notification = new NotificationCompat.Builder(this, "defult")
上面这个defult设置为上面注册的id就行。
然后还有一个关键点:
Notification notification = new NotificationCompat.Builder(this, "defult")
可以设置角标,这就非常好了。在android 我们看到很少有应用可以有角标,基本上看到的只有qq,微信这些霸主才可以。实际上android 系统本身并没有开发,到了8才开发,但是腾讯和这些手机商有一些XXX,所以能拿到手机应用的角标。
到了8后,就不需要了,google本身就支持了。
总结
RemoteViews 不是一种远程view,而是一种远程控制view的方式。