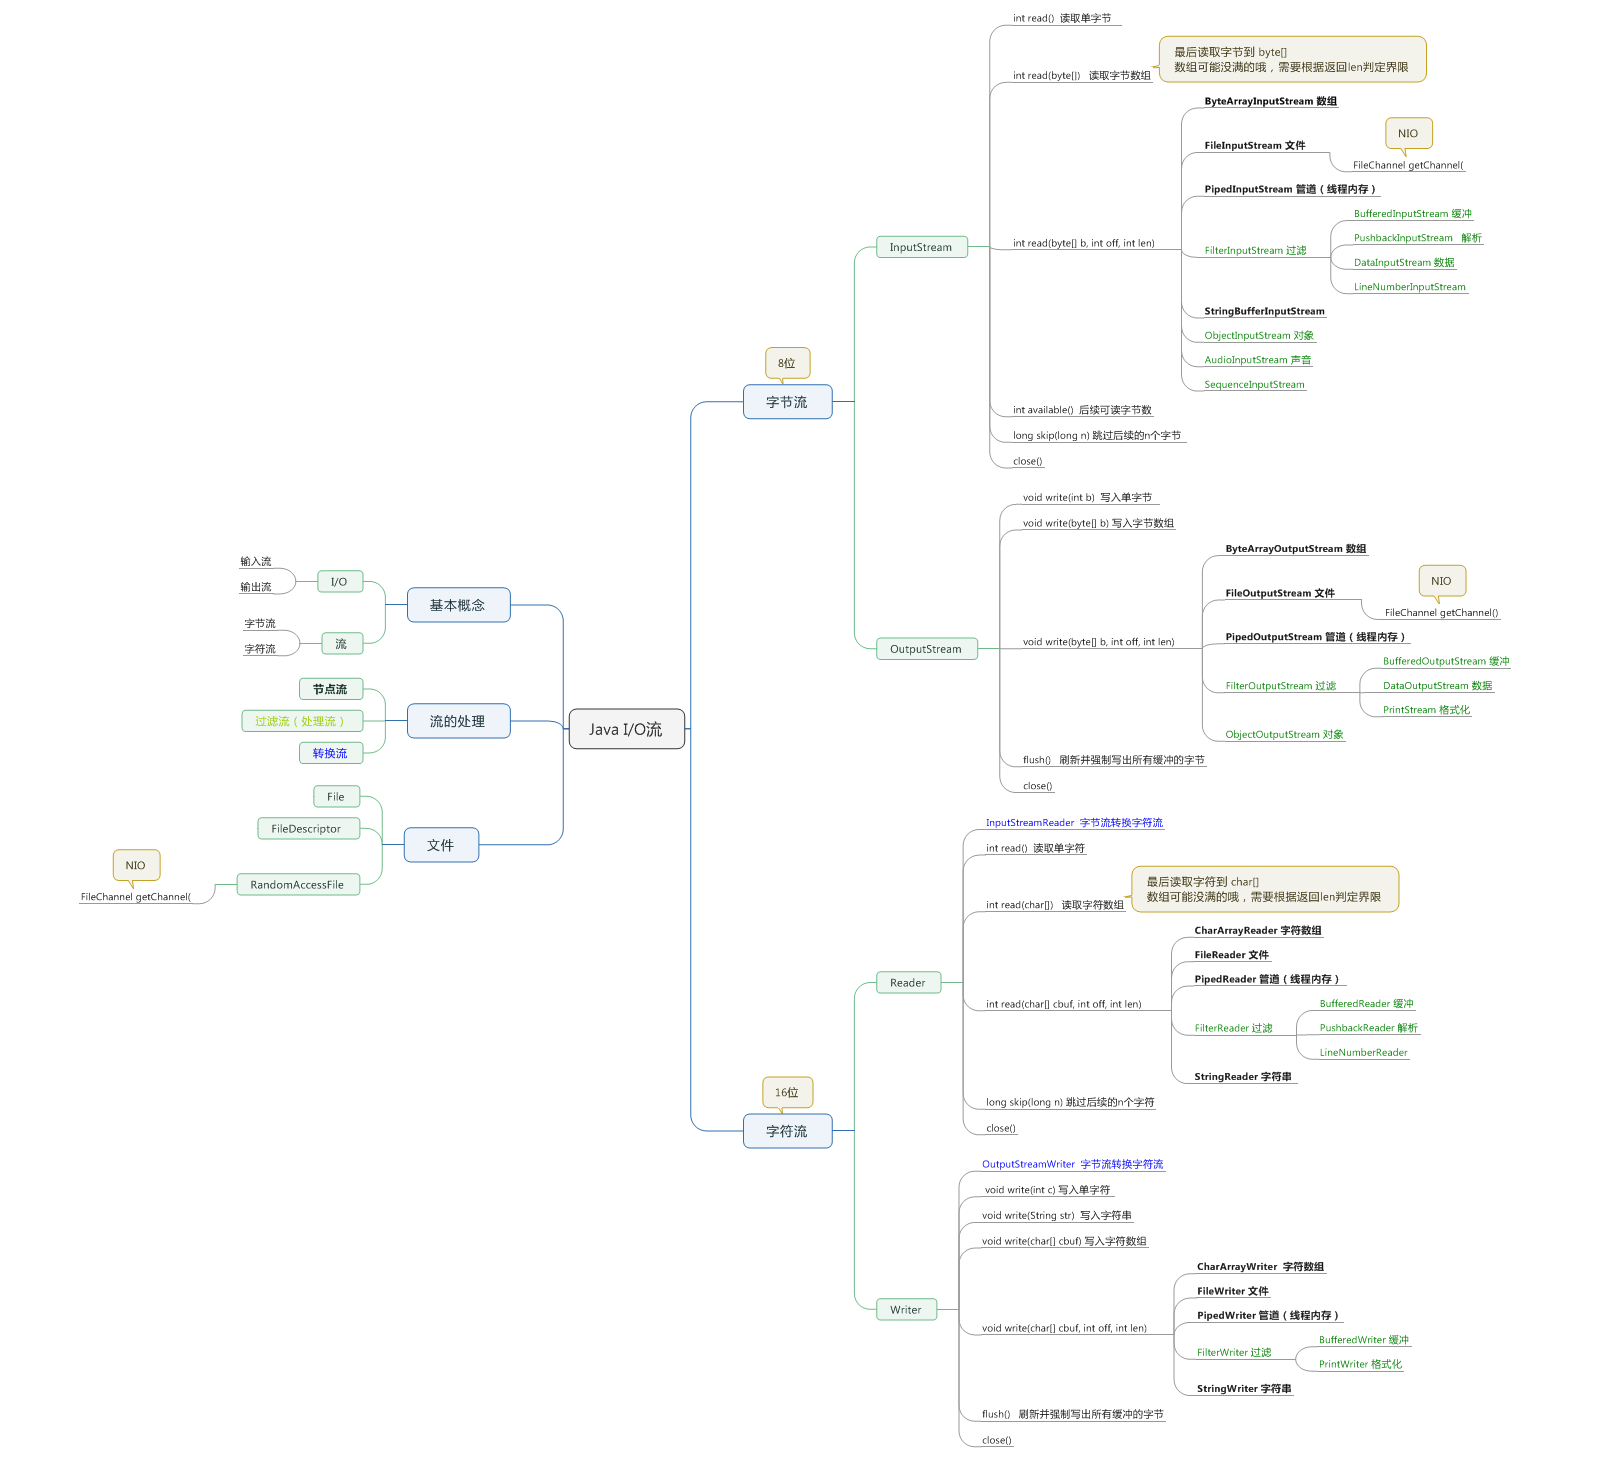
Java标准I/O知识体系图:

1、I/O是什么?
I/O 是Input/Output(输入、输出)的简称,输入流可以理解为向内存输入,输出流是从内存输出。
2、流
流是一个连续的数据流,可以从流中读取数据,也可以往流中写数据。流与数据源,或数据源流向的媒介相关联。
在Java IO流中,流可以是字节流,也可以是字符流。
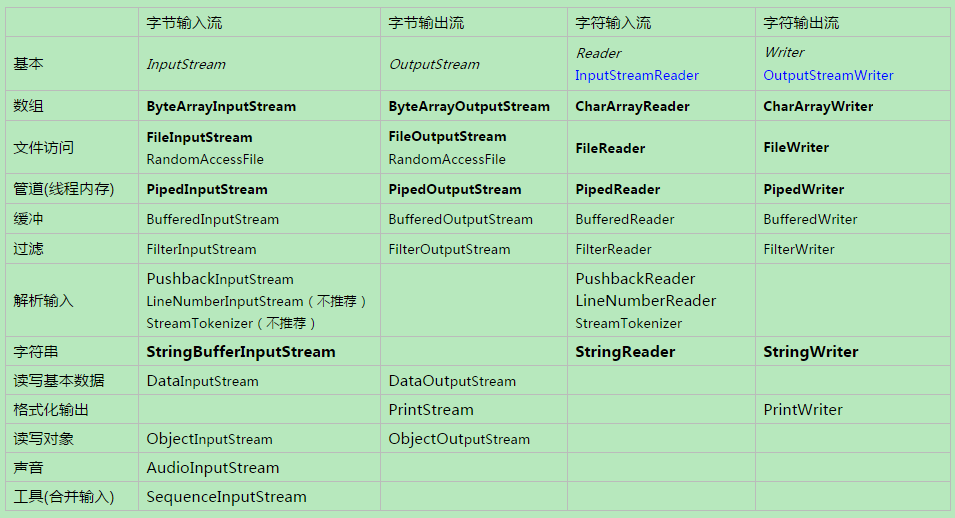
3、Java I/O 用途与对应的流一览

注:粗体为节点流。蓝色为转换流(字节流转为字符流)。
4、流的处理
流分节点流和处理流两种。
节点流:可以从或向一个特定的地方(节点)读写数据。如FileInputStream、FileReader。
处理流:是对一个已存在的流的连接和封装,通过所封装的流的功能调用实现数据读写。如BufferedReader.处理流的构造方法总是要带一个其他的流对象做参数。一个流对象经过其他流的多次包装,称为流的链接
5、文件访问
(1)读取文件
如果你需要在不同端使用读取文件,你可以根据你要读的文件是二进制文件还是文本文件,或者根据你要处理的数据是准备采取字节方式还是字符方式,决定使用 FileInputStream 或者 FileReader。两者支持你从文件开头开始到文件结尾读取一个字节或者字符,也可以将读取的多个字节或字符,写入到内存的字节数组或字符数组。
单字节读取文件示例:
public static void readFileAsByte() throws IOException {
		String filepath = "file.bin";
		java.io.InputStream is = null;
		try {
			is = new FileInputStream(filepath);
			int data = -1;
			while ((data = is.read()) != -1) {// -1 表示读取到达文件结尾
				//操作数据
				System.out.print((byte)data + " ");
			}
		} finally {
			if (is != null) {
				is.close();// 关闭流
			}
		}
	}
字节数组读取文件示例:
public static void readFileAsByteArray() throws IOException {
	String filepath = "file.bin";
	java.io.InputStream is = null;
	try {
		is = new BufferedInputStream(new FileInputStream(filepath));// 组装BufferedInputStream流,加入缓冲能力
		byte[] data = new byte[256];
		int len = -1;
		while ((len = is.read(data)) != -1) {// -1 表示读取到达文件结尾
			//操作数据
			for (int i = 0; i < len; i++) {
				System.out.print(data[i] + " ");
			}
		}
	} finally {
		if (is != null) {
			is.close();// 关闭流
		}
	}
}
单字符读取文件示例:
public static void readFileAsChar() throws IOException {
	String filepath = "file.txt";
	java.io.Reader r = null;
	try {
		r = new FileReader(filepath);
		int data = -1;
		while ((data = r.read()) != -1) {// -1 表示读取到达文件结尾
			//操作数据
			System.out.print((char) data);
		}
	} finally {
		if (r != null) {
			r.close();// 关闭流
		}
	}
}
字符数组读取文件示例:
public static void readFileAsCharArray() throws IOException {
	String filepath = "file.txt";
	java.io.Reader r = null;
	try {
		r = new BufferedReader(new FileReader(filepath));// 组装BufferedReader流,加入缓冲能力
		char[] data = new char[256];
		int len = -1;
		while ((len = r.read(data)) != -1) {// -1 表示读取到达文件结尾
			//操作数据
			for (int i = 0; i < len; i++) {
				System.out.print(data[i]);
			}
		}
	} finally {
		if (r != null) {
			r.close();// 关闭流
		}
	}
}
(2)写入文件
与读取文件类似:
如果你需要在不同端使用写入文件,你可以根据你要写的文件是二进制文件还是文本文件,或者根据你要处理的数据是准备采取字节方式还是字符方式,决定使用 FileOutputStream 或者 FileWriter。两者支持你可以一次写入一个字节或者字符到文件中,也可以直接写入一个字节数组或者字符数据。数据按照写入的顺序存储在文件当中。
单字节写入文件示例:
public static void writeFileAsByte() throws IOException {
	String filepath = "file.bin";
	java.io.OutputStream os = null;
	try {
		os = new FileOutputStream(filepath);
		os.write('1');
		os.write('2');
		os.write('3');
		os.write('4');
		os.flush();// 把缓冲区内的数据刷新到磁盘

	} finally {
		if (os != null) {
			os.close();// 关闭流
		}
	}
}
字节数组写入文件示例:
		String filepath = "file.bin";
		java.io.OutputStream os = null;
		try {
			os = new BufferedOutputStream(new FileOutputStream(filepath));
			// 模拟
			byte[] data = new byte[256];
			new Random().nextBytes(data);

			os.write(data);
			os.flush();// 把缓冲区内的数据刷新到磁盘
		} finally {
			if (os != null) {
				os.close();// 关闭流
			}
		}
	}
单字符写入文件示例:
public static void writeFileAsChar() throws IOException {
	String filepath = "file.txt";
	java.io.Writer w = null;
	try {
		w = new FileWriter(filepath);
		w.write('1');
		w.write('2');
		w.write('3');
		w.write('4');
		w.flush();// 把缓冲区内的数据刷新到磁盘

	} finally {
		if (w != null) {
			w.close();// 关闭流
		}
	}
}
字符数组写入文件示例:
public static void writeFileAsCharArray() throws IOException {
		String filepath = "file.txt";
		java.io.Writer w = null;
		try {
			w = new BufferedWriter(new FileWriter(filepath));// 组装BufferedWriter流,加入缓冲能力
			// 模拟
			char[] data = new char[256];
			String f = "0123456789abcdefghijklmnopqrstuvwxyz";
			Random rd = new Random();
			for (int i = 0; i < data.length; i++) {
				data[i] = f.charAt(rd.nextInt(f.length()));
			}
			w.write(data);
			w.flush();// 把缓冲区内的数据刷新到磁盘
		} finally {
			if (w != null) {
				w.close();// 关闭流
			}
		}
	}
(3)随机访问文件
如果你需要不按特定的存取顺序,随意读取或者写入文件,可以考虑RandomAccessFile。
void seek(long pos) 设置到此文件开头测量到的文件指针偏移量,在该位置发生下一个读取或写入操作。
简单示例:
public static void main(String[] args) throws IOException {
		RandomAccessFile file = null;
		try {
			file = new java.io.RandomAccessFile("file.bin", "rw");
			file.seek(0);

			file.writeChar('1');
			file.seek(0);
			System.out.println(file.readChar());

			/**
			 * 读取
			 */
			int data = -1;
			while ((data = file.read()) != -1) {// -1 表示读取到达文件结尾
				//操作数据
				System.out.print((byte)data + " ");
			}

		} finally {
			if (file != null) {
				file.close();// 关闭流
			}
		}
	}
6、管道(线程内存)
管道为同一JVM中运行的线程提供基于内存的通信机制。但是你不能利用管道在不同的JVM中的线程间通信。

在概念上,Java的管道不同于Unix/Linux系统中的管道。在Unix/Linux中,运行在不同地址空间的两个进程可以通过管道通信。在Java中,通信的双方应该是运行在同一进程中的不同线程。当然除了管道之外,一个JVM中不同线程之间还有许多通信的方式。实际上,线程在大多数情况下会传递完整的对象信息而非原始的字节数据。但是,如果你需要在线程之间传递字节数据,Java IO的管道是一个不错的选择。
当使用两个相关联的管道流时,务必将它们分配给不同的线程。read()方法和write()方法调用时会导致流阻塞,这意味着如果你尝试在一个线程中同时进行读和写,可能会导致线程死锁。
简单示例:
static class Input implements Runnable {
		private final PipedInputStream inputStream = new PipedInputStream();
		public Input() {
		}
		public PipedInputStream getInputStream() {
			return inputStream;
		}
		@Override
		public void run() {
			try {
				byte[] buf = new byte[1024];
				int len = -1;
				System.out.println("管道读取准备。");
				StringBuffer result = new StringBuffer();
				while ((len = inputStream.read(buf)) > 0) {
					//System.out.println(new String(buf, 0, len));
					result.append(new String(buf, 0, len));
				}
				System.out.println("管道读取结果:" + result.toString());
			} catch (IOException e) {
				e.printStackTrace();
			} finally {
				try {
					if (inputStream != null)
						inputStream.close();
				} catch (IOException e) {
					e.printStackTrace();
				}
			}
		}
	}
	static class Output implements Runnable {
		private final PipedOutputStream outputStream = new PipedOutputStream();
		public Output() {
		}
		public PipedOutputStream getOutputStream() {
			return outputStream;
		}
		@Override
		public void run() {
			try {
				System.out.println("管道写出准备。");
				StringBuilder sb = new StringBuilder();
				// 模拟 通过for循环写入2050个字节
				for (int i = 0; i < 201; i++) {
					sb.append("0123456789");
					if (i > 0 && (i % 10 == 0)) {
						sb.append("
");
					}
				}
				String str = sb.toString();
				outputStream.write(str.getBytes());
				System.out.println("管道写出完成。");
			} catch (IOException e) {
				e.printStackTrace();
			} finally {
				try {
					if (outputStream != null)
						outputStream.close();
				} catch (IOException e) {
					e.printStackTrace();
				}
			}
		}
	}
	public static void main(String[] args) throws IOException {
		Input input = new Input();
		Output output = new Output();
		/**
		 * 将“管道输入流”和“管道输出流”关联起来。
		 */
		//input.getInputStream().connect(output.getOutputStream());// 与下面一行等价
		output.getOutputStream().connect(input.getInputStream());
		new Thread(input).start();
		new Thread(output).start();
	}
7、序列化与ObjectInputStream、ObjectOutputStream
使用ObjectInputStream、ObjectOutputStream读取或写入对象,首先该对象必须实现Serializable接口,使得能够序列化和反序列化。
简单示例:
@SuppressWarnings("unused")
	public static void main(String[] args) throws IOException {
		class A implements java.io.Serializable {
			private static final long serialVersionUID = -9115696482036699559L;
			private int i = 1;
			private float f = 3;
			private String s = "风策信";
			public A() {
				super();
			}
			public A(int i, float f, String s) {
				super();
				this.i = i;
				this.f = f;
				this.s = s;
			}
			@Override
			public String toString() {
				StringBuilder builder = new StringBuilder();
				builder.append("A [i=").append(i).append(", f=").append(f).append(", s=").append(s).append("]");
				return builder.toString();
			}
		}
		class B implements java.io.Serializable {
			private static final long serialVersionUID = 6124575321340728225L;
			private long i = 2;
			private double f = 4;
			private String str = "风策信";
			public B() {
				super();
			}
			public B(long i, double f, String str) {
				super();
				this.i = i;
				this.f = f;
				this.str = str;
			}
			@Override
			public String toString() {
				StringBuilder builder = new StringBuilder();
				builder.append("B [i=").append(i).append(", f=").append(f).append(", str=").append(str).append("]");
				return builder.toString();
			}
		}
		A a = new A(1, 3, "a");
		B b = new B(2, 4, "b");
		//System.out.println(a);
		//System.out.println(b);
		ObjectOutputStream oos = null;
		try {
			oos = new ObjectOutputStream(new FileOutputStream("object.data.bin"));
			oos.writeObject(a);
			oos.writeObject(b);
			oos.flush();// 把缓冲区内的数据刷新到磁盘
		} finally {
			if (oos != null)
				oos.close();
		}
		ObjectInputStream ois = null;
		try {
			ois = new ObjectInputStream(new FileInputStream("object.data.bin"));
			A a1 = (A) ois.readObject();
			B b1 = (B) ois.readObject();
			System.out.println(a1);
			System.out.println(b1);
		} catch (ClassNotFoundException e) {
			e.printStackTrace();
		} finally {
			if (ois != null)
				ois.close();
		}
	}