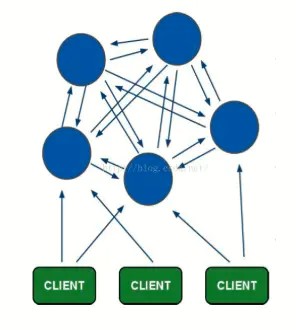
集群模式部署
Redis版本
5.0.10
端口
6371,6372,6373,6374,6375,6376.
配置文件
将Redis安装6份,或者将redis安装后的文件复制6份

修改各个redis包中的redis.windows.conf文件
修改79行
port 6371
取消注释707行
cluster-enabled yes
取消注释715行
cluster-config-file nodes-6371.conf
取消注释721行
cluster-node-timeout 15000
6个redis的端口号不同。
如果cluster-enabled 不为yes, 那么在使用JedisCluster集群代码获取的时候,会报错。
cluster-node-timeout 调整为15000,那么在创建集群的时候,不会超时。
cluster-config-file nodes-6371.conf 是为该节点的配置信息,这里使用 nodes-端口.conf命名方法。服务启动后会在目录生成该文件。
在各个redis目录下编写start.bat文件
内容如下:
title redis-6371
redis-server.exe redis.windows.conf
启动各个Redis下的start.bat文件
组成集群
找一个redis-cli执行:
注意:现在已经不需要使用Ruby了
redis-cli --cluster create 127.0.0.1:6371 127.0.0.1:6372 127.0.0.1:6373 127.0.0.1:6374 127.0.0.1:6375 127.0.0.1:6376 --cluster-replicas 1上述命令 --replicas 1 表示每个主节点拥有从节点个数为1。
master节点(主节点)不能少于3个,所以我们用了6个redis(3主+3从)
测试效果
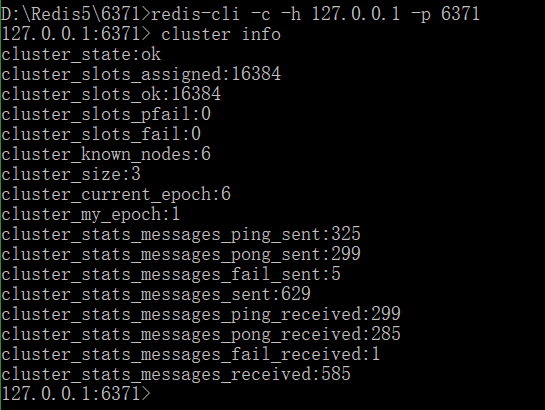
找一个cli执行:
命令 redis-cli –c –h ”地址” –p “端口号” ; -c 表示集群
redis-cli -c -h 127.0.0.1 -p 6371查看集群信息
cluster info
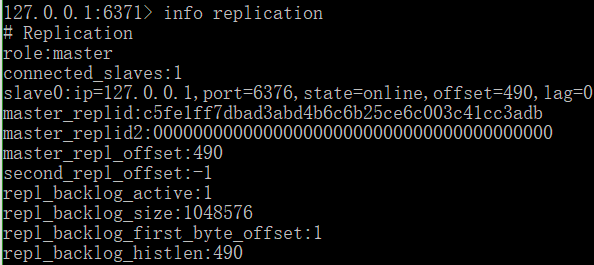
查看各结点主从关系
cluster nodes

查看当前结点信息
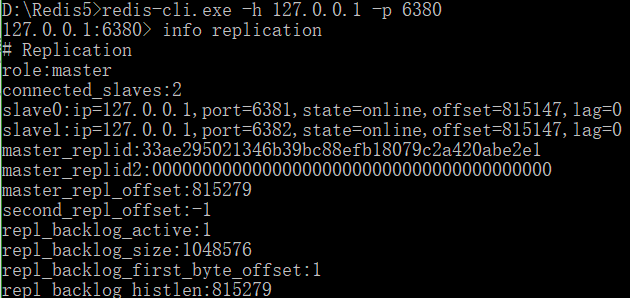
info replication
插入数据
显示Redirected to slot表示是使用集群方式插入的数据

nodejs使用ioredis操作集群
const Redis = require("ioredis");
const cluster = new Redis.Cluster([
{
port: 6380,
host: "127.0.0.1",
},
{
port: 6381,
host: "127.0.0.1",
},
]);
cluster.set("foo", "bar");
cluster.get("foo", (err, res) => {
// res === 'bar'
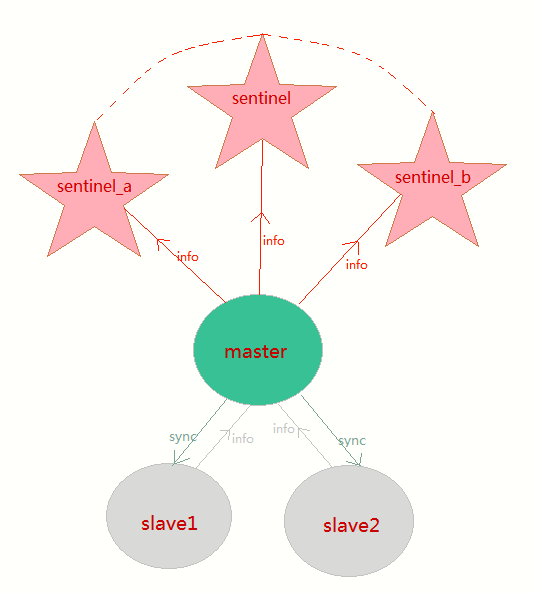
});哨兵模式部署
Redis版本
5.0.10
端口
主:6380
从:6381,6382
哨兵:6383,6384,6385
配置文件
新建文件
只需要装一个redis,在安装目录下新建6个配置文件
主服务器配置文件
(复制原来的redis.windows.conf文件)
redis.windows6380.conf
port 6379
bind 127.0.0.1
从服务器配置文件
redis.windows6381.conf
port 6380
bind 127.0.0.1
slaveof 127.0.0.1 6379 // 设置master服务器为6379
redis.windows6382.conf
port 6381
bind 127.0.0.1
slaveof 127.0.0.1 6379 // 设置master服务器为6379
哨兵配置文件
- port :当前Sentinel服务运行的端口
- sentinel monitor mymaster 127.0.0.1 6379 2:Sentinel去监视一个名为mymaster的主redis实例,这个主实例的IP地址为本机地址127.0.0.1,端口号为6379,而将这个主实例判断为失效至少需要2个 Sentinel进程的同意,只要同意Sentinel的数量不达标,自动failover就不会执行
- sentinel down-after-milliseconds mymaster 5000:指定了Sentinel认为Redis实例已经失效所需的毫秒数。当 实例超过该时间没有返回PING,或者直接返回错误,那么Sentinel将这个实例标记为主观下线。只有一个 Sentinel进程将实例标记为主观下线并不一定会引起实例的自动故障迁移:只有在足够数量的Sentinel都将一个实例标记为主观下线之后,实例才会被标记为客观下线,这时自动故障迁移才会执行
- sentinel parallel-syncs mymaster 1:指定了在执行故障转移时,最多可以有多少个从Redis实例在同步新的主实例,在从Redis实例较多的情况下这个数字越小,同步的时间越长,完成故障转移所需的时间就越长
- sentinel failover-timeout mymaster 15000:如果在该时间(ms)内未能完成failover操作,则认为该failover失败
sentinel6383.conf内容:
port 26379
sentinel myid 88a3f92f656984fd84c183b6b183d5d264ddc485
sentinel monitor mymaster 127.0.0.1 6381 2
sentinel down-after-milliseconds mymaster 5000
sentinel failover-timeout mymaster 15000
sentinel6384.conf内容:
port 26479
sentinel myid 6c4798231532356aacf132f1aa952f022f41012e
sentinel monitor mymaster 127.0.0.1 6381 2
sentinel down-after-milliseconds mymaster 5000
sentinel failover-timeout mymaster 15000
sentinel6385.conf内容:
port 26579
sentinel myid fad25e089080be8dddadd3f20e44f888b1f8d48a
sentinel monitor mymaster 127.0.0.1 6379 2
sentinel down-after-milliseconds mymaster 5000
sentinel failover-timeout mymaster 15000
启动
启动一主二从三哨兵
redis-server.exe redis.windows6380.conf
redis-server.exe redis.windows6381.conf
redis-server.exe redis.windows6382.conf
redis-server.exe sentinel6383.conf --sentinel
redis-server.exe sentinel6384.conf --sentinel
redis-server.exe sentinel8385.conf --sentinel
测试效果
查看服务器状态:
redis-cli.exe -h 127.0.0.1 -p 6380
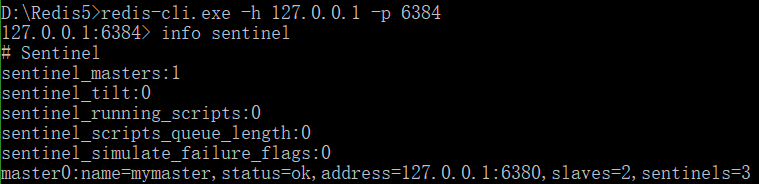
查看哨兵状态:
redis-cli.exe -h 127.0.0.1 -p 6384
nodejs使用ioredis操作哨兵
const redis = new Redis({
  sentinels: [
    { host: "localhost", port: 6383 },
    { host: "localhost", port: 6384 },
    { host: "localhost", port: 6385 }
  ],
  name: "mymaster",
});

redis.set("foo", "bar");
参考
ioredis文档
https://www.npmjs.com/package/ioredis
集群博客
https://www.cnblogs.com/thirteen-zxh/p/9187875.html
https://blog.csdn.net/woheniccc/article/details/79611050
哨兵博客
https://www.cnblogs.com/justdoyou/p/10253668.html