下面几篇来分别详细分析
Binder类作为服务端的Bn的代表,BinderProxy类作为客户端的Bp的代表,BinderInternal类仅供Binder架构使用,GcWatcher专门用于处理和Binder架构相关的垃圾回收,Parcel类用于承载通信数据。FLAG_ONEWAY标志如果被指明,则调用方只要把请求发送到Binder驱动即可返回,而不用等待服务端的结果,是一种所谓的非阻塞方式,所以客户端一般会向服务端注册一个回调。
在java层binder正式工作之前,Native层Binder和Java层Binder需要建立关系,将会调用一些JNI函数,Binder类、BinderInternal类、BinderProxy类依次初始化。
将AMS服务注册到ServiceManager中(整个Android系统中有一个Native的ServiceManager(SM)进程,它统筹管理Android系统上的所有Service。成为一个Service的必要条件是在SM中注册)。
SM注册服务
ServiceManager
public static void addService(String name, IBinder service, boolean allowIsolated) {
    try {
        getIServiceManager().addService(name, service, allowIsolated);
    } catch (RemoteException e) {
        Log.e(TAG, "error in addService", e);
    }
}

private static IServiceManager getIServiceManager() {
    ...
    // Find the service manager
    sServiceManager = ServiceManagerNative.asInterface(BinderInternal.getContextObject());
    return sServiceManager;
}
BinderInternal.getContextObject函数完成了两个工作
1.创建了一个java层的binderProxy对象
2.通过JNI,该BinderProxy对象和一个Native的BpProxy对象挂钩,而该BpProxy对象的通信目标就是ServiceManager。
static public IServiceManager asInterface(IBinder obj){
    ...
    IServiceManager in =
        (IServiceManager)obj.queryLocalInterface(descriptor);
    if (in != null) {
        return in;
    }

    return new ServiceManagerProxy(obj);
}
ServiceManagerProxy
public void addService(String name, IBinder service, boolean allowIsolated)
        throws RemoteException {
    Parcel data = Parcel.obtain();
    Parcel reply = Parcel.obtain();
    data.writeInterfaceToken(IServiceManager.descriptor);
    data.writeString(name);
    data.writeStrongBinder(service);
    data.writeInt(allowIsolated ? 1 : 0);
    mRemote.transact(ADD_SERVICE_TRANSACTION, data, reply, 0);
    reply.recycle();
    data.recycle();
}
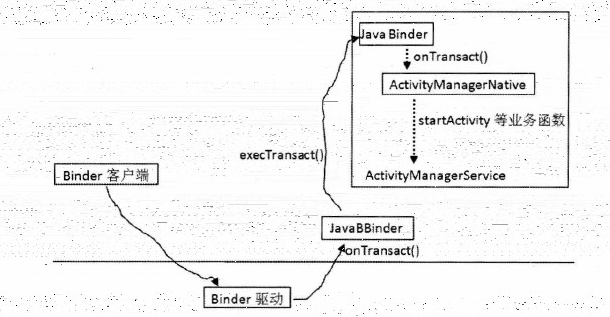
addService实际添加到Parcel的并不是AMS本身,而是一个名为JavaBBinder的对象。addService正是该JavaBBinder对象最终传递到Binder驱动。
当收到请求时,系统会调用JavaBBinder的onTransact函数,最终在Binder类中实现
private boolean execTransact(int code, long dataObj, long replyObj,
        int flags) {
    Parcel data = Parcel.obtain(dataObj);
    Parcel reply = Parcel.obtain(replyObj);
    boolean res;
    try {
        res = onTransact(code, data, reply, flags);
    }
    ...
    checkParcel(this, code, reply, "Unreasonably large binder reply buffer");
    reply.recycle();
    data.recycle();
    StrictMode.clearGatheredViolations();
    return res;
}
ActivityManagerNative类实现了onTransact函数
@Override
public boolean onTransact(int code, Parcel data, Parcel reply, int flags)
        throws RemoteException {
    switch (code) {
    case START_ACTIVITY_TRANSACTION:
    {
        data.enforceInterface(IActivityManager.descriptor);
        IBinder b = data.readStrongBinder();
        IApplicationThread app = ApplicationThreadNative.asInterface(b);
        String callingPackage = data.readString();
        Intent intent = Intent.CREATOR.createFromParcel(data);
        String resolvedType = data.readString();
        IBinder resultTo = data.readStrongBinder();
        String resultWho = data.readString();
        int requestCode = data.readInt();
        int startFlags = data.readInt();
        ProfilerInfo profilerInfo = data.readInt() != 0
                ? ProfilerInfo.CREATOR.createFromParcel(data) : null;
        Bundle options = data.readInt() != 0
                ? Bundle.CREATOR.createFromParcel(data) : null;
        int result = startActivity(app, callingPackage, intent, resolvedType,
                resultTo, resultWho, requestCode, startFlags, profilerInfo, options);
        reply.writeNoException();
        reply.writeInt(result);
        return true;
    }
    ...
JavaBBinder仅是一个传声筒,本身不实现任何业务函数,其工作是:
1.收到请求时,简单调用它所绑定的java层binder对象的execTransact
2.该binder对象的execTransact调用其子类实现的onTransact函数
3.子类的onTransact函数将业务又派发给其子类来完成
通过这种方式,来自客户端的请求就能传递到正确的Java层Binder对象了。
AMS响应请求的流程
Java层Binder架构总结
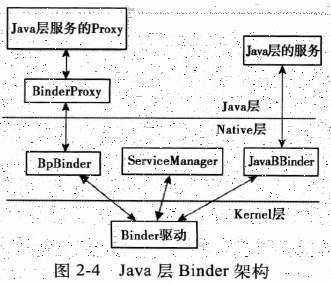
1.对于代表客户端的BinderProxy来说,Java层的BinderProxy在Native层对应一个BpBinder对象。凡是从Java层发出的请求,首先从Java层的BinderProxy传递到Native层的BpBinder,继而由BpBinder将请求发送到Binder驱动。
2.对于代表服务端的Service来说,Java层的Binder在Native层有一个JavaBBinder对象。所有Java层的Binder在Native层都对应为JavaBBinder,而JavaBBinder仅起到中转作用,即把来自客户端的请求从Native层传递到Java层。
3.系统中依然只有一个Native的ServiceManager。
MessageQueue的部分在我的另一篇博客中已经分析过了,可移步handler机制