对于前面的使用register_chrdev函数注册字符设备驱动程序的方法其实是尚未升级到2.6内核版本的驱动代码。使用这种方式虽然理解起来简单(可以简单理解为一主设备号为下标将驱动的file_operations结构体放入名为chrdevs的数组中,而当应用层调用open函数时,会通过字符设备的主设备号从chrdevs数组中找出file_operations结构体的open函数调用),但是有个缺点就是对于同一个主设备号的,不同的256个次设备号都可以调用同一个open,这样造成可用的设备驱动最多只能有256个。所以在2.6内核版本之后,有一个dev_t类型,它用于保存设备编号,它是一个32位的数,其中12位被用于主设备号,其余20位用于次设备号。而且同一个主设备号,不同的此设备号可以表示不同的设备。这样的话,就可以最大有4G个设备驱动可以使用。
1、字符设备驱动的写法
在以前的字符设备编写方法是这样的:
1、确定设备号
2、分配、设置一个file_operations结构体
3、register_chrdev(设备号,名字,file_operations结构体)
4、入口函数
5、出口函数
在2.6内核中,新的字符设备的编写方法是这样的:
以主设备号和次设备号来找到file_operations结构体。
把register_chrdev展开:
1、alloc_chrdev_region/register_chrdev_region(从(主,次)到(主,次+n)都对应file_operations结构体)
2、cdev_init
3、cdev_add
2、以新的字符设备编写方法编写驱动程序并且测试
直接把驱动程序列出,下面的程序实现了2个驱动程序,分别是hello_ops、与hello2_ops 。然后hello_ops可以对应次设备号为0与1的字符设备文件,而hello2_ops对应次设备号为2的字符设备文件。
#include <linux/module.h>
#include <linux/kernel.h>
#include <linux/fs.h>
#include <linux/init.h>
#include <asm/io.h>            //含有iomap函数iounmap函数
#include <asm/uaccess.h>       //含有copy_from_user函数
#include <linux/device.h>      //含有类相关的处理函数
#include <asm/arch/regs-gpio.h>//含有S3C2410_GPF0等相关的
#include <linux/irq.h>         //含有IRQ_HANDLEDIRQ_TYPE_EDGE_RISING
#include <asm-arm/irq.h>       //含有IRQT_BOTHEDGE触发类型
#include <linux/interrupt.h>   //含有request_irq、free_irq函数
#include <linux/cdev.h>

/* 1、确定主设备号 */
static int major;

static int hello_open (struct inode * inode, struct file * file)
{
    printk("hello_open
");
    return 0;
}

static int hello2_open (struct inode * inode, struct file * file)
{
    printk("hello2_open
");
    return 0;
}
/* 2、构造file_operations */
static struct file_operations hello_ops = {
    .owner   = THIS_MODULE,
    .open    =  hello_open,
};

/* 2、构造file_operations */
static struct file_operations hello2_ops = {
    .owner   = THIS_MODULE,
    .open    =  hello2_open,
};

#define HELLO_CNT 2
static struct cdev hello_cdev;
static struct cdev hello2_cdev;

static struct class *cls;//类

static int hello_init(void)
{
    dev_t devid;

    /* 3、告诉内核 */
#if 0
    register_chrdev(0, "hello", &hello_ops);/* 导致(major, 0), (major, 1), ...(major, 255)都对应hello_ops */
#else
    if (major)
    {
        devid = MKDEV(major, 0);
        register_chrdev_region(devid, HELLO_CNT, "hello");/* (major, 0-1)对应hello_ops,(major, 2-255)都不对应 */
    }
    else
    {
        alloc_chrdev_region(&devid, 0, HELLO_CNT, "hello");/* (major, 0-1)对应hello_ops,(major, 2-255)都不对应 */
        major = MAJOR(devid);
    }

    cdev_init(&hello_cdev, &hello_ops);
    cdev_add(&hello_cdev, devid, HELLO_CNT);

    devid = MKDEV(major, 2);
    register_chrdev_region(devid, 1, "hello2");/* (major, 2)对应hello2_ops,(major, 3-255)都不对应 */

    cdev_init(&hello2_cdev, &hello2_ops);
    cdev_add(&hello2_cdev, devid, 1);

#endif

    cls = class_create(THIS_MODULE, "hello");//创建类
    class_device_create(cls, NULL, MKDEV(major,0), NULL,"hello0");/* /dev/hello0 */
    class_device_create(cls, NULL, MKDEV(major,1), NULL,"hello1");/* /dev/hello1 */
    class_device_create(cls, NULL, MKDEV(major,2), NULL,"hello2");/* /dev/hello2 */
    class_device_create(cls, NULL, MKDEV(major,3), NULL,"hello3");/* /dev/hello3 */
    return 0;
}

static void hello_exit(void)
{
    class_device_destroy(cls, MKDEV(major,0));
    class_device_destroy(cls, MKDEV(major,1));
    class_device_destroy(cls, MKDEV(major,2));
    class_device_destroy(cls, MKDEV(major,3));
    class_destroy(cls);

    cdev_del(&hello_cdev);
    unregister_chrdev_region(MKDEV(major, 0), HELLO_CNT);

    cdev_del(&hello2_cdev);
    unregister_chrdev_region(MKDEV(major, 2), 1);
}


module_init(hello_init);
module_exit(hello_exit);

MODULE_LICENSE("GPL");
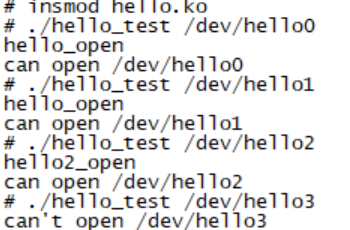
接着编写一个测试程序测试它,这个测试程序可以通过打开不同的字符设备文件找到相应的设备驱动。
#include <stdio.h>
#include <stdlib.h>
#include <string.h>
#include <sys/types.h>
#include <sys/stat.h>
#include <fcntl.h>

/*
 * ./hello_test <dev>
 */

void printf_usage(char *file)
{
    printf("%s <dev>
", file);
}

int main(int argc, char **argv)
{
    int fd;
    if(argc != 2)
    {
        printf_usage(argv[0]);
        return 0;
    }

    fd = open(argv[1], O_RDWR);

    if(fd <0)
    {
        printf("can't open %s
", argv[1]);
    }
    else
    {
        printf("can open %s
", argv[1]);
    }
    return 0;
}
测试的结果如下,从测试结果可以看出/dev/hello0~3这4个字符设备文件的主设备号都为252。其中次设备为0、1的文件对应hello_ops;次设备为2的文件对应hello2_ops。这个测试结果证明了同一个主设备,不同的次设备号可以对应不同的驱动程序。