一、线性布局
所有布局都可以作为容器类使用,因此可以调用多个重载的addView()向布局管理器中添加组件。
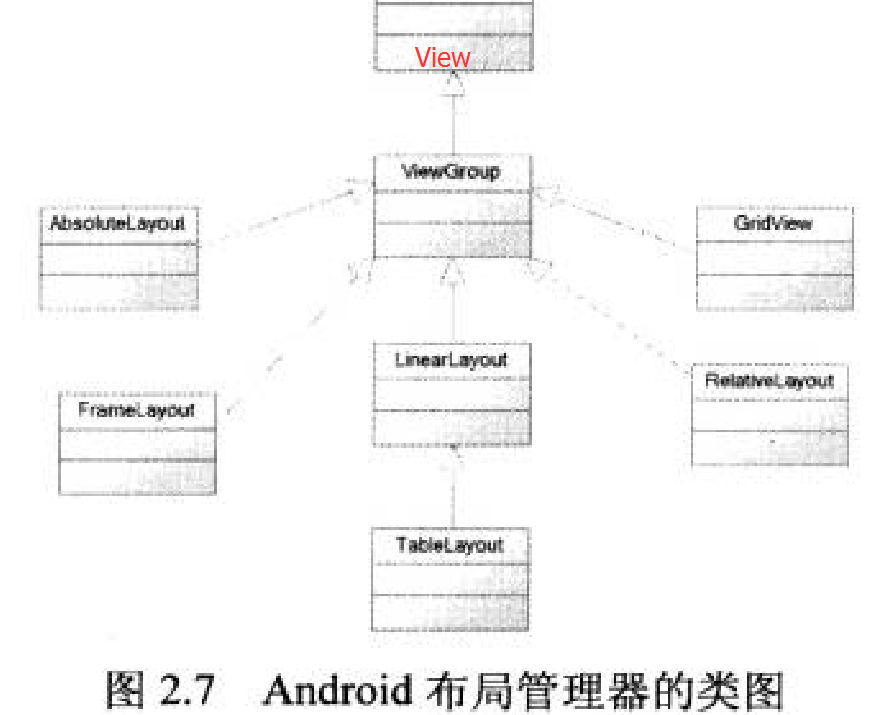
实际上,我们完全可以用一个布局管理器嵌套到其他布局管理器中---因为布局管理器也继承了
View,也可以作为普通UI组件使用。
【LinearLayout的常用XML属性及相关方法】
android:baselineAligned setBaselineAligned(boolean)
该属性设置为false,将会阻止该布局管理器与它的子元素的基线对齐。
android:divider setDividerDrawable(Drawable)
设置垂直布局时两个按钮之间的分割条
android:gravity setGravity(int)
设置布局管理器内组件的对其方式,该属性支持top, buttom, left, right, center_vertical,
fill_vertical, center_horizontal, fill_horizontal, center, fill, clip_vertical,
clip_horizontal几个属性值,也可以同时指定多种对其方式的组合,中间用|隔开。
android:measureWithLargestChild setMeasureWithLargestChildEnabled(boolean)
当属性设置为true时,所有带权重的子元素都会具有最大子元素的最小尺寸。
android:orientation setOrientation(int)
设置布局管理器内组件的排列方式,可以设置为horizontal, vertical两个之一。
LinearLayout包含的所有子元素都受LinearLayout.LayoutParams控制。因此LinearLayout包含的
子元素可以额外指定以下属性。
android:layout_gravity 指定该子元素在LinearLayout中的对齐方式。
android:layout_weight 指定该子元素在LinearLayout中所占的权重。
二、表格布局
TableLayout,继承了LinearLayout。表格布局采用行、列的形式来管理UI组件。
在表格布局管理器中,可以为单元格设置如下三种行为方式。
# Shrinkable:如果某个列被设为Shrinkable,那么该列的所有单元格的宽度可以被收缩,以保证该表格能适应父容器的宽度。
# Stretchable:如果某个列被设为Stretchable,那么该列的所有单元格的宽度可以被拉伸,以保证组件能完全填满表格空余空间。
# Collapsed:如果某个列被设为Collapsed,那么该列的所有单元格会被隐藏。
除了完全可以支持LinearLayout所支持的全部XML属性外,还支持以下属性。
【TableLayout的常用XML属性及相关方法】
android:collapseColumns setColumnCollapsed(int, boolean)
设置需要被隐藏的列的列序号。多个列序号之间用逗号隔开。
android:shrinkColumns setShrinkAllColumns(boolean)
设置允许被收缩的列的列序号。多个列序号之间用逗号隔开。
android:stretchColumns setStretchAllColumns(boolean)
设置允许被拉伸的列的列序号。多个列序号之间用逗号隔开。
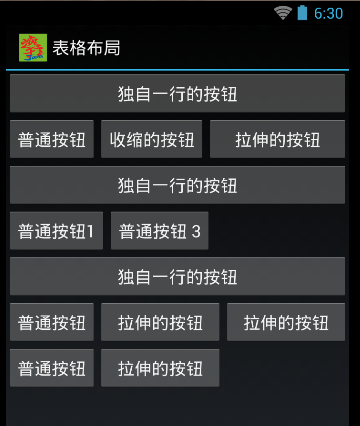
范例:丰富的表格布局
  1 <?xml version="1.0" encoding="utf-8"?>
  2 <LinearLayout
  3     xmlns:android="http://schemas.android.com/apk/res/android"
  4     android:layout_width="fill_parent"
  5     android:layout_height="fill_parent"
  6     android:orientation="vertical" >
  7
  8     <!-- 定义第一个表格布局,指定第2列允许收缩,第3列允许拉伸 -->
  9     <TableLayout
 10         android:id="@+id/TableLayout04"
 11         android:layout_width="fill_parent"
 12         android:layout_height="wrap_content"
 13         android:shrinkColumns="1"
 14         android:stretchColumns="2" >
 15
 16         <!-- 直接添加按钮,它自己会占一行 -->
 17         <Button
 18             android:id="@+id/ok1"
 19             android:layout_width="wrap_content"
 20             android:layout_height="wrap_content"
 21             android:text="独自一行的按钮" />
 22
 23         <!-- 添加一个表格行 -->
 24         <TableRow>
 25
 26             <!-- 为该表格行添加3个按钮 -->
 27             <Button
 28                 android:id="@+id/ok2"
 29                 android:layout_width="wrap_content"
 30                 android:layout_height="wrap_content"
 31                 android:text="普通按钮" />
 32             <Button
 33                 android:id="@+id/ok3"
 34                 android:layout_width="wrap_content"
 35                 android:layout_height="wrap_content"
 36                 android:text="收缩的按钮" />
 37             <Button
 38                 android:id="@+id/ok4"
 39                 android:layout_width="wrap_content"
 40                 android:layout_height="wrap_content"
 41                 android:text="拉伸的按钮" />
 42         </TableRow>
 43     </TableLayout>
 44
 45     <!-- 定义第二个表格布局 ,指定第二列隐藏 -->
 46     <TableLayout
 47         android:id="@+id/TableLayout02"
 48         android:layout_width="fill_parent"
 49         android:layout_height="wrap_content"
 50         android:collapseColumns="1" >
 51
 52         <!-- 直接添加按钮,它自己会占一行 -->
 53         <Button
 54             android:id="@+id/ok5"
 55             android:layout_width="wrap_content"
 56             android:layout_height="wrap_content"
 57             android:text=" 独自一行的按钮 " />
 58         <!-- 定义一个表格行 -->
 59         <TableRow>
 60
 61             <!-- 为该表格行添加3个按钮 -->
 62             <Button
 63                 android:id="@+id/ok6"
 64                 android:layout_width="wrap_content"
 65                 android:layout_height="wrap_content"
 66                 android:text="普通按钮1" />
 67             <Button
 68                 android:id="@+id/ok7"
 69                 android:layout_width="wrap_content"
 70                 android:layout_height="wrap_content"
 71                 android:text="被隐藏的按钮" />
 72             <Button
 73                 android:id="@+id/ok8"
 74                 android:layout_width="wrap_content"
 75                 android:layout_height="wrap_content"
 76                 android:text="普通按钮 3" />
 77         </TableRow>
 78     </TableLayout>
 79
 80     <!-- 定义第三个表格布局 ,指定第2、3两列可以被拉伸 -->
 81     <TableLayout
 82         android:id="@+id/TableLayout03"
 83         android:layout_width="fill_parent"
 84         android:layout_height="wrap_content"
 85         android:stretchColumns="1,2" >
 86
 87         <!-- 直接添加按钮,它自己会占一行 -->
 88         <Button
 89             android:id="@+id/ok9"
 90             android:layout_width="wrap_content"
 91             android:layout_height="wrap_content"
 92             android:text="独自一行的按钮" />
 93         <!-- 定义一个表格行 -->
 94         <TableRow>
 95             <!-- 为该表格行添加3个按钮 -->
 96             <Button
 97                 android:id="@+id/ok10"
 98                 android:layout_width="wrap_content"
 99                 android:layout_height="wrap_content"
100                 android:text="普通按钮" />
101             <Button
102                 android:id="@+id/ok11"
103                 android:layout_width="wrap_content"
104                 android:layout_height="wrap_content"
105                 android:text="拉伸的按钮" />
106             <Button
107                 android:id="@+id/ok12"
108                 android:layout_width="wrap_content"
109                 android:layout_height="wrap_content"
110                 android:text="拉伸的按钮" />
111         </TableRow>
112
113         <!-- 定义一个表格行 -->
114         <TableRow>
115             <!-- 为该表格行添加2个按钮 -->
116             <Button
117                 android:id="@+id/ok13"
118                 android:layout_width="wrap_content"
119                 android:layout_height="wrap_content"
120                 android:text="普通按钮" />
121             <Button
122                 android:id="@+id/ok14"
123                 android:layout_width="wrap_content"
124                 android:layout_height="wrap_content"
125                 android:text="拉伸的按钮" />
126         </TableRow>
127     </TableLayout>
128
129 </LinearLayout>
三、桢布局
FrameLayout。直接继承了ViewGroup组件。
桢布局容器为每个加入其中的组件创建一个空白的区域(称为一桢),每个子组件占据一桢,
这些桢都会根据gravity属性执行自动对齐。桢布局都是把组件一个个叠加在一起。
【FrameLayout的常用XML属性及相关方法】
android:foreground setForeground(Drawable)
设置该桢布局容器的前景图像
android:foregroundGravity setForegroundGravity(int)
定义绘制前景图像的gravity属性。
范例:霓虹灯效果
<?xml version="1.0" encoding="utf-8"?>
<FrameLayout
    xmlns:android="http://schemas.android.com/apk/res/android"
    android:layout_width="fill_parent"
    android:layout_height="fill_parent" >

    <!--
           依次定义6个TextView,先定义的TextView位于底层
    后定义的TextView位于上层
    -->
    <TextView
        android:id="@+id/view01"
        android:layout_width="wrap_content"
        android:layout_height="wrap_content"
        android:layout_gravity="center"
        android:background="#f00"
        android:height="320px"
        android:width="320px" />
    <TextView
        android:id="@+id/view02"
        android:layout_width="wrap_content"
        android:layout_height="wrap_content"
        android:layout_gravity="center"
        android:background="#0f0"
        android:height="280px"
        android:width="280px" />
    <TextView
        android:id="@+id/view03"
        android:layout_width="wrap_content"
        android:layout_height="wrap_content"
        android:layout_gravity="center"
        android:background="#00f"
        android:height="240px"
        android:width="240px" />
    <TextView
        android:id="@+id/view04"
        android:layout_width="wrap_content"
        android:layout_height="wrap_content"
        android:layout_gravity="center"
        android:background="#ff0"
        android:height="200px"
        android:width="200px" />
    <TextView
        android:id="@+id/view05"
        android:layout_width="wrap_content"
        android:layout_height="wrap_content"
        android:layout_gravity="center"
        android:background="#f0f"
        android:height="160px"
        android:width="160px" />
    <TextView
        android:id="@+id/view06"
        android:layout_width="wrap_content"
        android:layout_height="wrap_content"
        android:layout_gravity="center"
        android:background="#0ff"
        android:height="120px"
        android:width="120px" />
</FrameLayout>
 1 import java.util.Timer;
 2 import java.util.TimerTask;
 3 import android.app.Activity;
 4 import android.os.Bundle;
 5 import android.os.Handler;
 6 import android.os.Message;
 7 import android.widget.TextView;
 8
 9
10 public class FrameLayoutTest extends Activity {
11     private int currentColor = 0;
12     // 定义一个颜色数组
13     final int[] colors = new int[] { R.color.color1, R.color.color2,
14             R.color.color3, R.color.color4, R.color.color5, R.color.color6 };
15     final int[] names = new int[] { R.id.view01, R.id.view02, R.id.view03,
16             R.id.view04, R.id.view05, R.id.view06 };
17     TextView[] views = new TextView[names.length];
18     Handler handler = new Handler() {
19         @Override
20         public void handleMessage(Message msg) {
21             // 表明消息来自本程序所发送
22             if (msg.what == 0x123) {
23                 for (int i = 0; i < names.length; i++) {
24                     views[i].setBackgroundResource(colors[(i + currentColor)
25                             % names.length]);
26                 }
27                 currentColor++;
28             }
29             super.handleMessage(msg);
30         }
31     };
32
33     @Override
34     public void onCreate(Bundle savedInstanceState) {
35         super.onCreate(savedInstanceState);
36         setContentView(R.layout.main);
37         for (int i = 0; i < names.length; i++) {
38             views[i] = (TextView) findViewById(names[i]);
39         }
40
41         // 定义一个线程周期性的改变currentColor变量值
42         new Timer().schedule(new TimerTask() {
43             @Override
44             public void run() {
45                 // 发送一条空消息通知系统改变6个TextView组件的背景色
46                 handler.sendEmptyMessage(0x123);
47             }
48         }, 0, 200);
49     }
50 }


四、相对布局 RelativeLayout
相对布局容器内子组件的位置总是相对兄弟组件,父容器来决定的。
【RelativeLayout的XML属性及相关方法说明】
android:gravity setGravity(int) 设置该布局容器内各子组件的对其方式。
android:ignoreGravity setIgnoreGravity(int) 设置哪个组件不受gravity属性的影响。
【RelativeLayout.LayoutParams里猪能设为boolean值的属性】
layout_alignParentBottom 当前控件低端与父控件的低端对齐(重合)
layout_alignParentLeft 当前控件左端与父控件的左端对齐(重合)
layout_alignParentRight 当前控件右端与父控件的右端对齐(重合)
layout_alignParentTop 当前控件上端与父控件的上端对齐(重合)
layout_centerHorizontal 当前控件位于父控件的横向中间位置(水平方向上的中间)
layout_centerInParent 当前控件位于父控件的纵横向中间位置(垂直方向上的中间)
layout_centerVertical 当前控件位于父控件的纵向中间位置(平面上的正中间)
【RelativeLayout.LayoutParams里只能设为其他UI组件ID的属性】
layout_above 使当前控件位于给出id控件的上方
layout_below 使当前控件位于给出id控件的下方
layout_toLeftOf 使当前控件位于给出id控件的左侧
layout_toRightOf 使当前控件位于给出id控件的右侧
layout_alignBottom 使当前控件与给出id控件的底部部重合(注意可用和给出id控件来对齐)
layout_alignLeft 使当前控件与给出id控件的左边重合
layout_alignRight 使当前控件与给出id控件的右边重合
layout_alignTop 使当前控件与给出id控件的顶部重合
layout_alignBaseline 使当前控件的BaseLine与给出id控件t的BaseLine重合,这个主要用于
Label或者其他包含文本的widgets。
五、绝对布局 AbsoluteLayout
layout_x:指定该子组件的X坐标。
layout_y:指定该子组件的Y坐标。
六、Android4.0新增的网格布局
GridLayout的作用类似于HTML中的table标签。它把整个容器划分成rows X columns个网格。
每个网格可以放置一个组件。除此之外,也可以设置一个组件横跨多少列。一个组件纵跨多少行。
GridLayout提供了setRowCount(int)和setColumnCount(int)来控制该网格的行数量和列数量。


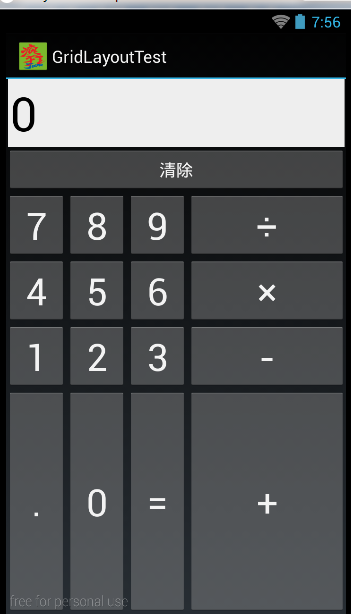
范例:计算器界面
<?xml version="1.0" encoding="utf-8"?>
<GridLayout xmlns:android="http://schemas.android.com/apk/res/android"
    android:id="@+id/root"
    android:layout_width="match_parent"
    android:layout_height="match_parent"
    android:columnCount="4"
    android:rowCount="6" >

    <!--
定义一个横跨4列的文本框,
并设置该文本框的前景色、背景色等属性
    -->

    <TextView
        android:layout_width="match_parent"
        android:layout_height="wrap_content"
        android:layout_columnSpan="4"
        android:layout_gravity="right"
        android:layout_marginLeft="4px"
        android:layout_marginRight="4px"
        android:background="#eee"
        android:padding="5px"
        android:text="0"
        android:textColor="#000"
        android:textSize="50sp" />
    <!-- 定义一个横跨4列的按钮 -->

    <Button
        android:layout_width="match_parent"
        android:layout_height="wrap_content"
        android:layout_columnSpan="4"
        android:text="清除" />

</GridLayout>
public class GridLayoutTest extends Activity {
    GridLayout gridLayout;
    // 定义16个按钮的文本
    String[] chars = new String[] { "7", "8", "9", "÷", "4", "5", "6", "×",
            "1", "2", "3", "-", ".", "0", "=", "+" };

    @Override
    public void onCreate(Bundle savedInstanceState) {
        super.onCreate(savedInstanceState);
        setContentView(R.layout.main);
        gridLayout = (GridLayout) findViewById(R.id.root);

        for (int i = 0; i < chars.length; i++) {
            Button bn = new Button(this);
            bn.setText(chars[i]);
            // 设置该按钮的字体大小
            bn.setTextSize(40);
            // 指定该组件所在的行
            GridLayout.Spec rowSpec = GridLayout.spec(i / 4 + 2);
            // 指定该组件所在列
            GridLayout.Spec columnSpec = GridLayout.spec(i % 4);
            GridLayout.LayoutParams params = new GridLayout.LayoutParams(
                    rowSpec, columnSpec);
            // 指定该组件占满父容器
            params.setGravity(Gravity.FILL);
            gridLayout.addView(bn, params);
        }
    }
}
