一.概述
侧滑菜单现在已经非常流行了,目前大概有这么几种:最普通的侧滑,抽屉侧滑,QQ侧滑
注:本文来自慕课网
二.最普通的侧滑
先上图
代码如下:
 1 public class MainActivity extends Activity {
 2     private SlidingMenuView mLeftMenu;
 3     @Override
 4     protected void onCreate(Bundle savedInstanceState) {
 5         super.onCreate(savedInstanceState);
 6         setContentView(R.layout.activity_main);
 7         mLeftMenu = (SlidingMenuView) findViewById(R.id.id_menu);
 8     }
 9
10     public void toggleMenu(View view) {
11         mLeftMenu.toggle();
12     }
13 }
以上是 MainActivity
public class SlidingMenuView extends HorizontalScrollView {
    private LinearLayout wapper;// 这是该横向水平滚动条里面的 第一个线性布局,和activity_main.xml对应
    private ViewGroup menu; // 左侧菜单区域
    private ViewGroup content;// 右边内容区域
    private int screenWidth;// 屏幕宽度
    private int menuRightPadding = 50; // 菜单距屏幕右侧边框距离,单位dp
    private boolean once;
    private boolean isOpen;
    private int mMenuWidth;//菜单宽度

    /** 未使用自定义属性时,调用 */
    public SlidingMenuView(Context context, AttributeSet attrs) {
        super(context, attrs);
        WindowManager wm = (WindowManager) context.getSystemService(context.WINDOW_SERVICE);
        DisplayMetrics outMetrics = new DisplayMetrics();
        wm.getDefaultDisplay().getMetrics(outMetrics);
        screenWidth = outMetrics.widthPixels;// 得到屏幕宽度
        //dp转成xp
        menuRightPadding = (int) TypedValue.applyDimension(
                TypedValue.COMPLEX_UNIT_DIP, 50, context
                        .getResources().getDisplayMetrics());//将50dp转成像素值
    }

    /***
     * 自定义控件重写方法1 该方法能够测量 子view 以及 自己的宽高 该方法可能被多次执行,所以定义一个标记once,让它只调用一次,不要多次设置宽高
     */
    @Override
    protected void onMeasure(int widthMeasureSpec, int heightMeasureSpec) {
        if (!once) {
            wapper = (LinearLayout) getChildAt(0);// 初始化该线性布局,因为是第一个所以childAt(0)
            menu = (ViewGroup) wapper.getChildAt(0);// 得到菜单布局容器
            content = (ViewGroup) wapper.getChildAt(1);// 得到内容布局容器
            mMenuWidth = menu.getLayoutParams().width
                    = screenWidth - menuRightPadding;//菜单宽度
            content.getLayoutParams().width = screenWidth;//内容宽度就是 屏幕宽度
            wapper.getLayoutParams().width = mMenuWidth + screenWidth;//这句可以不写,因为它是放在水平滚动内部的
            once = true;
        }
        super.onMeasure(widthMeasureSpec, heightMeasureSpec);
    }

    /***
     * 自定义控件重写方法2 设置子view 的位置
     * 要求content显示 内容区域
     * menu 缩到左边
     */
    @Override
    protected void onLayout(boolean changed, int l, int t, int r, int b) {
        super.onLayout(changed, l, t, r, b);
        if (changed){
            //设置偏移量,将menu隐藏 ,x为正值 ,表示滚动条向右移动,那么内容区域就向左移动,mMenuWidth是x轴移动宽度
            this.scrollTo(mMenuWidth, 0);
        }
    }
    /***
     * 自定义控件重写方法3
     * 控制手势,因为 HorizontalScrollView能自动控制 手势 按下,移动,所以这里只需要处理 up
     */
    @Override
    public boolean onTouchEvent(MotionEvent ev) {
        int action = ev.getAction();
        switch (action){
        case MotionEvent.ACTION_UP:
            // 隐藏在左边的宽度
            int scrollX = getScrollX();
            if (scrollX >= mMenuWidth / 2){ //大于菜单布局的 1/2 就隐藏菜单
                this.smoothScrollTo(mMenuWidth, 0);
                isOpen = false;
            } else{
                this.smoothScrollTo(0, 0);//显示出来菜单内容,也就是x轴偏移量scrollX=0
                isOpen = true;
            }
            return true;
        }
        return super.onTouchEvent(ev);
    }

    /**
     * 打开菜单
     */
    public void openMenu()
    {
        if (isOpen)
            return;
        this.smoothScrollTo(0, 0);//smoothScrollto带有动画效果
        isOpen = true;
    }

    public void closeMenu()
    {
        if (!isOpen)
            return;
        this.smoothScrollTo(mMenuWidth, 0);
        isOpen = false;
    }

    /**
     * 切换菜单
     */
    public void toggle()
    {
        if (isOpen)
        {
            closeMenu();
        } else
        {
            openMenu();
        }
    }

}
以上是自定义HorizontalScrollView ,注释已经非常详细了
<RelativeLayout xmlns:android="http://schemas.android.com/apk/res/android"
    xmlns:app="http://schemas.android.com/apk/res-auto"
    xmlns:tools="http://schemas.android.com/tools"
    android:layout_width="match_parent"
    android:layout_height="match_parent" >

    <com.example.slidingmenu.SlidingMenuView
        android:id="@+id/id_menu"
        android:layout_width="match_parent"
        android:layout_height="match_parent" >

        <LinearLayout
            android:layout_width="wrap_content"
            android:layout_height="match_parent"
            android:orientation="horizontal" >
            <!-- 左侧菜单 -->
            <include layout="@layout/left_menu"/>
            <!-- 真正的内容区域 -->
            <LinearLayout
                android:layout_width="match_parent"
                android:layout_height="match_parent"
                android:background="@drawable/qq" >

                <Button
                    android:layout_width="wrap_content"
                    android:layout_height="wrap_content"
                    android:onClick="toggleMenu"
                    android:text="切换菜单" />
            </LinearLayout>
        </LinearLayout>
    </com.example.slidingmenu.SlidingMenuView>

</RelativeLayout>
以上是 activity_main.xml
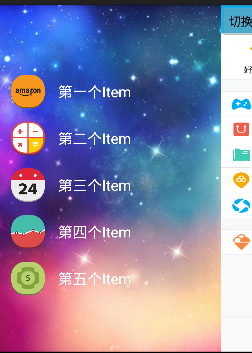
<?xml version="1.0" encoding="utf-8"?>
<LinearLayout xmlns:android="http://schemas.android.com/apk/res/android"
    android:layout_width="match_parent"
    android:layout_height="match_parent"
    android:background="@drawable/img_frame_background"
    android:orientation="vertical" >

    <RelativeLayout
        android:gravity="center"
        android:layout_width="match_parent"
        android:layout_height="match_parent" >

        <LinearLayout
            android:id="@+id/ll1"
            android:layout_marginLeft="20dp"
            android:layout_marginTop="20dp"
            android:layout_width="match_parent"
            android:layout_height="wrap_content"
            android:orientation="horizontal" >

            <ImageView
                android:layout_width="50dp"
                android:layout_height="50dp"
                android:src="@drawable/img_1" />

            <TextView
                android:textColor="#ffffff"
                android:layout_marginLeft="20dp"
                android:layout_gravity="center"
                android:textSize="22sp"
                android:layout_width="wrap_content"
                android:layout_height="wrap_content"
                android:text="第一个Item" />
        </LinearLayout>
        <LinearLayout
            android:id="@+id/ll2"
            android:layout_below="@+id/ll1"
            android:layout_marginLeft="20dp"
            android:layout_marginTop="20dp"
            android:layout_width="match_parent"
            android:layout_height="wrap_content"
            android:orientation="horizontal" >

            <ImageView
                android:layout_width="50dp"
                android:layout_height="50dp"
                android:src="@drawable/img_2" />

            <TextView
                android:textColor="#ffffff"
                android:layout_marginLeft="20dp"
                android:layout_gravity="center"
                android:textSize="22sp"
                android:layout_width="wrap_content"
                android:layout_height="wrap_content"
                android:text="第二个Item" />
        </LinearLayout>
        <LinearLayout
            android:id="@+id/ll3"
            android:layout_below="@+id/ll2"
            android:layout_marginLeft="20dp"
            android:layout_marginTop="20dp"
            android:layout_width="match_parent"
            android:layout_height="wrap_content"
            android:orientation="horizontal" >

            <ImageView
                android:layout_width="50dp"
                android:layout_height="50dp"
                android:src="@drawable/img_3" />

            <TextView
                android:textColor="#ffffff"
                android:layout_marginLeft="20dp"
                android:layout_gravity="center"
                android:textSize="22sp"
                android:layout_width="wrap_content"
                android:layout_height="wrap_content"
                android:text="第三个Item" />
        </LinearLayout>
        <LinearLayout
            android:id="@+id/ll4"
            android:layout_below="@+id/ll3"
            android:layout_marginLeft="20dp"
            android:layout_marginTop="20dp"
            android:layout_width="match_parent"
            android:layout_height="wrap_content"
            android:orientation="horizontal" >

            <ImageView
                android:layout_width="50dp"
                android:layout_height="50dp"
                android:src="@drawable/img_4" />

            <TextView
                android:textColor="#ffffff"
                android:layout_marginLeft="20dp"
                android:layout_gravity="center"
                android:textSize="22sp"
                android:layout_width="wrap_content"
                android:layout_height="wrap_content"
                android:text="第四个Item" />
        </LinearLayout>
        <LinearLayout
            android:id="@+id/ll5"
            android:layout_below="@+id/ll4"
            android:layout_marginLeft="20dp"
            android:layout_marginTop="20dp"
            android:layout_width="match_parent"
            android:layout_height="wrap_content"
            android:orientation="horizontal" >

            <ImageView
                android:layout_width="50dp"
                android:layout_height="50dp"
                android:src="@drawable/img_5" />

            <TextView
                android:textColor="#ffffff"
                android:layout_marginLeft="20dp"
                android:layout_gravity="center"
                android:textSize="22sp"
                android:layout_width="wrap_content"
                android:layout_height="wrap_content"
                android:text="第五个Item" />
        </LinearLayout>
    </RelativeLayout>

</LinearLayout>
上面是菜单布局.
源码地址:https://yunpan.cn/cq6nntbEBNmbW 访问密码 94c5
三.抽屉侧滑
抽屉侧滑,和普通侧滑最大区别是 , menu 菜单部分是静止的,只有内容区域在滑动
代码如下:
package com.example.slidingmenu;

import com.nineoldandroids.view.ViewHelper;

import android.content.Context;
import android.content.res.TypedArray;
import android.util.AttributeSet;
import android.util.DisplayMetrics;
import android.util.TypedValue;
import android.view.MotionEvent;
import android.view.ViewGroup;
import android.view.WindowManager;
import android.widget.HorizontalScrollView;
import android.widget.LinearLayout;

public class SlidingMenuView extends HorizontalScrollView {
    private LinearLayout wapper;// 这是该横向水平滚动条里面的 第一个线性布局,和activity_main.xml对应
    private ViewGroup menu; // 左侧菜单区域
    private ViewGroup content;// 右边内容区域
    private int screenWidth;// 屏幕宽度
    private int menuRightPadding = 50; // 菜单距屏幕右侧边框距离,单位dp
    private boolean once;
    private boolean isOpen;
    private int mMenuWidth;//菜单宽度

    public SlidingMenuView(Context context) {
        this(context,null,0);
    }

    /** 未使用自定义属性时,调用 */
    public SlidingMenuView(Context context, AttributeSet attrs) {
        this(context, attrs,0);
    }

    /**
     * 当使用了自定义属性时,会调用此构造方法
     */
    public SlidingMenuView(Context context, AttributeSet attrs, int defStyle) {
        super(context, attrs, defStyle);
        //获取自定义属性 ,这个设置后,可以在xml中自定义menu距右边框距离
        TypedArray ta = context.obtainStyledAttributes(attrs, R.styleable.SlidingMenu, defStyle, 0);
        menuRightPadding = ta.getDimensionPixelSize(R.styleable.SlidingMenu_rightPadding, (int) TypedValue.applyDimension(
                TypedValue.COMPLEX_UNIT_DIP, 50, context
                .getResources().getDisplayMetrics()));
        ta.recycle();

        WindowManager wm = (WindowManager) context.getSystemService(context.WINDOW_SERVICE);
        DisplayMetrics outMetrics = new DisplayMetrics();
        wm.getDefaultDisplay().getMetrics(outMetrics);
        screenWidth = outMetrics.widthPixels;// 得到屏幕宽度
    }

    /***
     * 自定义控件重写方法1 该方法能够测量 子view 以及 自己的宽高 该方法可能被多次执行,所以定义一个标记once,让它只调用一次,不要多次设置宽高
     */
    @Override
    protected void onMeasure(int widthMeasureSpec, int heightMeasureSpec) {
        if (!once) {
            wapper = (LinearLayout) getChildAt(0);// 初始化该线性布局,因为是第一个所以childAt(0)
            menu = (ViewGroup) wapper.getChildAt(0);// 得到菜单布局容器
            content = (ViewGroup) wapper.getChildAt(1);// 得到内容布局容器
            mMenuWidth = menu.getLayoutParams().width
                    = screenWidth - menuRightPadding;//菜单宽度
            content.getLayoutParams().width = screenWidth;//内容宽度就是 屏幕宽度
            wapper.getLayoutParams().width = mMenuWidth + screenWidth;//这句可以不写,因为它是放在水平滚动内部的
            once = true;
        }
        super.onMeasure(widthMeasureSpec, heightMeasureSpec);
    }

    /***
     * 自定义控件重写方法2 设置子view 的位置
     * 要求content显示 内容区域
     * menu 缩到左边
     */
    @Override
    protected void onLayout(boolean changed, int l, int t, int r, int b) {
        super.onLayout(changed, l, t, r, b);
        if (changed){
            //设置偏移量,将menu隐藏 ,x为正值 ,表示滚动条向右移动,那么内容区域就向左移动,mMenuWidth是x轴移动宽度
            this.scrollTo(mMenuWidth, 0);
        }
    }
    /***
     * 自定义控件重写方法3
     * 控制手势,因为 HorizontalScrollView能自动控制 手势 按下,移动,所以这里只需要处理 up
     */
    @Override
    public boolean onTouchEvent(MotionEvent ev) {
        int action = ev.getAction();
        switch (action){
        case MotionEvent.ACTION_UP:
            // 隐藏在左边的宽度
            int scrollX = getScrollX();
            if (scrollX >= mMenuWidth / 2){ //大于菜单布局的 1/2 就隐藏菜单
                this.smoothScrollTo(mMenuWidth, 0);
                isOpen = false;
            } else{
                this.smoothScrollTo(0, 0);//显示出来菜单内容,也就是x轴偏移量scrollX=0
                isOpen = true;
            }
            return true;
        }
        return super.onTouchEvent(ev);
    }

    /**
     * 打开菜单
     */
    public void openMenu()
    {
        if (isOpen)
            return;
        this.smoothScrollTo(0, 0);//smoothScrollto带有动画效果
        isOpen = true;
    }

    public void closeMenu(){
        if (!isOpen)
            return;
        this.smoothScrollTo(mMenuWidth, 0);
        isOpen = false;
    }

    /**
     * 切换菜单
     */
    public void toggle(){
        if (isOpen){
            closeMenu();
        } else{
            openMenu();
        }
    }
    /**
     * l是偏移量, 就是getScrollX()
     * t 和 oldl,oldt是变化的梯度值
     * 为兼容3.0以下使用  nineoldandroids-2.4.0.jar里面的动画
     */
    @Override
    protected void onScrollChanged(int l, int t, int oldl, int oldt) {
        super.onScrollChanged(l, t, oldl, oldt);
        //滚动发生时,调用属性动画,设置TranslationX
        float scale = l * 1.0f / mMenuWidth; // 1 ~ 0()
        //设置动画, menu偏移量从 1~0显示
        ViewHelper.setTranslationX(menu, mMenuWidth*scale);
    }
}
和图片侧滑自定义view很相似,只是这里引入了 ,自定义属性 以及重写了 onScrollChanged
<RelativeLayout xmlns:android="http://schemas.android.com/apk/res/android"
    xmlns:app="http://schemas.android.com/apk/res-auto"
    xmlns:tools="http://schemas.android.com/tools"
    android:layout_width="match_parent"
    android:layout_height="match_parent" >

    <com.example.slidingmenu.SlidingMenuView
        android:id="@+id/id_menu"
        app:rightPadding="80dp"
        android:layout_width="match_parent"
        android:layout_height="match_parent" >

        <LinearLayout
            android:layout_width="wrap_content"
            android:layout_height="match_parent"
            android:orientation="horizontal" >
            <!-- 左侧菜单 -->
            <include layout="@layout/left_menu"/>
            <!-- 真正的内容区域 -->
            <LinearLayout
                android:layout_width="match_parent"
                android:layout_height="match_parent"
                android:background="@drawable/qq" >

                <Button
                    android:layout_width="wrap_content"
                    android:layout_height="wrap_content"
                    android:onClick="toggleMenu"
                    android:text="切换菜单" />
            </LinearLayout>
        </LinearLayout>
    </com.example.slidingmenu.SlidingMenuView>

</RelativeLayout>
以上是Activity_main.xml 只是加入一个 自定义属性:app:rightPadding="80dp" 此处可以任意设置 menu菜单布局距右边框距离
MainActivity没有做任何变动,不再给出. 需要注意的是: 如果是eclipse创建的工程,默认会导入v7包, 会引入一些主题样式, 可能会导致nineoldandroid.jar失效,我的解决方式是要么用android studio创建工程, 要么 把Eclipse创建的工程 的v7包干掉, 然后去掉主题,就好了.
一般情况下,侧护栏做到抽屉侧滑基本就算完成了, 市面很多应用侧滑 基本都是抽屉侧滑. 当然如果想更炫,那就仿QQ侧滑,或者 其他第三方侧滑库
代码地址:https://yunpan.cn/cqMt3ez6Yvm93 访问密码 89d5
四.QQ5.0侧滑
在抽屉侧滑的 自定义View的基础上 ,只需要变动onScrollChanged() 该方法即可
protected void onScrollChanged(int l, int t, int oldl, int oldt)
    {
        super.onScrollChanged(l, t, oldl, oldt);
        float scale = l * 1.0f / mMenuWidth; // 1 ~ 0

        /**
         * 区别1:内容区域1.0~0.7 范围变化缩放效果 scale : 1.0~0.0 0.7 + 0.3 * scale
         *
         * 区别2:菜单的偏移量需要修改
         *
         * 区别3:菜单的显示时有缩放以及透明度变化 缩放:0.7 ~1.0 1.0 - scale * 0.3 透明度 0.6 ~ 1.0
         * 0.6+ 0.4 * (1- scale) ;
         *
         */
        float rightScale = 0.7f + 0.3f * scale;
        float leftScale = 1.0f - scale * 0.3f;
        float leftAlpha = 0.6f + 0.4f * (1 - scale);

        // 调用属性动画,设置TranslationX
        ViewHelper.setTranslationX(mMenu, mMenuWidth * scale * 0.8f);
        //设置菜单布局的缩放
        ViewHelper.setScaleX(mMenu, leftScale);
        ViewHelper.setScaleY(mMenu, leftScale);
        ViewHelper.setAlpha(mMenu, leftAlpha);
        /** 设置content的缩放的中心点, 如果此处不设置中心点会造成menu菜单直接滑到屏幕右边框
         *  因为动画刚开始以mContent内容布局的中心点开始的. 等滑到屏幕右边后
         *  要设置中心点 变换到 mContent的 Y轴方向的中心点, X轴为0点
         */
        ViewHelper.setPivotX(mContent, 0);
        ViewHelper.setPivotY(mContent, mContent.getHeight() / 2);
        //设置 内容布局的 缩放
        ViewHelper.setScaleX(mContent, rightScale);
        ViewHelper.setScaleY(mContent, rightScale);

    }
以上就是 所有侧滑的过程分析.