点击PyMySQL介绍
PyMySQL是在Python3版本中用于连接MySQL服务器的一个库,Python2中则使用MySQL数据库。
Django中也可以使用PyMySQL连接MySQL数据库。
PyMySQL安装
pip3 install pymysql

连接数据库
注意事项
在进行本文以下内容之前需要注意:

你有一个MySQL数据库,并且已经启动。
你有可以连接该数据库的用户名和密码
你有一个有权限操作的database设置
设置
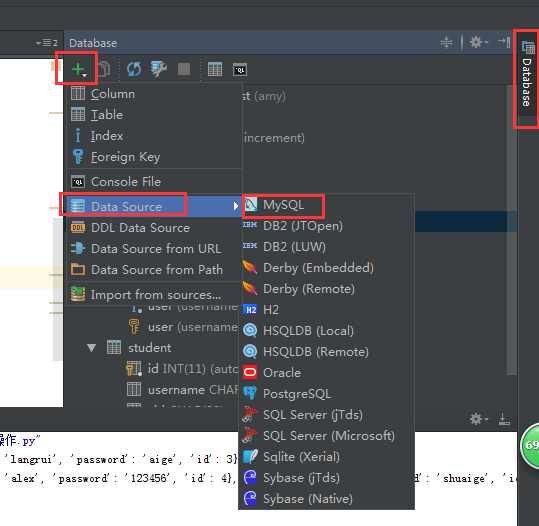
1.打开pycharm右侧的Database,如下图所示:
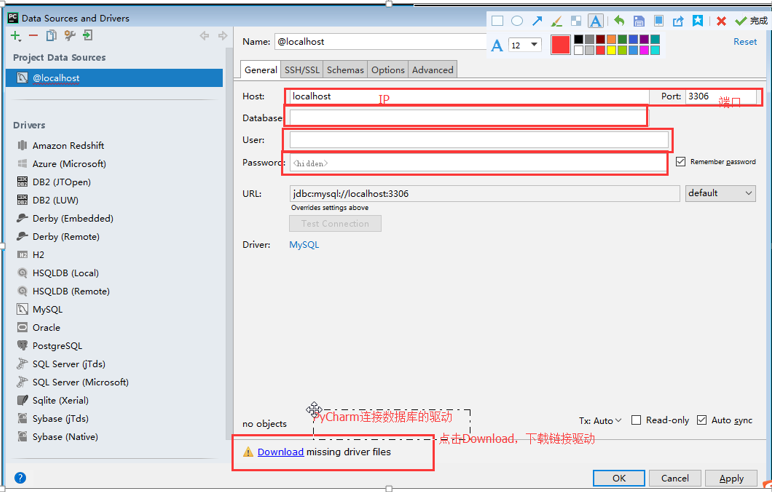
2、打开mySQL连接窗口后,输入完数据之后,下载连接数据库的驱动,再点击Test connection,点击apply,最后点击ok;
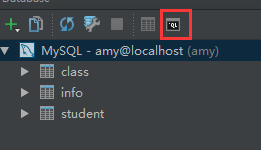
3、连接完数据库之后,点击图中标出的按钮,创建表操作。
基本使用
# 导入pymysql模块
import pymysql
# 连接database
conn = pymysql.connect(host=“你的数据库地址”, port="你需要连接的端口号" ,user=“用户名”,password=“密码”,database=“数据库名”,charset=“utf8”)
# 得到一个可以执行SQL语句的光标对象
cursor = conn.cursor()
# 定义要执行的SQL语句
sql = """
CREATE TABLE USER1 (
id INT auto_increment PRIMARY KEY ,
name CHAR(10) NOT NULL UNIQUE,
age TINYINT NOT NULL
)ENGINE=innodb DEFAULT CHARSET=utf8;
"""
# 执行SQL语句
cursor.execute(sql)
# 关闭光标对象
cursor.close()
# 关闭数据库连接
conn.close()
返回字典格式数据:
# 导入pymysql模块
import pymysql
# 连接database
conn = pymysql.connect(host=“你的数据库地址”, port="你需要连接的端口号" , user=“用户名”,password=“密码”,database=“数据库名”,charset=“utf8”) # 得到一个可以执行SQL语句并且将结果作为字典返回的游标 cursor = conn.cursor(cursor=pymysql.cursors.DictCursor) # 定义要执行的SQL语句 sql = """ CREATE TABLE USER1 ( id INT auto_increment PRIMARY KEY , name CHAR(10) NOT NULL UNIQUE, age TINYINT NOT NULL )ENGINE=innodb DEFAULT CHARSET=utf8; """ # 执行SQL语句 cursor.execute(sql) # 关闭光标对象 cursor.close() # 关闭数据库连接 conn.close()
注意:
charset=“utf8”,编码不要写成"utf-8"
增删改查操作
增
# 导入pymysql模块
import pymysql
# 连接database
conn = pymysql.connect(host=“你的数据库地址”, port="你需要连接的端口号" , user=“用户名”,password=“密码”,database=“数据库名”,charset=“utf8”) # 得到一个可以执行SQL语句的光标对象 cursor = conn.cursor() sql = "INSERT INTO USER1(name, age) VALUES (%s, %s);" username = "Alex" age = 18 # 执行SQL语句 cursor.execute(sql, [username, age]) # 提交事务 conn.commit() cursor.close() conn.close()
(1)SQL注入问题
SQL语句在程序中是字符串,动态拼接的字符串,拿用户输入的内容去拼接字符串。
例:
sql="select * from info where username='amy'-- ' and password='123456'"

#相当于执行了:select * from info where username='amy'   之后的内容被当成注释了。

sql="select * from info where username='amy' or 1=1 --' and password=' ' "

#相当于执行了"select * from info where username='amy' or 1=1”,恒成立

#以上情况都会被当作条件成立。
解决方案:
sql="select * from info where username='%s' and password='%s' "
ret = cursor.execute(sql,[username,password])
插入数据失败回滚
# 导入pymysql模块
import pymysql
# 连接database
conn = pymysql.connect(host=“你的数据库地址”, port="你需要连接的端口号" , user=“用户名”,password=“密码”,database=“数据库名”,charset=“utf8”) # 得到一个可以执行SQL语句的光标对象 cursor = conn.cursor() sql = "INSERT INTO USER1(name, age) VALUES (%s, %s);" username = "Alex" age = 18 try: # 执行SQL语句  cursor.execute(sql, [username, age]) # 提交事务  conn.commit() except Exception as e: # 有异常,回滚事务  conn.rollback() cursor.close() conn.close()
获取插入数据的ID(关联操作时会用到)
# 导入pymysql模块
import pymysql
# 连接database
conn = pymysql.connect(host=“你的数据库地址”, port="你需要连接的端口号" , user=“用户名”,password=“密码”,database=“数据库名”,charset=“utf8”) # 得到一个可以执行SQL语句的光标对象 cursor = conn.cursor() sql = "INSERT INTO USER1(name, age) VALUES (%s, %s);" username = "Alex" age = 18 try: # 执行SQL语句  cursor.execute(sql, [username, age]) # 提交事务  conn.commit() # 提交之后,获取刚插入的数据的ID last_id = cursor.lastrowid except Exception as e: # 有异常,回滚事务  conn.rollback() cursor.close() conn.close()
批量执行
# 导入pymysql模块
import pymysql
# 连接database
conn = pymysql.connect(host=“你的数据库地址”, port="你需要连接的端口号" , user=“用户名”,password=“密码”,database=“数据库名”,charset=“utf8”) # 得到一个可以执行SQL语句的光标对象 cursor = conn.cursor() sql = "INSERT INTO USER1(name, age) VALUES (%s, %s);" data = [("Alex", 18), ("Egon", 20), ("Yuan", 21)] try: # 批量执行多条插入SQL语句  cursor.executemany(sql, data) # 提交事务  conn.commit() except Exception as e: # 有异常,回滚事务  conn.rollback() cursor.close() conn.close()
删
# 导入pymysql模块
import pymysql
# 连接database
conn = pymysql.connect(host=“你的数据库地址”, port="你需要连接的端口号" , user=“用户名”,password=“密码”,database=“数据库名”,charset=“utf8”) # 得到一个可以执行SQL语句的光标对象 cursor = conn.cursor() sql = "DELETE FROM USER1 WHERE id=%s;" try: cursor.execute(sql, [4]) # 提交事务  conn.commit() except Exception as e: # 有异常,回滚事务  conn.rollback() cursor.close() conn.close()
改
# 导入pymysql模块
import pymysql
# 连接database
conn = pymysql.connect(host=“你的数据库地址”, port="你需要连接的端口号" , user=“用户名”,password=“密码”,database=“数据库名”,charset=“utf8”) # 得到一个可以执行SQL语句的光标对象 cursor = conn.cursor() # 修改数据的SQL语句 sql = "UPDATE USER1 SET age=%s WHERE name=%s;" username = "Alex" age = 80 try: # 执行SQL语句  cursor.execute(sql, [age, username]) # 提交事务  conn.commit() except Exception as e: # 有异常,回滚事务  conn.rollback() cursor.close() conn.close()
import pymysql
conn=pymysql.connect(
    host="localhost",
    port=3306,
    database="amy",
    user="root",
    password="111111",
    charset="utf8"
)
cursor=conn.cursor()
sql="update info set password=%s where username=%s"
try:
    cursor.executemany(sql,["666","amy"])
    conn.commit()
except Exception:
    conn.rollback()

cursor.close()
conn.close()
查
查询单条数据
# 导入pymysql模块
import pymysql
# 连接database
conn = pymysql.connect(host=“你的数据库地址”, port="你需要连接的端口号" , user=“用户名”,password=“密码”,database=“数据库名”,charset=“utf8”) # 得到一个可以执行SQL语句的光标对象 cursor = conn.cursor() # 查询数据的SQL语句 sql = "SELECT id,name,age from USER1 WHERE id=1;" # 执行SQL语句 cursor.execute(sql) # 获取单条查询数据 ret = cursor.fetchone() cursor.close() conn.close() # 打印下查询结果 print(ret)
查询多条数据
# 导入pymysql模块
import pymysql
# 连接database
conn = pymysql.connect(host=“你的数据库地址”, port="你需要连接的端口号" , user=“用户名”,password=“密码”,database=“数据库名”,charset=“utf8”) # 得到一个可以执行SQL语句的光标对象 cursor = conn.cursor() # 查询数据的SQL语句 sql = "SELECT id,name,age from USER1;" # 执行SQL语句 cursor.execute(sql) # 获取多条查询数据 ret = cursor.fetchall() cursor.close() conn.close() # 打印下查询结果 print(ret)
进阶用法
# 可以获取指定数量的数据
cursor.fetchmany(3)
# 光标按绝对位置移动1
cursor.scroll(1, mode="absolute")
# 光标按照相对位置(当前位置)移动1
cursor.scroll(1, mode="relative")