本文纯属介绍怎么简单地创建自己的Owin。还没有理解owin概念的请看上一篇文章:http://www.cnblogs.com/alunchen/p/7049307.html
目录
1.创建项目
2.导入Nuget包
3.创建Startup类
4.创建自己的中间件Middleware
5.把中间件加入owin
6.测试
7.总结
本文是以WebApi空项目来创建owin的。使用工具VS2017
1.创建项目
创建一个空的webapi项目
2.导入Nuget包
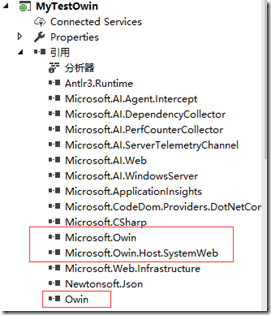
可以看到导入成功后,项目的引用多了下面的包。
3.创建Startup类
为什么要创建Startup类呢?
因为owin中有这样的规定:启动类定义为:Startup。在这个类中有一个Configuration方法,这是它的规定,owin会自动查找此类此方法并执行。
下面是我的Startup类
using System;
using System.Collections.Generic;
using System.Linq;
using System.Web;
using Microsoft.Owin;
using MyTestOwin.Middleware;
using Owin;

[assembly: OwinStartup(typeof(MyTestOwin.Startup))]
namespace MyTestOwin
{
    public class Startup
    {
        public void Configuration(IAppBuilder app)
        {
        }

    }
}
4.创建自己的中间件Middleware
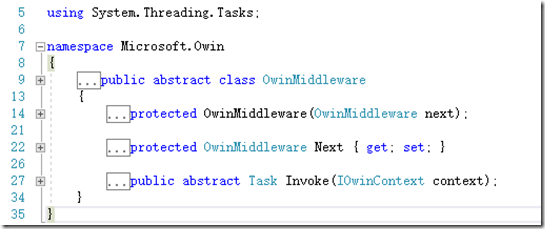
创建自己的中间件的话,首先要继承OwinMiddleware类,他是抽象类。可以看看此类上有什么内容:
此类主要有1个构造函数、1个属性、1个抽象方法。
构造函数OwinMiddleware:作用是初始化下一个可选的中间件。
属性Next:意思是下一个中间件。
抽象方法Invoke:创建自己的中间件都要重写此方法。此方法在中间件运行的时候就运行,处理个人请求。
下面我们来继承OwinMiddleware类,并且重构构造函数、重写Invoke方法。类名字为Middleware1
直接贴代码,没什么可说的,可以看注释:
using System;
using System.Collections.Generic;
using System.Linq;
using System.Text;
using System.Threading.Tasks;
using System.Web;
using Microsoft.Owin;

namespace MyTestOwin.Middleware
{
    public class Middleware1:OwinMiddleware
    {

        public Middleware1(OwinMiddleware next):base(next)
        { }


        public override Task Invoke(IOwinContext context)
        {
            if (context.Request.Path == new PathString("/owin1"))
            {
                var msg = "Owin1";
                var msgBytes = Encoding.UTF8.GetBytes(msg);
                context.Response.ContentType = "text/html;charset=utf-8";
                context.Response.Write(msgBytes, 0, msgBytes.Length);
                //解答者告诉Server解答已经完毕,后续Middleware不需要处理
                return Task.FromResult(0);
            }
            //如果不是要处理的路径,那么交付后续Middleware处理
            return Next.Invoke(context);
        }
    }
}
解析一下上面代码:
- 首先,我们判断一下请求的link是否为’/owin1’?
- 如果是,则执行我们想要的方法,并且执行完毕,后续所有的中间件以及controller等都不做执行处理。
- 如果不是,则执行下一个中间件,直到找到对应的中间件为止。如果中间件最后找不到,则到controller里面找。
下面理清一下:
- PathString是Miscrosoft.Owin下一个类,封装了URL处理的一些功能.
- Task.FromResult(0) 表示一个空的Task,说明该Middleware在某些情况下不再触发后续的Middleware运行—也就是”到此为止”.
- 最后Next.Invoke(context)是一个非常标准的实现,把上下文交付下一个Middleware继续处理—相当于”交出接力棒”.
- 这个Middleware是一个标准的解答者.它给出了”/owin1”这个问题的最终答案.
5.把中间件加入owin
下面我们把中间件Middleware1加入到owin中。
很简单,只需要在Startup类的Configuration方法中,加入下面的代码:
app.Use<Middleware1>();
6.测试
1)为了方便测试&理解,我们再加入一个中间件Middleware2类,并且执行owin2 的path,代码如下:
using System;
using System.Collections.Generic;
using System.Linq;
using System.Text;
using System.Threading.Tasks;
using System.Web;
using Microsoft.Owin;

namespace MyTestOwin.Middleware
{
    public class Middleware2 : OwinMiddleware
    {

        public Middleware2(OwinMiddleware next):base(next)
        { }


        public override Task Invoke(IOwinContext context)
        {
            if (context.Request.Path == new PathString("/owin2"))
            {
                var msg = "owin2";
                var msgBytes = Encoding.UTF8.GetBytes(msg);
                context.Response.ContentType = "text/html;charset=utf-8";
                context.Response.Write(msgBytes, 0, msgBytes.Length);
                //解答者告诉Server解答已经完毕,后续Middleware不需要处理
                return Task.FromResult(0);
            }
            //如果不是要处理的路径,那么交付后续Middleware处理
            return Next.Invoke(context);
        }
    }
}
2)再在Startup类中加入自定义中间件:
app.Use<Middleware2>();
整体代码如下:
using System;
using System.Collections.Generic;
using System.Linq;
using System.Web;
using Microsoft.Owin;
using MyTestOwin.Middleware;
using Owin;

[assembly: OwinStartup(typeof(MyTestOwin.Startup))]
namespace MyTestOwin
{
    public class Startup
    {
        public void Configuration(IAppBuilder app)
        {
            //注意:这里的顺序是与owin中间件类执行的顺序一样。
              app.Use<Middleware1>();
            app.Use<Middleware2>();
        }

    }
}
3)在写一个继续ApiController的类,请求路径为:http://xx/api/values/get
using System;
using System.Collections.Generic;
using System.Linq;
using System.Net;
using System.Net.Http;
using System.Web.Http;

namespace MyTestOwin.Controllers
{
    [RoutePrefix("api/values")]
    public class ValuesController : ApiController
    {
        [Route("get")]
        [HttpGet]
        public IEnumerable<string> Get()
        {
            return new string[] { "value1", "value2" };
        }
    }
}
加上上面的所有东西,让我们更好地理解owin做了什么操作,与我们平时所写的apicontroller有什么联系。
下面,我们开始启动项目:
我们分别打一个断点在Startup类的方法Configuration中、Middleware1的Invoke方法、Middleware2的Invoke方法。
项目启动了,先执行Startup中的Configuration、再执行Middleware1、最后执行Middleware2。
请注意的是,这里的项目启动的路径是 http://localhost:52023/,并没有二级路径。上面都执行了中间件。
也就是说,我们的中间件注册后,所有的请求都经过我们的中间件。
测试一:在浏览器上输入 http://localhost:52023/api/values/get
第一执行Middleware1、第二执行Middleware2、最后是ValuesController。并且返回controller的结果:
测试二:在浏览器上输入 http://localhost:52023/owin1
第一执行Middleware1,最后也是它执行。返回结果是:
测试三:在浏览器上输入http://localhost:52023/owin2
第一执行Middleware1、最后执行Middleware2。返回结果是:
7.总结
我们通过自己的测试,可以总结到的是:
1)我们在startup类中注册的中间件顺序是中间件执行的顺序。
2)每个请求都会执行中间件的Invoke方法,直到有请求的结果为止。
3)从测试看出,中间件有点类似于拦截器。
可以到github上面下载项目 https://github.com/cjt321/MyTestOwin/
可以关注本人的公众号,多年经验的原创文章共享给大家。


