Mybatis快速入门

1、SqlSessionFactoryBuilder:读取配置信 息创建SqlSessionFactory,建造者模式, 方法级别生命周期;
2、SqlSessionFactory:创建Sqlsession,工 厂单例模式,存在于程序的整个生命周 期;
3、SqlSession:代表一次数据库连接,可 以直接发送SQL执行,也可以通过调用 Mapper访问数据库;线程不安全,要保 证线程独享(方法级);
4、SQL Mapper:由一个Java接口和XML文 件组成,包含了要执行的SQL语句和结果 集映射规则。方法级别生命周期;
Mybatis配置

1、settings
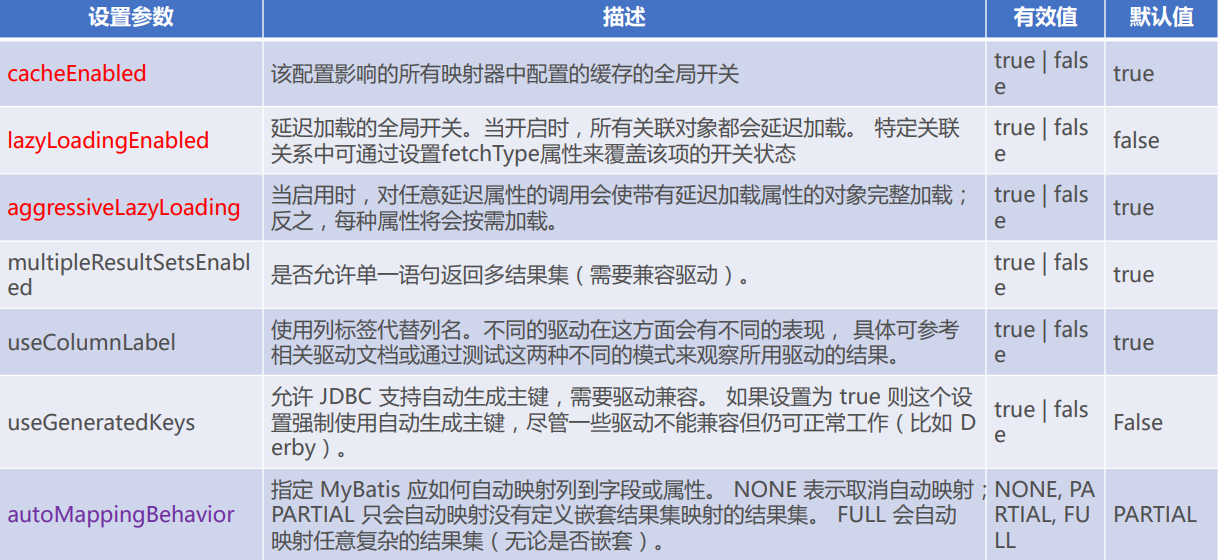
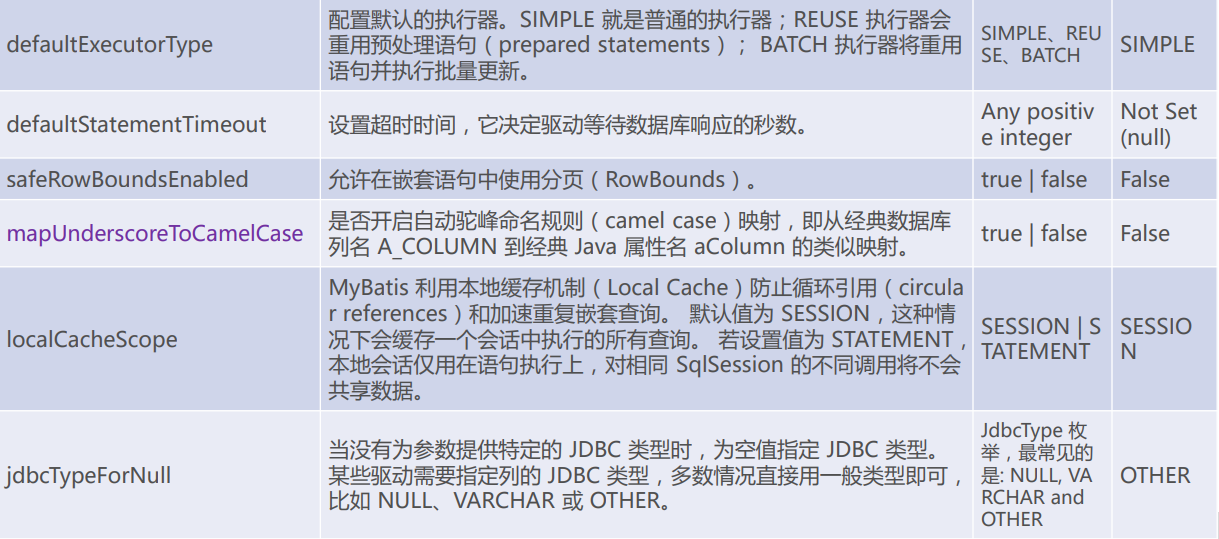

<!-- 参数设置 -->
    <settings>
        <!-- 这个配置使全局的映射器启用或禁用缓存 -->
        <setting name="cacheEnabled" value="true" />
        <!-- 全局启用或禁用延迟加载。当禁用时,所有关联对象都会即时加载 -->
        <setting name="lazyLoadingEnabled" value="true" />
        <!-- 当启用时,有延迟加载属性的对象在被调用时将会完全加载任意属性。否则,每种属性将会按需要加载 -->
        <setting name="aggressiveLazyLoading" value="true" />
        <!-- 允许或不允许多种结果集从一个单独的语句中返回(需要适合的驱动) -->
        <setting name="multipleResultSetsEnabled" value="true" />
        <!-- 使用列标签代替列名。不同的驱动在这方便表现不同。参考驱动文档或充分测试两种方法来决定所使用的驱动 -->
        <setting name="useColumnLabel" value="true" />
        <!-- 允许JDBC支持生成的键。需要适合的驱动。如果设置为true则这个设置强制生成的键被使用,尽管一些驱动拒绝兼容但仍然有效(比如Derby) -->
        <setting name="useGeneratedKeys" value="true" />
        <!-- 指定MyBatis如何自动映射列到字段/属性。PARTIAL只会自动映射简单,没有嵌套的结果。FULL会自动映射任意复杂的结果(嵌套的或其他情况) -->
        <setting name="autoMappingBehavior" value="PARTIAL" />
        <!--当检测出未知列(或未知属性)时,如何处理,默认情况下没有任何提示,这在测试的时候很不方便,不容易找到错误。 NONE : 不做任何处理
            (默认值) WARNING : 警告日志形式的详细信息 FAILING : 映射失败,抛出异常和详细信息 -->
        <setting name="autoMappingUnknownColumnBehavior" value="WARNING" />
        <!-- 配置默认的执行器。SIMPLE执行器没有什么特别之处。REUSE执行器重用预处理语句。BATCH执行器重用语句和批量更新 -->
        <setting name="defaultExecutorType" value="SIMPLE" />
        <!-- 设置超时时间,它决定驱动等待一个数据库响应的时间 -->
        <setting name="defaultStatementTimeout" value="25000" />
        <!--设置查询返回值数量,可以被查询数值覆盖 -->
        <setting name="defaultFetchSize" value="100" />
        <!-- 允许在嵌套语句中使用分页 -->
        <setting name="safeRowBoundsEnabled" value="false" />
        <!--是否开启自动驼峰命名规则(camel case)映射,即从经典数据库列名 A_COLUMN 到经典 Java 属性名 aColumn
            的类似映射。 -->
        <setting name="mapUnderscoreToCamelCase" value="false" />
        <!--MyBatis 利用本地缓存机制(Local Cache)防止循环引用(circular references)和加速重复嵌套查询。
            默认值为 SESSION,这种情况下会缓存一个会话中执行的所有查询。 若设置值为 STATEMENT,本地会话仅用在语句执行上,对相同 SqlSession
            的不同调用将不会共享数据。 -->
        <setting name="localCacheScope" value="SESSION" />
        <!-- 当没有为参数提供特定的 JDBC 类型时,为空值指定 JDBC 类型。 某些驱动需要指定列的 JDBC 类型,多数情况直接用一般类型即可,比如
            NULL、VARCHAR OTHER。 -->
        <setting name="jdbcTypeForNull" value="OTHER" />
        <!-- 指定哪个对象的方法触发一次延迟加载。 -->
        <setting name="lazyLoadTriggerMethods" value="equals,clone,hashCode,toString" />
    </settings>
2、environments
environment 元素是配置一个数据源的开始,属性id是它的唯一标识
transactionManager 元素配置数据库事务,其中type属性有三种配置方式
- jdbc,采用jdbc的方式管理事务;
- managed,采用容器的方式管理事务,在JNDI数据源中使用; 、
- 自定义,自定义数据库事务管理办法;
dataSource 元素配置数据源连接信息,type属性是连接数据库的方式配置,有四种配置方式
- UNPOOLED 非连接池方式连接
- POOLED 使用连接池连接
- JNDI 使用JNDI数据源
- 自定义数据源
<!--配置environment环境 -->
    <environments default="development">
        <!-- 环境配置1,每个SqlSessionFactory对应一个环境 -->
        <environment id="development1">
            <!-- 事务配置 type= JDBC、MANAGED 1.JDBC:这个配置直接简单使用了JDBC的提交和回滚设置。它依赖于从数据源得到的连接来管理事务范围。
                2.MANAGED:这个配置几乎没做什么。它从来不提交或回滚一个连接。而它会让容器来管理事务的整个生命周期(比如Spring或JEE应用服务器的上下文)。
                默认情况下它会关闭连接。然而一些容器并不希望这样,因此如果你需要从连接中停止它,将closeConnection属性设置为false -->
            <transactionManager type="JDBC" />
            <!-- <transactionManager type="MANAGED"> <property name="closeConnection"
                value="false"/> </transactionManager> -->
            <!-- 数据源类型:type = UNPOOLED、POOLED、JNDI 1.UNPOOLED:这个数据源的实现是每次被请求时简单打开和关闭连接。它有一点慢,这是对简单应用程序的一个很好的选择,因为它不需要及时的可用连接。
                不同的数据库对这个的表现也是不一样的,所以对某些数据库来说配置数据源并不重要,这个配置也是闲置的 2.POOLED:这是JDBC连接对象的数据源连接池的实现,用来避免创建新的连接实例时必要的初始连接和认证时间。
                这是一种当前Web应用程序用来快速响应请求很流行的方法。 3.JNDI:这个数据源的实现是为了使用如Spring或应用服务器这类的容器,容器可以集中或在外部配置数据源,然后放置一个JNDI上下文的引用 -->
            <dataSource type="UNPOOLED">
                <property name="driver" value="com.mysql.jdbc.Driver" />
                <property name="url" value="jdbc:mysql://localhost:3306/xhm" />
                <property name="username" value="root" />
                <property name="password" value="root" />
                <!-- 默认连接事务隔离级别 <property name="defaultTransactionIsolationLevel" value=""
                    /> -->
            </dataSource>
        </environment>

        <!-- 环境配置2 -->
        <environment id="development2">
            <transactionManager type="JDBC" />
            <dataSource type="POOLED">
                <property name="driver" value="com.mysql.jdbc.Driver" />
                <property name="url" value="jdbc:mysql://localhost:3306/xhm" />
                <property name="username" value="root" />
                <property name="password" value="root" />
                <!-- 在任意时间存在的活动(也就是正在使用)连接的数量 -->
                <property name="poolMaximumActiveConnections" value="10" />
                <!-- 任意时间存在的空闲连接数 -->
                <property name="poolMaximumIdleConnections" value="5" />
                <!-- 在被强制返回之前,池中连接被检查的时间 -->
                <property name="poolMaximumCheckoutTime" value="20000" />
                <!-- 这是给连接池一个打印日志状态机会的低层次设置,还有重新尝试获得连接,这些情况下往往需要很长时间(为了避免连接池没有配置时静默失败) -->
                <property name="poolTimeToWait" value="20000" />
                <!-- 发送到数据的侦测查询,用来验证连接是否正常工作,并且准备接受请求。 -->
                <property name="poolPingQuery" value="NO PING QUERY SET" />
                <!-- 这是开启或禁用侦测查询。如果开启,你必须用一个合法的SQL语句(最好是很快速的)设置poolPingQuery属性 -->
                <property name="poolPingEnabled" value="false" />
                <!-- 这是用来配置poolPingQuery多次时间被用一次。这可以被设置匹配标准的数据库连接超时时间,来避免不必要的侦测 -->
                <property name="poolPingConnectionsNotUsedFor" value="0" />
            </dataSource>
        </environment>

        <!-- 环境配置3 -->
        <environment id="development3">
            <transactionManager type="JDBC" />
            <dataSource type="JNDI">
                <property name="data_source" value="java:comp/env/jndi/mybatis" />
                <property name="env.encoding" value="UTF8" />
                <!-- <property name="initial_context" value=""/> <property name="env.encoding"
                    value="UTF8"/> -->
            </dataSource>
        </environment>
    </environments>
3、mapper
PS:第一种方式用的推荐使用,类文件和mapper文件可以不需要 放在一个文件夹中,xml文件也不会和java文件混合在一起;
A、用classPath下资源引用-----将mapper.xml文件放在resource文件夹下是常规做法
<mappers>
   <!--直接映射到相应的mapper文件 -->
   <mapper resource="sqlmapper/TUserMapper.xml" />
</mappers>
B、用类注册方式引用-----将mapper.xml文件与Mapper接口放在同一路径下
<mappers>
  <!—通过类扫描mapper文件 -->
  <mapper class="com.enjoylearning.mybatis.mapper.TUserMapper" />
</mappers>
C、使用包名引入引射器名-----与B同理
<mappers>
  <!—扫描包下所有的mapper文件 -->
  <package name="com.enjoylearning.mybatis.mapper"/>
</mappers>
D、用文件的全路径引用
<!-- 映射文件,mapper的配置文件 -->
    <mappers>
        <!--直接映射到相应的mapper文件 -->
        <mapper resource="com/xhm/mapper/UserMapper.xml" />
        <!--扫描包路径下所有xxMapper.xml文件 -->
        <package name="com.xhm.mapper" />
    </mappers>
基于xml配置的映射器
cache – 给定命名空间的缓存配置。
cache-ref – 其他命名空间缓存配置的引用。
resultMap – 是最复杂也是最强大的元素,用来描述如何从数据库结果集中来加载对象。
sql – 可被其他语句引用的可重用语句块。
insert – 映射插入语句
update – 映射更新语句
delete – 映射删除语句
select – 映射查询语句
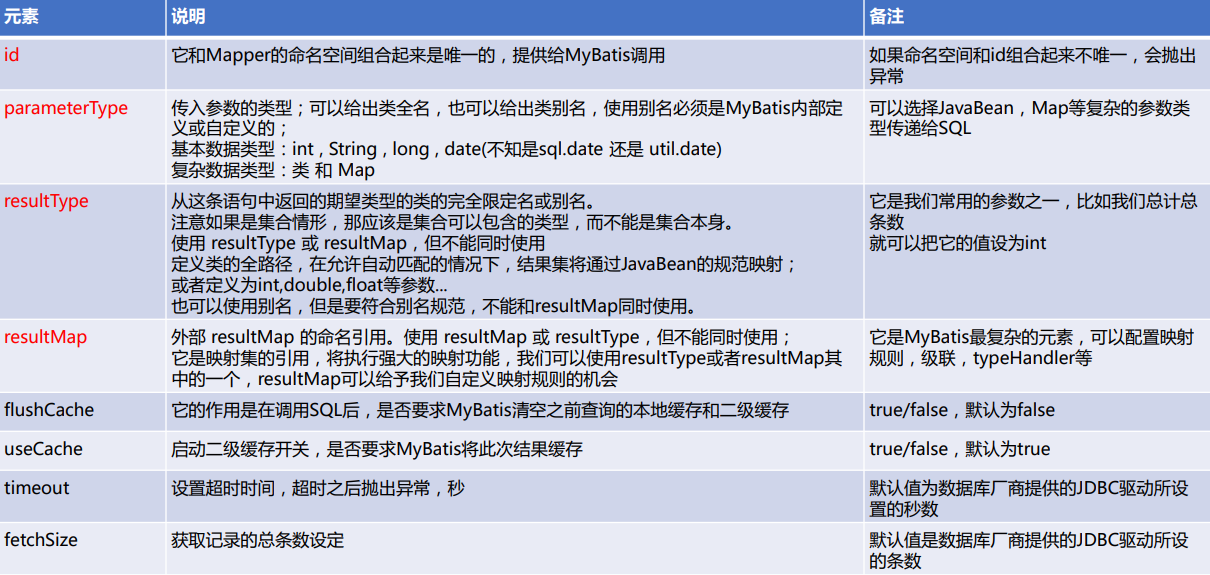
select元素
自动映射
- 前提:SQL列名和JavaBean的属性是一致的;
- 自动映射等级autoMappingBehavior设置为PARTIAL,需要谨慎使用FULL;
- 使用resultType;
- 如果列名和JavaBean不一致,但列名符合单词下划线分割,Java是驼峰命名法, 则mapUnderscoreToCamelCase可设置为true;
传递多个查询入参
- 使用map传递参数;可读性差,导致可维护性和可扩展性差,杜绝使用;
- 使用注解传递参数;直观明了,当参数较少一般小于5个的时候,建议使用;
- 使用Java Bean的方式传递参数;当参数大于5个的时候,建议使用;
     // 第一种方式使用map
        Map<String, Object> params = new HashMap<String, Object>();
        params.put("email", email);
        params.put("sex", sex);
        List<TUser> list1 = mapper.selectByEmailAndSex1(params);
        System.out.println(list1.size());

        // 第二种方式直接使用参数
        List<TUser> list2 = mapper.selectByEmailAndSex2(email, sex);
        System.out.println(list2.size());

        // 第三种方式用对象
        EmailSexBean esb = new EmailSexBean();
        esb.setEmail(email);
        esb.setSex(sex);
        List<TUser> list3 = mapper.selectByEmailAndSex3(esb);
        System.out.println(list3.size());
   List<TUser> selectByEmailAndSex1(Map<String, Object> param);

    List<TUser> selectByEmailAndSex2(@Param("email")String email,@Param("sex")Byte sex);

    List<TUser> selectByEmailAndSex3(EmailSexBean esb);
resultMap元素
属性
resultMap 元素是 MyBatis 中最重要最强大的元素。它可以让你从 90% 的 JDBC ResultSets 数据提取代码中解放出 来,在对复杂语句进行联合映射的时候,它很可能可以代替数千行的同等功能的代码。
ResultMap 的设计思想是,简单的语句不需要明确的结果映射,而复杂一点的语句只需要描述它们的关系就行了。

resultMap元素 子元素
constructor - 用于在实例化类时,注入结果到构造方法中
- idArg - ID 参数;标记出作为 ID 的结果可以帮助提高整体性能
- arg - 将被注入到构造方法的一个普通结果
id – 一个 ID 结果;标记出作为 ID 的结果可以帮助提高整体性能
result – 注入到字段或 JavaBean 属性的普通结果
association – 一个复杂类型的关联;许多结果将包装成这种类型嵌套结果映射 – 关联可以指定为一个 resultMap 元素,或者引用一个
collection – 一个复杂类型的集合嵌套结果映射 – 集合可以指定为一个 resultMap 元素,或者引用一个
discriminator – 使用结果值来决定使用哪个 resultMap
- case – 基于某些值的结果映射嵌套结果映射 – 一个 case 也是一个映射它本身的结果,因此可以包含很多相 同 的元素,或者它可以参照一个外部的 resultMap
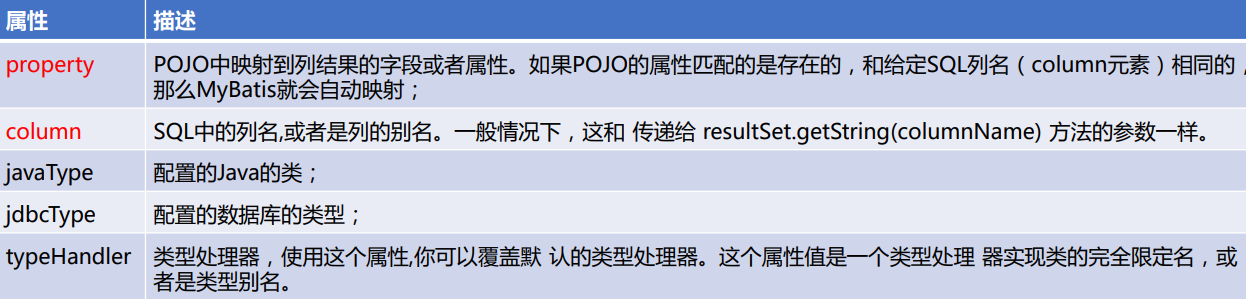
id & result
- id 和 result 都将一个列的值映射到一个简单数据类型(字符串,整型,双精度浮点数,日期等)的属性或字段
- 两者之间的唯一不同是, id 表示的结果将是对象的标识属性,这会在比较对象实例时用到。 这样可以 提高整体的性能,尤其是缓存和嵌套结果映射(也就是联合映射)的时候
constructor
- 一个pojo不存在没有参数的构造方法,就需要使用constructor;
- 为了通过名称来引用构造方法参数,你可以添加 @Param 注解,指定参数名称的前提下,以任意顺序编写 arg 元素
<constructor>
  <idArg column="id" javaType="int" />
  <arg column="user_name" javaType="String" />
</constructor>
<resultMap id="BaseResultMap" type="TUser">

        <!-- <constructor>
            <idArg column="id" javaType="int"/>
            <arg column="user_name" javaType="String"/>
        </constructor>  -->
        <id column="id" property="id" jdbcType="INTEGER" />
        <result column="user_name" property="userName" jdbcType="VARCHAR" />
        <result column="real_name" property="realName" jdbcType="VARCHAR" />
        <result column="sex" property="sex" jdbcType="TINYINT" />
        <result column="mobile" property="mobile" jdbcType="VARCHAR" />
        <result column="email" property="email" jdbcType="VARCHAR" />
        <result column="note" property="note" jdbcType="VARCHAR" />
        <result column="position_id" property="positionId" jdbcType="INTEGER" />
    </resultMap>
insert, update 和 delete
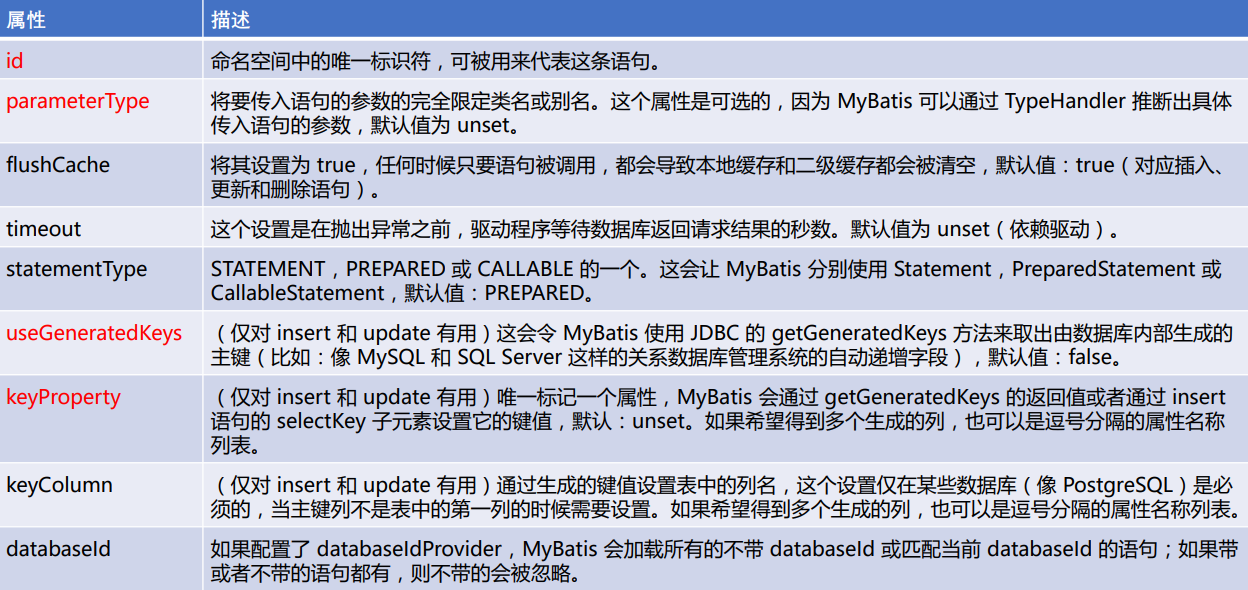
    <insert id="insert1" parameterType="TUser" useGeneratedKeys="true" keyProperty="id">
        insert into t_user (id, user_name, real_name,
        sex, mobile,
        email,
        note, position_id)
        values (#{id,jdbcType=INTEGER},
        #{userName,jdbcType=VARCHAR},
        #{realName,jdbcType=VARCHAR},
        #{sex,jdbcType=TINYINT}, #{mobile,jdbcType=VARCHAR},
        #{email,jdbcType=VARCHAR},
        #{note,jdbcType=VARCHAR},
        #{positionId,jdbcType=INTEGER})
    </insert>
selectKey元素
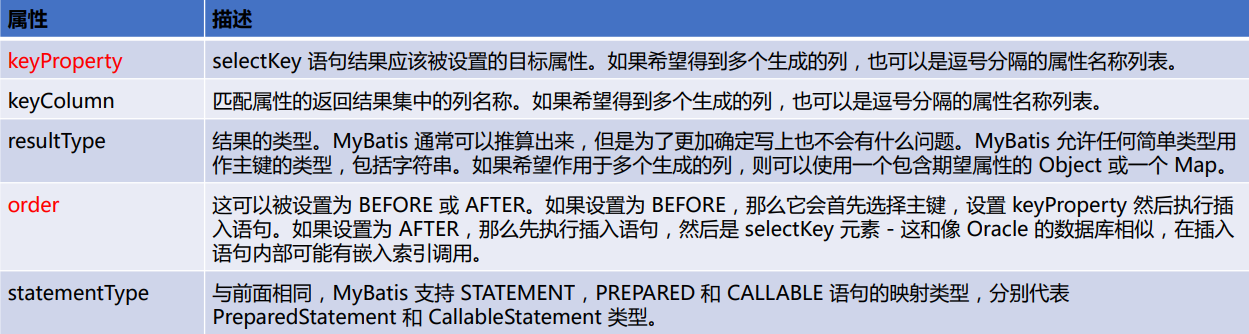
<selectKey keyProperty=“id” order= " Before" resultType="int">
  select SEQ_ID.nextval from dual
</selectKey>
sql元素和参数
sql元素:用来定义可重用的 SQL 代码段,可以包含在其他语句中;
参数:向sql语句中传递的可变参数
- 预编译 #{}:将传入的数据都当成一个字符串,会对自动传入的数据加一个双引号,能够很大程度防止 sql注入;
- 传值 ${}:传入的数据直接显示生成在sql中,无法防止sql注入;
- 表名、选取的列是动态的,order by和in操作, 可以考虑使用$
    <select id="selectBySymbol" resultMap="BaseResultMap">
        select
        #{inCol}
        from ${tableName} a
        where a.sex = #{sex}
        order by ${orderStr}
    </select>
动态sql元素

注解方式配置
注解方式就是将SQL语句直接写在接口上,对于需求比较简单的系统,效率较高。缺点在于,每次修改sql语句 都要编译代码,对于复杂的sql语句可编辑性和可读性都差,一般不建议使用这种配置方式;
@Select
@Results
@Insert
@Update
@Delete
    @Results(id="jobInfo",value={
            @Result(property="id",column="id",id = true),
            @Result(property="userId",column="user_id"),
            @Result(property="compName",column="comp_name"),
            @Result(property="years",column="years"),
            @Result(property="title",column="title")
    })
    @Select("select id, user_id, comp_name, years, title from t_job_history"
            + "    where user_id = #{userId}")
    List<TJobHistory> selectByUserId(int userId);

    @ResultMap("jobInfo")
    @Select("select id, user_id, comp_name, years, title from t_job_history")
    List<TJobHistory> selectAll();

    @Insert("insert into t_job_history (id, user_id, comp_name,    years, title)"
            + "    values (#{id,jdbcType=INTEGER}, #{userId,jdbcType=INTEGER},"
            + "#{compName,jdbcType=VARCHAR},"
            + "#{years,jdbcType=INTEGER}, #{title,jdbcType=VARCHAR})")
    @Options(useGeneratedKeys=true,keyProperty="id")
    int insert(TJobHistory record);
批量操作
- 通过foreach动态拼装SQL语句
- 使用BATCH类型的excutor
例一:
<sql id="Base_Column_List">
    id, user_name, real_name, sex, mobile, email, note, position_id
</sql>
<select id="selectIfandWhereOper" resultMap="BaseResultMap">
    select
    <include refid="Base_Column_List" />
        from t_user a
    <where>
        <if test="email != null and email != ''">
            and a.email like CONCAT('%', #{email}, '%')
        </if>
        <if test="sex != null ">
            and a.sex = #{sex}
        </if>
    </where>
</select>
例二:
<select id="selectForeach4In" resultMap="BaseResultMap">
    select
    <include refid="Base_Column_List" />
    from t_user a
    where a.user_name in
    <foreach collection="array" open="(" close=")" item="userName" index="i" separator=",">
        #{userName}
    </foreach>
</select>

<insert id="insertForeach4Batch">
    insert into t_user (user_name, real_name, sex, mobile,email,note, position_id)
    values
    <foreach collection="list" separator="," item="user">
        (
            #{user.userName,jdbcType=VARCHAR},
            #{user.realName,jdbcType=VARCHAR},
            #{user.sex,jdbcType=TINYINT},
            #{user.mobile,jdbcType=VARCHAR},
            #{user.email,jdbcType=VARCHAR},
            #{user.note,jdbcType=VARCHAR},
            #{user.positionId,jdbcType=INTEGER}
        )
    </foreach>
</insert>
例三:
SqlSession sqlSession = sqlSessionFactory.openSession(ExecutorType.BATCH, false);
SqlSessionFactory sqlSessionFactory=getSqlSessionFactory();
//可以执行批量操作的sqlSession
SqlSession openSession=sqlSessionFactory.openSession(ExecutorType.BATCH);

//批量保存执行前时间
long start=System.currentTimeMillis();
try{
    EmployeeMapper mapper=    openSession.getMapper(EmployeeMapper.class);
    for (int i = 0; i < 1000; i++) {
        mapper.addEmp(new Employee(UUID.randomUUID().toString().substring(0,5),"b","1"));
    }

    openSession.commit();
    long end=  System.currentTimeMillis();
    //批量保存执行后的时间
    System.out.println("执行时长"+(end-start));
    //批量 预编译sql一次==》设置参数==》10000次==》执行1次   677
    //非批量  (预编译=设置参数=执行 )==》10000次   1121
}finally{
    openSession.close();
}
mapper.xml
<mapper namespace="com.agesun.mybatis.dao.EmployeeMapper"
     <!--批量保存员工 -->
    <insert id="addEmp">
        insert into employee(lastName,email,gender)
        values(#{lastName},#{email},#{gender})
    </insert>
</mapper>
补充:
在SSM框架中使用batch方式的批量插入
1、在全局配置文件applcationContext.xml中加入
<!-- 配置一个可以批量执行的sqlSession -->
<bean id="sqlSession" class="org.mybatis.spring.SqlSessionTemplate">
    <constructor-arg name="sqlSessionFactory" ref="sqlSessionFactory"></constructor-arg>
    <constructor-arg name="executorType" value="BATCH"></constructor-arg>
</bean>
2、在serviceImpl中加入
@Autowired
private SqlSession sqlSession;

//批量保存员工
@Override
public Integer batchEmp() {

    //批量保存执行前时间
    long start=System.currentTimeMillis();

    EmployeeMapper mapper=    sqlSession.getMapper(EmployeeMapper.class);
    for (int i = 0; i < 10000; i++) {
        mapper.addEmp(new Employee(UUID.randomUUID().toString().substring(0,5),"b","1"));
    }

    long end=  System.currentTimeMillis();
    long time2= end-start;
    //批量保存执行后的时间
    System.out.println("执行时长"+time2);
    return (int) time2;
}
总结:性能对比
插入通常有三种方式,分别为for循环插入、batch插入、foreach插入,性能总结如下:
1.for循环insert
        long start = System.currentTimeMillis();
        for(int i = 0 ;i < 100000; i++) {
            User user = new User();
            user.setId("id" + i);
            user.setName("name" + i);
            user.setPassword("password" + i);
            userMapper.insert(user);
        }
        long end = System.currentTimeMillis();
        System.out.println("---------------" + (start - end) + "---------------");
    <insert id="insert">
      INSERT INTO t_user (id, name, password)
          VALUES(#{id}, #{name}, #{password})
    </insert>
时间为380826ms
2、Mybatis batch模式
        SqlSession sqlSession = sqlSessionTemplate.getSqlSessionFactory().openSession(ExecutorType.BATCH, false);//跟上述sql区别
        UserMapper userMapper = sqlSession.getMapper(UserMapper.class);

        long start = System.currentTimeMillis();
        for (int i = 0; i < 100000; i++) {
            User user = new User();
            user.setId("id" + i);
            user.setName("name" + i);
            user.setPassword("password" + i);
            userMapper.insert(user);
        }
        sqlSession.commit();
        long end = System.currentTimeMillis();
        System.out.println("---------------" + (start - end) + "---------------");
    <insert id="insert">
      INSERT INTO t_user (id, name, password)
          VALUES(#{id}, #{name}, #{password})
    </insert>
时间为203660ms
3、批量foreach插入
      long start = System.currentTimeMillis();
        List<User> userList = new ArrayList<>();
        for (int i = 0; i < 100000; i++) {
            User user = new User();
            user.setId("id" + i);
            user.setName("name" + i);
            user.setPassword("password" + i);
            userMapper.insert(user);
        }
        userMapper.insertBatch(userList);
        long end = System.currentTimeMillis();
        System.out.println("---------------" + (start - end) + "---------------");
<insert id="insertBatch">
    INSERT INTO t_user
    (id, name, password)
    VALUES
    <foreach collection ="userList" item="user" separator =",">
        (#{id}, #{name}, #{password})
    </foreach >
</insert>
时间为8706ms
结论:foreach批量插入 > mybatis batch模式插入 > for循环insert