AOP概述
aop其实就是面向切面编程,举个例子,比如项目中有n个方法是对外提供http服务的,那么如果我需要对这些http服务进行响应时间的监控,按照传统的方式就是每个方法中添加相应的逻辑,但是这些逻辑是重复的,我无非是需要记录请求的时间以及响应时间,另外可能需要加上请求入参以及响应出参。这时候就可以把这些http服务看成切面,通过aop的方式在方法前和方法后去做点什么操作。
aop的实现者有很多,包括AspectJ、Spring AOP等等,当然我们重点就放在Spring aop上了。
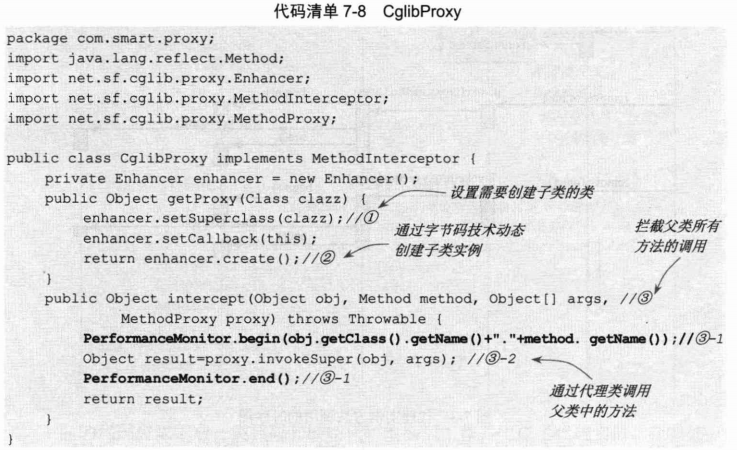
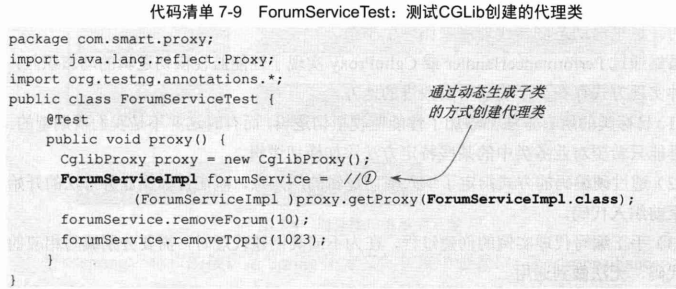
在spring中,aop可以由jdk动态代理或cglib实现,这地方的示例可以看下本人之前的文章了动态代理
jdk动态代理跟cglib有个重要的区别就是jdk动态代理的类必须要实现了某个接口,但是cglib则没这个要求。
针对cglib,举例如下:
spring aop简单示例
业务代码
@Component("knight")
public class BraveKnight {
    public void saying(){
        System.out.println("我是骑士..(切点方法)");
    }
}
package com.cjh.aop2;

import org.aspectj.lang.ProceedingJoinPoint;
import org.aspectj.lang.annotation.After;
import org.aspectj.lang.annotation.Around;
import org.aspectj.lang.annotation.Aspect;
import org.aspectj.lang.annotation.Before;
import org.aspectj.lang.annotation.Pointcut;
import org.springframework.stereotype.Component;

/**
 * 注解方式声明aop
 * 1.用@Aspect注解将类声明为切面(如果用@Component("")注解注释为一个bean对象,那么就要在spring配置文件中开启注解扫描,<context:component-scan base-package="com.cjh.aop2"/>
 *      否则要在spring配置文件中声明一个bean对象)
 * 2.在切面需要实现相应方法的前面加上相应的注释,也就是通知类型。
 * 3.此处有环绕通知,环绕通知方法一定要有ProceedingJoinPoint类型的参数传入,然后执行对应的proceed()方法,环绕才能实现。
 */
@Component("annotationTest")
@Aspect
public class AnnotationTest {
    //定义切点
    @Pointcut("execution(* *.saying(..))")
    public void sayings(){}
    /**
     * 前置通知(注解中的sayings()方法,其实就是上面定义pointcut切点注解所修饰的方法名,那只是个代理对象,不需要写具体方法,
     * 相当于xml声明切面的id名,如下,相当于id="embark",用于供其他通知类型引用)
     * <aop:config>
        <aop:aspect ref="mistrel">
            <!-- 定义切点 -->
            <aop:pointcut expression="execution(* *.saying(..))" id="embark"/>
            <!-- 声明前置通知 (在切点方法被执行前调用) -->
            <aop:before method="beforSay" pointcut-ref="embark"/>
            <!-- 声明后置通知 (在切点方法被执行后调用) -->
            <aop:after method="afterSay" pointcut-ref="embark"/>
        </aop:aspect>
       </aop:config>
     */
    @Before("sayings()")
    public void sayHello(){
        System.out.println("注解类型前置通知");
    }
    //后置通知
    @After("sayings()")
    public void sayGoodbey(){
        System.out.println("注解类型后置通知");
    }
    //环绕通知。注意要有ProceedingJoinPoint参数传入。
    @Around("sayings()")
    public void sayAround(ProceedingJoinPoint pjp) throws Throwable{
        System.out.println("注解类型环绕通知..环绕前");
        pjp.proceed();//执行方法
        System.out.println("注解类型环绕通知..环绕后");
    }
}
<?xml version="1.0" encoding="UTF-8"?>
<beans xmlns="http://www.springframework.org/schema/beans"
    xmlns:xsi="http://www.w3.org/2001/XMLSchema-instance"
    xmlns:context="http://www.springframework.org/schema/context"
    xmlns:aop="http://www.springframework.org/schema/aop"
    xsi:schemaLocation="http://www.springframework.org/schema/beans http://www.springframework.org/schema/beans/spring-beans.xsd
        http://www.springframework.org/schema/aop http://www.springframework.org/schema/aop/spring-aop-4.3.xsd
        http://www.springframework.org/schema/context http://www.springframework.org/schema/context/spring-context-4.3.xsd">
    <!-- 开启注解扫描 -->
    <context:component-scan base-package="com.cjh.aop2"/>
    <!-- 开启aop注解方式,此步骤不能少,这样java类中的aop注解才会生效 -->
    <aop:aspectj-autoproxy/>
</beans>
测试:
package com.cjh.aop2;

import org.springframework.context.ApplicationContext;
import org.springframework.context.support.ClassPathXmlApplicationContext;

public class Test {
    public static void main(String[] args) {
        ApplicationContext ac = new ClassPathXmlApplicationContext("com/cjh/aop2/beans.xml");
        BraveKnight br = (BraveKnight) ac.getBean("knight");
        br.saying();
    }
}
自动创建代理
1、BeanNameAutoProxyCreator
通过名字就可以看出来是干嘛的,可以根据bean的名字来创建自动代理,示例如下:
业务类:
public interface UserService {
    void print();
}
public class UserServiceImpl implements UserService {
    public void print(){
        System.out.println(getClass()+"#print");
    }
}
拦截器:
public class MyMethodInterceptor implements MethodInterceptor {
    @Override
    public Object invoke(MethodInvocation invocation) throws Throwable {
        System.out.println(getClass()+"调用方法前");
        Object ret=invocation.proceed();
        System.out.println(getClass()+"调用方法后");
        return ret;
    }
}
配置类:
@Configuration
public class AppConfig {
    //要创建代理的目标Bean
    @Bean
    public UserService userService(){
        return new UserServiceImpl();
    }
    //创建Advice或Advisor
    @Bean
    public Advice myMethodInterceptor(){
        return new MyMethodInterceptor();
    }
    //使用BeanNameAutoProxyCreator来创建代理
    @Bean
    public BeanNameAutoProxyCreator beanNameAutoProxyCreator(){
        BeanNameAutoProxyCreator beanNameAutoProxyCreator=new BeanNameAutoProxyCreator();
        //设置要创建代理的那些Bean的名字
        beanNameAutoProxyCreator.setBeanNames("userSer*");
        //设置拦截链名字(这些拦截器是有先后顺序的)
        beanNameAutoProxyCreator.setInterceptorNames("myMethodInterceptor");
        return beanNameAutoProxyCreator;
    }
}
测试:
public class Main {
    public static void main(String[] args) {
        ApplicationContext applicationContext=new AnnotationConfigApplicationContext(AppConfig.class);
        UserService userService= applicationContext.getBean(UserService.class);
        userService.print();
    }
}
自定义注解+BeanNameAutoProxyCreator
基于上面说的,对一些http接口做个响应时间监控,先以一个接口为例吧!
注解(PerformanceMonitor):
package com.ty.annotation;

import java.lang.annotation.ElementType;
import java.lang.annotation.Retention;
import java.lang.annotation.RetentionPolicy;
import java.lang.annotation.Target;

//代表此注解是运行过程中生效
@Retention(RetentionPolicy.RUNTIME)
//此注解作用于方法上
@Target(ElementType.METHOD)
public @interface PerformanceMonitor {
    String value() default "";
}
AnnotationController:
package com.ty.controller;

import com.ty.annotation.PerformanceMonitor;
import org.springframework.stereotype.Controller;

@Controller
public class AnnotationController {

    @PerformanceMonitor
    public String testServer() {
        System.out.println("do someThing");
        return "test";
    }
}
BeanNameAutoProxyConfig:
package com.ty.configuration;

import org.springframework.aop.framework.autoproxy.BeanNameAutoProxyCreator;
import org.springframework.context.annotation.Bean;
import org.springframework.context.annotation.Configuration;

@Configuration
public class BeanNameAutoProxyConfig {

    @Bean
    public BeanNameAutoProxyCreator create() {
        BeanNameAutoProxyCreator beanNameAutoProxyCreator = new BeanNameAutoProxyCreator();
        //为所有的controller创建自动动态代理
        beanNameAutoProxyCreator.setBeanNames("*Controller");
        //代理的具体的业务逻辑交给bean-----performanceInterceptor
        beanNameAutoProxyCreator.setInterceptorNames("performanceInterceptor");
        return beanNameAutoProxyCreator;
    }
}
PerformanceInterceptor:
package com.ty.interceptor;
import com.ty.annotation.PerformanceMonitor;
import org.aopalliance.intercept.MethodInterceptor;
import org.aopalliance.intercept.MethodInvocation;
import org.springframework.cglib.proxy.MethodProxy;
import org.springframework.stereotype.Service;

import java.lang.reflect.Method;

@Service
public class PerformanceInterceptor implements MethodInterceptor {

    public Object invoke(MethodInvocation methodInvocation) throws Throwable {
        Object result = null;
        //判断被代理类的方法上是否使用了@PerformanceMonitor注解
        PerformanceMonitor performanceMonitor = methodInvocation.getMethod().getAnnotation(PerformanceMonitor.class);
        if(performanceMonitor != null) {
            //具体的代理逻辑,实现aop的效果
            System.out.println("----------before----" + methodInvocation.getMethod().getName());
            result = methodInvocation.proceed();
            System.out.println("----------after----" + methodInvocation.getMethod().getName() + ";该笔调用耗时:" + (System.currentTimeMillis() - t1) + "ms");
        }else {
            //不使用该注解,则走原方法的调用逻辑
            result = methodInvocation.proceed();
        }

        return result;
    }
}
applicationContext.xml:
<?xml version="1.0" encoding="UTF-8"?>
<beans xmlns="http://www.springframework.org/schema/beans"
       xmlns:xsi="http://www.w3.org/2001/XMLSchema-instance"
       xmlns:context="http://www.springframework.org/schema/context"
       xsi:schemaLocation="http://www.springframework.org/schema/beans http://www.springframework.org/schema/beans/spring-beans.xsd http://www.springframework.org/schema/context http://www.springframework.org/schema/context/spring-context.xsd">

    <!--自动扫描包配置-->
    <context:component-scan base-package="com.ty"/>

    <bean id="student" class="com.ty.beans.Student">
        <!-- property代表的是set方法注入-->
        <property name="age" value="27"></property>
        <property name="name" value="马云"></property>
    </bean>

    <bean id="school" class="com.ty.beans.School">
        <!-- constructor代表的是构造器注入-->
        <constructor-arg ref="student"></constructor-arg>
    </bean>
</beans>
测试类:
package com.ty.beans;

import com.ty.controller.AnnotationController;
import javafx.application.Application;
import org.junit.Test;
import org.junit.runner.RunWith;
import org.springframework.beans.factory.BeanFactory;
import org.springframework.beans.factory.xml.XmlBeanFactory;
import org.springframework.context.ApplicationContext;
import org.springframework.context.support.ClassPathXmlApplicationContext;
import org.springframework.test.context.ContextConfiguration;
import org.springframework.test.context.junit4.AbstractJUnit4SpringContextTests;
import org.springframework.test.context.junit4.SpringJUnit4ClassRunner;

@ContextConfiguration(locations = { "classpath:applicationContext.xml" })
@RunWith(SpringJUnit4ClassRunner.class)
public class IOCTest  {

    @Test
    public void testAnnotation() {
        ApplicationContext context = new ClassPathXmlApplicationContext("classpath:applicationContext.xml");
        AnnotationController annotationController = (AnnotationController) context.getBean("annotationController");
        annotationController.testServer();
    }
}
运行结果:
----------before----testServer
do someThing
----------after----testServer;该笔调用耗时:8ms
这样也就实现了性能监控的目的,并且以后项目中所有的controller的接口,只要需要这个功能,加个注解即可。
@AspectJ
基于@AspectJ实现aop是相对简单的方式,上面也有类似的案例,下面详细的说说这个玩意。
aop主要包括切面、切入点、增强方法等核心组成部分。
1、切面
//用来声明这是一个AspectJ
@Aspect
//在此处声明一个Component 是因为Spring扫描注解并不能识别AspectJ 因此在此处声明,不必在applicationContext.xml配置bean标签了
@Component
public class ServiceLog {
    。。。
}
2、切入点
@Pointcut("execution(* com.sample.service.impl..*.*(..))")
public void pc() {}
a、execution()是最常用的切点函数,整个表达式可以分为五个部分,其语法如下所示:
- execution(): 表达式主体。
- 第一个*号:表示返回类型,*号表示所有的类型。
- 包名:表示需要拦截的包名,后面的两个句点表示当前包和当前包的所有子包,com.sample.service.impl包、子孙包下所有类的方法。
- 第二个*号:表示类名,*号表示所有的类。
- *(..):最后这个星号表示方法名,*号表示所有的方法,后面括弧里面表示方法的参数,两个句点表示任何参数。
b、@annotation
另外切入点中的execution()也可以用@Annotation代替,如下:
@AfterReturning("@annotation(com.ty.annotation.PerformanceMonitor)")
public void needTestFun() {
    System.out.println("可以对注明@PerformanceMonitor的方法进行增强");
}
对于所有注明@PerformanceMonitor的方法进行增强。
或者还有一种用法,可以方便拿到注解上的信息
@Around(value = "@annotation(apiOperation)")
public Object logApiCallInfo(ProceedingJoinPoint joinPoint, ApiOperation apiOperation) {
    //TODO 1、这里方便拿到注解的信息。不过注意@annotation(apiOperation)名称要与参数名称一致
    String apiCode = apiOperation.value();

    //TODO 调用业务接口
    result = joinPoint.proceed();

    //TODO 获取接口请求参数,并拼装成json,格式化输出
    Object[] args = joinPoint.getArgs();
    MethodSignature methodSignature = (MethodSignature) joinPoint.getSignature();
    String[] parameterNames = methodSignature.getParameterNames();
    JSONObject jsonObject = new JSONObject();
    if(parameterNames != null && parameterNames.length > 0 && args != null && args.length > 0) {
        for(int i = 0; i < parameterNames.length; i++) {
            jsonObject.put(parameterNames[i], args[i]);
        }
        //标准化输出
        jsonObject.toJsonString();
    }
}
3、增强方法
//环绕通知注解,pc()则是上面的pointcut切入点
@Around("pc()")
//环绕通知会多ProceedingJoinPoint这个参数
public Object log(ProceedingJoinPoint pjp) throws Throwable {
    。。。
}
- @Before
- @AfterReturning
- @Around
- @AfterThrowing
- @After
4、applicationContext.xml
<aop:aspectj-autoproxy/>