一、web应用
Web应用程序是一种可以通过Web访问的应用程序,程序的最大好处是用户很容易访问应用程序,用户只需要有浏览器即可,不需要再安装其他软件。
应用程序有两种模式C/S、B/S。C/S是客户端/服务器端程序,也就是说这类程序一般独立运行。而B/S就是浏览器端/服务器端应用程序,
这类应用程序一般借助谷歌,火狐等浏览器来运行。WEB应用程序一般是B/S模式。Web应用程序首先是“应用程序”,和用标准的程序语言,
如java,python等编写出来的程序没有什么本质上的不同。在网络编程的意义下,浏览器是一个socket客户端,服务器是一个socket服务端
import socket

def handle_request(client):

    request_data = client.recv(1024)
    print("request_data: ",request_data)
    client.send("HTTP/1.1 200 OK

".encode("utf8"))
    client.send("<h1 style='color:red'>Hello, 路飞学城! </h1>".encode("utf8"))

def main():

    sock = socket.socket(socket.AF_INET, socket.SOCK_STREAM)
    sock.bind(('localhost',8800))
    sock.listen(5)

    while True:
        print("the server is waiting for client-connection....")
        connection, address = sock.accept()
        handle_request(connection)
        connection.close()

if __name__ == '__main__':

    main()
二、http协议
1.简介
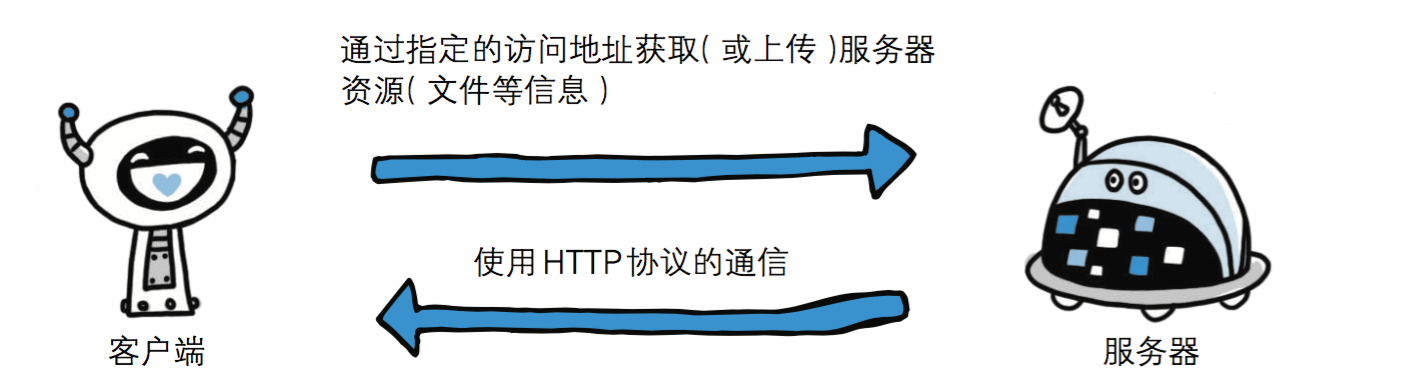
HTTP协议是Hyper Text Transfer Protocol(超文本传输协议)的缩写,是用于万维网(WWW:World Wide Web )服务器与本地浏览器之间传输超文本的传送协议。
HTTP是一个属于应用层的面向对象的协议,由于其简捷、快速的方式,适用于分布式超媒体信息系统。它于1990年提出,经过几年的使用与发展,得到不断地完善和扩展。
HTTP协议工作于客户端-服务端架构为上。浏览器作为HTTP客户端通过URL向HTTP服务端即WEB服务器发送所有请求。Web服务器根据接收到的请求后,向客户端发送响应信息。
2.特性
(1) 基于TCP/IP
http协议是基于TCP/IP协议之上的应用层协议。
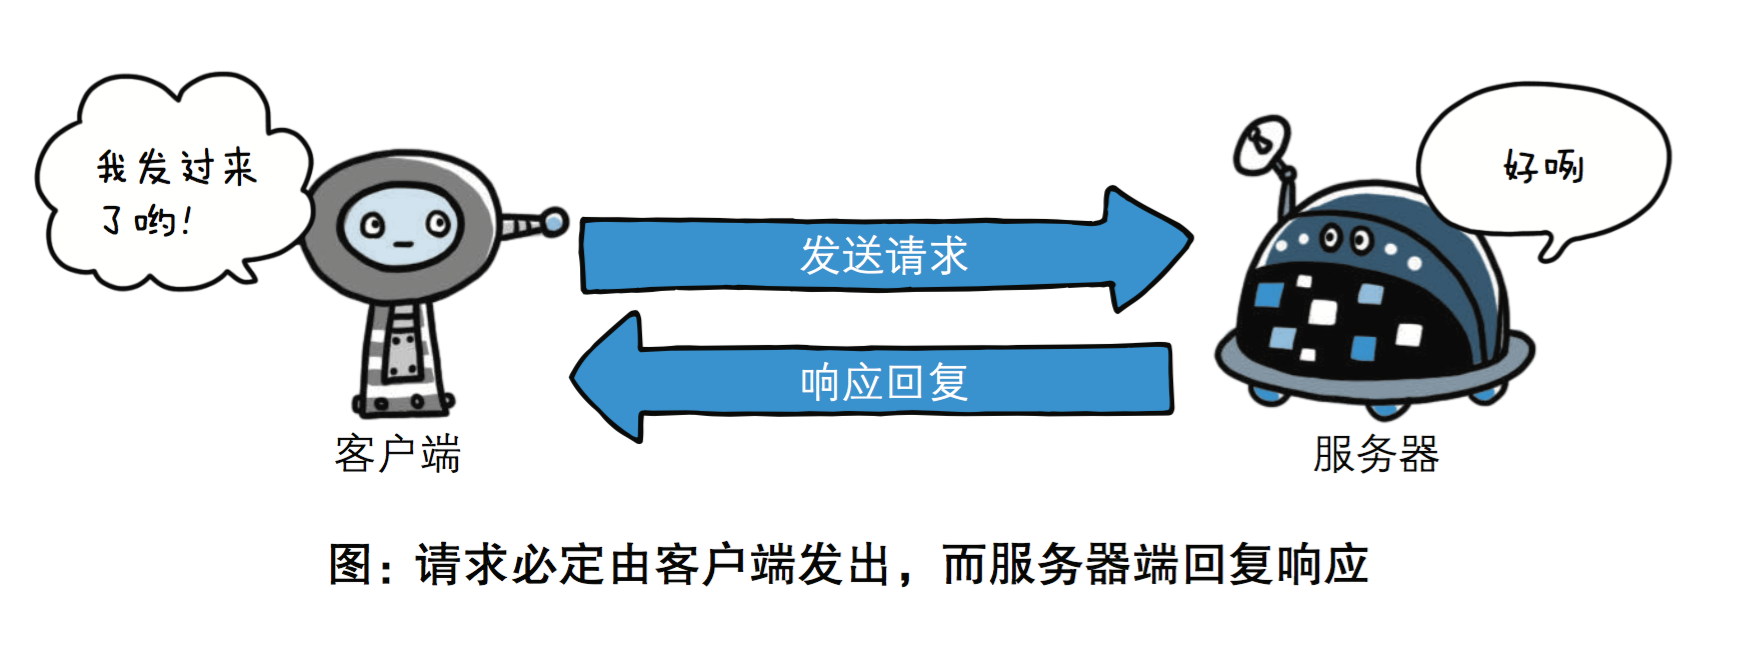
(2) 基于请求-响应模式
HTTP协议规定,请求从客户端发出,最后服务器端响应该请求并返回。换句话说,肯定是先从客户端开始建立通信的,服务器端在没有 接收到请求之前不会发送响应。
    (3) 无状态保存
        HTTP是一种不保存状态,即无状态(stateless)协议。HTTP协议 自身不对请求和响应之间的通信状态进行保存。
        也就是说在HTTP这个 级别,协议对于发送过的请求或响应都不做持久化处理。

使用HTTP协议,每当有新的请求发送时,就会有对应的新响应产生。协议本身并不保留之前一切的请求或响应报文的信息。
这是为了更快地处理大量事务,确保协议的可伸缩性,而特意把HTTP协议设计成如此简单的。
可是,随着Web的不断发展,因无状态而导致业务处理变得棘手的情况增多了。比如,用户登录到一家购物网站,即使他跳转到该站的其他页面后,
也需要能继续保持登录状态。针对这个实例,网站为了能够掌握是谁送出的请求,需要保存用户的状态。
HTTP/1.1虽然是无状态协议,但为了实现期望的保持状态功能, 于是引入了Cookie技术。有了Cookie再用HTTP协议通信,就可以管理状态了。
有关Cookie的详细内容之后讲解。
(4)无连接
无连接的含义是限制每次连接只处理一个请求。服务器处理完客户的请求,并收到客户的应答后,即断开连接。采用这种方式可以节省传输时间。
3.http请求协议与响应协议
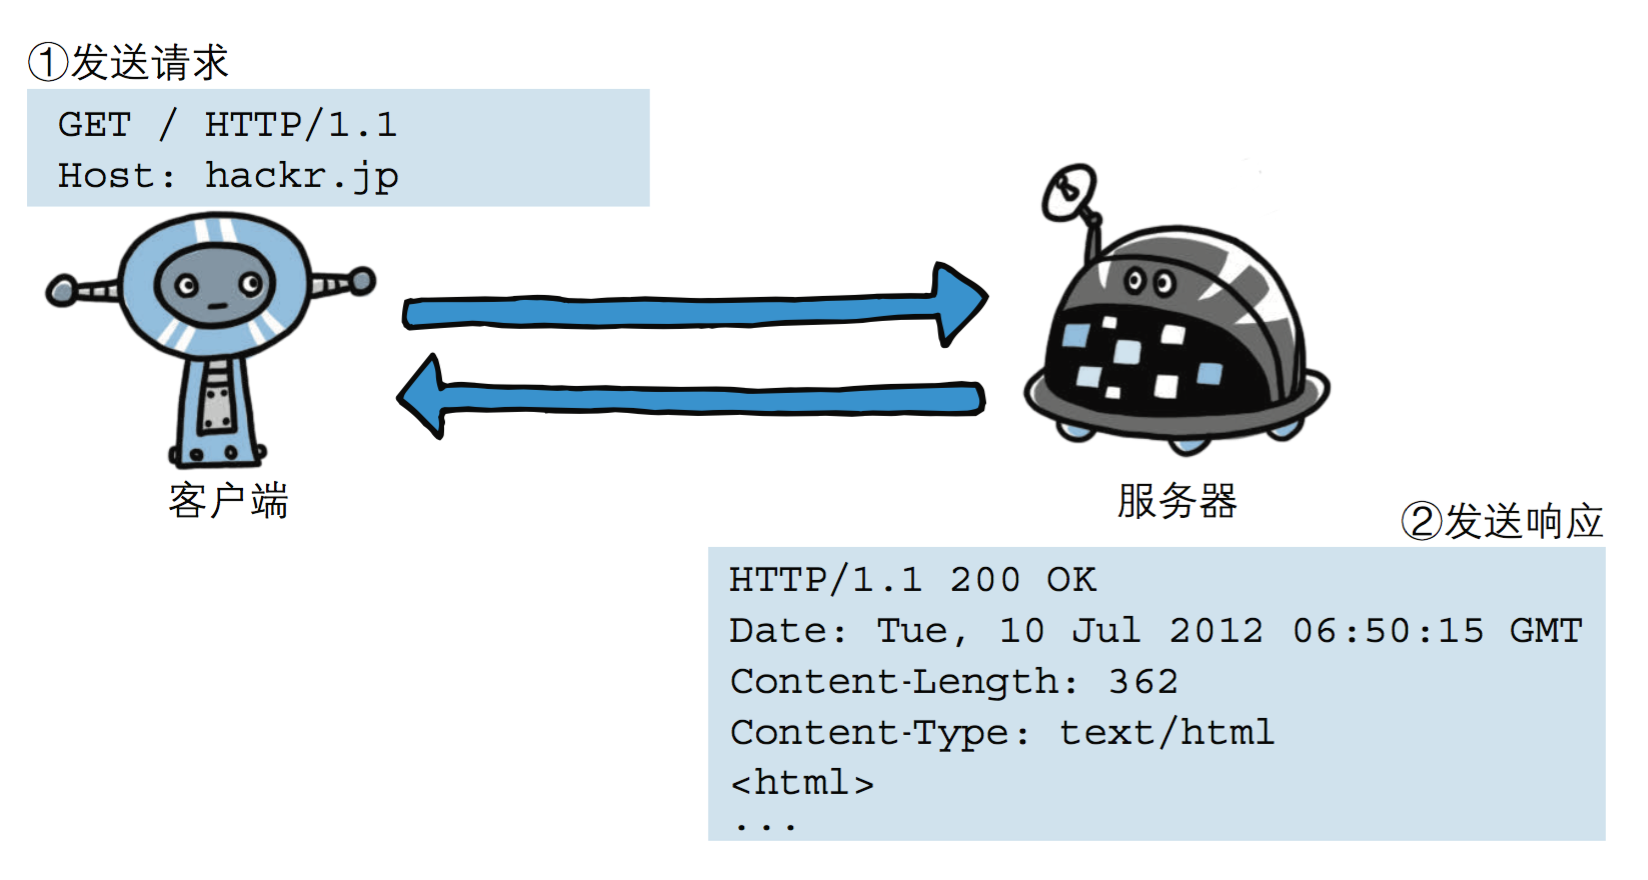
http协议包含由浏览器发送数据到服务器需要遵循的请求协议与服务器发送数据到浏览器需要遵循的响应协议。
用于HTTP协议交互的信被为HTTP报文。请求端(客户端)的HTTP报文 做请求报文,响应端(服务器端)的 做响应报文。
HTTP报文本身是由多行数据构成的文本。
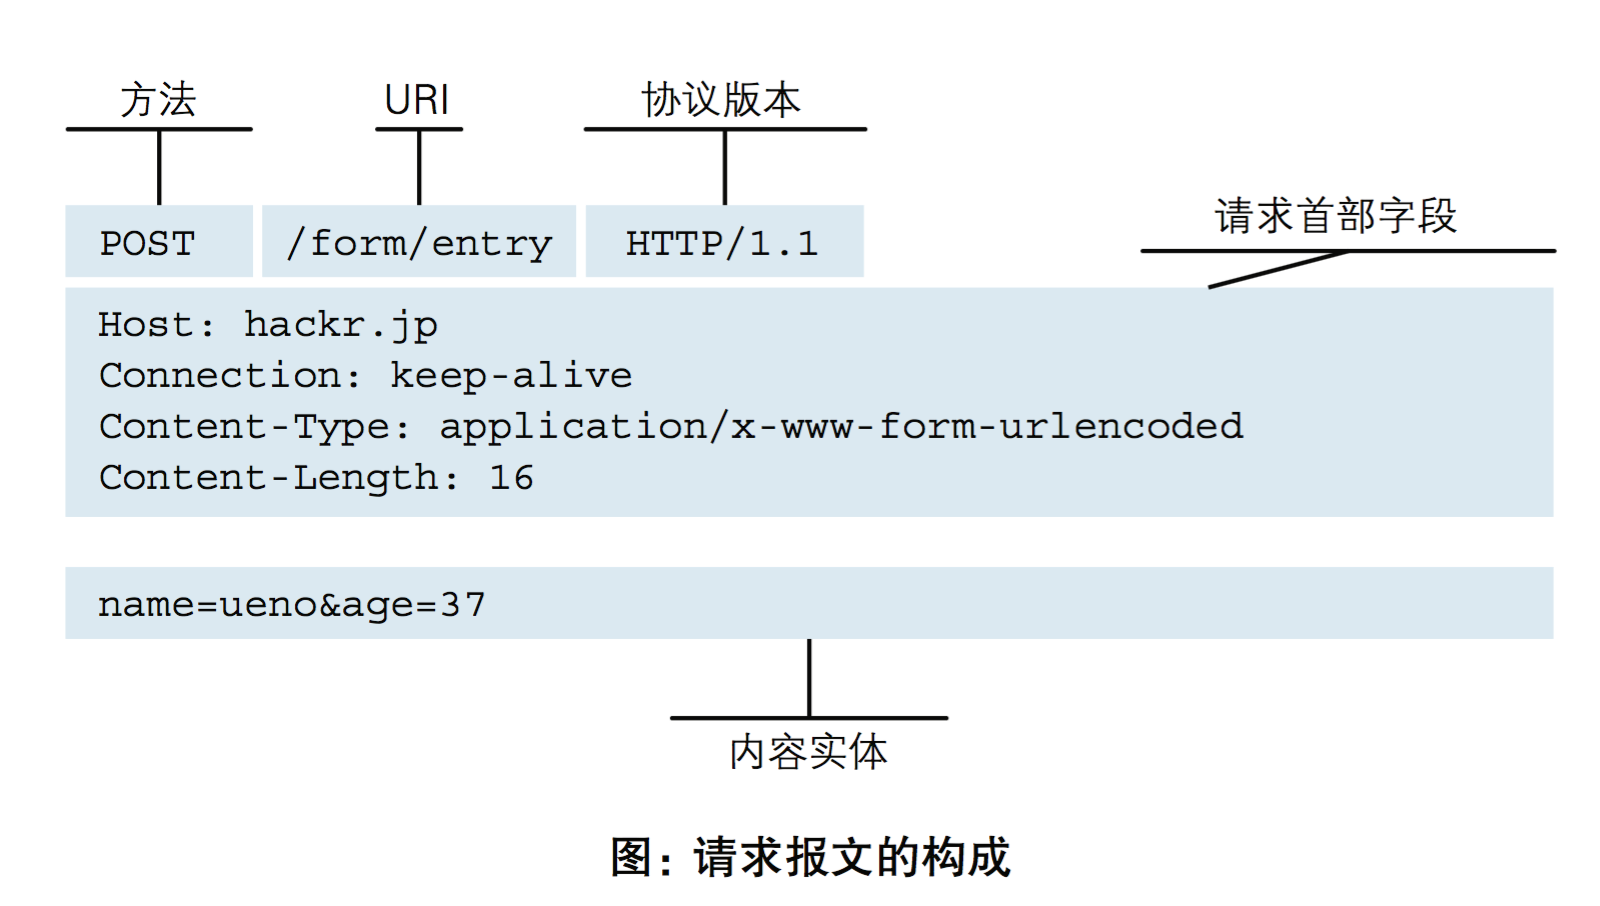
    请求协议
        请求格式:
        请求方式: get与post请求
            GET提交的数据会放在URL之后,以?分割URL和传输数据,参数之间以&相连,如EditBook?name=test1&id=123456。POST方法是把提交的数据放在HTTP包的请求体中.
            GET提交的数据大小有限制(因为浏览器对URL的长度有限制),而POST方法提交的数据没有限制.
            GET与POST请求在服务端获取请求数据方式不同。

    响应协议
        响应格式:
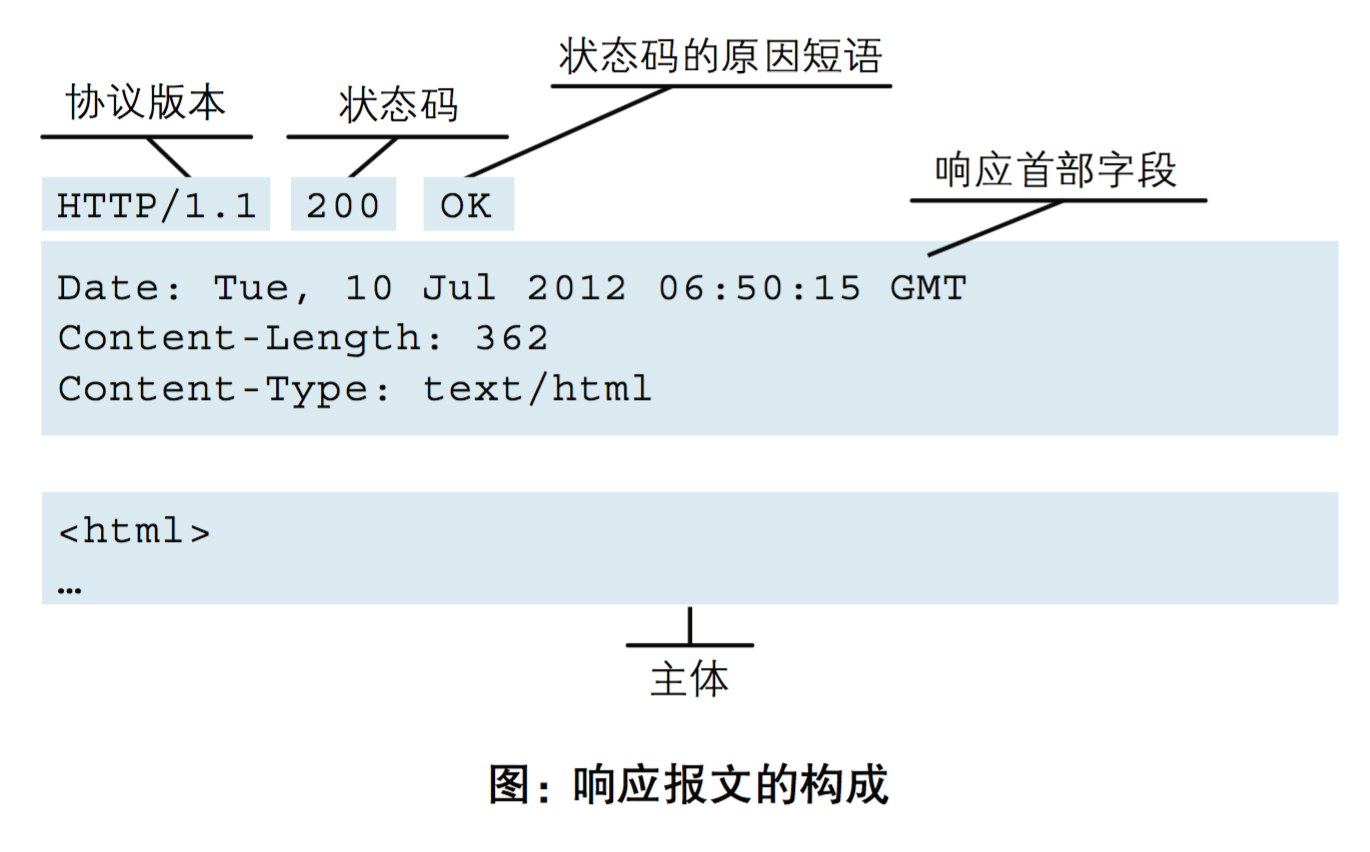
响应状态码
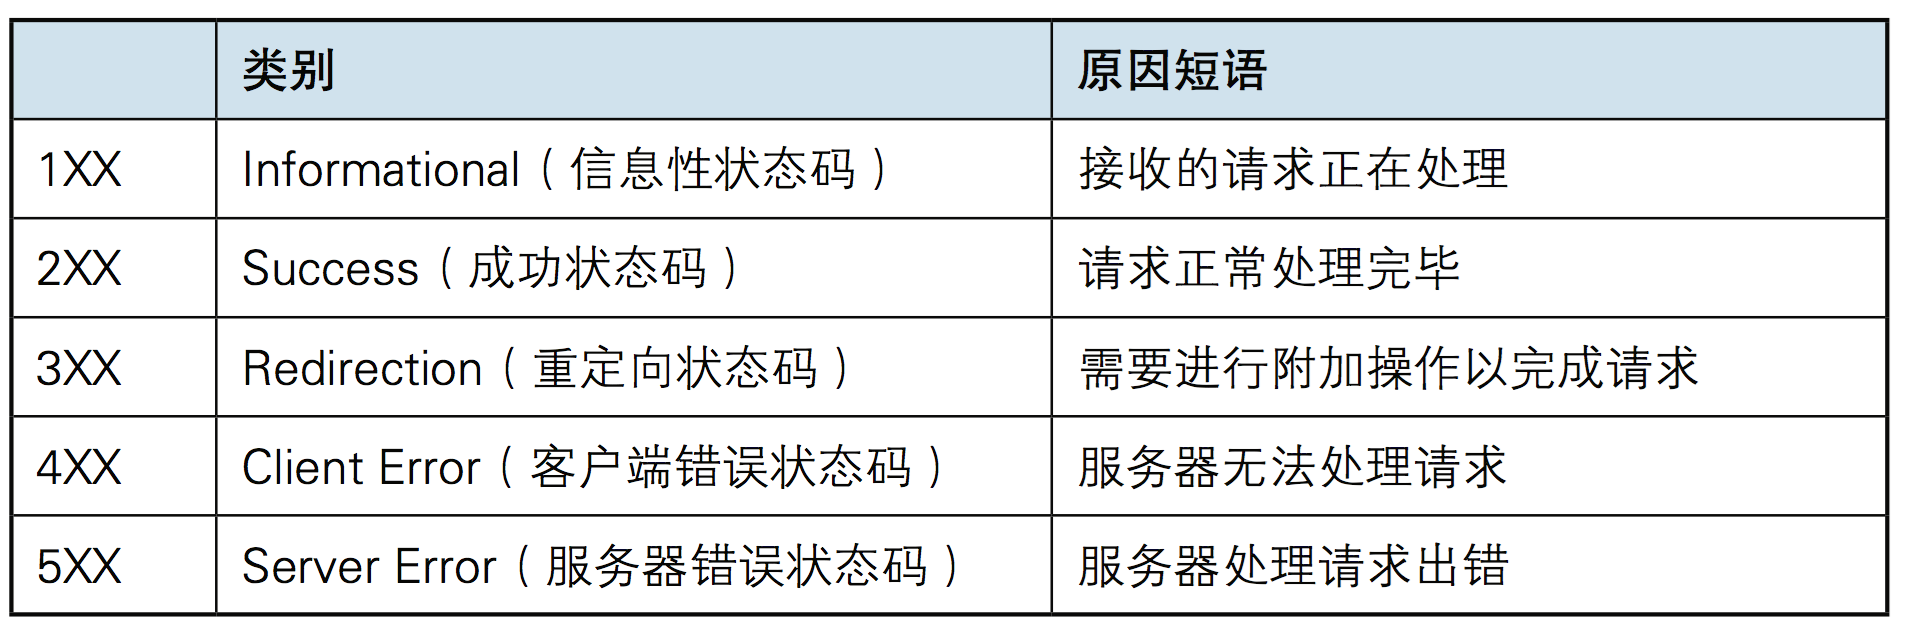
状态码的是当客户端向服务器端发送请求时, 返回的请求结果。借助状态码,用户可以知道服务器端是正常处理了请求,还是出现了问题 。
状态码如200 OK,以3位数字和原因组成。数字中的 一位指定了响应类别,后两位无分。响应分为别5种。
4.示例
url:   默认端口 80
协议 ip  端口/路径?a=1
https://www.jd.com/

请求协议:
    请求首行

    请求头

    请求头

    请求头

    ...
    /r/n/r/n
    请求体(a=1&b=2) # 注意:只有post请求才有请求体

请求方式: get与post请求
    GET提交的数据会放在URL之后,以?分割URL和传输数据,参数之间以&相连,如EditBook?name=test1&id=123456.
    POST方法是把提交的数据放在HTTP包的请求体中.

    GET提交的数据大小有限制(因为浏览器对URL的长度有限制),
    而POST方法提交的数据没有限制.

    GET与POST请求在服务端获取请求数据方式不同。

    什么时候发get 什么时候发post
    查询时 用get
    做数据库更新操作用post
b'GET / HTTP/1.1

Host: 127.0.0.1:8080

Connection: keep-alive

Cache-Control: max-age=0

Upgrade-Insecure-Requests: 1

User-Agent: Mozilla/5.0 (Windows NT 10.0; WOW64) AppleWebKit/537.36 (KHTML, like Gecko) Chrome/66.0.3359.181 Safari/537.36

Accept: text/html,application/xhtml+xml,application/xml;q=0.9,image/webp,image/apng,*/*;q=0.8

Accept-Encoding: gzip, deflate, br

Accept-Language: zh-CN,zh;q=0.9,en;q=0.8


'

b'GET /yuan?name=yuan&age=22 HTTP/1.1

Host: 127.0.0.1:8080

Connection: keep-alive

Upgrade-Insecure-Requests: 1

User-Agent: Mozilla/5.0 (Windows NT 10.0; WOW64) AppleWebKit/537.36 (KHTML, like Gecko) Chrome/66.0.3359.181 Safari/537.36

Accept: text/html,application/xhtml+xml,application/xml;q=0.9,image/webp,image/apng,*/*;q=0.8

Accept-Encoding: gzip, deflate, br

Accept-Language: zh-CN,zh;q=0.9,en;q=0.8


'

b'POST / HTTP/1.1

Host: 127.0.0.1:8080

Connection: keep-alive
Content-Length: 18

Cache-Control: max-age=0

Origin: http://127.0.0.1:8080
Upgrade-Insecure-Requests: 1

Content-Type: application/x-www-form-urlencoded

User-Agent: Mozilla/5.0 (Windows NT 10.0; WOW64) AppleWebKit/537.36 (KHTML, like Gecko) Chrome/66.0.3359.181 Safari/537.36

Accept: text/html,application/xhtml+xml,application/xml;q=0.9,image/webp,image/apng,*/*;q=0.8

Referer: http://127.0.0.1:8080

Accept-Encoding: gzip, deflate, br

Accept-Language: zh-CN,zh;q=0.9,en;q=0.8


user=alice&pwd=123'   #只有post请求才有请求体
import socket

sock = socket.socket()
sock.bind(('127.0.0.1',8080))
sock.listen(5)

while True:
    print('server waiting ...')
    conn,addr = sock.accept()
    data = conn.recv(1024)
    print('data:',data)

    # 读取html 文件
    with open('login.html','rb') as f:
        data = f.read()

    # conn.send(b'HTTP/1.1 200 OK

hello luffy')
    # conn.send(b'HTTP/1.1 200 OK

%s'%data)
    conn.send(b'HTTP/1.1 200 OK
Content-Type:text/html

%s'%data)
    conn.close()
<!DOCTYPE html>
<html lang="en">
<head>
    <meta charset="UTF-8">
    <title>Title</title>
</head>
<body>

<form action="" method="post">
    用户名 <input type="text" name="user">
    密码 <input type="password" name="pwd">
    <input type="submit">
</form>

</body>
</html>
三、web框架
Web框架(Web framework)是一种开发框架,用来支持动态网站、网络应用和网络服务的开发。这大多数的web框架提供了一套开发和部署网站的方式,
也为web行为提供了一套通用的方法。web框架已经实现了很多功能,开发人员使用框架提供的方法并且完成自己的业务逻辑,就能快速开发web应用了。
浏览器和服务器的是基于HTTP协议进行通信的。也可以说web框架就是在十几行代码基础上扩展出来的,有很多简单方便使用的方法,大大提高了开发的效率。

wsgiref模块
    最简单的Web应用就是先把HTML用文件保存好,用一个现成的HTTP服务器软件,接收用户请求,从文件中读取HTML,返回
    如果要动态生成HTML,就需要把上述步骤自己来实现。不过,接受HTTP请求、解析HTTP请求、发送HTTP响应都是苦力活,
    如果我们自己来写这些底层代码,还没开始写动态HTML呢,就得花个把月去读HTTP规范。
    正确的做法是底层代码由专门的服务器软件实现,我们用Python专注于生成HTML文档。
    因为我们不希望接触到TCP连接、HTTP原始请求和响应格式,所以,需要一个统一的接口协议来实现这样的服务器软件,
    让我们专心用Python编写Web业务。这个接口就是WSGI:Web Server Gateway Interface。而wsgiref模块就是python基于wsgi协议开发的服务模块。
from wsgiref.simple_server import make_server


def login(environ):
    with open('login.html','rb') as f:
        data = f.read()
    return data

def reg(environ):
    with open('reg.html','rb') as f:
        data = f.read()
    return data

def index(environ):
    with open('index.html','rb') as f:
        data = f.read()
    return data

def fav(environ):
    with open('favicon.ico','rb') as f:
        data = f.read()
    return data

url_patterns = [
    ('/login', login),
    ('/reg', reg),
    ('/index', index),
    ('/favicon', fav)
]

def application(environ, start_response):
    start_response('200 OK', [('Content-Type', 'text/html')])
    print('PATH:',environ.get('PATH_INFO'))

    # path 当前请求路径
    path = environ.get('PATH_INFO')

    func = None
    for item in url_patterns:
        if path == item[0]:
            func = item[1]
            break
    if func:
        return [func(environ)]
    else:
        return [b'404']

httpd = make_server('', 8080, application)
print('Serving HTTP on port 8080...')
# 开始监听HTTP请求:
httpd.serve_forever()
QIY一个web框架
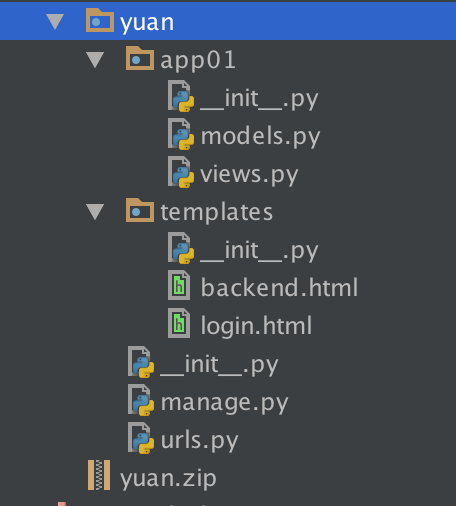
models.py

import pymysql
#连接数据库
conn = pymysql.connect(host='127.0.0.1',port= 3306,user = 'root',passwd='',db='web') #db:库名
#创建游标
cur = conn.cursor()

sql='''
create table userinfo(
        id INT PRIMARY KEY ,
        name VARCHAR(32) ,
        password VARCHAR(32)
)

'''

cur.execute(sql)

#提交
conn.commit()
#关闭指针对象
cur.close()
#关闭连接对象
conn.close()
启动文件manage.py
from wsgiref.simple_server import make_server

from app01.views import *
import urls


def routers():

    URLpattern=urls.URLpattern
    return URLpattern


def applications(environ,start_response):

    path=environ.get("PATH_INFO")
    start_response('200 OK', [('Content-Type', 'text/html'),('Charset', 'utf8')])
    urlpattern=routers()
    func=None
    for item in urlpattern:
        if path==item[0]:
            func=item[1]
            break
    if func:
        return [func(environ)]
    else:
        return [b"<h1>404!<h1>"]

if __name__ == '__main__':

    server=make_server("",8889,applications)
    print("server is working...")
    server.serve_forever()
urls.py
from app01.views import *


URLpattern = (
    ("/login/", login),
)
views
import pymysql

from urllib.parse import parse_qs


def login(request):

    if request.get("REQUEST_METHOD")=="POST":

        try:
            request_body_size = int(request.get('CONTENT_LENGTH', 0))
        except (ValueError):
            request_body_size = 0

        request_body = request['wsgi.input'].read(request_body_size)
        data = parse_qs(request_body)


        user=data.get(b"user")[0].decode("utf8")
        pwd=data.get(b"pwd")[0].decode("utf8")

        #连接数据库
        conn = pymysql.connect(host='127.0.0.1',port= 3306,user = 'root',passwd='',db='web') # db:库名
        #创建游标
        cur = conn.cursor()
        SQL="select * from userinfo WHERE NAME ='%s' AND PASSWORD ='%s'"%(user,pwd)
        cur.execute(SQL)

        if cur.fetchone():

            f=open("templates/backend.html","rb")
            data=f.read()
            data=data.decode("utf8")
            return data.encode("utf8")

        else:
             print("OK456")
             return b"user or pwd is wrong"

    else:
        f = open("templates/login.html", "rb")
        data = f.read()
        f.close()
        return data
login.html
<!DOCTYPE html>
<html lang="en">
<head>
    <meta charset="UTF-8">
    <title>Title</title>
</head>
<body>

<h4>登录页面</h4>
<form action="" method="post">
     用户名 <input type="text" name="user">
     密码 <input type="text" name="pwd">
    <input type="submit">
</form>

</body>
</html>
backend.html
<!DOCTYPE html>
<html lang="en">
<head>
    <meta charset="UTF-8">
    <title>Title</title>
</head>
<body>
<h4>welcome to oldboy!</h4>
</body>
</html>
yuan这个package就是一个web框架,下载这个web框架就可以快速实现一些简单的web功能,比如查看时间。
http://www.cnblogs.com/yuanchenqi/articles/8869302.html
http://www.cnblogs.com/yuanchenqi/articles/8875623.html
http://www.cnblogs.com/yuanchenqi/articles/8946917.html
四、补充知识
1. web框架的原理(实质)
   1. 理解!!!

   博客园(socket server)
   0.先启动服务,监听
      while 1:
         等待连接...
         3. 接收到你的请求
         4. 根据你的需求,返回相应的内容
         断开

   你的浏览器(socket client)
      1. 请求连接服务端(IP和端口)
      2. 发送消息(我想要xx)
      5. 收到返回的消息
      断开

   HTTP协议补充:
      1. 请求(request)和响应(response)
      2. HTTP请求的生命周期

   1. Web框架本质
      本质上:socket互发消息
   2. 不同的URL返回不同的内容
      本质上:根据路径的不同返回不同的内容
   3. 动态的网页
      本质上:字符串的替换

   小总结:
      A. socket server                    URL路径      --> 服务器程序(专门用来处理socket收发消息部分)
      B. 根据不同的URL路径执行不同的函数  路径-->函数  --> 应用程序(业务逻辑,控制要返回的消息的具体内容)
      C. 具体返回内容   动态的网页        字符串的替换 --> jinja2

   常用的服务器程序: wsgi协议:定义了 服务器程序和Django/Flask通信的规范!
      1. wsgiref  Python内置的模块
      2. Gunicorn和uwsgi

   大总结:
      Python Web框架分类:
         1. 第三方的A,  自己写B和C          --> Django
         2. 第三方的A和C 自己写自带B         --> Flask
         3. 自己写A、B、C                    --> Tornado

      另外一个层面的分类:
         1. Django  大而全(基本上做网站用到的它自己都有) 缺点就是臃肿
         2. 其他    Flask小而美


2. Django(第一个Django实例)
   1. 安装
      1. pip install django==1.11.11
      2. 卸载:pip uninstall django
        官网:www.djangoproject.com
        https://www.djangoproject.com/download/

        // pip -v     # 查看pip 是为python2 还是python3
        // pip list   # 查看所有安装得第三方
        http://www.cnblogs.com/liwenzhou/p/8258992.html

   2. 创建Django项目
      1. 命令行创建
         1. 切换到你要保存Django项目的目录下
         2. 执行:django-admin startproject 项目名
      2. PyCharm创建
   3. 启动Django项目
      1. 命令行:python manage.py runserver IP:端口

      2. PyCharm 点绿色的小三角

   4. Django项目的设置
      1. 注释csrf
      2. 配置templates文件夹的路径
      3. 配置static 文件夹的路径

3. 作业
   1. 用Django把你之前写的登录页面返回!
http://www.cnblogs.com/liwenzhou/p/8258992.html
http://www.cnblogs.com/liwenzhou/articles/8620663.html
1. 内容回顾
   1. 自己写一个web框架

   2. 补充HTTP协议

      1. 请求(request)
      2. 响应(response)


      消息的格式:
         见图
         见Blog:http://www.cnblogs.com/liwenzhou/articles/8620663.html

   3. wsgiref模块

   4. jinja2 模板语言
      本质上就是 字符串替换(渲染render)

2.Django
   1. Django安装
      pip install django==1.11.11

   2. 新建Django项目
      1. 命令行创建
         1. django-admin startproject mysite (会在当前目录下新建Django项目)
      2. PyCharm创建
         1. File -> new project --> Django --> 填路径选Python解释器

   3. Django项目配置
      1.
      2.
      3.

   4. 启动Django
        /

3. 今日内容
   1. 登录示例完善版

      1. 页面往后端提交数据要使用form表单!!!不是from!!!

      form表单提交数据注意事项:(周一默写!!!)
         1. 提交按钮要使用submit!!!
         2. input要写在form表单里面,input标签要有name属性
         3. form标签要加action和method,如果有文件的话还要加一个enctype这个属性

      2. PyCharm启动Django项目
         1. 注意小三角左边的项目名要和项目名一致才能启动Django项目

      3.

   2. app概念
      1. 什么是app,一个大的Django项目内部可以分成很多个APP
      2. 创建APP
         1. 命令行 python manage.py startapp app01
         2. PyCharm创建

      3. models.py       数据库

         1. 类    --->   表
         2. 对象  --->   数据行
         3. 属性  --->   字段

         两个神奇的命令:(注意顺序)
            1. python manage.py makemigrations
            2. python manage.py migrate

         Django默认用的数据库:
            sqlite3 --> 文件数据库
            下周我们来学习怎么连接MySQL

         查询数据库的语法:
            1. 取出所有的数据
               类名.objects.all()        返回所有的对象
               类名.objects.filter(id=1) 返回的是对象的一个列表
               类名.objects.get(id=1)    返回的是单独的对象。但是当id不存在时会报错,

         模板语言的语法:  --> render(request, "xx.html", {"data": data})
            1. {{ name }}
            2.  {% for i in xx %}
                  {{i.xx}}
               {% endfor %}
4.作业
   1. 自己在models.py中写一个class类
   2. 创建一些测试数据
   3. 在页面(使用我们之前上课写得Bootstrap的后台管理页面)上展示出来
wsgiref
# -*- coding:utf-8 -*-
'''
http://www.cnblogs.com/liwenzhou/p/8258992.html
wsgiref
'''
import time
from wsgiref.simple_server import make_server

def index(url):
    with open('index.html','r',encoding='utf-8') as f:
        s = f.read()
        s = s.replace('oo',str(time.time()))
    return bytes(s,encoding='utf-8')

def home(url):
    with open('home.html','r',encoding='utf-8') as f:
        s = f.read()
    return bytes(s, encoding='utf-8')

# 定义一个url 和实际要执行得函数得对应关系
list1 = [
    ('/index',index),
    ('/home',home)
]

def run_server(environ, start_response):
    start_response('200 OK', [('Content-Type', 'text/html;charset=utf8'), ])  # 设置HTTP响应的状态码和头信息
    url = environ['PATH_INFO']  # 取到用户输入的url
    print(url)
    func = None
    for i in list1:
        if i[0] == url:
            func = i[1]
            break
    if func:
        response = func(url)
    else:
        response = b"404 not found!"
    return [response, ]

if __name__ == '__main__':
    httpd = make_server('127.0.0.1', 8080, run_server)
    print("我在8080等你哦...")
    httpd.serve_forever()
wsgiref-jinja2
# -*- coding:utf-8 -*-
'''
http://www.cnblogs.com/liwenzhou/p/8258992.html
wsgiref  jinja2

pip install jinja2

CREATE TABLE user(
  id int auto_increment PRIMARY KEY,
  name CHAR(10) NOT NULL,
  hobby CHAR(20) NOT NULL
)engine=innodb DEFAULT charset=UTF8;

'''
import time
from wsgiref.simple_server import make_server
import jinja2


def index(url):
    with open('index.html','r',encoding='utf-8') as f:
        s = f.read()
        s = s.replace('oo',str(time.time()))
    return bytes(s,encoding='utf-8')

def home(url):
    with open('home.html','r',encoding='utf-8') as f:
        s = f.read()
    return bytes(s, encoding='utf-8')

def alice(url):
    with open('alice.html', 'r', encoding='utf-8') as f:
        s = f.read()
        template = jinja2.Template(s) # 生成模板对象
        data = {'name':'alice','hobby_list':['学习','运动','读书']}
        response = template.render(data)  # 本质上 完成了字符串得 替换
    return bytes(response,encoding='utf-8')

# 定义一个url 和实际要执行得函数得对应关系
list1 = [
    ('/index',index),
    ('/home',home),
    ('/alice',alice)
]

def run_server(environ, start_response):
    start_response('200 OK', [('Content-Type', 'text/html;charset=utf8'), ])  # 设置HTTP响应的状态码和头信息
    url = environ['PATH_INFO']  # 取到用户输入的url
    print(url)
    func = None
    for i in list1:
        if i[0] == url:
            func = i[1]
            break
    if func:
        response = func(url)
    else:
        response = b"404 not found!"
    return [response, ]

if __name__ == '__main__':
    httpd = make_server('127.0.0.1', 8080, run_server)
    print("我在8080等你哦...")
    httpd.serve_forever()
wsgiref-jinja2-pymysql
# -*- coding:utf-8 -*-
'''
http://www.cnblogs.com/liwenzhou/p/8258992.html
wsgiref  jinja2  pymysql

pip install jinja2

CREATE TABLE user(
  id int auto_increment PRIMARY KEY,
  name CHAR(10) NOT NULL,
  hobby CHAR(20) NOT NULL
)engine=innodb DEFAULT charset=UTF8;

'''
import time
from wsgiref.simple_server import make_server
import jinja2
import pymysql

def index(url):
    with open('index.html','r',encoding='utf-8') as f:
        s = f.read()
        s = s.replace('oo',str(time.time()))
    return bytes(s,encoding='utf-8')

def home(url):
    with open('home.html','r',encoding='utf-8') as f:
        s = f.read()
    return bytes(s, encoding='utf-8')

def alice(url):
    with open('alice.html', 'r', encoding='utf-8') as f:
        s = f.read()
        template = jinja2.Template(s) # 生成模板对象
        # data = {'name':'alice','hobby_list':['学习','运动','读书']}
        conn = pymysql.connect(host="127.0.0.1", port=3306, user="root", passwd="123", db="userinfo", charset="utf8")
        cursor = conn.cursor(cursor=pymysql.cursors.DictCursor)
        cursor.execute("select name, hobby from user")
        user = cursor.fetchone()
        # user_list = cursor.fetchall()
        cursor.close()
        conn.close()
        print('user:',user)
        print('*'*120)

        hobby_list = user['hobby'].split()
        user['hobby_list'] = hobby_list
        print('user:', user)
        print('*' * 120)

        response = template.render(user)  # 本质上 完成了字符串得 替换
    return bytes(response,encoding='utf-8')

# 定义一个url 和实际要执行得函数得对应关系
list1 = [
    ('/index',index),
    ('/home',home),
    ('/alice',alice)
]

def run_server(environ, start_response):
    start_response('200 OK', [('Content-Type', 'text/html;charset=utf8'), ])  # 设置HTTP响应的状态码和头信息
    url = environ['PATH_INFO']  # 取到用户输入的url
    print(url)
    func = None
    for i in list1:
        if i[0] == url:
            func = i[1]
            break
    if func:
        response = func(url)
    else:
        response = b"404 not found!"
    return [response, ]

if __name__ == '__main__':
    httpd = make_server('127.0.0.1', 8080, run_server)
    print("我在8080等你哦...")
    httpd.serve_forever()
alice.html
<!DOCTYPE html>
<html lang="zh-CN">
<head>
  <meta charset="UTF-8">
  <meta http-equiv="x-ua-compatible" content="IE=edge">
  <meta name="viewport" content="width=device-width, initial-scale=1">
  <title>alice</title>
</head>
<body>
    <h1>姓名:{{name}}</h1>
    <h1>爱好:</h1>
    <ul>
        {% for hobby in hobby_list %}
        <li>{{hobby}}</li>
        {% endfor %}
    </ul>
</body>
</html>
index.html
<!DOCTYPE html>
<html lang="en">
<head>
    <meta charset="UTF-8">
    <title>index</title>
</head>
<body>
<h1>这是index页面</h1>
<h2>oo</h2>
</body>
</html>