time 模块:
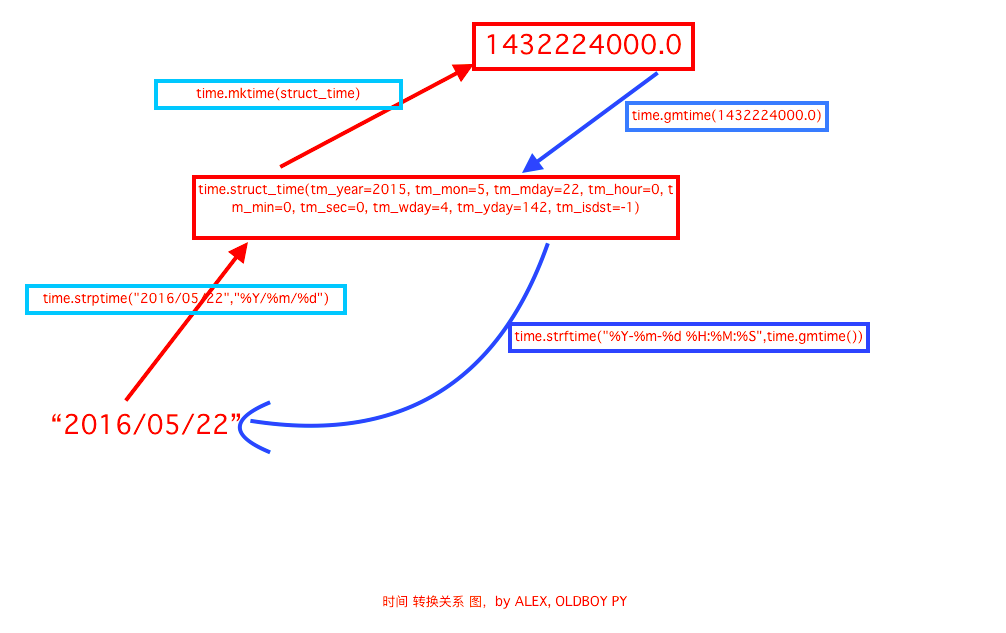
time.time()                             #时间戳
time.localtime()                        #当前时间对象元组
time.localtime(123123)                  #根据时间戳的时间对象
time.mktime(time.localtime())           #把时间对象转成时间戳
time.gmtime()                           #0时区,我们是东8区,比我们晚8h的时间对象元组
time.sleep(2)                           #单位s 睡一会
time.asctime()                          #美国表示时间字符串  'Sat Feb 24 13:23:36 2018'
time.ctime()                            #美国表示时间字符串
time.ctime(213123)                      #美国表示时间字符串
time.strftime('%Y-%m-%d %H:%M:%S',time.localtime())     #时间对象转化成字符串'2018-02-24 13:41:42'
time.strftime('%Y-%m-%d %H:%M:%S %A',time.localtime())  # %a %A %b %B %p %U %w %z %Z 表示不同的含义
time.strptime('2018-2-24','%Y-%m-%d')   #将字符串转化成时间对象
time.mktime(time.strptime('2018-2-24','%Y-%m-%d'))    #字符串->时间对象->时间戳

datetime 模块
datetime.datetime.now()                                    #年月日时分秒对象
datetime.datetime.now().year
datetime.datetime.now().timetuple() == time.localtime()    #时间对象
datetime.date.fromtimestamp(time.time())                   #根据时间戳快速的拿到年月日
datetime.date.fromtimestamp(time.time()).timetuple()       #时间对象的时分秒会丢

时间运算:
datetime.datetime.now()-datetime.timedelta(days=3)         # - + days hours minutes seconds 没有年,月

时间替换:
datetime.datetime.now().replace(year=2016,month=12,day=12,hour=12)   # 年月日时 没有,分 秒
random 模块
random.randint(1,3)                   #[1-3]的随机数
random.randrange(1,3)                 #[1-3)的随机数
random.random()                       #[0-1)的浮点数
random.choice('abcdefg1234!@#$')      #字符串中的随机一个
random.sample('abcdefg12345!@#$%',5)  #随机产生5
d=list(range(10)) random.shuffle(d)   #洗牌,将列表打乱
''.join(random.sample(string.ascii_lowercase+string.digits+string.punctuation,6))  #随机数
string 模块
string.digits                     #[0-9]的字符串
string.ascii_letters              #[a-z][A-Z]的字符串
string.ascii_lowercase            #[a-z]
string.ascii_uppercase            #[A-Z]
string.punctuation                #特殊字符
os 模块
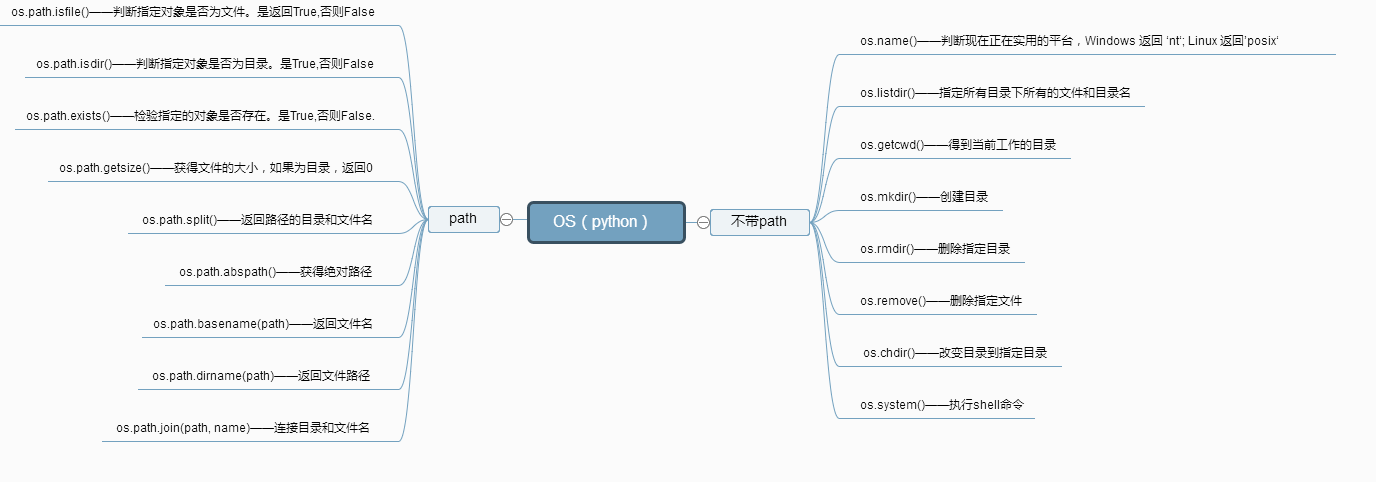
os.getcwd()                  #获取当前工作目录
os.listdir()                 #当前工作目录下的文件和目录名
os.remove('')                #当前目录下删除一个文件
os.removedirs('')            #删除空目录
os.system('ls')              #运行shell命令
os.environ                   #操作系统所在的环境变量
os.getenv('USERNAME')        #读取操作系统环境变量USERNAME的值
os.environ.setdefault('HOME','/home/alex') #设置环境变量的值仅程序运行时有效
os.linesep                   #当前平台使用的终止符 windows:
  linux mac:

os.name                      #当前使用的平台  windows:nt  linux mac:posix
os.rename(old, new)        #重命名
os.makedirs('./test1/test2') #创建多级目录
os.mkdir('test')             #创建单个目录
os.stat(file)               #获取文件属性 http://www.runoob.com/python/os-stat.html
os.chmod('test_new.txt',stat.S_IREAD) #修改文件权限http://www.runoob.com/python/os-chmod.html
os.chdir(dirname)            #改变工作目录到dirname
os.get_terminal_size()       #获取当前终端大小
os.kill(10884,signal.SIGILL) #杀死进程

os.path.isfile()             #判断是否是文件
os.path.isdir()              #判断是否是目录
os.path.isabs()              #判断是否是绝对路径
os.path.exists()             #判断路劲文件是否真的存在
os.path.split()              #当前目录下分割
os.path.splitext()           #将文件的后缀名给分隔开
os.path.dirname()            #获取目录名
os.path.abspath()            #获取绝对路径
os.path.basename()           #获取文件名
os.path.getsize(filename)   #获取文件大小
os.path.join(dir,filename)   #结合目录名和文件名

sys 模块
sys.argv                    #命令行参数List,第一个元素是程序本身路径   print(sys.argv)   python exec.py luffy == ['exec.py', 'luffy']
sys.exit(n)=exit()          #退出程序,正常退出时exit(0)
sys.version                 #获取python解释程序的版本信息
sys.maxsize                 #最大的Int值
sys.path                    #python所在环境变量 模块搜索时的搜索路径
sys.platform                #返回操作系统的平台
sys.stdout.write('ab')      #标准输出
sys.stdin.readline()[:-1]   #标准输入
sys.getrecursionlimit()     #获取最大递归层次 1000
sys.setrecursionlimit(1000) #设置最大递归层次
sys.getdefaultencoding()    #获取python解释器默认编码 utf-8
sys.getfilesystemencoding() #获取内存数据存到文件里的默认编码 utf-8
shutil 模块
shutil.copyfileobj(open('ok.txt','r'),open('ok1.txt','w'))   #将文件内容拷贝到另一个文件中,目标文件可以不存在
shutil.copyfile('ok.txt','ok3.txt')  #拷贝文件内容,目标文件可以不存在
shutil.copymode('ok.txt','ok2.txt')  #仅拷贝权限,目标文件必须存在 mode   os.chmod('ok.txt',stat.S_IREAD)
shutil.copystat('ok.txt','ok2.txt')  #仅拷贝文件状态信息,目标文件必须存在  mode atime, mtime, flags   os.stat('ok.txt')
shutil.copy('ok.txt','ok5.txt')      #拷贝文件内容和权限,目标文件可以不存在
shutil.copy2('ok.txt','ok6.txt')     #拷贝文件内存和权限和状态信息,目标文件可以不存在
shutil.copytree('test1','test3',ignore=shutil.ignore_patterns('*.rar','*.py'))
                                     #递归的去拷贝文件夹,文件,目标目录不能存在,ignore 可忽略拷贝哪些文件,拷贝了文件的内容,权限,状态信息
shutil.rmtree('test4')               #递归的去删除文件
shutil.move('test2','test22')        #递归的去移动文件 其实就是重命名 shutil.move('./test5/test2','./test5/test22')

shutil.make_archive('bao','zip')                             #创建当前目录下的压缩包 返回路径
shutil.make_archive('bao1','zip',root_dir='./test5')         #创建root_dir下的压缩包
shutil.make_archive('./test6/bao2','tar',root_dir='./test5') #创建root_dir下的压缩包 存放在./test6下面

shutil 对压缩包的处理是调用 ZipFile 和 TarFile 两个模块来进行的,详细:
zipfile 模块 压缩&解压缩
# 压缩
z = zipfile.ZipFile('laxi.zip', 'w')
z.write('a.log')
z.write('data.data')
z.close()

# 解压
z = zipfile.ZipFile('laxi.zip', 'r')
z.extractall(path='.')
z.close()
tarfile 模块 压缩&解压缩
import tarfile

# 压缩
>>> t=tarfile.open('/tmp/egon.tar','w')
>>> t.add('/test1/a.py',arcname='a.bak')
>>> t.add('/test1/b.py',arcname='b.bak')
>>> t.close()

# 解压
>>> t=tarfile.open('/tmp/egon.tar','r')
>>> t.extractall('/egon')
>>> t.close()