上一篇乱说了一阵socket,这篇要说说怎么干活了。毕竟用的起来才行。
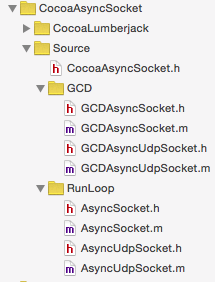
我的项目里面使用的是CocoaAsyncSocket,这个是对CFSocket的封装。如果你觉得自己可以实现封装或者直接用原生的,我可以告诉你,很累;关键是等你弄出来,项目可能都要交了。这个库,支持TCP和UDP;有GCD和RunLoop两种选择。UDP相比TCP的话,可靠性低一点,一般用来传输视频,少个一两帧没有什么影响。这里我就说一下TCP的使用,当然为了发挥Apple设备的牛X性能,我用GCD。

建立socket 单例
先说一点,要保持长连接。我们需要建一个全局的单例。标准单例模式写法⬇️
1 + (instancetype)ShareBaseClient {
2     static SocketClient * iSocketCilent;
3     static dispatch_once_t onceToken;
4     dispatch_once(&onceToken, ^{
5         iSocketCilent = [[SocketClient alloc]init];
6     });
7     return iSocketCilent;
8 }
 1 #define USE_SECURE_CONNECTION    0 // 是否需要使用安全连接
 2 #define USE_CFSTREAM_FOR_TLS     0 // Use old-school CFStream style technique
 3 #define MANUALLY_EVALUATE_TRUST  1 // 是否需要人工验证
 4
 5
 6 - (id)init {
 7     self = [super init];
 8     // Start the socket stuff 最后的那个是你的要放在哪个线程里面操作 果断全局
 9     asyncSocket = [[GCDAsyncSocket alloc] initWithDelegate:self delegateQueue:dispatch_get_main_queue()];
10     NSError *error = nil;
11     uint16_t port = DefalutPORT;// 默认的端口号
12     // 连接是否成功
13     // WWW_HOST 连接的地址
14     // 50秒 是我设置的 超时时间
15     if (![asyncSocket connectToHost:WWW_HOST onPort:port withTimeout:50.0f error:&error]){
16
17         NSLog(@"Unable to connect to due to invalid configuration: %@", error);
18
19     }else{
20         NSLog(@"Connecting to "%@" on port %hu...", WWW_HOST, port);
21     }
22     {
23 #if USE_SECURE_CONNECTION
24
25 #if USE_CFSTREAM_FOR_TLS
26         {
27             // Use old-school CFStream style technique
28
29             NSDictionary *options = @{
30                                       GCDAsyncSocketUseCFStreamForTLS : @(YES),
31                                       GCDAsyncSocketSSLPeerName : CERT_HOST
32                                       };
33
34             DDLogVerbose(@"Requesting StartTLS with options:
%@", options);
35             [asyncSocket startTLS:options];
36         }
37 #elif MANUALLY_EVALUATE_TRUST
38         {
39             // Use socket:didReceiveTrust:completionHandler: delegate method for manual trust evaluation
40
41             NSDictionary *options = @{
42                                       GCDAsyncSocketManuallyEvaluateTrust : @(YES),
43                                       GCDAsyncSocketSSLPeerName : CERT_HOST
44                                       };
45
46             DDLogVerbose(@"Requesting StartTLS with options:
%@", options);
47             [asyncSocket startTLS:options];
48         }
49 #else
50         {
51             // Use default trust evaluation, and provide basic security parameters
52
53             NSDictionary *options = @{
54                                       GCDAsyncSocketSSLPeerName : CERT_HOST
55                                       };
56
57             DDLogVerbose(@"Requesting StartTLS with options:
%@", options);
58             [asyncSocket startTLS:options];
59         }
60 #endif
61 #endif
62     }
63     return self;
64 }
接受报文
如果你连接成功了,那你就可以开始收发报文了。我这里用的是delegate模式,所以我们要实现一下几个比较重要的代理:
连接上的第一步,我们要准备读数据。我用一个简单的枚举标识了每次读取数据的区域,一般报文都是先读报头,再去解析正文的。所以连接上之后,要首先接受报头。
 1 #define READ_HEADER_LINE_BY_LINE  0
 2
 3 typedef NS_ENUM(long, ReadTagType){ //读取数据的类型
 4     ReadTagTypehead = 1,// 报头
 5     ReadTagTypebody = 2 // 主体
 6 };
 7
 8 - (void)socket:(GCDAsyncSocket *)sock didConnectToHost:(NSString *)host port:(UInt16)port
 9 {
10     NSLog(@"socket:didConnectToHost:%@ port:%hu", host, port);
11
12     // 是否一行一行的读数据,我这里设置的是 0
13 #if READ_HEADER_LINE_BY_LINE
14     // Now we tell the socket to read the first line of the http response header.
15     // As per the http protocol, we know each header line is terminated with a CRLF (carriage return, line feed).
16     [asyncSocket readDataToData:[GCDAsyncSocket CRLFData] withTimeout:-1.0 tag:0];
17
18 #else
19     // Now we tell the socket to read the full header for the http response.
20     // As per the http protocol, we know the header is terminated with two CRLF's (carriage return, line feed).
21     // sizeof(protocol_head)  一个报文头的长度
22     // ReadTagTypehead 先读的是报文的头的
23     // -1代表没有超时时间
24     [asyncSocket readDataToLength:sizeof(protocol_head) withTimeout:-1 tag:ReadTagTypehead];
25
26 #endif
27 }
开始读取后,有数据的话会进入这个代理。
 1 - (void)socket:(GCDAsyncSocket *)sock didReadData:(NSData *)data withTag:(long)tag {
 2
 3     switch (tag) {
 4         case ReadTagTypehead:// 先 读取 head部分
 5         {
 6              // 拿到之后,我们处理一下这段头
 7              // 获得head里面的命令CMD 和 下一段正文的长度BodyLength
 8              // 把这些参数传到一个方法里面处理一下(万一是空头呢。)
 9
10             [self willReadBody:CMD size: BodyLength data:data];
11         }
12             break;
13         case ReadTagTypebody:// 再 读取 body部分
14         {
15             // 加上这一段,我们取得了完整的数据了,可以给需要的地方发过去了
16             [self haveReadData:data];
17             // 然后我们去读下一个报文,还是先读报文头
18             [asyncSocket readDataToLength:sizeof(protocol_head) withTimeout:-1 tag:ReadTagTypehead];
19         }
20             break;
21         default:
22             break;
23     }
24 }
25
26 // 处理用的方法 下面两个是我写的私有方法 不是CocoaAsyncSocket的代理方法
27 // 准备读取body的数据 CMD需要记录下来的
28 - (void)willReadBody:(int)CMD size:(long)size data:(NSData *)data{
29    gCMD = CMD;
30     alldata = [[NSMutableData alloc]initWithData: data];
31     if(size == 0) {// 如果是空头,就丢掉这段数据,继续读下一个头
32         [self haveReadData:nil];
33         [asyncSocket readDataToLength:sizeof(protocol_head) withTimeout:-1 tag:ReadTagTypehead];
34     }else {// 如果不是的话,就去读下一段 报文的正文
35         [asyncSocket readDataToLength:dataBufferSize withTimeout:-1 tag:ReadTagTypebody];
36     }
37 }
38
39 // 读取完数据了 要回调代理
40 - (void)haveReadData:(NSData *)data {
41     // 把头和正文拼接起来 构成完整的数据
42     if(data && data.length>0)
43         [alldata appendData:data];
44
45 //    NSLog(@"receiveData: %@",alldata);
46     if(alldata.length>0) {
47        // 这里去告诉 你需要处理数据的地方 让他去处理数据
48     }
49     alldata = nil;
50 }
到上面这一步的话,你的接受数据就算完成了。
发送报文
[asyncSocket writeData:data withTimeout:-1.0 tag:0];
就一行,不用怀疑。把你的信息转为NSData后 调用这个方法就好了。成功的话,会进入这个代理。
- (void)socket:(GCDAsyncSocket *)sock didWriteDataWithTag:(long)tag;
socket 断开
当然,socket也有断开的时候,所以你需要处理这个代理。这里面你可以发个通知,让你的application断线重连一下。PS:移动网络和Wi-Fi切换,socket会断开哦。
- (void)socketDidDisconnect:(GCDAsyncSocket *)sock withError:(NSError *)err
附加:
当我们连续收到错误报文的时候,我们需要主动断开socket。
// 先去掉代理 再断开连接
self.asyncSocket.delegate = nil;
[self.asyncSocket disconnect];