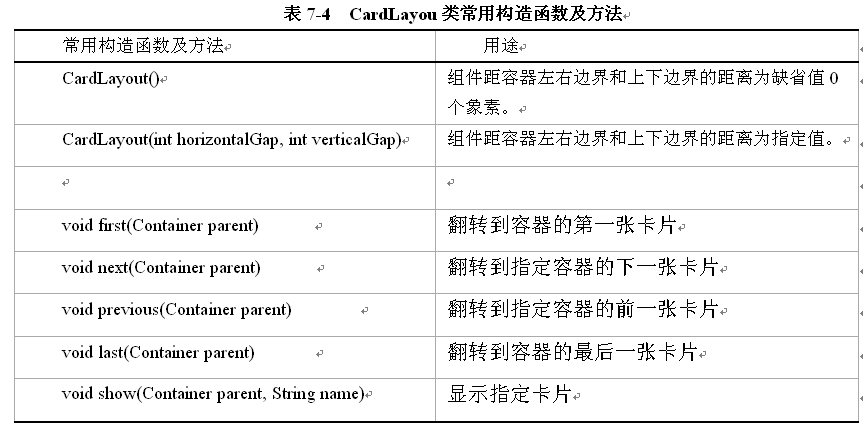
卡片布局能够让多个组件共享同一个显示空间,共享空间的组件之间的关系就像一叠牌,组件叠在一起,初始时显示该空间中第一个添加的组件,通过CardLayout类提供的方法可以切换该空间中显示的组件。

2、 使用CardLayout类提供的方法可以切换显示该空间中的组件
例如:Panel cardPanel=new Panel();
(2) 定义卡片对象:CardLayout 布局对象名称=new CardLayout();
例如:CardLayout card=new CardLayout();
(3) 设置使用卡片布局的容器为卡片布局:
(4) 设置容器中显示的组件
例如:for (int i = 0; i < 5; i++) {
cardPanel.add(newJButton("按钮"+i));
}
(5) 定义响应事件代码,让容器显示相应的组件
格式:
n 布局对象名称.next(容器名称) 显示容器中当前组件之后的一个组件,若当前组件为最后添加的组件,则显示第一个组件,即卡片组件显示是循环的。
n 布局对象名称.first(容器名称) 显示容器中第一个组件
n 布局对象名称.last(容器名称) 显示容器中最后一个组件
n 布局对象名称.previous(容器名称) 显示容器中当前组件之前的一个组件,若当前组件为第一个添加的组件,则显示最后一个组件,即卡片组件显示是循环的。
例如:
card.next(cardPanel);
card.previous(cardPanel);
card.first(cardPanel);
card.last(cardPanel);
实例一:卡片的切换
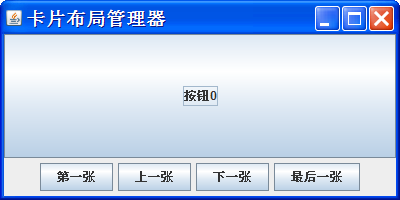
窗体默认边界布局,一个面板以卡片布局,面板上添加五个按钮,该面板添加到CENTER位置,另一个面板添加两个按钮,两个按钮添加事件来切换显示CENTER位置中的面板的组件
// cardlayout.Java
import java.awt.*;
import javax.swing.*;
import java.awt.event.*;//引入事件包
//定义类时实现监听接口
public class cardlayout extendsJFrame implements ActionListener{
JButton nextbutton;
JButton preButton;
Panel cardPanel=new Panel();
Panel controlpaPanel=new Panel();
//定义卡片布局对象
CardLayout card=new CardLayout();
//定义构造函数
public cardlayout() {
super("卡片布局管理器");
setSize(300, 200);
setDefaultCloseOperation(JFrame.EXIT_ON_CLOSE);
setLocationRelativeTo(null);
setVisible(true);
//设置cardPanel面板对象为卡片布局
cardPanel.setLayout(card);
//循环,在cardPanel面板对象中添加五个按钮
//因为cardPanel面板对象为卡片布局,因此只显示最先添加的组件
for (int i = 0; i < 5; i++) {
cardPanel.add(new JButton("按钮"+i));
}
//实例化按钮对象
nextbutton=new JButton("下一张卡片");
preButton=new JButton("上一张卡片");
//为按钮对象注册监听器
nextbutton.addActionListener(this);
preButton.addActionListener(this);
controlpaPanel.add(preButton);
controlpaPanel.add(nextbutton);
//定义容器对象为当前窗体容器对象
Container container=getContentPane();
//将 cardPanel面板放置在窗口边界布局的中间,窗口默认为边界布局
container.add(cardPanel,BorderLayout.CENTER);
// 将controlpaPanel面板放置在窗口边界布局的南边,
container.add(controlpaPanel,BorderLayout.SOUTH);
}
//实现按钮的监听触发时的处理
public void actionPerformed(ActionEvent e){
//如果用户单击nextbutton,执行的语句
if (e.getSource()==nextbutton){
//切换cardPanel面板中当前组件之后的一个组件
//若当前组件为最后添加的组件,则显示第一个组件,即卡片组件显示是循环的。
card.next(cardPanel);
}
if (e.getSource()==preButton){
//切换cardPanel面板中当前组件之前的一个组件
//若当前组件为第一个添加的组件,则显示最后一个组件,即卡片组件显示是循环的。
card.previous(cardPanel);
}
}
public static void main(String[] args) {
cardlayout kapian=new cardlayout();
}
}
程序显示结果如下图所示,单击“上一张”、“下一张”等按钮可以上面的面板中显示不同的按钮来。

方法二步骤:
(1) 定义使用卡片布局的容器
例如:Panel cardPanel=new Panel();
(2) 定义卡片对象:CardLayout 布局对象名称=newCardLayout();
例如:CardLayout card=new CardLayout();
(3) 设置使用卡片布局的容器为卡片布局:
例如:cardPanel.setLayout(card);
(4) 设置容器中显示的组件,同时为组件命名对应的卡片名称
例如:for (int i = 0; i < 4; i++) {
cardPanel.add(“0”,newJButton("按钮"+i));
}
(5) 定义响应事件代码,让容器显示相应的组件
格式:卡片对象名称.show(容器名称,卡片名称)
实例二:使用CardLayout类的show方法显示组件。
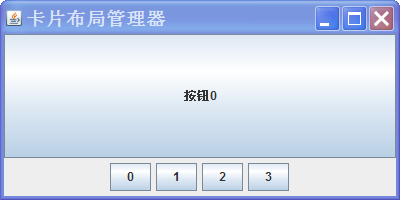
窗体默认边界布局,一个面板以卡片布局,面板上添加4个按钮,该面板添加到CENTER位置,另一个面板添加4个按钮,这4个按钮添加事件来切换显示CENTER位置中的面板的组件按钮。
// cardlayout1.java
import java.awt.*;
import javax.swing.*;
import java.awt.event.*;//引入事件包
//定义类时 实现监听接口
public class cardlayout1 extends JFrameimplements ActionListener{
JButton b0,b1,b2,b3;
Panel cardPanel=new Panel();
Panel controlpaPanel=newPanel();
//定义卡片布局对象
CardLayout card=newCardLayout();
//定义字符数组,为卡片命名
StringcardName[]={"0","1","2","3"};
//定义构造函数
public cardlayout1() {
super("卡片布局管理器");
setSize(400,200);
setDefaultCloseOperation(JFrame.EXIT_ON_CLOSE);
setLocationRelativeTo(null);
setVisible(true);
//设置cardPanel面板对象为卡片布局
cardPanel.setLayout(card);
//循环,在cardPanel面板对象中添加4个按钮
//因为cardPanel面板对象为卡片布局,因此初始时显示最先添加的组件
for (int i = 0; i< 4; i++) {
//面板中添加的每个按钮对应设置一个卡片名
cardPanel.add(cardName[i],newJButton("按钮"+i));
}
//实例化按钮对象
b0=newJButton("0");
b1=newJButton("1");
b2=newJButton("2");
b3=newJButton("3");
//为按钮对象注册监听器
b0.addActionListener(this);
b1.addActionListener(this);
b2.addActionListener(this);
b3.addActionListener(this);
controlpaPanel.add(b0);
controlpaPanel.add(b1);
controlpaPanel.add(b2);
controlpaPanel.add(b3);
//定义容器对象为当前窗体容器对象
Containercontainer=getContentPane();
//将 cardPanel面板放置在窗口边界布局的中间,窗口默认为边界布局
container.add(cardPanel,BorderLayout.CENTER);
// 将controlpaPanel面板放置在窗口边界布局的南边,
container.add(controlpaPanel,BorderLayout.SOUTH);
}
//实现按钮的监听触发时的处理
public voidactionPerformed(ActionEvent e){
//用户单击b0按钮时执行的语句
if(e.getSource()==b0){
//通过show()方法中的卡片名称,显示容器中的组件。
card.show(cardPanel,cardName[0]);
}
if(e.getSource()==b1){
card.show(cardPanel,cardName[1]);
}
if(e.getSource()==b2){
card.show(cardPanel,cardName[2]);
}
if(e.getSource()==b3){
card.show(cardPanel,cardName[3]);
}
}
public static voidmain(String[] args) {
cardlayout1kapian=new cardlayout1();
}
}
程序执行结果:
