springcloud用法
使用springcloud搭建微服务肯定要在父工程下面编写子工程
一.搭建eureka注册中心
1. 创建maven项目(在springboot项目下建立子工程eureka-server)
2. 导入坐标
|
<dependencies>
<dependency>
<groupId>org.springframework.cloud</groupId>
<artifactId>spring-cloud-starter-netflix-eureka-server</artifactId>
</dependency>
</dependencies>
|
3.
创建引导类
@SpringBootApplication

  @EnableEurekaServer  //添加注解 表名服务,声明这个应用时EurekaServer

  public class EurekaManager {

    public static void main(String[] args) {

        SpringApplication.run(EurekaManager.class,args);

    }

}
|
4. 编写配置文件
编写application.yml文件
server:

  port: 10086

  spring:

  application:

    name: eureka-server  #自己注册的serviceId,即注册名称
  eureka:

  client:

    service-url:

      defaultZone: http://127.0.0.1:10086/eureka
    register-with-eureka: true   #注册自己,默认为true

    fetch-registry: true  #拉取服务,默认为true
|
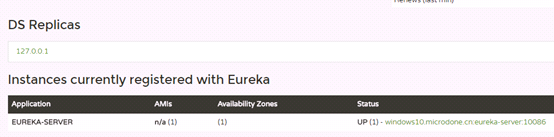
5. 效果截图
二.搭建提供者,user-service
提供者user-service对于注册中心而言还是客户端
1. 创建maven工程user-service
2. 导入坐标
<!--添加坐标-->

  <dependencies>

    <dependency>

        <groupId>org.springframework.boot</groupId>

        <artifactId>spring-boot-starter-web</artifactId>

    </dependency>


    <dependency>

        <groupId>mysql</groupId>

        <artifactId>mysql-connector-java</artifactId>

    </dependency>


    <dependency>

        <groupId>tk.mybatis</groupId>

        <artifactId>mapper-spring-boot-starter</artifactId>

    </dependency>


      <dependency>

        <groupId>org.springframework.cloud</groupId>

        <artifactId>spring-cloud-starter-netflix-eureka-client</artifactId>

    </dependency>


  </dependencies>
|
3. 编写启动类
package com.ahd;


  import org.springframework.boot.SpringApplication;

  import org.springframework.boot.autoconfigure.SpringBootApplication;

  import org.springframework.cloud.client.discovery.EnableDiscoveryClient;

  import org.springframework.context.annotation.Bean;

  import org.springframework.web.client.RestTemplate;

  import tk.mybatis.spring.annotation.MapperScan;


  @SpringBootApplication

@EnableDiscoveryClient  //使用这个注解 针对所有注册中心,

//@EnableEurekaClient  这个注解只针对eureka的注册中心

  @MapperScan("com.ahd.mapper")

  public class UserServiceApplication {

    public static void main(String[] args) {

        SpringApplication.run(UserServiceApplication.class,args);

    }


}
|
4. 编写配置文件
server:

  port: 8181

  spring:

  datasource:

    driver-class-name: com.mysql.jdbc.Driver

    url: jdbc:mysql://127.0.0.1:3306/cloud_test

    username: root

    password: 123456

  application:

    name: user-service

  eureka:

  client:

    service-url:

      defaultZone: http://127.0.0.1:10086/eureka

    register-with-eureka: true  #默认的

    fetch-registry: true  #默认的
|
5. 编写具体业务逻辑
略
6. 编写controller层代码
package com.ahd.controller;


  import com.ahd.pojo.User;

  import com.ahd.service.UserService;

  import org.springframework.beans.factory.annotation.Autowired;

  import org.springframework.web.bind.annotation.GetMapping;

  import org.springframework.web.bind.annotation.PathVariable;

  import org.springframework.web.bind.annotation.RestController;


  @RestController

  public class UserController {

    @Autowired

    private UserService userService;


    @GetMapping("/user/{id}")

    public User findById(@PathVariable("id") Long id){

        return userService.findById(id);

    }

}
|
三.负载均衡Ribbon
当消费方 向 提供方发送请求,可能有多个提供方,这时候就需要考虑向那个提供方发送请求了
1. 创建消费者maven工程
consumer
2. 导入坐标
eureka中已经继承了ribbon的坐标,不需要导入,展示一下所有坐标
<dependencies>

    <dependency>

        <groupId>org.springframework.cloud</groupId>

        <artifactId>spring-cloud-starter-netflix-eureka-client</artifactId>

    </dependency>


    <dependency>

        <groupId>org.springframework.boot</groupId>

        <artifactId>spring-boot-starter-web</artifactId>

    </dependency>

  </dependencies>
|
3. 编写引导类
package com.and;


  import org.springframework.boot.SpringApplication;

  import org.springframework.boot.autoconfigure.SpringBootApplication;

  import org.springframework.cloud.client.discovery.EnableDiscoveryClient;

  import org.springframework.cloud.client.loadbalancer.LoadBalanced;

  import org.springframework.context.annotation.Bean;

  import org.springframework.web.client.RestTemplate;


  @SpringBootApplication

@EnableDiscoveryClient  //使用这个注解 针对所有注册中心,

//@EnableEurekaClient  这个注解只针对eureka的注册中心

  public class ConsumerApplication {

    public static void main(String[] args) {

        SpringApplication.run(ConsumerApplication.class,args);

    }


    @Bean

    @LoadBalanced

    public RestTemplate getTemplate(){

        return new RestTemplate();

    }

}
|
4. 编写配置文件application.yml文件
server:

  port: 8180

  spring:

  application:

    name: consumer

  eureka:

  client:

    fetch-registry: true  #默认的,可以不写

    service-url:

      defaultZone: http://127.0.0.1:10086/eureka

    register-with-eureka: true #默认的,可以不写

  ribbon:

  eager-load:

    enabled: true  #开启饥饿加载,默认是不开启,采用懒加载

    clients: user-service  #需要指定是哪个提供方

  user-service:

  ribbon:

    NFLoadBalancerRuleClassName: com.netflix.loadbalancer.RandomRule  #配置负载均衡的策略,默认是轮训,这里是随机
|
5. 编写controller层(发送请求的类)
package com.and.controller;


  import com.and.pojo.User;

  import org.springframework.beans.factory.annotation.Autowired;

  import org.springframework.cloud.client.discovery.DiscoveryClient;

  import org.springframework.web.bind.annotation.GetMapping;

  import org.springframework.web.bind.annotation.PathVariable;

  import org.springframework.web.bind.annotation.RestController;

  import org.springframework.web.client.RestTemplate;


  @RestController

  public class ConsumerController {

    @Autowired

    private RestTemplate restTemplate;

    @Autowired

    private DiscoveryClient discoveryClient;

    @GetMapping("/user/{id}")

    public User getUserFromService(@PathVariable("id") Long id){

       /*不使用负载均衡时使用的方法,使用ribbon负载均衡不需要自己选择哪个提供者

       List<ServiceInstance> instances = discoveryClient.getInstances("USER-SERVICE");

        ServiceInstance serviceInstance = instances.get(0);


        String host = serviceInstance.getHost();

        int port = serviceInstance.getPort();


        String url = String.format("http://%s:%d/user/%d", host, port, id);*/

       String url="http://user-service/user/"+id;

        return restTemplate.getForObject(url,User.class);

    }

}
|
四.Hystrix-服务降级
两大主要作用:
线程隔离,服务降级
服务熔断
一般作用于消费者
1. 引入坐标
在源consumer基础上添加一下坐标即可
|
<dependency>
<groupId>org.springframework.cloud</groupId>
<artifactId>spring-cloud-starter-netflix-hystrix</artifactId>
</dependency>
|
完整坐标:
<dependencies>

    <dependency>

        <groupId>org.springframework.cloud</groupId>

        <artifactId>spring-cloud-starter-netflix-eureka-client</artifactId>

    </dependency>


    <dependency>

        <groupId>org.springframework.boot</groupId>

        <artifactId>spring-boot-starter-web</artifactId>

    </dependency>


    <dependency>

        <groupId>org.springframework.cloud</groupId>

        <artifactId>spring-cloud-starter-netflix-hystrix</artifactId>

    </dependency>


  </dependencies>
|
2. 配置引导类
package com.and;


  import org.springframework.boot.SpringApplication;

  import org.springframework.boot.autoconfigure.SpringBootApplication;

  import org.springframework.cloud.client.SpringCloudApplication;

  import org.springframework.cloud.client.circuitbreaker.EnableCircuitBreaker;

  import org.springframework.cloud.client.discovery.EnableDiscoveryClient;

  import org.springframework.cloud.client.loadbalancer.LoadBalanced;

  import org.springframework.cloud.netflix.hystrix.EnableHystrix;

  import org.springframework.context.annotation.Bean;

  import org.springframework.web.client.RestTemplate;


  /*@SpringBootApplication

@EnableDiscoveryClient  //使用这个注解 针对所有注册中心,

//@EnableEurekaClient  这个注解只针对eureka的注册中心

@EnableCircuitBreaker  这个是hystrix的注解*/

  @SpringCloudApplication  //代表上面的三个注解

  public class ConsumerApplication {

    public static void main(String[] args) {

        SpringApplication.run(ConsumerApplication.class,args);

    }


    @Bean

    @LoadBalanced

    public RestTemplate getTemplate(){

        return new RestTemplate();

    }

}
|
3. 改写Controller类
方式一:针对方法服务降级
package com.and.controller;
import com.and.pojo.User;
import com.netflix.hystrix.contrib.javanica.annotation.HystrixCommand;
import org.springframework.beans.factory.annotation.Autowired;
import org.springframework.cloud.client.discovery.DiscoveryClient;
import org.springframework.web.bind.annotation.GetMapping;
import org.springframework.web.bind.annotation.PathVariable;
import org.springframework.web.bind.annotation.RestController;
import org.springframework.web.client.RestTemplate;
@RestController
public class ConsumerController {
@Autowired
private RestTemplate restTemplate;
@Autowired
private DiscoveryClient discoveryClient;
@GetMapping("/user/{id}")
@HystrixCommand(fallbackMethod = "fallBack")
public String getUserFromService(@PathVariable("id") Long id){
String url="http://user-service/user/"+id;
return restTemplate.getForObject(url,User.class).toString();
}
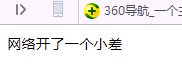
public String fallBack(Long id){//返回值和参数必须和对应方法保持一致
return "网络开了一个小差";
}
}
|
方式二:针对类进行服务降级
package com.and.controller;


  import com.and.pojo.User;

  import com.netflix.hystrix.contrib.javanica.annotation.DefaultProperties;

  import com.netflix.hystrix.contrib.javanica.annotation.HystrixCommand;

  import org.springframework.beans.factory.annotation.Autowired;

  import org.springframework.cloud.client.discovery.DiscoveryClient;

  import org.springframework.web.bind.annotation.GetMapping;

  import org.springframework.web.bind.annotation.PathVariable;

  import org.springframework.web.bind.annotation.RestController;

  import org.springframework.web.client.RestTemplate;


  @RestController

  @DefaultProperties(defaultFallback = "quanjuFallBack")

  public class ConsumerController {

    @Autowired

    private RestTemplate restTemplate;

    @Autowired

    private DiscoveryClient discoveryClient;

    @GetMapping("/user/{id}")

    @HystrixCommand

    public String getUserFromService(@PathVariable("id") Long id){

       String url="http://user-service/user/"+id;

        return restTemplate.getForObject(url,User.class).toString();

    }


    public String fallBack(Long id){//返回值和参数必须和对应方法保持一致

        return "网络开了一个小差";

    }


    public String quanjuFallBack(){ //针对多个方法,不需要配置参数

        return "全局配置:网络开了一个小差";

    }

}
|
4. 修改配置文件application.yml
server:

  port: 8180

  spring:

  application:

    name: consumer

  eureka:

  client:

    fetch-registry: true  #默认的,可以不写

    service-url:

      defaultZone: http://127.0.0.1:10086/eureka

    register-with-eureka: true #默认的,可以不写

  ribbon:

  eager-load:

    enabled: true  #开启饥饿加载,默认是不开启,采用懒加载

    clients: user-service  #需要指定是哪个提供方

  user-service:

  ribbon:

    NFLoadBalancerRuleClassName: com.netflix.loadbalancer.RandomRule  #配置负载均衡的策略,默认是轮训,这里是随机

  hystrix:

  command:

    default:

      execution:

        isolation:

          thread:

            timeoutInMilliseconds: 2000  #超时时间配置,超过这个时间请求还没有响应,服务降级
|
配置文件响应时间修改为两秒也是为了测试
5. 运行结果
为了获取测试结果,在提供方进行了两秒的睡眠

最终结果效果图:
五.Hystrix-服务熔断
这个东西好搞,和服务降级配置相同
@GetMapping("/user/{id}")

  @HystrixCommand

  public String getUserFromService(@PathVariable("id") Long id){

      if(id==1){

        throw new RuntimeException();

    }//方便进行测试


   String url="http://user-service/user/"+id;

    return restTemplate.getForObject(url,User.class).toString();

}
|
熔断器的默认触发阈值是20次请求,不好触发。休眠时间时5秒,时间太短,不易观察,为了测试方便,我们可以通过配置修改熔断策略:
circuitBreaker.requestVolumeThreshold=10
circuitBreaker.sleepWindowInMilliseconds=10000
circuitBreaker.errorThresholdPercentage=50
解读:
- requestVolumeThreshold:触发熔断的最小请求次数,默认20
- sleepWindowInMilliseconds:休眠时长,默认是5000毫秒
- errorThresholdPercentage:触发熔断的失败请求最小占比,默认50%
在类中进行配置,配置方式
@HystrixCommand(commandProperties={@HystrixProperty(name="circuitBreaker.requestVolumeThreshold",value="10"),

       @HystrixProperty(name="circuitBreaker.sleepWindowInMilliseconds",value="10000"),

        @HystrixProperty(name="circuitBreaker.errorThresholdPercentage",value="50")

        })
|
六.feign
feign :伪装
减少重复代码
1. 导入坐标
添加坐标:
<dependency>

    <groupId>org.springframework.cloud</groupId>

    <artifactId>spring-cloud-starter-openfeign</artifactId>

  </dependency>
|
完整坐标:
<dependencies>

    <dependency>

        <groupId>org.springframework.cloud</groupId>

        <artifactId>spring-cloud-starter-netflix-eureka-client</artifactId>

    </dependency>


    <dependency>

        <groupId>org.springframework.boot</groupId>

        <artifactId>spring-boot-starter-web</artifactId>

    </dependency>


    <dependency>

        <groupId>org.springframework.cloud</groupId>

        <artifactId>spring-cloud-starter-netflix-hystrix</artifactId>

    </dependency>


    <dependency>

        <groupId>org.springframework.cloud</groupId>

        <artifactId>spring-cloud-starter-openfeign</artifactId>

    </dependency>


  </dependencies>
|
2. 修改引导类(添加feign的注解)
package com.and;


  import org.springframework.boot.SpringApplication;

  import org.springframework.boot.autoconfigure.SpringBootApplication;

  import org.springframework.cloud.client.SpringCloudApplication;

  import org.springframework.cloud.client.circuitbreaker.EnableCircuitBreaker;

  import org.springframework.cloud.client.discovery.EnableDiscoveryClient;

  import org.springframework.cloud.client.loadbalancer.LoadBalanced;

  import org.springframework.cloud.netflix.hystrix.EnableHystrix;

  import org.springframework.cloud.openfeign.EnableFeignClients;

  import org.springframework.context.annotation.Bean;

  import org.springframework.web.client.RestTemplate;


  /*@SpringBootApplication

@EnableDiscoveryClient  //使用这个注解 针对所有注册中心,

//@EnableEurekaClient  这个注解只针对eureka的注册中心

@EnableCircuitBreaker  这个是hystrix的注解*/

  @SpringCloudApplication  //代表上面的三个注解

  @EnableFeignClients  //开启feign功能

  public class ConsumerApplication {

    public static void main(String[] args) {

        SpringApplication.run(ConsumerApplication.class,args);

    }


    @Bean

    @LoadBalanced

    public RestTemplate getTemplate(){

        return new RestTemplate();

    }

}
|
3. 编写feign的接口
feign支持springmvc所有的注解
package com.and.feign;


  import com.and.pojo.User;

  import org.springframework.cloud.openfeign.FeignClient;

  import org.springframework.web.bind.annotation.GetMapping;

  import org.springframework.web.bind.annotation.PathVariable;


  @FeignClient("user-service")

  public interface UserClient {

    @GetMapping("/user/{id}") //这里的返回结果和 url地址一定要和提供方保持一致

    User getUserFromService(@PathVariable("id") Long id);

}
|
4. 修改controller层代码
package com.and.controller;


  import com.and.feign.UserClient;

  import com.and.pojo.User;

  import com.netflix.hystrix.contrib.javanica.annotation.DefaultProperties;

  import com.netflix.hystrix.contrib.javanica.annotation.HystrixCommand;

  import com.netflix.hystrix.contrib.javanica.annotation.HystrixProperty;

  import org.springframework.beans.factory.annotation.Autowired;

  import org.springframework.cloud.client.discovery.DiscoveryClient;

  import org.springframework.web.bind.annotation.GetMapping;

  import org.springframework.web.bind.annotation.PathVariable;

  import org.springframework.web.bind.annotation.RestController;

  import org.springframework.web.client.RestTemplate;


  @RestController

@DefaultProperties(defaultFallback = "quanjuFallBack")

  public class ConsumerController {

    @Autowired

    private RestTemplate restTemplate;

    @Autowired

    private DiscoveryClient discoveryClient;

      @Autowired

    private UserClient userClient;

    @GetMapping("/user/{id}")

    @HystrixCommand

    public String getUserFromService(@PathVariable("id") Long id){

        return userClient.getUserFromService(id).toString();

    }


    public String fallBack(Long id){//返回值和参数必须和对应方法保持一致

        return "网络开了一个小差";

    }


    public String quanjuFallBack(){ //针对多个方法,不需要配置参数

        return "全局配置:网络开了一个小差";

    }

}
|
5. feign其他拓展
feign继承了ribbon,不需要再单独配置,也不需要再配置RestTemplate,
Fegin内置的ribbon默认设置了请求超时时长,默认是1000ms,我们可以通过手动配置来修改这个超时时长:
ribbon:
ReadTimeout: 2000 # 读取超时时长
ConnectTimeout: 1000 # 建立链接的超时时长
,因为ribbon内部有重试机制,一旦超时,会自动重新发起请求。如果不希望重试,可以添加配置:
ribbon:
ReadTimeout: 2000 # 数据通信超时时长
ConnectTimeout: 500 # 连接超时时长
MaxAutoRetries: 0 # 当前服务器的重试次数
MaxAutoRetriesNextServer: 1 # 重试多少次服务
OkToRetryOnAllOperations: false # 是否对所有的请求方式都重试
另外,hystrix的超时时间,应该比重试的总时间要大,比如当前案例中,应该配 大于2500*2 = 5000
6.
feign内置hystrix
只不过,默认情况下是关闭的。我们需要通过下面的参数来开启:
feign:

  hystrix:

    enabled: true # 开启Feign的熔断功能
但是,Feign中的Fallback配置不像Ribbon中那样简单了
1)首先,我们要定义一个类,实现刚才编写的UserFeignClient,作为fallback的处理类
@Component
public class UserClientFallback implements UserClient {
@Override
public User queryById(Long id) {
User user = new User();
user.setId(id);
user.setName("用户查询出现异常!");
return user;
}
}
2)然后在UserFeignClient中,指定刚才编写的实现类
@FeignClient(value = "user-service", fallback = UserFeignClientFallback.class)
public interface UserClient {
@GetMapping("/user/{id}")
User queryById(@PathVariable("id") Long id);
}
7.
feign请求压缩
Spring Cloud Feign 支持对请求和响应进行GZIP压缩,以减少通信过程中的性能损耗。通过下面的参数即可开启请求与响应的压缩功能:
feign:

  compression:

    request:

      enabled: true # 开启请求压缩

    response:

      enabled: true # 开启响应压缩
同时,我们也可以对请求的数据类型,以及触发压缩的大小下限进行设置:
feign:

  compression:

    request:

      enabled: true # 开启请求压缩

      mime-types: text/html,application/xml,application/json # 设置压缩的数据类型

      min-request-size: 2048 # 设置触发压缩的大小下限
注:上面的数据类型、压缩大小下限均为默认值。
8. feign日志级别
前面讲过,通过logging.level.xx=debug来设置日志级别。然而这个对Fegin客户端而言不会产生效果。因为@FeignClient注解修改的客户端在被代理时,都会创建一个新的Fegin.Logger实例。我们需要额外指定这个日志的级别才可以。
1)设置cn.itcast包下的日志级别都为debug
logging:
level:
cn.itcast: debug
2)编写配置类,定义日志级别
@Configuration
public class FeignConfig {
@Bean
Logger.Level feignLoggerLevel(){
return Logger.Level.FULL;
}
}
这里指定的Level级别是FULL,Feign支持4种级别:
- NONE:不记录任何日志信息,这是默认值。
- BASIC:仅记录请求的方法,URL以及响应状态码和执行时间
- HEADERS:在BASIC的基础上,额外记录了请求和响应的头信息
- FULL:记录所有请求和响应的明细,包括头信息、请求体、元数据。
3)在FeignClient中指定配置类:
@FeignClient(value = "user-service", fallback = UserClientFallback.class, configuration = FeignConfig.class)
public interface UserClient {
@GetMapping("/user/{id}")
User queryById(@PathVariable("id") Long id);
}
4)重启项目,即可看到每次访问的日志:
七.Zuul网关
网关的核心功能是:过滤和路由
1.
新建maven工程
略,zuul-server
2.
配置依赖坐标
|
<dependencies>
<dependency>
<groupId>org.springframework.cloud</groupId>
<artifactId>spring-cloud-starter-netflix-zuul</artifactId>
</dependency>
<dependency>
<groupId>org.springframework.cloud</groupId>
<artifactId>spring-cloud-starter-netflix-eureka-client</artifactId>
</dependency>
</dependencies>
|
3.
编写启动类
package com.ahd;


  import org.springframework.boot.SpringApplication;

  import org.springframework.boot.autoconfigure.SpringBootApplication;

  import org.springframework.cloud.netflix.zuul.EnableZuulProxy;


  @SpringBootApplication

  @EnableZuulProxy //开启zuul网关

  public class ZuulApplication {

    public static void main(String[] args) {

        SpringApplication.run(ZuulApplication.class,args);

    }

}
|
4. 编写配置
application.yml
server:

  port: 10010

  spring:

  application:

    name: zuul-server

  #编写路由规则

#user-service:

#  routes:

#    path: /user-service/**  #这里是映射路径

#    url: http://127.0.0.1:8181 #映射路径对应的实际url地址

#如果配置了eureka,上面的代码可以写成

#user-service:

#  routes:

#    path: /user-service/**  #这里是映射路径

#    serviceId: user-service #映射路径对应的实际url地址


  user-service: /user-service/**  #如果配置了eureka,上面代码可以简写成这行,这行也可以不写

  eureka:

  client:

    service-url:

      defaul                                                                                                                                                                                                                                                                                                                                                                                                                                                                                                                                                                                                                                                                                                                                                                                                                      tZone: http://127.0.0.1:10086/eureka
|
5. 禁用路由规则
默认情况下,一切服务的映射路径就是服务名本身。
a) 例如服务名为:user-service,则默认的映射路径就是:/user-service/**
也就是说,刚才的映射规则我们完全不配置也是OK的,不信就试试看。
如果想要禁用某个路由规则,可以这样:
zuul:

  ignored-services:

    - user-service

    - consumer
6. 路由前缀
配置示例:
zuul:
prefix: /api # 添加路由前缀
routes:
user-service: /user-service/** # 这里是映射路径
我们通过zuul.prefix=/api来指定了路由的前缀,这样在发起请求时,路径就要以/api开头。
路径/api/user-service/user/1将会被代理到/user-service/user/1
忽略路由前缀:
zuul:
prefix: /api
routes:
user-service:
path: /user/**
serviceId: user-service
strip-prefix: false # 是否在转发时,去除路由前缀,这里不去除,映射路径中的user就会继续转发
此时,只需要访问:http://localhost:10010/api/user/1
7.
过滤器
Zuul作为网关的其中一个重要功能,就是实现请求的鉴权。而这个动作我们往往是通过Zuul提供的过滤器来实现的。
ZuulFilter是过滤器的顶级父类。在这里我们看一下其中定义的4个最重要的方法:
public abstract ZuulFilter implements IZuulFilter{
abstract public String filterType();
abstract public int filterOrder();
boolean shouldFilter();// 来自IZuulFilter
Object run() throws ZuulException;// IZuulFilter
}
filterType:返回字符串,代表过滤器的类型。包含以下4种:
pre:请求在被路由之前执行
route:在路由请求时调用
post:在routing和errror过滤器之后调用
error:处理请求时发生错误调用
filterOrder:通过返回的int值来定义过滤器的执行顺序,数字越小优先级越高。shouldFilter:返回一个Boolean值,判断该过滤器run方法是否需要执行。返回true执行,返回false不执行。run:过滤器的具体业务逻辑
8. 自定义过滤器
自定义过滤器只需要继承ZuulFilter抽象类,实现四个方法,交给spring管理
|
@Component
public class LoginFilter extends ZuulFilter {
@Override
public String filterType() {
return FilterConstants.PRE_TYPE;
}
@Override
public int filterOrder() {
return FilterConstants.PRE_DECORATION_FILTER_ORDER - 1;
}
@Override
public boolean shouldFilter() {
return true;
}
@Override
public Object run() throws ZuulException {
// 获取请求上下文
RequestContext ctx = RequestContext.getCurrentContext();
// 获取request对象
HttpServletRequest request = ctx.getRequest();
// 获取请求参数
String token = request.getParameter("access-token");
// 判断是否存在
if(StringUtils.isBlank(token)){
// 不存在,未登录,拦截
ctx.setSendZuulResponse(false);
// 设置返回状态码
ctx.setResponseStatusCode(HttpStatus.UNAUTHORIZED.value());
}
return null;
}
}
|
9. 负载均衡和熔断
Zuul中默认就已经集成了Ribbon负载均衡和hystrix熔断机制。但是所有的超时策略都是走的默认值,比如熔断超时时间只有1S,很容易就触发了。因此建议我们手动进行配置:
hystrix:

  command:

    default:

      execution:

        isolation:

          thread:

            timeoutInMilliseconds: 6000

ribbon:

  ConnectTimeout: 1000

  ReadTimeout: 2000

  MaxAutoRetries: 0

  MaxAutoRetriesNextServer: 1
10. zuul的高可用
启动多个Zuul服务,自动注册到Eureka,形成集群。如果是服务内部访问,你访问Zuul,自动负载均衡,没问题。
但是,Zuul更多是外部访问,PC端、移动端等。他们无法通过Eureka进行负载均衡,那么该怎么办?
此时,我们会使用其它的服务网关,来对Zuul进行代理。比如:Nginx
Eureka、Ribbon、hystrix、Feign、Zuul
spring-cloud-config:统一配置中心,自动去Git拉取最新的配置,缓存。使用Git的Webhook钩子,去通知配置中心,说配置发生了变化,配置中心会通过消息总线去通知所有的微服务,更新配置。
spring-cloud-bus:消息总线
Spring-cloud-stream:消息通信
spring-cloud-hystrix-dashboard:容错统计,形成图形化界面
spring-cloud-sleuth:链路追踪 结合Zipkin