http://blog.csdn.net/sunmc1204953974/article/details/49976045
人脸检测
#coding=utf-8
# -*- coding: utf-8 -*-

import sys

import dlib

from skimage import io


#使用dlib自带的frontal_face_detector作为我们的特征提取器
detector = dlib.get_frontal_face_detector()

#使用dlib提供的图片窗口
win = dlib.image_window()

#sys.argv[]是用来获取命令行参数的,sys.argv[0]表示代码本身文件路径,所以参数从1开始向后依次获取图片路径
for f in sys.argv[1:]:

    #输出目前处理的图片地址
    print("Processing file: {}".format(f))

    #使用skimage的io读取图片
    img = io.imread(f)

    #使用detector进行人脸检测 dets为返回的结果
    dets = detector(img, 1)

    #dets的元素个数即为脸的个数
    print("Number of faces detected: {}".format(len(dets)))

    #使用enumerate 函数遍历序列中的元素以及它们的下标
    #下标i即为人脸序号
    #left:人脸左边距离图片左边界的距离 ;right:人脸右边距离图片左边界的距离
    #top:人脸上边距离图片上边界的距离 ;bottom:人脸下边距离图片上边界的距离
    for i, d in enumerate(dets):
        print("dets{}".format(d))
        print("Detection {}: Left: {} Top: {} Right: {} Bottom: {}"
            .format( i, d.left(), d.top(), d.right(), d.bottom()))

    #也可以获取比较全面的信息,如获取人脸与detector的匹配程度
    dets, scores, idx = detector.run(img, 1)
    for i, d in enumerate(dets):
        print("Detection {}, dets{},score: {}, face_type:{}".format( i, d, scores[i], idx[i]))

    #绘制图片(dlib的ui库可以直接绘制dets)
    win.set_image(img)
    win.add_overlay(dets)

    #等待点击
    dlib.hit_enter_to_continue()
python dlibface.py itlay.jpg

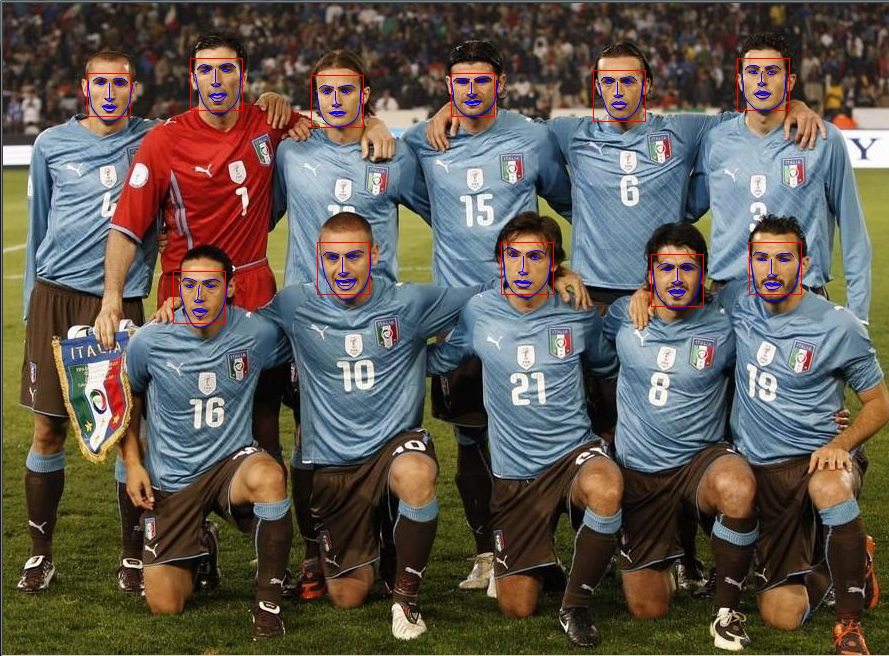
人脸关键点标记
# -*- coding: utf-8 -*-

import dlib

import numpy

from skimage import io

#源程序是用sys.argv从命令行参数去获取训练模型,精简版我直接把路径写在程序中了
predictor_path = "./shape_predictor_68_face_landmarks.dat"

#源程序是用sys.argv从命令行参数去获取文件夹路径,再处理文件夹里的所有图片
#这里我直接把图片路径写在程序里了,每运行一次就只提取一张图片的关键点
faces_path = "./itlay.jpg"

#与人脸检测相同,使用dlib自带的frontal_face_detector作为人脸检测器
detector = dlib.get_frontal_face_detector()

#使用官方提供的模型构建特征提取器
predictor = dlib.shape_predictor(predictor_path)

#使用dlib提供的图片窗口
win = dlib.image_window()

#使用skimage的io读取图片
img = io.imread(faces_path)

#绘制图片
win.clear_overlay()
win.set_image(img)

 #与人脸检测程序相同,使用detector进行人脸检测 dets为返回的结果
dets = detector(img, 1)

#dets的元素个数即为脸的个数
print("Number of faces detected: {}".format(len(dets)))

#使用enumerate 函数遍历序列中的元素以及它们的下标
#下标k即为人脸序号
#left:人脸左边距离图片左边界的距离 ;right:人脸右边距离图片左边界的距离
#top:人脸上边距离图片上边界的距离 ;bottom:人脸下边距离图片上边界的距离
for k, d in enumerate(dets):
    print("dets{}".format(d))
    print("Detection {}: Left: {} Top: {} Right: {} Bottom: {}".format(
    k, d.left(), d.top(), d.right(), d.bottom()))

    #使用predictor进行人脸关键点识别 shape为返回的结果
    shape = predictor(img, d)

    #获取第一个和第二个点的坐标(相对于图片而不是框出来的人脸)
    print("Part 0: {}, Part 1: {} ...".format(shape.part(0),  shape.part(1)))

    #绘制特征点
    win.add_overlay(shape)

#绘制人脸框
win.add_overlay(dets)


#也可以这样来获取(以一张脸的情况为例)
#get_landmarks()函数会将一个图像转化成numpy数组,并返回一个68 x2元素矩阵,输入图像的每个特征点对应每行的一个x,y坐标。
def get_landmarks(im):

    rects = detector(im, 1)

    return numpy.matrix([[p.x, p.y] for p in predictor(im, rects[0]).parts()])

#多张脸使用的一个例子
def get_landmarks_m(im):

    dets = detector(im, 1)

    #脸的个数
    print("Number of faces detected: {}".format(len(dets)))

    for i in range(len(dets)):

        facepoint = np.array([[p.x, p.y] for p in predictor(im, dets[i]).parts()])

        for i in range(68):

            #标记点
            im[facepoint[i][1]][facepoint[i][0]] = [232,28,8]

    return im

#打印关键点矩阵
print("face_landmark:")

print(get_landmarks(img))

#等待点击
dlib.hit_enter_to_continue()