最近想写点技术总结,WPF正好从来没写过,就写这个了,分成4个例子,如下:
- Mouse移入移出效果
- DataGrid模版
- 怪异Window效果
- Ribbon效果
Mouse移入移出效果
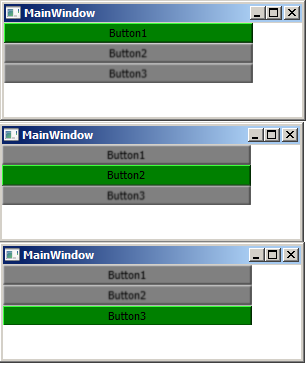
效果图(分别是鼠标移动过3个button时的效果{当前按钮清晰显示、其他按钮模糊显示})
XAML主代码如下:
<Window x:Class="WpfApplication1.MainWindow"
        xmlns="http://schemas.microsoft.com/winfx/2006/xaml/presentation"
        xmlns:x="http://schemas.microsoft.com/winfx/2006/xaml"
        Title="MainWindow" Height="121" Width="306" Loaded="App_Loaded">
    <StackPanel HorizontalAlignment="Left" VerticalAlignment="Top" Height="60" Width="249">
        <Button x:Name="btn1" Content="Button1" Width="249" MouseEnter="btn_MouseEnter" MouseLeave="btn_MouseLeave"/>
        <Button x:Name="btn2" Content="Button2" Width="249" MouseEnter="btn_MouseEnter" MouseLeave="btn_MouseLeave"/>
        <Button x:Name="btn3" Content="Button3" Width="249" MouseEnter="btn_MouseEnter" MouseLeave="btn_MouseLeave"/>
        //这3个按钮是用MouseEnter/MouseLeave连接C#event的,这里用的比较臃肿,实际上可以通过Style.Triggers能解决,大家自己解决吧
</StackPanel>
</Window>
cs主代码如下:
public partial class MainWindow : Window
    {
        public MainWindow()
        {
            InitializeComponent();
        }

        private List<Button> buttons = new List<Button>();

        private void App_Loaded(object sender, RoutedEventArgs e)
        {
            buttons.Add(btn1);//把按钮加入List,以便后续的reset样式操作
            buttons.Add(btn2);
            buttons.Add(btn3);
            buttons.ForEach(t => t.Style = (Style)t.FindResource("DefaultButtonStyle")); //这个FindResource是找到目标对象的资源的意思
        }

        private void btn_MouseEnter(object sender, MouseEventArgs e)
        {
            buttons.ForEach(t => t.Style = (Style)t.FindResource("DefaultButtonStyle"));//同上

            Button btn = sender as Button;
            if (btn != null)
                btn.Style = (Style)btn.FindResource("HighlightedButtonStyle");//同上
        }

        private void btn_MouseLeave(object sender, MouseEventArgs e)
        {
            Button btn = sender as Button;
            if (btn != null)
                btn.Style = (Style)btn.FindResource("DefaultButtonStyle");//同上
        }
    }
样式定义和资源定义如下:
<ResourceDictionary xmlns="http://schemas.microsoft.com/winfx/2006/xaml/presentation"
                    xmlns:x="http://schemas.microsoft.com/winfx/2006/xaml">
    <Style TargetType="Button" x:Key="DefaultButtonStyle">    //这个就是默认样式(里面定义了模糊效果)
        <Setter Property="Effect">
            <Setter.Value>
                 <BlurEffect Radius="2"></BlurEffect>         //Radius就是模糊效果
            </Setter.Value>
        </Setter>
        <Setter Property="Background" Value="Gray"></Setter>
    </Style>
    <Style TargetType="Button" x:Key="HighlightedButtonStyle">  //这个是当前鼠标时的样式
        <Setter Property="Effect" Value="{x:Null}"></Setter>    //这句定义了remove effect(效果)样式,就变清晰了
        <Setter Property="Background" Value="Green"></Setter>
    </Style>
</ResourceDictionary>
DataGrid模版
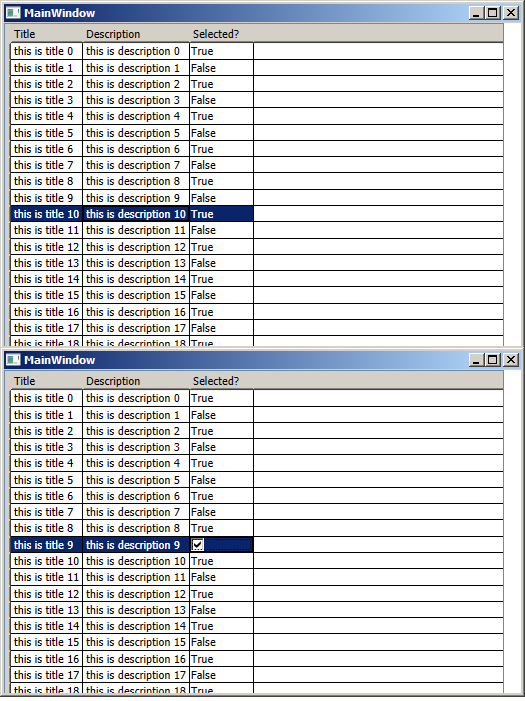
效果图(关注点是里面的True/False==> Checkbox的是否选中):
XAML代码:
<Window x:Class="WpfApplication2.MainWindow"
        xmlns="http://schemas.microsoft.com/winfx/2006/xaml/presentation"
        xmlns:x="http://schemas.microsoft.com/winfx/2006/xaml"
        Title="MainWindow" Height="350" Width="525" Loaded="Win_Loaded">
        <DataGrid x:Name="dgList" HorizontalAlignment="Left" VerticalAlignment="Top" Width="500" Height="500" ItemsSource="{Binding}" AutoGenerateColumns="False">       //这个必须写,不然下面的{Binding Path=XXXXXXXX}和{Binding XXXXXXXX}就没有value了
            <DataGrid.Columns>                                                                                                                                           //{Binding Path=XXXXXXXX}和{Binding XXXXXXXX}效果是一样的
                <DataGridTextColumn Header="Title" Binding="{Binding Path=Title}"></DataGridTextColumn>
                <DataGridTextColumn Header="Description" Binding="{Binding Path=Description}"></DataGridTextColumn>
                <DataGridTemplateColumn Header="Selected?">           //这列是模板列,非常类似于ASP.NET中DataGrid时代的格式...
                    <DataGridTemplateColumn.CellEditingTemplate>      //编辑时的模板
                        <DataTemplate>
                            <CheckBox IsChecked="{Binding IsSelected}"></CheckBox>
                        </DataTemplate>
                    </DataGridTemplateColumn.CellEditingTemplate>
                    <DataGridTemplateColumn.CellTemplate>             //正常时的模板
                        <DataTemplate>
                            <TextBlock Text="{Binding IsSelected}"></TextBlock>
                        </DataTemplate>
                    </DataGridTemplateColumn.CellTemplate>
                </DataGridTemplateColumn>
            </DataGrid.Columns>
        </DataGrid>
</Window>                                                            //上面的4个Binding标记后面的Title/Description/IsSelected是Entity的属性,在后面有定义
C#代码很简单:
public partial class MainWindow : Window
    {
        public MainWindow()
        {
            InitializeComponent();
        }


        private ObservableCollection<SampleData> data = new ObservableCollection<SampleData>();
        private void Win_Loaded(object sender, RoutedEventArgs e)
        {
            for (var i = 0; i < 20;i++ )
                data.Add(new SampleData() {  Title="this is title "+i, Description="this is description "+i, IsSelected=(i%2==0)});

            dgList.DataContext = data;                     //绑定数据
        }
    }

    public class SampleData
    {
        public string Title { get; set; }                   //这些属性和XAML中的Binding一致
        public string Description { get; set; }
        public bool IsSelected { get; set; }
    }
怪异Window效果
效果图(就一光秃秃的怪异窗口...)
这个代码只有xaml,没有C#代码:
<Window x:Class="WpfApplication3.MainWindow"
        xmlns="http://schemas.microsoft.com/winfx/2006/xaml/presentation"
        xmlns:x="http://schemas.microsoft.com/winfx/2006/xaml"
        Title="MainWindow" Height="350" Width="525" AllowsTransparency="True" WindowStyle="None" Background="#00000000">    //需要先把最外部的Window样式设置成透明的
    <Border BorderBrush="Black" BorderThickness="1" HorizontalAlignment="Left" Height="100" Margin="88,85,0,0" VerticalAlignment="Top" Width="341" CornerRadius="50" Background="#FFE4C5C5">  //CornerRadius就是圆角化的代码
        <Border.LayoutTransform>
            <TransformGroup>
                <RotateTransform Angle="20"/>  //旋转20度...
            </TransformGroup>
        </Border.LayoutTransform>
    </Border>
</Window>
Ribbon效果
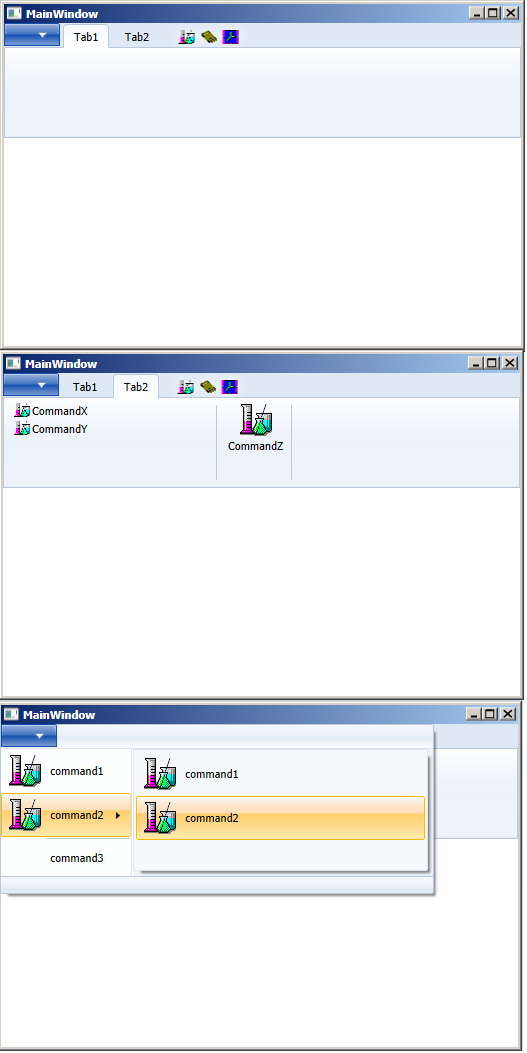
效果图:
这个例子比较特别,原先继承自Window类,现在要修改为继承自RibbonWindow类,如下:
public partial class MainWindow : RibbonWindow
    {
        public MainWindow()
        {
            InitializeComponent();
        }
        private void App_Loaded(object sender, RoutedEventArgs e)
        {
            //this.Resources.MergedDictionaries.Add(PopularApplicationSkins.);
        }
    }
XAML代码如下:
<RibbonWindow x:Class="WpfApplication4.MainWindow"                                                         //RibbonWindow也是要跟着修改过来的(原先的是Window)
        xmlns="http://schemas.microsoft.com/winfx/2006/xaml/presentation"
        xmlns:x="http://schemas.microsoft.com/winfx/2006/xaml"
        Title="MainWindow" Height="350" Width="525" Loaded="App_Loaded">
    <DockPanel HorizontalAlignment="Left" Height="323" LastChildFill="False" VerticalAlignment="Top" Width="517">
        <Ribbon Height="323" VerticalAlignment="Top" DockPanel.Dock="Top">
            <Ribbon.ApplicationMenu>
                <RibbonApplicationMenu>
                    <RibbonApplicationMenuItem Header="command1" ImageSource="icons\Chemistry.ico"/>
                    <RibbonApplicationMenuItem  Header="command2" ImageSource="icons\Chemistry.ico">
                        <RibbonApplicationMenuItem Header="command1" ImageSource="icons\Chemistry.ico"/>
                        <RibbonApplicationMenuItem Header="command2" ImageSource="icons\Chemistry.ico"/>
                    </RibbonApplicationMenuItem>
                    <RibbonSeparator />
                    <RibbonApplicationMenuItem  Header="command3"/>
                </RibbonApplicationMenu>
            </Ribbon.ApplicationMenu>
            <RibbonTab  Header="Tab1">
            </RibbonTab>
            <RibbonTab  Header="Tab2">
                <RibbonGroup>
                    <RibbonButton Height="18" VerticalAlignment="Top" Width="200" SmallImageSource="icons\Chemistry.ico" Content="CommandX" Label="CommandX"/>
                    <RibbonButton Height="18" VerticalAlignment="Top" Width="200" SmallImageSource="icons\Chemistry.ico" Content="CommandX" Label="CommandY"/>
                </RibbonGroup>
                <RibbonGroup>
                    <RibbonButton VerticalAlignment="Top" LargeImageSource="icons\Chemistry.ico" Content="CommandXX" Label="CommandZ"/>
                </RibbonGroup>
            </RibbonTab>
            <RibbonQuickAccessToolBar Margin="0" Width="70" >
                <RibbonButton HorizontalAlignment="Left" Height="18" VerticalAlignment="Top" Width="22" SmallImageSource="icons\Chemistry.ico"/>
                <RibbonButton HorizontalAlignment="Left" Height="18" VerticalAlignment="Top" Width="22" SmallImageSource="icons\CHIP2.ico" />
                <RibbonButton HorizontalAlignment="Left" Height="18" VerticalAlignment="Top" Width="22" SmallImageSource="icons\clock.ico" />
            </RibbonQuickAccessToolBar>
        </Ribbon>
    </DockPanel>
</RibbonWindow>
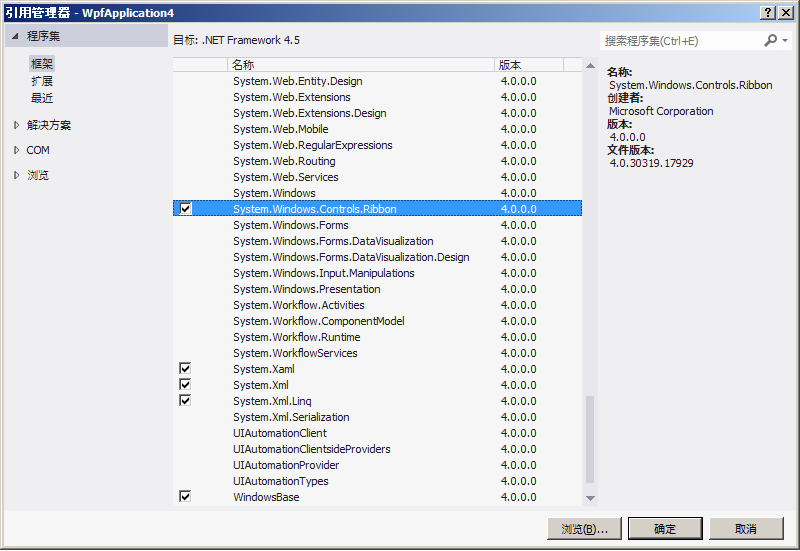
需要成功运行这个例子,需要增加一步,就是引用Ribbon的dll,如下: